The attic structure allows you to expand usable space Houses. A structure with a high slope roof will look solid, and its construction will require less effort than constructing a two-story building. The article will talk about how to make an attic roof at home with your own hands.
How to make an attic roof for a house depends primarily on the intended roof structure.
There are 2 types of roofs for organizing an attic:
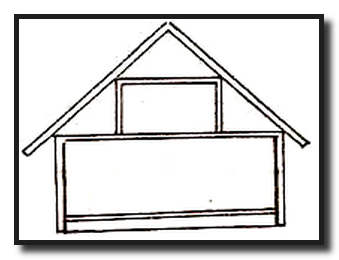
The construction of a gable roof is much simpler. But you should understand that the attic in such a design will be small and with low ceilings. Therefore, to complete the task it is preferable sloping roof with a slope angle of 40 to 45 degrees. And what less slope, the larger the attic space will be. But in this case, additional strengthening of the structure is necessary, adjacent beams between the rafters.
There are 2 types of rafter structures:

The layered option can be implemented if there are no such partitions. But in this case load-bearing walls will have to be very high load. Therefore, it is allowed to install layered structures only if the distance between the main walls is no more than 8 meters. If this is not the case, then it is preferable to organize hanging rafter systems.
How to build a roof mansard type with a broken slope? For this purpose, it is mainly installed combined types designs. In them, the upper rafters are mounted in a hanging manner, the rest - layered. This design is most rational for buildings with a low roof slope.
To organize an attic room with ceilings of 2.5 meters, you need to make a roof with a break height of 3.1 meters. The preferred design slope is 60 and 30 degrees. At the top of the rafters, angles from 15 to 45 degrees are possible.
In construction, the Mauerlat is the lower support of the roof, which is installed on top of load-bearing external walls. It allows you to support the roof structure, taking on a certain part of the load. Let's figure out how to make an attic roof yourself.
To organize a gable structure, it is necessary to fix the Mauerlat on both sides of the building where the rafters are located. In this case, the load from the roof will be distributed over the surface of the walls. If the roof structure is relatively light, then it is possible to install a mauerlat under the rafters. In other cases, it is placed along the entire perimeter of the walls.
It is necessary to prepare a timber beam coniferous species, which will be used to make the Mauerlat. It is recommended to apply to the material waterproofing layer. Ruberoid or bitumen are excellent for the task.

To install an attic roof with your own hands to the base, threaded rods designed for a wide washer are used. In its design you need to make holes corresponding to the size of the fastening. The drilling step should not exceed 2 meters.
Now let’s consider the option of how to make an attic roof with your own hands if the house is brick. To install the Mauerlat on brick walls, wooden plugs are used. It is advisable to leave pockets in the masonry - special gaps for laying the structure. In this case, the installation procedure will be easier. IN brickwork you can place a wire rod to which you can easily screw the Mauerlat to the base. If you plan to build a house from concrete slabs or aerated concrete, then it is necessary to install an armored belt with metal studs. Moreover, their length should be such that it is enough to install the power plate with subsequent tightening with a lock nut.
IN wooden structures It is possible to replace the standard support with a beam or the top log of a log house. This is another way to make a mansard roof correctly.
Purlins are additional horizontally located beams designed to strengthen the structure.
Types of runs:

Instructions for building a mansard roof with your own hands step by step:
There are 2 types of rafter fastening:

The option of how to properly make an attic with a sliding fastening demonstrates greater reliability, since it takes into account the mobility of roof elements when the ground subsides. Sliding mount will be useful during construction wooden house, for which shrinkage is possible. It will help the roof “adapt” to the movement of the building.
Recommendation: to understand the location of the upper rafters, it is worth making a temporary stand from beams. It is attached to the Mauerlat so that its top is located along the center line of the roof. This design will be a hint when aligning the upper rafters, which will greatly facilitate the task.

It is necessary to make the upper part of the Mauerlat beveled. It is advisable to first make it from a thinner board. Then you need to attach it to the purlin and trace its contours. And then fill in the form according to the received form. This approach will allow you to do the work more accurately. Now you know how to build an attic roof with your own hands.
Many males, having found a family, sooner or later think about purchasing their own home. Someone takes out a mortgage on an apartment, and someone saves money for... But save up for big house Not many succeed and the alternative would be to build a house with.
The attic can be built from or from a material suitable for you.
It will not be difficult to build an attic, but it requires patience, hard work, suitable materials and availability of tools.
The shape and design of the roof must be included in the design of the house in order to avoid incidents during further operation.
 You can build a house with standard project or order it from professionals. In such documentation you will be able to understand where to start and choose the appropriate materials for construction.
Now you can purchase everything you need, but first equip a place to store building materials and tools. The storage place must be dry and so that rain or snow cannot harm the construction material.
It will also be possible to equip a small workshop under the canopy for the manufacture of some parts of the house or roof. For a house made of or who does not have the opportunity to build a full second floor, the choice of an attic roof will be the best option. The house from will budget option. Next we will look at the structure of the attic.
The design elements of the attic are practically no different from two pitched roofs.
The roof is the outer covering of the roof, it protects the inside of the attic and can be made of various materials.
For roofing, as a rule, such materials are used:
 The board that covers the frame of the rafters is called sheathing.
After becoming familiar with the names of the roof structure, we can continue to further analyze the construction step by step.
First stage
Attic construction always begins from mounting the Mauerlat.
 When building on a stone box, you need to think about securing with studs or anchors at a distance of no more than two meters.
At the locations of the anchors, the timber is marked, a hole is made in it and put on the anchors, then the Mauerlat is fixed with nuts to the wall.
To simplify the marking, you need to place the beam on the anchor and lightly go over it with a hammer, after these manipulations there should be traces left, they will be the places for drilling holes.
 Second phase
The second stage of the attic construction will be the installation of floor beams.
Actions must be consistent.
First of all, the outer beams are installed at the ends, then the intermediate ones. It is necessary to stretch a nylon cord or scaffolding between the intermediate and outer beams, or you can also use a level. These devices are needed to indicate the plane.
Third stage
 We install, align in a vertical position and secure the support posts.
We strengthen it with jibs and make horizontal runs.
It must be taken into account that the racks are placed in equal numbers with the floor beams on two parallel sides of the attic.
Rigidity supporting structure provide horizontal runs.
 Fourth stage (rafter system)
We install the rafter structure parts prepared according to the template according to the template and fix them to the vertical supports.
The elements can be fixed using boards or metal plates with holes.
Fifth stage (gables and sheathing)
Z  we sew up the gables, leaving space for them, and attach sheathing boards along the entire roof. This is the most simple work during the construction of an attic.
Sixth stage
Now we have come almost to the completion of construction and this is the insulation of the attic roof with our own hands.
IN modern construction They use a variety of materials for insulation and you can purchase them at any hardware store.
Final stage
With the help of an attic you can not only increase the number of usable rooms. A building with a high pitched roof looks more solid and presentable, while its construction is less expensive than the construction of a full-fledged two-story building. Read about how to make a mansard roof with your own hands in this article.
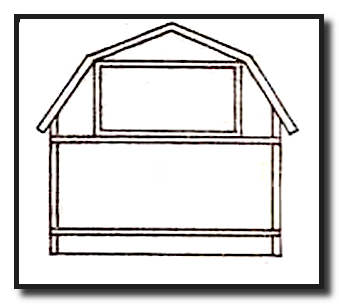
broken line: each of the slopes is additionally divided into two more, located at different angles; at the same time, the angle of inclination of the upper one is much less; the ends (pediments) have the shape of a pentagon.
Sloping and gable roofs
The construction of a gable roof is certainly much simpler. But attic rooms Unfortunately, it will be cramped and the ceilings will be too low. Therefore, to arrange comfortable attic More often they use sloping gable roofs with a small (40-45°) slope angle. Moreover, the smaller this angle, the more spacious the attic rooms will be. However, when constructing a more complex broken structure It will be necessary to install additional connections between the rafters (inclined beams that serve as the roof frame).
There are two types rafter systems:
layered: the rafters rest only on the outer walls;
hanging: additionally rest on capital partitions.
The first option is used only in the absence of such partitions. But, since the load on the load-bearing walls in this case is quite high, it is possible to erect layered structures only if the distance between the main walls is up to 8 m. In other cases, it is better to use stronger hanging structures.

Layered and hanging rafter systems
On sloping mansard roofs they are most often mounted combined systems , in which the rafters coming from the ridge are made hanging, and the lower side ones are layered. This device is especially effective for roofs with a slight slope.

Combined rafter system

Frame of a gable sloping roof
To obtain a full attic with a ceiling height of 2.5 m height of the roof before its break should be equal to 3.1 m. Recommended tilt angles– 60 and 30° (the upper part of the rafters can be tilted 15-45°).

1. When installing gable roof The Mauerlat is attached on both sides of the building at the rafter locations. Thanks to it, the load from the weight of the roof is evenly distributed over the entire surface of the wall. With a small roof mass, it is allowed to be laid only under the rafters, but in our case it should be laid along the entire perimeter of the wall.

Mounting the Mauerlat
2. To make the Mauerlat, timber is used made of coniferous wood 100×150 mm. To prevent the wood from rotting, it is better to separate it from the wall layer of waterproofing. For these purposes, roofing felt or bitumen is most often used.

Waterproofing Mauerlat
3. The Mauerlat is attached to the base using threaded rods under a wide washer. To do this, holes are drilled in it exactly to the size of the fasteners. Moreover, their frequency should be no less than the number of rafter legs, but no more than 2 m.
4. B brick walls it is attached to wooden plugs. To strengthen the fastening of the mauerlat in the masonry, you can provide special pockets, where it will be laid. It is allowed to lay a special one in the masonry wires (wire rods), with which the Mauerlat is screwed to the base. When constructing buildings made of aerated concrete or concrete slabs, an armored belt with thick metal pins inserted into the walls is provided for it. Their length should be enough to girth the Mauerlat and tighten the locknut.
5. IN wooden buildings The top log of a log house or beam is used as a mauerlat.

IN wooden houses The top log of the log house can serve as a maeurlat
2. For ease of movement on the roof, a temporary flooring is prepared, replacing scaffolding.

Installation of a U-shaped roof frame

Terms used in construction
Runs are called additional horizontal beams. They can be:
skating: the upper part of the rafters rests on such a purlin; they may not be used in broken mansard roofs;
lateral: are located evenly along the entire roof slope, their number can be different and depends on the size of the roof itself and its angle of inclination.
4. Rafters made of durable timber 50×150 mm. Extra rigidity rafter legs give with the help struts(diagonal beams used to strengthen the structure, installed at an angle of 45°, sometimes called rafter legs).
sliding (hinged): if the house moves, the rafters move along the mauerlat along the “slides” provided in the fastenings.

Rigid connection of rafters
The hinged version is more reliable, as it avoids displacements or even ruptures of roof elements during seasonal ground movements. When constructing wooden houses subject to shrinkage, such fastening also helps the roof “adjust” to the new position of the walls.

Hinged rafter legs

Types of rafter fastenings
Advice. To determine the location of the upper rafters, you should make a temporary stand from several beams and nail it to the wall plate so that the upper part is exactly on the center line of the roof. You can easily align the upper rafters using it.
Top part the mauerlat should be beveled. To avoid mistakes, it is better to make a template from a thinner board, which is applied to the purlin and the shape of the cut is drawn on it. If the lower part of the rafters is attached to cuts, they are cut out on site.
Watch a video on how to make a mansard roof with your own hands:
Everyone dreams of expanding the usable area of their home. But the area of the house does not always allow for the installation of, for example, an extension. One of best solutions in this case - the construction of an attic roof - additional footage with minimal investment.
This roof is built quite easily and quickly. And by enlisting the help of a few friends, you can save on labor.
To build an attic roof yourself, you need to equip yourself with as much knowledge as possible in this area. Read more about the design of the attic roof. So, attic roofs are:

− 1 level - the building has remote consoles, large area And vertical windows. An attic with a single-level roof extends beyond the level of one of the sides of the house;
− in 2 levels - a project with a mixed type of support. This type of roof is the most complex at all stages of construction; it is designed together with the house;
− gable – one-level attic superstructures, easy to install. The main disadvantage is small area And low ceilings;
− gable broken lines - buildings with 4 pitched planes at different angles. Somewhat more complicated than the previous option, but among the advantages is a full-fledged interior room.
Various designs of mansard roofs are almost no different from standard pitched roofs and include the following elements:

Mansard roof in a private house - photos during construction
For the construction, for example, slate roof you will need this type:
You most likely won’t even have to buy tools for building an attic roof:
The angle of the roof allows precipitation to be discharged, but takes away the height of the room. That is, the smaller the angle of inclination, the larger the area of the room itself. Partially effective area The attic space is also reduced due to roof insulation. Read which ones exist and how to install them correctly.
The technology for constructing a mansard roof has some subtleties:
− the thickness of the rafters must be more than 250 mm. This is necessary for comfortable installation of a 20 cm insulating layer. The rafters can be made from laminated veneer lumber;
− for thermal insulation it is better to use foamed polystyrene or glass - they retain their properties even when humidity increases;
− between thermal insulation layer and the roof must be properly ventilated - with hoods and vents so that air can circulate freely under the surface of the building;
For a roof to be of high quality and reliable, it must have excellent ventilation, thermal insulation, and a high-quality rafter structure made of treated wood.
− the inner side of the thermal insulation needs a vapor barrier layer over the entire surface;
− a layer of hydro- and, if necessary, sound insulation is laid under the roof with outside rafters;
− wood for the entire structure must be treated with special agents against microorganisms and fire, in accordance with the requirements of SNiP;

− if the house is located in a quiet, windless place, you need to increase the angle of inclination;
− such roofs are covered with ceramic tiles or slate. Metal, due to its low thermal insulation properties, is not recommended;
− for thermal insulation it is necessary to use non-combustible materials;
− the attic roof provides for a staircase.
The external staircase will not take up the space of the house, but the attic can only be accessed from the street. The internal one is much more convenient, but takes up space in the house. To solve this problem, you can install a ceiling ladder on a hinged joint or a screw structure. And how to choose one for the second floor according to GOST, read our instructions.
Before erecting a roof you must:

Rafters of a sloping mansard roof - diagram
After designing the roof and the preparatory process, you can begin construction:
Let's consider the prices for materials for the attic roof, taking into account that the construction will be done independently.
The price of insulation (mineral wool) depends on the density per cubic meter and the base:
Roofing materials do not differ much in price:
Calculations of the final cost of the building are made based on the area of the attic roof.
About the construction of an attic roof with your own hands in the video. There is a clear overview of the technology itself and some useful tips.
Mansard roof – perfect solution to expand the area of the house. Having enlisted the support of several people and armed with the knowledge of building a structure, you can as soon as possible build a functional and reliable attic roof for many years of use.
In an effort to effectively use all available space country house Many owners equip the attic. When doing this, you need to be prepared to arrange the roof in a certain way. At its core, the attic is a converted attic and requires certain constructive solutions and some alterations in thermal insulation and roofing. In general, the construction of an attic roof for a country house is not much different from the construction of other types of roofs. But due to operational features Attic roofs and the requirements for them must have knowledge and understanding of the specifics of the arrangement of this type of roof.
Like any construction works, the construction of an attic roof begins with the design stage and selection of the most suitable attic roof for the structure, its type and type. For the attic, shed roofs or regular and sloping gable roofs are used. In addition, the appearance of the roof is influenced by the materials used and design features the roof itself.
Depending on the structural features of the building itself, several standard solutions for the roof. Mansard roofs: photos and description


Various mansard roof designs are not much different in design from conventional pitched roofs. Of course, there are certain design features, but in general they are the same as gable or single-pitch, and consist of the following main elements:

. Roof. The outer part of the roof, which serves as protection against various atmospheric phenomena.
. Lathing. More often wooden boards, to which the roof is attached, as well as insulating materials.
. Ridge run. The upper part of the entire truss structure.
. Rafters. These are the stiffening ribs of the entire roof structure; they can be layered or hanging. Layered rafters are used for the attic roof.
. Mauerlat. This structural element consists of beams laid around the perimeter external walls and connected to the walls using special fasteners. The entire rafter structure is attached to the Mauerlat.
.Diagonal connections. To ensure the reliability and strength of the entire rafter structure, the rafters are connected to longitudinal beams and vertical posts using diagonal connections or bevels.
. Internal supports. To give the roof stability, the rafters and/or ridge girder are supported by vertical beams.
. Insulation layer. Due to the fact that the attic roof and the interior premises are practically one whole, to maintain temperature and humidity conditions, a multi-layer insulation cake is laid between the roof and the walls of the room. The insulation consists of hydro- and vapor barriers, sound and noise insulation, as well as a thick layer of thermal insulation. In addition, proper insulation of the attic roof is important for the safety of the roof itself.
When designing and constructing an attic roof, many builders and designers, either out of ignorance or doing their work poorly, make serious mistakes in insulation, ventilation and truss structure. The result is an attic roof, which literally after a couple of seasons becomes unusable, fungus and mold appear, and the roof begins to leak or completely collapse. This happens due to a violation of the mansard roof construction technology.
Due to the fact that the attic roof is drawn as close as possible to the walls interior space, and it is quite difficult to obtain excellent heat transfer performance in this case, the entire attic roof structure must have excellent thermal insulation, ventilation and a properly constructed rafter structure using wood treated with fire-bioprotective agents.

To make your attic roof reliable and durable, you need to know the following:
Such requirements are determined by certain natural and physical phenomena. But first things first:
A large thickness of the rafters is required to be able to lay a 20 cm thick layer of thermal insulation between them, and this in turn entails an increase in the mass of the entire roof structure, which is supported by the rafters.
The wood for the entire structure is processed by special means for protection against fire and microorganisms, which is a strict requirement of SNiP. This will protect it from damage by fungi and increase its service life.
If you use such popular materials as mineral and glass wool for thermal insulation, you can only gain in ease of installation and lightening of the entire structure as a whole. But cotton wool, no matter what it is, is cotton wool that absorbs water like a sponge, cakes and loses its insulating qualities. If you choose a material other than polystyrene and foam glass, you should focus on complete resistance to moisture, low heat transfer coefficient and relatively low weight.
A thermal insulation thickness of 20 cm is necessary because in our latitudes it is very cold in winter and very hot in summer. A feature of the attic design is large heat losses in winter and rapid heating of the room in summer. A large layer of thermal insulation will prevent heat loss and penetration inside. But this is only one of the reasons, the second is the safety of the roof. The fact is that the heat that escapes from their premises in winter warms up the roof, on which there is a layer of snow and partially causes it to thaw, and snow is a natural insulation. Melted snow at sub-zero temperatures turns into ice, which has no thermal insulation properties, it weighs down the roof and ultimately destroys the roof itself. And since up to 100 cycles of thawing and freezing can occur in one day, roofing material will fail in literally one season. In summer, the room becomes incredibly hot and stuffy, and you need to install an air conditioner, or even two. But these inconveniences can be avoided by installing a thick layer of proper thermal insulation.

Equally important is proper roof ventilation. It will help cool the roof, both in summer and winter, and also remove excess humidity from under the roof. All this will ensure comfortable living in the attic, protect against the appearance of mold, fungi and rot, and in addition will protect the roof from destruction in winter.
Regarding steam, hydro and sound insulation, everything is simple. Vapor barrier passes through excess moisture from the premises and prevents its penetration from the outside, waterproofing protects thermal insulation materials and the premises from accidental ingress of moisture. And sound insulation reduces the noise level from impacts of rain, hail and wind on the roof surface.
Carrying out all the work to create a roof for an attic requires builders to have some experience in this area. Unlike ordinary pitched roofs, building an attic roof with your own hands is somewhat more difficult due to the installation of angled windows in the roof itself and the broken structure of the slopes. To build an attic roof with your own hands, you must adhere to the following stages of work:

The first thing you have to do is develop a roof project. To do this, you can turn to specialists or, if you are good with a computer, do everything yourself in an architectural program. Also at this stage all necessary calculations loads, angle of inclination of roof slopes, etc. To do everything right, you should contact necessary information to a document such as SNiP “Loads and Impacts”.
This stage of work is the most labor-intensive, and for a do-it-yourself attic roof to be made with high quality, the combined efforts of 3 to 4 people will be required. We begin the construction of the attic roof by laying and securing the mauerlats along the entire perimeter of the house, using timber with a section of 100x100 mm.
Construction of an attic roof photo:

After this, we install a frame for the attic space, the racks of which will also serve as supports for the rafter structure. To do this, we use a beam with a cross-section no smaller than the cross-section of the longitudinal beams on which the racks will rest. First of all, we install vertical posts at the beginning and end of the building. We fix them to the longitudinal beams using special stamped metal corners and self-tapping screws. To facilitate all fastening work, we use a screwdriver. Now we lay the jumper over the racks and secure it.

We stretch the cord between the two resulting arches, and if everything was done correctly, it will be strictly horizontal, if not, you will have to disassemble one of the arches, trim it a little and reinstall it. Now, using a stretched cord, we install similar arches with the step provided for the rafters. We connect the resulting arches with jumpers, which we secure with stamped corners or nail plates.

Having assembled the frame of the future interior space, we proceed to install the rafters. We start with those that have the greatest angle of inclination and are on the same level with the frame of the attic room. There are no particular difficulties here. The timber for the rafters is cut to the required size effective length, a groove is cut at the base of the beam for installation on the Mauerlat, and the top is cut at a certain angle. After which each rafter is installed in place and fixed to the main structure.

The next step is a little more difficult, since you will have to install the upper rafters. The difficulty lies in maintaining a certain angle and centering of the entire structure. To make the task easier, you can first make a template from two long boards that will exactly repeat the future connected rafters. Using this template, we cut the rafters on the ground and then install them in place. The rafter installation algorithm is the same as for the interior frame arches.

To complete the installation of the rafter structure, we nail the sheathing. For lathing can be used as regular boards, and sheets of plywood or chipboards. This will depend on the type of roofing materials.
Having installed the rafters and sheathing, we begin to create the insulating layer. To do this, first of all, we lay a vapor barrier on the inside of the rafters and fix it to the rafters with brackets. Next we lay thermal insulation material and we carefully ensure that it lies close to the rafters and does not leave any gaps. On top of the thermal insulation, in increments of 50 cm, we fill the lathing, which will hold all the thermal insulation.

On the outside of the rafters we lay a layer of waterproofing, which will protect against accidental penetration of moisture. Finally, we lay the roof on top of the waterproofing.
Diversity finished projects The attic roofs are very extensive. They can be with or without windows, rounded or strictly straight, with one slope or several. But no matter what the attic roof is, its construction will require the knowledge and skills of a construction master.


