There are often unusual glass wine bottles left at home that are a pity to throw away and have no use for, and there are always a large number of plastic sparkling water bottles of different colors.
Instead of getting rid of them, you can turn them not only into a practical thing - a vessel for flowers, but also into an element of interior decoration.

For those who like to make beautiful unique things with their own hands and who know how to do it from scrap materials, here are a few ideas on how to make a vase from an ordinary bottle.

Making a vase from a glass bottle is quite simple, you just need to know a few techniques, and then there is room for imagination and creativity.

The first step is to make a base for the future vase - cut off the neck of the bottle, then you can put not just one flower, but a whole bouquet in the vase.


This can be done without tools - you need to take a thick woolen thread 50 cm long, a lighter or matches, a wide vessel with water - so that a bottle can easily fit there, any flammable liquid used in everyday life - acetone, gasoline, alcohol, a block of fire sharpening sharp objects or sandpaper.

For safety reasons, you will need safety glasses and household gloves.

Operating procedure:

Now all that remains is to sand down the chips and begin creativity - the process of decorating the vase.

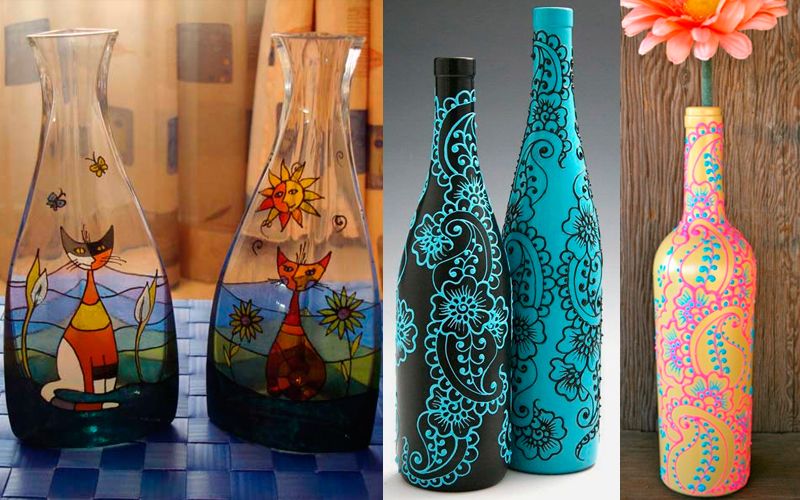
The idea is to cover the surface with images on paper and secure them with varnish. Paper napkins with different designs are usually used. This is done like this:


For this technique you will need acrylic paint of different colors, a felt-tip pen with a thin rod, a special outline for glass - silver or gold, cotton swabs, art brushes.

You can choose the design to your liking - a tree branch, a flower, patterns. You can draw a cartoon character, a firebird, or depict a rural landscape - a house and a river.

The drawing is applied like this:

For example, if this is a peacock, then the coloring process will look like this: you need to start filling the spaces of the contours with dots of paint from the body of the bird.

Then color her wings and tail feathers, leaving their center unpainted.

Glue a glass shiny or mother-of-pearl ball into the center of each tail feather; you can line it with sequins and beads.

A satin or mother-of-pearl vase is very beautiful; decoration is done with appropriate ribbons. This is done like this:


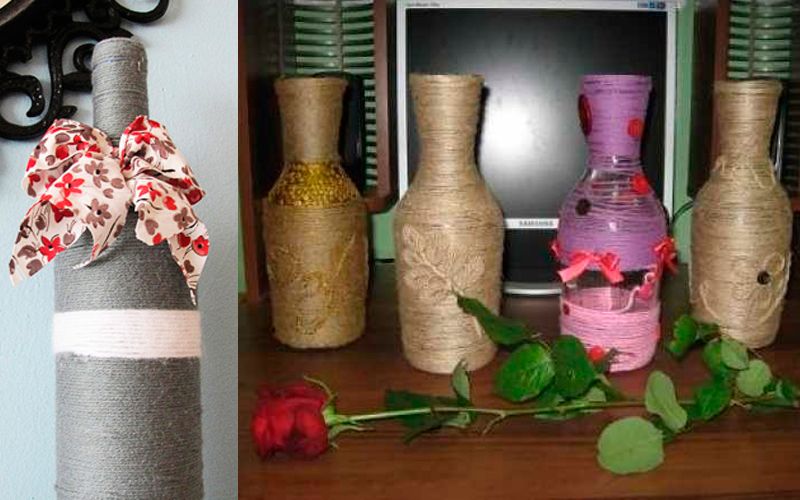
Ribbons can be taken in different widths, or with a pattern - both a plain mother-of-pearl vase and one with an ornament will look beautiful. In the same way, you can wrap the bottle with thick threads and twine.

Using this technique, you can make unique vases with a textile surface.
You can wrap the bottle with ribbons obliquely, horizontally or in a pigtail - all this will create a unique pattern thanks to the light that will play on the satin fabric.


You can decorate a textile vase with beads and bows.

You need regular soda bottles. Basic master class:


To make the vase colored, insert a colored paper sheet or napkin with an ornament inside.

What you need is a plastic bottle, a felt-tip pen, a regular nail and a can of spray paint (you can use regular stained glass paint). Then proceed as follows:

Paint the blank with spray paint or stained glass.


Plastic milk bottles and a glass jar will make an unusual floor vase about a meter high. You will need 14 bottles, a 3 liter jar, paper napkins, toilet paper, glue and tape.

Manufacturing process:

Then decorate the frame with papier-mâché - cover the structure with paper:

To make it you will need a 0.5 liter bottle, scissors, a knife, glue or tape.

Cut off the neck of the bottle, cut the upper part into strips, bend them outward downwards and secure them to the base of the bottle with glue or tape. Paint the vase, decorate it with beads, sequins or seed beads.

You can decorate such vases by gluing interestingly shaped pasta, semolina, coarse salt, shells, and small pebbles.

You can cover a bottle with narrow electrical tape with intricate patterns and paint it with a spray bottle, then remove the electrical tape - you will get a fancy pattern of perfectly straight lines. Making vases from bottles can be an interesting and useful way to spend your leisure time with your children.


Decorating a vase with your own hands is quite an exciting hobby. Designer, unique vases in finished form are quite expensive, but a vase decorated with your own hands will definitely suit your interior, because you will select materials according to color and style to match the finished room. Another advantage of decorating a vase yourself is its uniqueness. You will never find exactly the same one, even if you use materials from a specific master class.
A vase in the interior is not just a vessel in which you can put a bouquet of flowers. This is a work of art, an interior item, and a thing that can be used to cover an empty space. And in combination with the bouquet itself, the vase will become an integral part of your interior.
To decorate a vase with your own hands, you may need available materials and various tools, but also, of course, your hands. Decorating a vase with your own hands is a creative process that can be a fun activity for the whole family. Well, we will give you ideas and tips on how to decorate a vase with your own hands in this article.
There are many ways to decorate, the most popular of which are:
Let's look at some of them - do-it-yourself vase decor with photos.
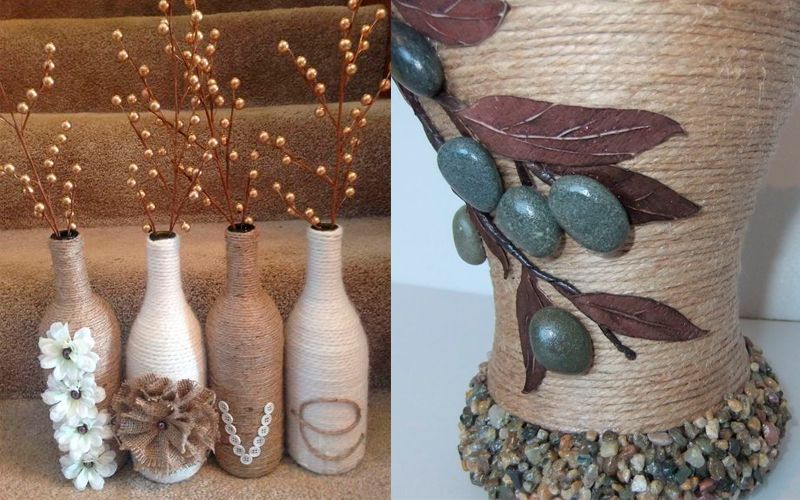
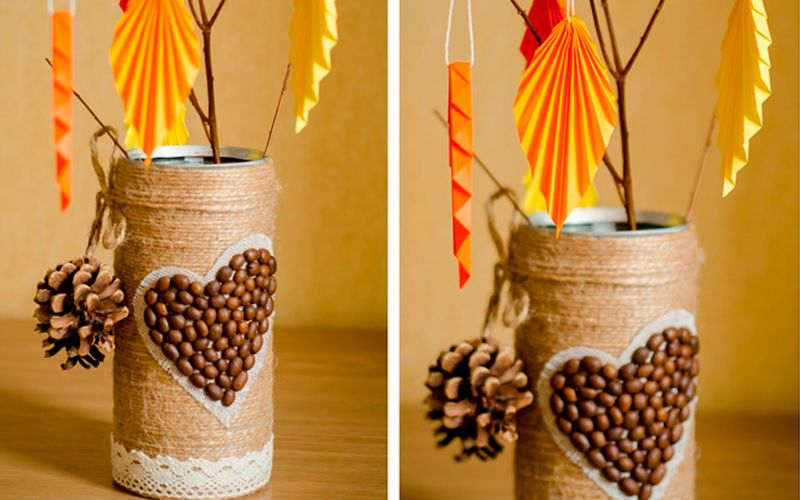
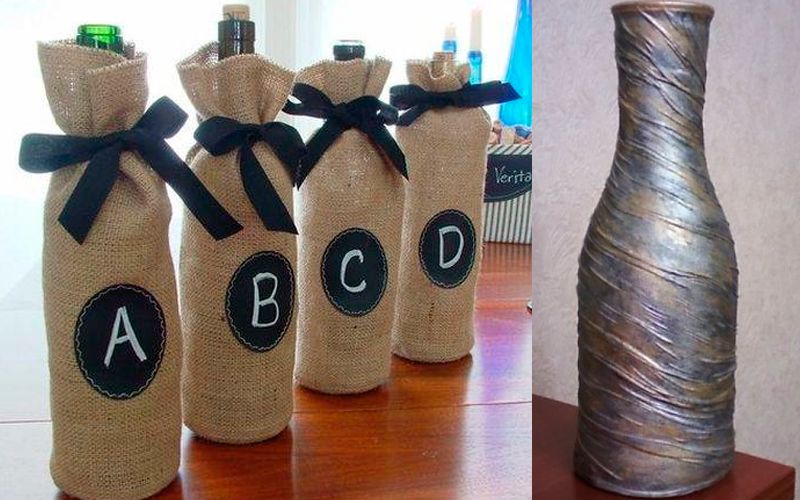
Twine is an excellent material for decorating bottles, glasses and vases. Its flexibility (literally) allows you to decorate even the most complex shapes. Along with twine, you can also use other materials: rhinestones, beads, buttons, threads, fabric, ribbons. Both regular PVA and hot melt glue or “moment” are suitable as glue.


Natural materials can also complement twine or rope: pine cones, shells, dried leaves, small pebbles or other stones.
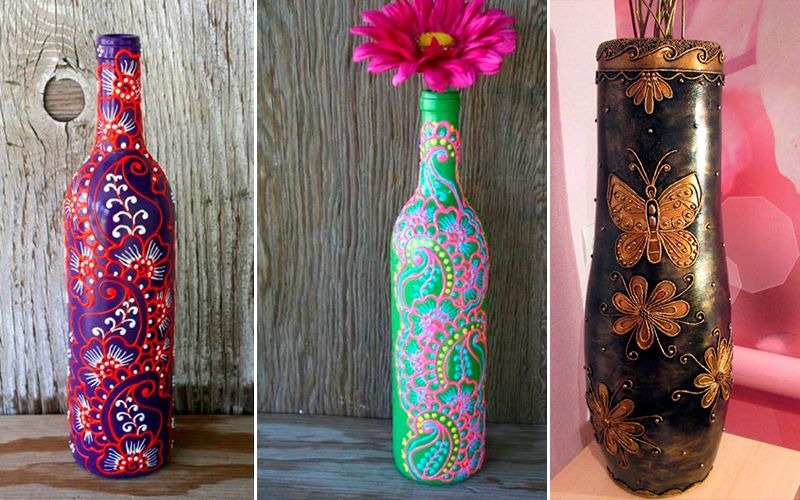
Of course, artistic painting is not for everyone. But a vase painted with your own hands will look expensive and unique. For painting on glass, use stained glass paints or special acrylic paints marked “for painting on glass.” You can go another, more economical way: first, the vase is coated in two layers with PVA glue, and then a drawing is applied to it using ordinary gouache.
Important! Before starting work, the vase must be thoroughly degreased - wiped with alcohol or an alcohol wipe.
In order not to spoil a large vase without painting experience, you can practice on an ordinary glass or bottle of wine or champagne.

To create a relief contour, use a special acrylic contour on glass.
The fabric can be used not only for sewing clothes or home textiles. It is also an excellent material for decorating various interior items.
You can decorate a vase using fabric in different ways: sew a cover on it, paste it with pieces of multi-colored fabric, wrap or tie the vase.
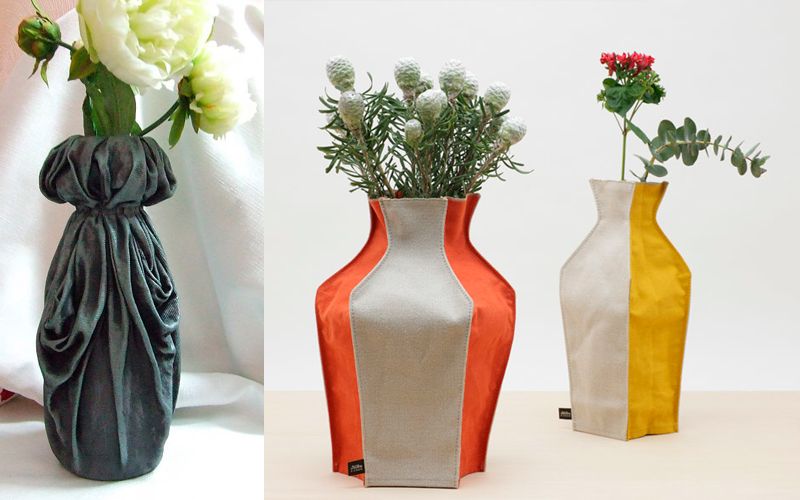


You can decorate with fabric not only a vase, but also any other container, for example, a bottle. For this you need the following materials and tools:
The fabric should be soaked in glue and wrapped around the bottle. Then glue the decorative elements and paint.

A vase decorated with lace and ribbons is no less beautiful and elegant. To glue materials to the surface of the vase, you can use hot glue, moment, or PVA. Also combine with artificial flowers, buttons, rhinestones, beads and beads.
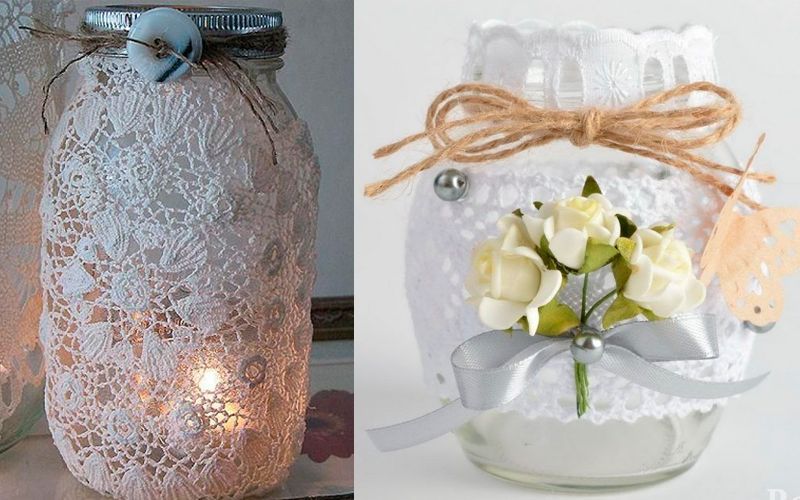


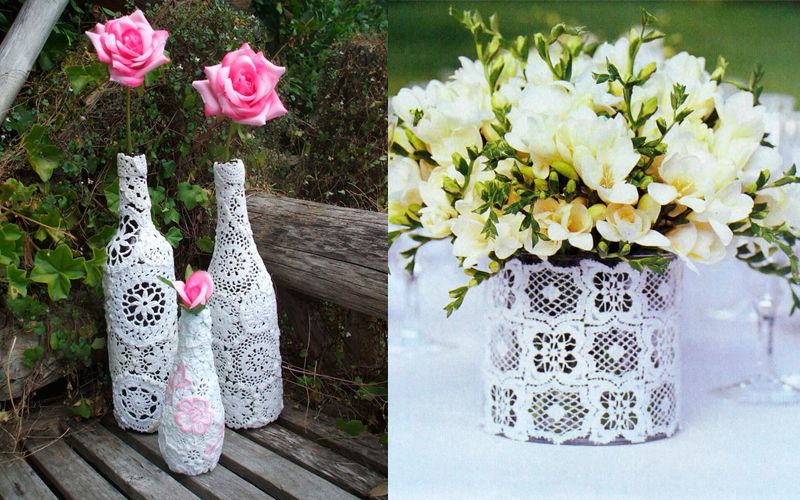
Decorating a vase with lace is quite easy, and you get a unique and original pattern.


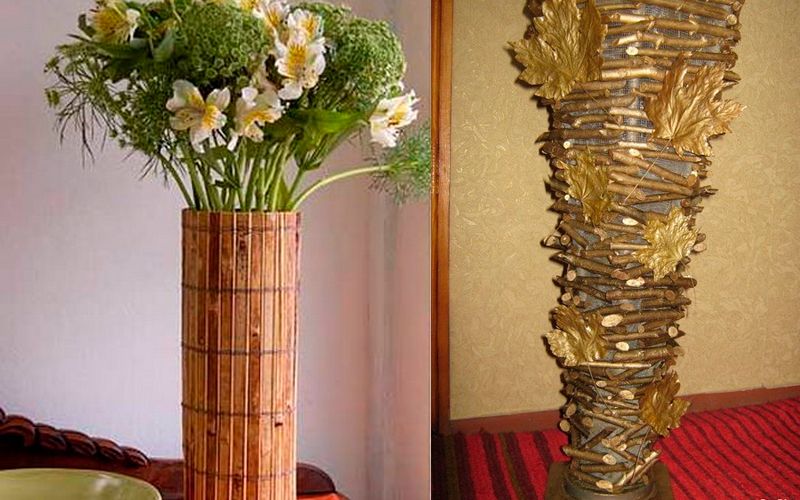
Any natural materials can be used as decoration for a vase with your own hands: wood, twigs, pine cones, shells, pebbles, dried leaves and flowers, straw.
How to decorate a vase with your own hands using natural materials? Just like other materials for gluing, you can use PVA, hot melt glue, and moment. Before applying glue, the vase must be degreased.


One of the original ways to decorate a vase with your own hands is to paste it with pasta of different shapes and sizes. Thanks to the huge selection of pasta in modern supermarkets, vases turn out to be unique and original. From above, the entire pattern is covered with paint and varnish for durability.


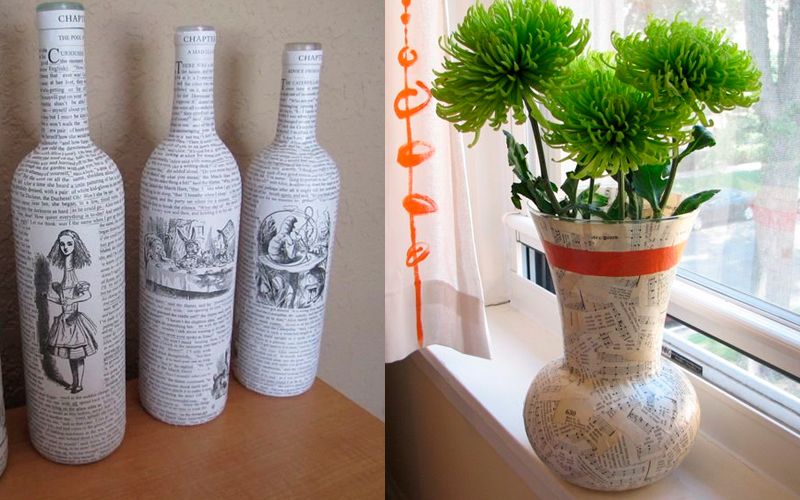
Old newspapers can be used to decorate a vintage style vase. Aged paper or sheet music are also suitable for this purpose. Simply cover the vase with pieces of newspaper and decorate with twine or thread.


Vases are used not only as containers for flowers, but also as a decorative element in the interior of a house, yard, and even garden plot. They can be used in a variety of ways: placing fresh flowers or ikebana, folding knitting or filling with original stones. But in any case, this item should look decent, so we offer you a master class on decorating a vase with your own hands.
One of the simplest ways that does not require a lot of money and time is decorating with twine.
All you need is to choose a vase of an interesting shape and wrap it around it, starting from the bottom. We attach the beginning and end of the twine string with glue. You can also periodically peck the thread as you wind, but don’t be overzealous, otherwise the glue will be visible. When winding, we try to tighten the twine to ensure a tight fit to the surface.

If desired, you can decorate the vase with additional elements in the form of flowers, bows or leaves.

Even in childhood, in school lessons, we were taught to decorate all kinds of jars with semolina, seeds, coffee beans, etc. Unfortunately, such lessons no longer exist. But we will remember our childhood and modernize this type of decoration a little.
1) If possible, choose a jar with a high neck, this will make it easier to decorate it with ribbon. We also need a tube of PVA glue with a narrow dispenser. And, in fact, the semolina itself is in the plate.

2) We estimate an approximate pattern and apply part of it to the jar with glue. By the way, the pattern can be either free or thematic, in the form of hearts, animals, inscriptions or names.

3) Sprinkle a strip of glue with semolina, don’t skimp on the grains, the more the better. Everything unnecessary will fall off on its own.

4) Literally after a few seconds, turn the jar over a plate of semolina and shake it off. At the same time, we don’t touch with our hands; what fell was supposed to fall.

5) Using the same technology, we perform the remaining pattern. It takes about 12 hours for the glue to dry, after which, for reliability, you can coat the pattern with aerosol varnish. And again leave for 12 hours.
6) After complete drying, you can add additional decorative elements. Decorate the neck with a ribbon, and cover the vase itself with beads or rhinestones. Result in the photo:

All! The cute vase is ready. The longest time will be spent waiting for the glue and varnish to dry, but you will spend nothing on the work.
Floor vases can also be decorated in a very interesting way.

This work is done from simple wooden blocks glued together with wood glue.
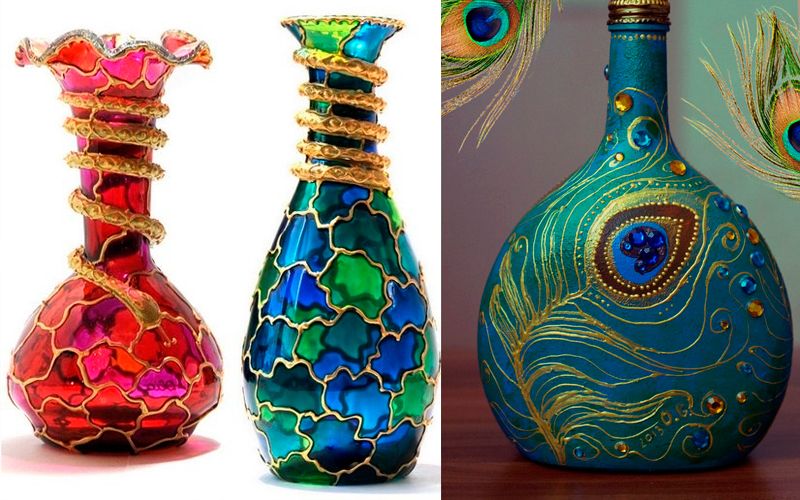
If you have an old yellowed glass vase somewhere, then you can also revive it and use it for your pleasure. Such “rarities” are suitable for decoration with sealant and paints. Before starting work, the surface of the vase must be thoroughly cleaned of dirt and degreased. Then a pattern of sealant is carefully applied to the surface.

The sealant dries for at least 24 hours. After it has completely dried, apply the first layer of paint with the effect of frozen glass (sold in handicraft stores) from an aerosol can to the vase.

After a couple of hours, you can apply 1-2 layers of regular white paint.
There are many more materials that can be used to decorate flower vases. For example, from seeds.
Today, only the lazy do not improve the design of their home. Fashion trends allow us to satisfy the most sophisticated tastes of demanding consumers. At the same time, the demand for decorating the interior with tall floor vases has always remained. However, their affordability does not always coincide with the desired appearance. Like any other thing, you can make a floor vase with your own hands. Such a beauty will have the desired shape, and in the desired color scheme, and is much cheaper than its store-bought counterparts.
Materials for work:
Glass jar with a capacity of 3 liters – 2 pcs.;
Tea saucer – 1 pc.;
Plastic container for preserves – 1 pc.;
Silicone sealant – 1 bottle;
Liquid PVA glue (construction) – 1 liter;
Construction alabaster – 4 tbsp;
Potato starch – 100 g;
Egg racks – 4 pcs.;
Vegetable oil – 1 tbsp;
Vaseline – 1 tbsp;
Three-layer napkins – 2 pcs.;
Plasticine – 1 box;
Old tube of PVA glue with a narrow spout – 1 pc.;
Liquid nails glue, white and gold paints, blush, eye shadow, face powder, brush, colorless acrylic varnish, water.
Stages of work:
First stage: forming the basis.
We turn one jar upside down and glue a tea saucer turned upside down to it with “liquid nails”.
We glue the bottom of the second can to the bottom of the same jar.


Everyone knows that a bouquet of flowers in a beautiful vase is a wonderful decoration for a table or home space in general. But, unfortunately, it is not always possible to buy a vase that suits your interior. At the same time, it’s not at all difficult to find a very simple, inexpensive glass container or even a bottle and decorate it the way you want.
The process is creative and exciting, because modern decorative and finishing materials make it possible to turn any ordinary vessel into a masterpiece. Special paints, contours on glass, and napkins for decoupage come to the aid of craftswomen. Needlewomen do not limit themselves to special materials, but use the most unexpected things for decoration, such as: plaster bandages, cereals, pasta, jute twine, dried fruits and skeletonized leaves.
  More interesting master classes More interesting master classes |
So the craftswoman Ann got the idea to decorate the vase in some unusual way, this is what she writes on her blog: “I had been chasing this idea in my head for a long time, some time passed and I finally decided to do it. I kept thinking about how I could get three-dimensional image on a vase, jar, box or even canvas. I didn’t like the options associated with cutting out shapes from foam plastic and gluing them onto a base, and I also didn’t like the option of buying voluminous stickers. All this, in my opinion, required a lot of effort or investment of money, I knew that there was an easier way. And this is what I came up with..."
So, to decorate a vase you will need:
Step 1. To implement her idea, the author found this container at a sale, which cost her fifty cents. Take your glass vase and treat it with alcohol. 
Step 2. Find a design or design that suits your vase. The craftswoman used the pattern on her favorite cap as a template. 
Step 3. Transfer the pattern onto the paper and fold the paper to make sure it is symmetrical and find the center of the pattern as shown in the photo. Attach the drawing to the desired location.

Step 4: Fill the pattern with hot glue. If in the process of work you accidentally went beyond the boundaries of the pattern, it’s okay; the hot glue can be easily cleaned up with a knife when it has cooled. 
Step 5. Take tissue paper, remember it, and tear it into squares no larger than 6*6 cm. You can also use thin fabric for these purposes. 
Step 6. Place scraps of fabric or scraps of paper on the vase and glue them with PVA glue. Do this very carefully, try not to tear the paper. Cover the entire vase, smoothing out excess folds with your fingers. Dry the resulting relief.
Step 7. To smooth the relief and give it integrity, coat the vessel with PVA glue one more time.

Step 7. After this layer of glue has dried, use a foam sponge to tint the vase with light acrylic paint. At this stage, the craftswoman asks if you see the laughing face of a guy with a small mustache on the vase? Lush eyebrows, curled mustache? A goatee on your chin? She wants you to see this laughing Frenchman, she will be very pleased if you have the same rich imagination as she does. 
Step 8. After the layer of light paint has dried, take a soft brush and paint in a contrasting color. The needlewoman used black, you may want to use Umber or some other color that best suits your interior. Make sure your brush is almost dry before applying paint. It's better to put too little paint on your brush than too much. But even if it happens that you applied too much dark paint, do not be discouraged, let the paint dry and paint over the dark spot with the light paint that was used earlier.
Step 9. After the paint has dried, cover the entire surface with acrylic varnish. Ann really likes the result, she thinks that it turned out very rustic. As the craftswoman’s father, an engineer by profession, says: “If you can’t make it look perfect, emphasize its imperfection.”

Decorating glass vases with your own hands
The next master class, already in video format from Natasha Fokhtina. In it she will talk about how to make such cute vases from glass bottles. 
To decorate them, the craftswoman used the decoupage technique. 
This jar vase was made using a glue gun, metallic paint and decorative glass pebbles. 
But this beauty was achieved using acrylic paints, semolina and contour, and on glass.

Watch the video tutorial, select suitable containers and create with inspiration!
Translation by Oksana Korshunova especially for the site:


