The problem of free space is always relevant, especially for small apartments. What to do if you want to place your favorite books or children's crafts? Corner shelves will help out.
Almost always in the apartment there is an unoccupied free corner in which a rack or small shelf would be perfectly located. This will free up some space and also add a new decorative element.
Today it is difficult to find a house or apartment that does not have shelves. They are convenient for laying out personal hygiene items in the bathroom, arranging books, flowers, kitchen utensils or small crafts and trinkets. The angular position provides great opportunities for design imagination when creating various shelf configurations.
Due to their design, corner shelves can save apartment space and at the same time aesthetically decorate the corners.
Today it is possible to choose a corner shelf on the wall for any room. Specialized stores are ready to offer a wide range of shapes and designs from various materials. But the cost of such shelves does not always suit every potential buyer.
Wooden wall hangings have a traditional and classic look. It can be made in a minimalist style, but will still remain attractive.
Often the corners in rooms are empty, although there is a way to use them rationally: arrange corner corners. Such designs compare favorably with standard ones appearance, and most importantly, they save free space in rooms with small footage.
They are sold in furniture store and are made to order, but self-construction will also not cause difficulties. Today we will tell you how to properly place such furniture in the house, choose suitable materials for making and making corner shelves from wood, chipboard, glass and scraps metal-plastic pipes without the help of professionals.
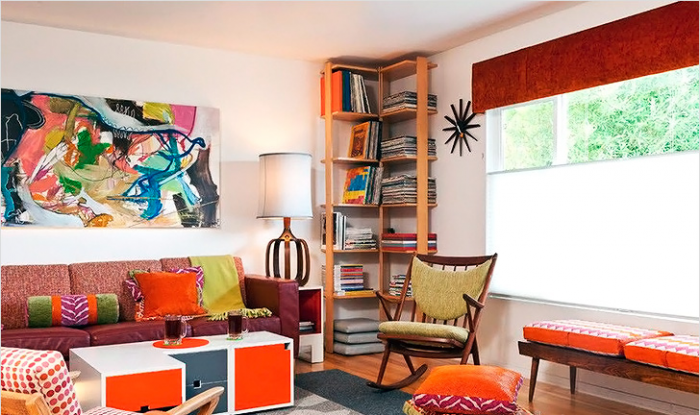
Hanging corner shelves are good because they allow you to free up space below for other furniture. Typically, such shelves are used to store books, souvenirs and other small items. It is also convenient to place flowers, icons, telephones, bathroom and kitchen accessories on them. We will look at the nuances of creating models suitable for each of the listed cases, and will start with a corner shelf for the living room.
Corner shelves save space in the room
Shelves for flowers, souvenirs and other small items are made of metal, plasterboard, glass, but the most popular material is still wood and its substitutes: they are practical, easy to care for and without extra effort can be processed at home. To save money, you can not take full-size wood boards (MDF, laminated chipboard), but choose from leftovers on the market; there are often pieces of sizes suitable for shelves.
In addition to the material, you will need tools for wood processing - a drill, a jigsaw, sandpaper, a tape measure, a ruler and a marker for marking. You can’t do without fastening elements (screws, dowels) and trim tape for finishing the edges.
Considered decorative shelf on the wall consists of three tiers connected by sidewalls. First, we make a design drawing and indicate the dimensions of the components on it. Then we make individual parts from cardboard or paper and transfer them to the material, in this case - laminated chipboard, tracing the outline with a marker or the edge of a stationery knife.
 Construction drawing
 The parts are cut out using a jigsaw with fine teeth. After cutting, it is better to number the shelf fragments so as not to confuse them during assembly. In the finished parts, mark the fastener locations (for fastening individual fragments of the structure and for hanging on the wall) and drill holes of the required diameter with a drill.
Before joining, the components of the structure are cleaned of dust and sawdust and equipped with a decorative edge. To do this, the trimming tape is applied to the cut areas and glued by running a heated iron over the surface covered with a rag. If the tape turns out to be longer than necessary, carefully cut off the excess stationery knife, and the resulting edge is cleaned sandpaper.
 Processing slices
 After completing the processing of the parts, we begin assembly, focusing on the diagram and numbering. Dowels are inserted into some of the holes and the parts are connected to each other with self-tapping screws, using a screwdriver or screwdriver. Upon completion of assembly, marks are made on the wall for the fasteners on which the shelf will be hung. IN in this case You will need four of them - one for each jumper.
Having drilled holes of the required depth with a drill (for concrete walls It is worth using drills with a Pobedit tip) dowels are placed in them and the shelf is fixed with self-tapping screws. The finishing touch is to decorate the heads of the wall fasteners with special caps to match the color of the shelf. The design is ready! Now all that remains is to arrange books, photos and other little things dear to the heart.
 Fastener caps can be disguised
 The kitchen accumulates a considerable amount of all kinds of jars with spices and sauces, small utensils for cooking, serving, and the like. If the main cabinets are already full, they will come to help in the fight against kitchen chaos corner shelves on the wall. They are hung above the dining area, above the stove or in other suitable place. Of course, such a shelf must be durable and spacious, so we opted for a two-tier structure made of fiberboard.
 Kitchen shelf layout and diagram
 The tools needed are similar to those used for the living room shelf. The fittings and fasteners are also similar, but you will additionally need hinged hinges and confirmations (furniture screws). The first step is to measure the available free space and, focusing on it, draw up a drawing of the shelf, indicating on it the parameters of all parts. Take the sketches given in the article as a sample or find others on the Internet.
Work on the construction of a kitchen corner shelf is carried out in the following order:
 Sidewalls and crossbars
  Connecting parts
  Assembled shelf
 Most Orthodox people keep icons in their home. To place them you need special place Traditionally, icons are placed in the corner of the house facing east. A corner shelf, especially a wooden one, is perfect for these purposes.
 Simple single-tier shelf for icons
 Making a shelf for icons does not require special skills; difficulties arise only if you want to decorate it with openwork carvings or balusters. But you can do without such finishing or purchase the necessary parts from professional wood carvers. We will look at creating a simple single-tier shelf.
Natural wood looks more noble than substitutes, so it’s worth choosing it. Suitable materials include solid wood and wide planed boards. The first step is to outline the outline and cut out a corner that will become the basis of the structure and a cornice - a narrow strip attached to the front of the shelf.
 Preparation and assembly of the structure
 If desired, the cornice is made curly - wavy at the bottom. The connection between the cornice and the shelf is made using dowels (protruding wooden pins). To do this, 2-3 cm recesses are drilled in a triangular fragment and dowels are placed inside them so that they protrude outward by 1 cm.
Then the places opposite the dowels are marked on the cornice and holes are drilled to allow the two parts to be tightly connected. Before assembling, it is recommended to sand the shelf components and varnish them. The finished product is equipped with four hangers (two on each side) and attached to the wall. Interestingly, if you place the same structure lower, you will get an original shelf for a telephone on the wall.
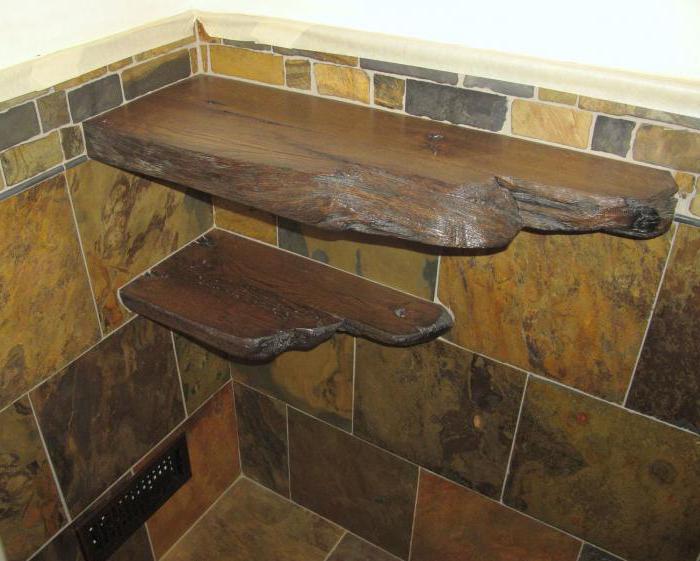
 Glass shelf for bathroom
 The bathroom is the place that needs saving space more than others, because the rooms for taking water procedures in most apartments cannot be called spacious. Therefore, it is more rational to use corner structures for storing things. It is clear that a corner shelf on a wall made of wood or chipboard is not The best decision for the bathroom, after all high humidity will quickly destroy material prone to rotting. In this situation, it is more appropriate to use products made of plastic or glass, which are resistant to moisture and can be easily treated with disinfectants.
Such shelves are available in abundance in any plumbing store, but if you like to make things with your own hands and want to get an original item, adapted to your tastes and needs, you can make them yourself. Let's look at how to properly make a shelf for a bathroom using a glass structure as an example.
Tools you should prepare:
You will also need shelf holders (available at hardware stores) and strained glass no thinner than 5 mm. First you need to think about the design of the product, take measurements at the location where it will be placed and draw a template. Then the parts are cut out of the glass. It is recommended to order this procedure from a glass workshop, this way the shelf will look more aesthetically pleasing, and you will protect yourself from injuries and possible damage to the material.
The next stage of work is to fasten finished parts on the wall. To do this, the holders are put on and fixed on the shelf, it is brought to the wall and in in the right place places for dowels are marked. Using a drill (with a special drill) according to the marks, checking the level, holes are drilled and fasteners are inserted into them. Then all that remains is to hang the structure and make sure that it is securely fastened.
 Holes for fasteners
 Owners of a large library are familiar with the problem of convenience, when they want to place their favorite publications in immediate access without cluttering the room with cabinets and shelving. There is an exit. We have already told you how to make classic wooden shelves, but there is another option for a corner design that is ideal for storing books. Because of unusual design it will not take root in every home, but for lovers non-standard solutions you'll definitely like it.
 Roomy bookshelf from pipes
 Corner shelf on a wall made from scraps water pipes will compactly place your books and will cost very little. You will need pipes, carbon fittings, dowels, self-tapping screws, paint and tools - an angle grinder, a gas wrench, a vice, a welding machine.
The shelf is assembled as follows - the pipes are cut into fragments (in this case 15 pieces), connected with fittings and welded. If welding machine no, you can get by with screws by screwing them in at the junctions of pipes and fittings. The structure is fixed to the wall at the top and bottom points using dowels previously driven into the wall.
It is advisable to paint the finished product ( paint will do from a can) to hide defects, welding marks and differences in the color of parts. The resulting octagonal shelf will easily fit into modern interior apartments and organize your library.
We looked at what corner shelves are (in a stand-alone version).
Today we will look at how quickly and easily you can make a module of such parts.
Well, I don’t think it’s worth talking about how these very shelves are made. Their production is ordered along with cutting.
They are cut out, processed with a milling cutter, and “rolled” with plastic, 2 millimeters thick, using special equipment. In a word, it is better to make corner shelves not in makeshift conditions.
And since we are talking about how to make furniture in artisanal conditions, let’s take a better look at assembling a module with corner shelves.
So, the module itself consists of a side, a back piece and three corner shelves.
First, “by eye,” we make three holes in the end of the rear wall (just make sure that the middle one is not in the center, since there will be an axis for attaching the corner shelf).
Then, we apply it to the side of the module (in the place where there should be holes in it for connecting to it, we align their extreme ends, and with a pencil we make notches on the side part, opposite the holes made in the positioned part).


 Having retreated 8 millimeters (our chipboard is 16 millimeters thick), we make holes in the side part.

 As you can see, we do all the markings without a tape measure, “live.” Moreover, in this case, we obtain fairly good accuracy (hole alignment).
After that, we connect it to the back wall.
But here you need to be careful.
If you make two perpendicular holes close to each other (near the corner of the shelf), then when attaching the shelf (when confirmats are screwed into it), these confirmats may intersect. Therefore, by attaching the confirmation sheet opposite the hole made, we determine (visually) the position of the perpendicular hole.
 After this, again, we attach shelves to each of the joining faces (side and back wall), and mark the position of the holes.


 When the holes in the side part and in back wall done - attach the shelf. When fixing the shelf, you need to press it towards the joining surface in order to remove possible gaps between them.


In the interior of any room, be it a room, a kitchen or a bathroom, fixed corner ones look very harmonious. This element of furniture, with its simplicity, plays both practical and aesthetic role. It can be used to arrange books in the living room, children's room or office, installed in the kitchen in order to arrange kitchen utensils, jars for bulk products or cute trinkets to arrange in the bathroom comfortable places for placing personal hygiene products and cosmetics.
Thanks to this design, you can rationally use the space in the premises small area, and also smooth out the corners. Such shelves, not being the main elements of furniture, will add emphasis to the interior design, effectively decorating it.
Nowadays, stores have a huge assortment of different shelves, which makes it possible to perfectly match them to any room interior. Manufacturers offer products made from different materials, all kinds of designs, sizes and shapes. Despite this, many are not averse to making corner shelves on the wall themselves.
But in any case, you should know which materials are most suitable for the manufacture of such structures.
When decorating a kitchen, such shelves are used not so much for decoration as for convenience. As a rule, they are placed above the work surface, taking into account the rules of ergonomics. The photo will reveal in full what the corner shelves hung on the wall look like.

They have L-shape and can only occupy a corner or continue along the length of the wall. Often such an element, placed in the corner, connects hanging cabinets located on adjacent walls. For small kitchens, they are an excellent alternative to bulky cabinets and are used to place certain types of food, cookware and other utensils.
They can be made from all of the materials listed above, but more organically in kitchen interior An attached corner shelf on a wooden wall looks great, especially if the room is decorated in styles such as classic, Provence or country.
It's no secret that most bathrooms are small in size, and the issue of saving space is very acute. But in this room you should conveniently place bath accessories, shampoos and shower gels, cosmetics and perfumes, as well as all kinds of detergents for washing and cleaning.

That's why different suspended structures are simply irreplaceable here. The best option- hang the corner ones on the wall. They go well with mirrors, look elegant and suit almost any bathroom decor. And if you consider that the humidity in this room is always high, then you cannot find a better material for shelves.
Although plastic shelves would be no less appropriate here. Their design consists of a stand, which is installed in the spacer between the edge of the bathtub and the ceiling, and four shelves with perforations (for water drainage). For convenience, the shelves are equipped with hanging soap dishes and hooks for washcloths.
Also in the bathroom you can hang corner shelves on a metal wall. Such structures are usually made of stainless or chrome-plated steel.
Shelves for books are present in every home. On the one hand, they are very comfortable, and on the other hand, they complement the interior of the room well. The design of these structures is striking in its diversity and originality.
Corner shelves for the wall in the room are made in both classic and non-traditional versions.
But even classics can be somewhat unusual. Looks impressive wooden shelf, the elements of which alternately adjacent to one side of the angle, then to the other. The book surfaces have rectangular shape, rounded at the corners, and located at equal distances from each other.
Open shelves look more monumental. Usually, each side of such a cabinet is divided into compartments of different widths, in which the transverse shelves are located at different distances. Such corner shelves on the wall, photos of which are shown below, have a small depth, while remaining very convenient and spacious structures.

This type of shelves for a children's room looks interesting. They have an L-shape with the same length of transverse elements from the angle. But their highlight is that they can accommodate both books and toys, for which there are semicircular vertical compartments at the ends of the shelves.
Original corner shelves on the wall in a minimalist style are now very popular. They are made of wood. The base also has an L-shaped rather narrow shape, at the ends of which sides are installed as book holders.
Since shelves are a fairly simple design, many people prefer to make them themselves. There are plenty of advantages to this. Firstly, you can really save money, and secondly, you can make it to your taste the desired design, which is ideally sized to fit into the required corner. And you don’t need any special knowledge, skills or expensive equipment here.
Corner ones can be made from any material, as discussed above. And having decided on it, you just need to select the right tools.
If you decide to make a glass shelf, you need to prepare the following set of tools:

The manufacturing process of such a shelf consists of several stages:
You can also make such a shelf yourself if you have some carpentry skills. The best material For its manufacture there will be chipboard, MDF or plywood.

To work you will need the following tools:
A corner shelf on a wooden wall is made in the following way:
Knowing all these subtleties, making corner shelves on a wooden wall is not so difficult. This kind of work will take you several hours. A comfortable and beautiful shelf will serve you for many years.
Creating coziness and comfort in your home is a very pleasant experience. And if hand-made items are used in the interior, this brings some warmth to the home environment. Imagine, experiment, make your own decor - and you will bring joy to yourself and your loved ones.


.jpg)


