3 8 444 0
Every day computer technology becomes more powerful, sophisticated and compact. It becomes much easier to use, and this is largely due to the wireless communication modules - Wi-Fi in particular. Just recently, 7-8 years ago, the peak speed that could be obtained at home via a dial-up channel rarely exceeded 50 kilobits per second. Nowadays, you can easily distribute a stream that is 20-30 times more powerful - without wires or cables.
And if you decide to get a home wireless network, but don’t know how to set up Wi-Fi, these instructions will come in handy for you.
You will need:
We will miss the moment of choosing and purchasing it. Let us only note that without it, making Wi-Fi at home will be very problematic. This device will cost you $30-50 (depending on the power of the antennas and the specific model) and will save you from a lot of unnecessary hassle.
Having the above device in hand, take it out of the box. We connect the power, and insert the Internet cord into the port labeled WAN. Also, the kit will include a regular network cable - we will use it to connect the laptop and the router (by inserting it into any LAN port). We need this solely for setup - we will not need this cord in the future.
Having completed all the above steps, open the browser and enter the address of the web interface of our network wi-fi router (192.168.0.1 or 192.168.1.1 - depending on the model) into the address bar. The next thing we will encounter is the authorization window. Login and password are standard for all models and are indicated on back side the device itself. In our case, this is the standard combination “admin / admin”.

At the same time, open a new tab and try to open any other address. If everything works and you have internet, congratulations. All you have to do is set it up yourself wireless network. If the sites do not open and there is no active connection on the computer, you will need to configure the connection through the router manually.

To do this, on the router’s web interface page, go to the “WAN” or “Internet Connection” tab.
Attention: depending on the specific device model, some sections may have a different name. There is nothing wrong with this - read the instructions and you will not have problems navigating through the sections of the web interface.
In a word, we need to open the Internet connection settings page. Your provider should tell you its type and additional settings (DNS, IP address and connection type). Contact the Technical Service. support and this information will be provided to you.
Having sorted out the Internet connection, the last thing left for us is to directly set up Wi-Fi. To do this, look for the “Wireless Network” tab. Here we need to set several parameters:

We are not interested in the meaning of other parameters (except perhaps the checkbox “Enable wireless broadcasting of the router”). We save the changes: the router will reboot, and in the list of available Wi-Fi networks one new one will be added to your laptop. We join it, and forever forget about inconvenient wires and cables (by the way, the power cord can also be removed).
The last thing that remains for us is to secure the newly created network from prying eyes. To do this, look for the “Security” tab in the web interface. Here we can select one of the protection modes and also set a password for the connection.
With the advent of laptops, and later other mobile devices, the wires that traditionally connected PCs to networks began to get in the way. can be moved from place to place, but this is not very convenient to do when it is attached to it. The idea of combining computers using radio waves in the manner of a radiotelephone has become quite natural. The first developments in wireless Wi-Fi standards have appeared.
Now this technology has become firmly established in our lives, since anyone can make WiFi at home. It’s so convenient to be able to quickly connect to the Internet from anywhere in your apartment, office, park or cafe. Modern Wi-Fi standards allow you to surf the network at a speed sufficient to listen to music and watch movies online. We can say that Wi-Fi wireless technologies give a person information freedom.

Making a Wi-Fi network
To create a network, you will need two types of equipment: a Wi-Fi access point and clients that will connect to the network. Clients can be laptops, PDAs, mobile devices, supporting Wi-Fi, as well as desktop computers that have an external or internal Wi-Fi adapter. An access point is typically a router that supports wireless networks, such as the D-Link DIR 300.
First you need to configure the router itself, since it will not be possible to make WiFi at home with distribution to several clients without it. The device must be connected to a computer using a web interface, which can be opened in a browser, to control this device. If the setup is being done for the first time, then you can find the login and password in the documentation for the router, but if not, then the owner of the device should know it.
When authorization is passed, the router management page will open, where you need to find the section dedicated to Wi-Fi. Here you can enable or disable the wireless connection, set the network SSID, which will help protect it from outside interference, and also select the traffic encryption method and security key.
Once on the router, you can start setting up the client. As a rule, there is nothing complicated here: if the wireless adapter is working normally and software is installed for it, then the list of available networks will be visible in the Network Sharing Center or in a special window on Windows XP. You can usually find out about the discovery of a new network from the Windows tray. After selecting a network from the list, you can connect to it by entering the network's SSID and, depending on your encryption settings, the security key.

The question may arise about how to make WiFi at home without a router. There is such a method, but it can only be used to connect two computers, not all adapters support it, and the speed will be lower than using a router.
How it works?
How to make WiFi at home is practically clear, but how does this system work? The entire technology is built on access points to which clients connect. Each such point creates its own network and has its own data transmission parameters, such as network identifier, encryption method (if used), and encryption key. Each network has a coverage area, that is, an area around the access point in which the signal from clients can be recognized by it, and, conversely, the signal from the access point can be recognized by clients. has a range of up to 300 meters. But this value is “ideal”; in practice it decreases due to various obstacles.
As you can see, it has a fairly short range. But progress does not stand still, and wireless networks of the WiMAX standard are gradually being introduced. A WiMAX access point has a range measured in kilometers and, perhaps, in the future this technology will provide Internet access to the most remote corners of the planet.
The development of computer technology does not stand still, but many see this process only in an increase in the volume of the computer’s hard drive and the appearance of a color display in mobile phone. This article will talk about wifi technology, and without unnecessary details about how a home wifi network should be configured.
Creating a wifi network
For example, you can take the following set of devices: a personal computer, a printer, a laptop, ADSL Internet access, a PDA, and set the task of connecting all these devices to your home network. What are the advantages? Using wifi technology, you can exchange files, use Internet access on your home network, use a shared printer, and all this will be done practically without the use of wires.
Let's figure out what wifi technology is. It involves the possibility of using radio waves, and this is precisely the main disadvantages and advantages of wifi. The advantage is that there are no wires involved, which are so often a tripping hazard or an object of interest for your pet. However, the range of the network is noticeably reduced due to the presence of walls and tree foliage. Of course, you can increase the range of your wireless network by using more powerful transmitting antennas or by including several routers in the chain.
Is your home wifi network safe?
It has been said for quite some time that prolonged use of a wireless network negatively affects human health. However, at the moment there is no accurate data that would confirm the presence of a negative impact.
What devices are needed if you need a home wifi network?
For each of the devices participating in a wireless home network, it is necessary to install a wireless network adapter, that is, wireless All models of modern laptops, some personal computers, smartphones and communicators already contain such devices in their equipment. But very often, to create a wireless network, you need to purchase network adapters yourself. You can consider the case when, with the above set of devices, all devices except a personal computer and a printer already have wireless adapters.
You will need a router, which will be assigned the functions of monitoring the operation of devices among themselves. The router acts as a gateway between the Internet and your computer. Communication between all devices will be carried out via high-frequency radio waves. For a small apartment, one router is enough; its average range is 30-40 meters.
Home wifi network: connection
The router must be combined with a modem, and a personal computer must be connected to the router. The task of the router is to distribute the Internet to all devices of the organized network, as well as to provide access to the printer. If you want the printer to be available to all devices on the network at any time, then it must be connected directly to the router using the “print server” function. It is important to remember that not every printer may be compatible with your router, so it is worth checking such details when purchasing. And if we're talking about about the MFP, it may not be detected correctly by the router, so its functions will not be available. It is better to connect the MFP directly to a desktop computer.
They should be detailed in the instructions for the router, but there are certain points that are worth paying attention to. For example, the question: how to protect a wifi network? First of all, you need to enable network encryption. It is also important to update your antivirus software on time. software. And it is imperative to set a complex password for the network. To prevent anyone from causing any harm to your network, you must use secure passwords.
Wireless Internet is gaining more and more popularity and this process can no longer be stopped. To have a demon at home wired Internet, or Wi-Fi hotspot. I tried to describe the connection process in detail Wi-Fi router with photos and videos.
In fact, there is nothing complicated here, but you will need a little care and, perhaps, the phone number of your Internet provider. The whole process can be divided into three stages: physical connection, setting up a router and setting up a computer or laptop.
After you have taken the router out of the box, you need to connect it to your computer. By default, I will mean that you have a regular wired Internet.


After turning on the router, it needs time to boot and get itself in order. At this time, the lights on the front panel may light up and go out, wait 1 minute. We need to go to the administrative interface of the router and configure it. This can be done through any browser, for example Internet Explorer, Google Chrome or Opera. To log into the “admin panel” of the router you need to write in the address bar:
192.168.1.1
login: admin
password: admin

A small note: the address 192.168.1.1 is used in most routers. If you receive a “Page not found” or “Page cannot open” error, then try using a different address, for example: 192.168.0.1
If there is an ambush here, then you need to find out the correct address, for example from the sticker on the back of the device:

If it’s not there, then you need to look at the instructions, which may be on the included disk, or search the Internet from your phone. The same applies to the login (username) and password (password), i.e. not everyone has admin/admin. If the device is used, then maybe someone changed the default settings. In this case it is necessary. To do this, you need to find the “Reset” hole on the router and press the button inside with a match.
Let’s say the login address and login/password are known, but you still can’t log into the admin panel due to a network error. Then you need to check the network card settings in Windows 7/10. Let's go “Start -> Control Panel -> Network and Internet -> Network and Sharing Center”. There on the left we find “Change adapter settings”. The “Local Area Connection” connection should NOT have the “Network cable not connected” status:

If this is so, then most likely this is the problem, i.e. The cable is not connected, is connected in the wrong place or is faulty.
Also, the status should not be “Disabled”. If this is the case, then right-click on the icon and select “Enable”.
If you still can’t log into the admin panel, then right-click on the connection icon and select “Properties”, and there we find “Internet Protocol version 4 (TCP / IPv4)” and double-click on it. In the protocol properties, you need to check that the “Obtain an IP address automatically” and “Obtain DNS server address automatically” checkboxes are checked. Click “OK” twice. Now wait 10 seconds and you can check.

I hope this was sorted out and I was able to log in to the admin panel of the router without any problems.
It's more complicated here, because... All routers are different and the interface may vary greatly. Yes, and Internet settings among providers can also differ dramatically. If you have TP-Link router or another with the possibility quick setup, then you are in luck, everything can end very quickly. Find the “Quick Setup” item in the menu on the left or top and follow the instructions of the wizard:
On the first screen just click “Next”

I have a 3G router, so I'm prompted to select my preferred connection type: 3G or cable. I don't have a 3G modem so I select "WAN only"


If you don’t know what to choose, then try automatic mode. The router itself will try to determine the type of connection. If he succeeds, the wizard will move on to the next configuration step. But you may need to enter your login and password (in case of PPPoE connection)

or network settings (in case of “Static IP” connection type)

The provider should have given you all this information; look carefully in the contract. If the technician is unable to determine the connection automatically, then he will have to call the provider and ask, or try at random, there seem to be not many options
At the next step, the wizard prompts us to enable the Wi-Fi module:

A small digression: when everything works, if it turns out that the Internet is too slow or if there are problems, then try selecting “Channel” not “Auto”, but some number from 1 to 13 and saving the settings. You can go through all the numbers to find the right one. The fact is that now there is a lot of wifi equipment around, and each device needs its own channel to work. As a result, devices operating on the same channel interfere with each other.
It’s good if you don’t have the cheapest router and it can operate at a frequency of 5 MHz. In this case, there will be a corresponding option to select a frequency of 2.4 or 5 MHz. At this frequency it works much fewer devices, and therefore the likelihood that someone will interfere decreases significantly.
Well, if there was no automatic setup, then you will have to go through the items manually. We find a section something like “Network” and there is an item with the word “WAN”:

There should be similar settings items. Here everything is the same as for automatic setup, only we ourselves must select the type of Internet connection and enter the login/password.
If the provider requires you to specify the IP address and DNS server, then this can be done in the Advanced settings, but usually this is not necessary:

But, for example, I have a provider with problematic DNS servers and I register the Google server: 8.8.4.4 , which always works! How does a problematic DNS server manifest itself? This is when not a single site or website, but Skype or torrents work without problems! However, if you install the server on Google, then the internal sites of some providers may not open, for example, such as account replenishment and statistics.
It is here, in the manual settings, that you can specify the connection type - VPN, if you have one. To do this, select “L2TP”, enter the name/password and VPN server address (provided by the provider). If an IP address, mask, gateway and DNS are provided, then select “Static IP” and enter all the data. Don't forget to check the automatic connection box at the bottom.

That’s it, save the settings and look for the “Wireless Settings” menu section:
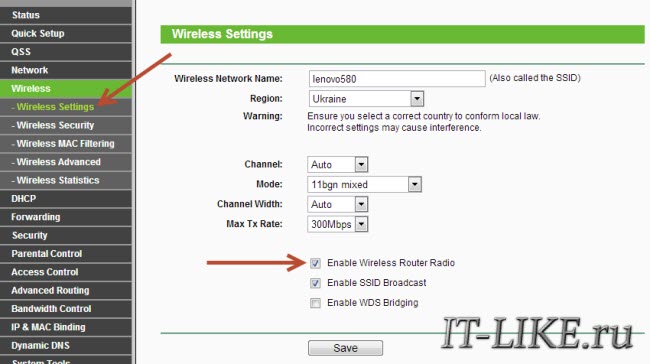
All settings have been described above. For Wi-Fi to work, the checkbox must be checked. "Enable Wireless Router Radio".
Next point, here we enable encryption, that is, we set up security as already mentioned above:
The router setup is complete! I advise you to save all parameters from the menu "System Tools -> Backup & Restore". Button “Backup” - saves, “Restore” - restores from a saved file. This will be useful in case everything suddenly goes to hell and all settings are lost. You can easily restore them from a file
Oh yes, I almost forgot, change the default password for logging into the admin area. This is done in the section “System tools -> Password”.
In Windows 8/10, you need to click on the icon at the bottom of the screen:

A panel will appear on the right where you need to select the desired wireless network. Remember when we gave the name of the network in English? This is where you need to find it. If this is a public institution and you don’t know which network to connect to, then choose any one with a higher signal level. When you hover over a network, a hint appears whether a password is required or not. If, when you hover, you see something like WPA/WPA2, this means that you need a password to connect to the Wi-Fi network.

You can leave the “Connect automatically” checkbox. Next, the system will connect to the router and ask for the Wi-Fi password that we set earlier. If your device supports QSS technology, then you don’t have to enter a password, but simply press the button on the router labeled “QSS”. In this case, the password will be filled in without our participation!

When the system asks about file sharing, I advise you to select “No, do not enable sharing” if you do not know why it is needed:

I made a short video tutorial on how to do this:
In Windows 7, everything is the same, only the icon and the window with found networks look “Semerovsky”

Here you also find the desired connection, click on it and voila.
First, check whether the wireless module is turned on using the switch on the laptop body. Many Asus, Toshiba, Sony and Acer models have this switch. On some laptops, wifi can be activated using hot buttons, for example “Fn+F2” (look for the antenna icon on the F1-F12 buttons). In any case, the method works through the “Network Control Center”, the same way when we “turned on” the network interface to connect to the router via wire.
In more severe cases, please study.
I hope everything worked out for you! Most likely, questions will arise regarding setting up the router, because... The interface and parameter names are different for everyone. To receive an answer in the comments, immediately send a link to a screenshot of the window.
According to my observations, few of those who were able to independently connect wifi router, if there wired Internet, knew how to do it RIGHT. That is, use it to set up a wireless network and integrate it into it different devices. As a result, they subsequently encounter difficulties that could have been solved at the local network design stage.
Before you start step by step description regarding connecting a Wi-Fi router, I want to draw your attention to one point.
To create a full-fledged local wireless network, you need to buy a device such as a ROUTER, or also called a ROUTER.
The fact is that there are a lot of devices that are similar in appearance and functionality. for various purposes. For example, out of ignorance it is easy to confuse it with a wired router without WiFi, which also distributes the Internet signal to devices. But only with the help of cables - it does not have an antenna.
Another device similar in design appearance- access point. In general, her tasks are slightly different from ours. A characteristic difference between a router and an access point is the presence of several outlets for network cables. While at the point there is usually only one.
The point of connecting a router is that it is now it, and not your PC, that will connect to the Internet via cable. To do this, all the necessary parameters required to connect to the provider, which were once applied in your desktop computer, will now be registered in the router settings. And all other devices will already receive Internet via wifi from it and according to the rules that will be specified in it.
For clarity, look at the diagram:

In order to connect a router at home and set up a Wi-Fi network, I used a dozen models from completely different manufacturers. I can say with confidence that in terms of the configuration itself WiFi router and connection to the provider, the difference between them lies only in the details of the graphic design of the admin panel. Therefore, having mastered the principle once on one model, you can apply them to others. Today, as an example, I will illustrate with screenshots from two routers - TrendNet TEW-632BRP and ASUS WL-520GC.

The first setting we will look at is setting up a DHCP server.
If previously there was only one computer and it alone received an IP address from the provider, then we can connect many computers and gadgets to the router. This means that it is the router, instead of the computer, that will “communicate” with the provider’s equipment. And within the framework of our home network between these devices, it will itself assign an internal IP address to each computer, laptop, phone, TV and everything else.
Procedure:

I also want to note that it is better to connect the router to the network through an uninterruptible power supply. I had an unpleasant experience when good device from Netgear faltered due to a power surge in the network. It simply began broadcasting wifi not at 100, but at 2 meters. Of course, I had to buy a new one.

For Windows XP: Start > Control Panel > Switch to classic look> Network connections".
In Windows 7: “Start > Control Panel > Network and Internet > Network and Sharing Center > Manage network connections > Change adapter settings.”
In the screenshot I go to settings " Wireless connection", but you don’t have it yet, and since we connected the computer to the router with a cable, you need to select the “Local Area Connection” item:

If you have something indicated here, then write down this data on a piece of paper. This is especially true for those who have lost their contract for the provision of services and do not know the data for connecting to the World Wide Web. For a certain type of connection, which will be discussed below, this may be useful. After this, here, in the network connection settings on your computer, you need to set the IP, gateway and DNS to automatic. We will already enter these parameters in the wireless router itself.

This is what it looked like on Trendnet (highlighted in red):

And here it is in ASUS:

Now we will set the parameters for our wifi network at home - IP and router mask. For Trendnet this is the same item (see Figure 1, highlighted in green), for Asus - the WAN & LAN section - at the very bottom of the settings page. In the first case I set IP 192.168.10.1, in the second - 192.168.1.1. This is the address within the local network at which we can access the admin panel through a browser. And through which computers will access the Internet. Mask - default, 255.255.255.0
These were all the flowers, now the most interesting part is setting up the external connection of the router to the Internet.
There are several types depending on the provider settings. This happens in the WAN menu.

There are several other options for connecting to the provider’s equipment, but I didn’t come across them. Therefore, I will not talk about them for now.
If you did everything correctly and saved all the settings, then all devices that support wifi should now see the new network with the name you specified. However, this is the question of how to connect wifi at home, not closed yet. home network wifi turned out to be open, that is, anyone can use your Internet access for free. In order to ruin everyone and make the wifi network at home accessible only to its owner, you need to protect the wireless network.
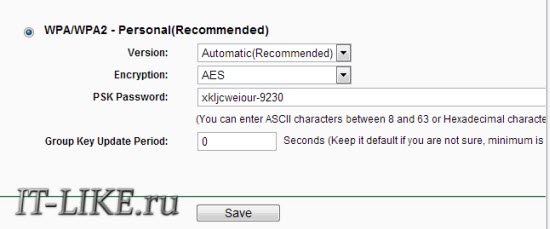
There are several methods, I have used two in my practice: WPE (or Shared Key) and WPA. The latter is more reliable, so I'll consider it. Go to security settings. In Trendnet this is the “Security” menu item, in Asus it is “Wireless > Interface”.
Select WPE or WPA Personal (PSK, TKIP) from the menu and set a password for authorization - from 7 to 64 characters. And we save. I show you how it was for me:


Well, now to access the Internet through your router, you need to enter a password. The final touch remains - so that there are no problems with connecting various devices to the router and with the operation of programs, we will manually set the DNS server. Setting this parameter is located in the same place where you entered the parameters for connecting to the Internet. We activate the function of manually assigning DNS servers and enter the IP from Google there:
You can also specify one of the Yandex servers (for example 77.88.8.8).

As you can see, connecting wifi through a router and making a wifi network at home is quite easy. I hope everything works out for you too!
Now for the traditional video for dessert on connecting a router, which will tell you even more clearly about the typical settings for working with the network.


