Our company strives to minimize construction costs, which do not affect the quality of construction. We cut SIP panels and lumber at the customer’s site. This significantly reduces costs and the estimated cost of building a house. The option of assembling a house kit is also possible, but it will be significantly more expensive. You don’t have to worry about the cleanliness of the area. We cut materials under a canopy. We collect waste in bags. The building material is covered with an awning from precipitation.
|
|
 |
 |
 |
 |
 |
 |
 |
 |
 |
 |
 |
 |
The walls are assembled using the tongue-and-groove principle. Grooves are made in SIP panels by cutting out polystyrene foam. After applying the foam, a connecting antiseptic beam is inserted into them, which is secured with self-tapping screws. At this stage, it is very important to measure the horizontal and vertical position of the parts with a building level.
 |
 |
 |
 |
 |
 |
It is advisable to make frame walls that are not load-bearing. Utilities can be hidden in the frame, which is also an undeniable advantage.
.JPG) |
|
 |

 |
 |
 |
 |
 |
 |
Dormer windows have their own specific technical characteristics, since they are located at an angle to the ground level.
Attic windows are made of plastic or wood. They can be installed both at the stage of roof installation and on the finished roof.
In 1964, my husband and I came to Russia to the Volgograd region from Kazakhstan, where my husband, a driver, had gone to explore virgin lands in 1951. The climate there, in the Pavlodar region, is harsh, + 40 degrees in summer. In winter - 40. 12 km from the Irtysh there is bare steppe all around, not a bush, not a tree.
We lived near the regional center on the outskirts of a large village near a motor depot. There wasn't even fresh water there. They brought them once a day in tanks from the Irtysh, sometimes even with fish. You can fill three or four buckets for the whole day and do as you please. Of course, there was no time for a garden.
The settlement was large, close to the city, a commuter train went to Pavlodar three times, there were three schools in the village, two clubs, a good bakery, a hospital, a pharmacy, a rich library where I worked. But the nature is poor, plain, salt marshes, salt lakes. Sandstorms.
In the spring, the Irtysh flooded, and the water reached the outskirts of our 7th village.
And my childhood passed in Mordovia, in the village. Atyashevo. There is greenery all around, forest, berries, nuts, springs with wonderful water coming out of the ground.
And so, when my daughter finished fourth grade, she really wanted to live among the greenery, to have her own garden. We left the state-owned two-room apartment and in 1964, having visited the Urals and the north of the country, we finally stopped in the Volgograd region in the then small regional center of Surovikino, which later became a city.
Before leaving, we sold a motorcycle and some household items, and with these funds we began to build our house. We bought a frame on credit - posts, window frames, door jambs and doors, on credit for two years, the rest was bought from my husband's salary - 90 rubles. He was disabled during the Great Patriotic War due to injury, I was in the second group due to illness and did not work. We spent the winter in a private apartment, and in the summer we moved to our own site and lived in a trailer there.
The two of us poured the foundation of the house, which was small by today’s standards, six by seven meters, but there was enough space for the three of us. The street was new, the neighbors were also building, and in difficult cases they came to each other’s aid.
They put up a frame and covered the walls with wood. They filled them with slats and coated the house inside and out with clay. I had to learn how to work with a hammer, and smear walls, and plaster. My daughter was twelve, and she also helped to knead the clay, carry water, and even collect horse “apples” for the interior plaster of the walls.
The main work, of course, went to the head of the family, my beloved husband Pavel.
From the foundation to the roof, he did everything with his own hands conscientiously. I watched how people worked, learned, and then built them myself. So, for example, it happened with the stove. For the first time in his life, he laid it, remade it several times, but by winter the stove of his work was already warming us.
At the end of August we had to move to a new house. In one room they laid the floor and put glass in the window, and they settled in, continuing work until the cold weather.
They lived very poorly, only buying the most necessary things for themselves. Everything went to construction. The food was poor, black bread cost 14 kopecks, dry milk (there was a dairy plant in Surovikino; they sold burnt milk at a reduced price). Sugar was a luxury. The entire salary was spent on construction, one month was spent on cement, the other on glass, nails, slate, brick.
It was still cool in the fall, I caught a cold, got sick again, and had to take a long time to get injections. Although treatment was free back then, there were no large expenses.
But they still built the house in one summer without any financial help and spent the winter in it.
The daughter studied well, was an activist at school, the school gave her a free ticket to the Artek pioneer camp, even though she visited the Black Sea.
My husband had an elementary education, two grades, the third was a corridor, that’s what he said about himself, but he knew how to do any job. He installed the glass himself, sawed it himself, planed it himself, and did the electrical wiring in the house himself. Gradually he brought water into the house, made a drain, then a cellar, and courtyard buildings. I planted a garden, planted a vegetable garden - the dream of owning my own farm came true. For twenty years later, my husband and I lived in our house, where everything was made with our own hands and therefore very expensive. And then in 1986 he died, and I was left alone.
I had to sell my house and move to my daughter in the Saratov region.
According to the author. Our young family built this house for 3.5 years, and our parents on both sides and my husband’s brother helped us. At first they built on weekends and vacations, and after that they happily devoted almost all their free time to it. And although it was not easy, I remember these moments with such warmth! All stages were captured - as a result, today we have more than 1800 photographs and a wealth of experience behind us. But first things first.

By a happy coincidence, around 2000, my husband’s parents got tired of traveling to their dacha 60 km from Minsk, and 20 acres of land were then sold (just think!) for $300. A new plot was found 3 km from Minsk - 6 acres of dacha land with a small shed cost $800.

At that time, the intended purpose of this land was clearly a vegetable garden, but life made its own adjustments. My husband and I met at the university and after a couple of years of close relationship we started thinking about the housing issue: a job placement with the opportunity to move to different parts of the country was hanging in the balance. Therefore, we decided to take root next to our parents. Our families could not afford to buy an apartment, and besides, we also had to think about solving this issue for my husband’s brother. Then the idea of building my own house was born. I really liked the idea, because I myself grew up in a private house and was well aware of its advantages over a city apartment.
We were aware that everything would not be easy at all, but we did not deviate from our plans. Having found out that the previously introduced restrictions on the area and configuration of the garden house no longer apply, we started with the project. By the way, the Internet helped us in everything, where there were answers to any questions, which allowed us, who were not related to construction, to still get down to business on our own.
The sketch of the house was developed in the 3Dhome program. The box was designed to be rectangular (the best in terms of price/quality) and divided into 2 halves (our family and my husband’s brother’s family). Then we turned to one of the architectural firms, where for a small amount (we’ll write about the financial side in more detail at the very end) our drawing was implemented into a multi-page project (however, it still had to be finalized later); a separate pile of documentation was the design of utility networks.
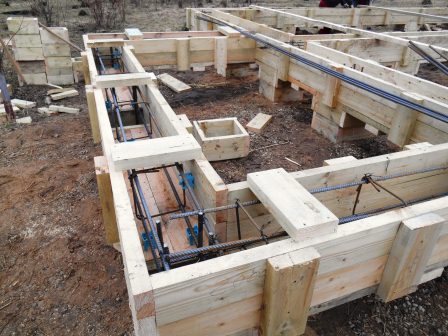
In the fall of 2008, preparations began - the fertile layer of soil was removed, the foundation (12.8 × 7.6 m) was marked, and a trench was dug for it using a small excavator.

True, the next day it rained heavily, and everything collapsed... There were even thoughts about stopping work until spring (they say it was a bad omen). However, we decided to try again. I’ll say right away that that unfortunate rain became the biggest problem during the entire construction period.
The second time (we dug by hand, with shovels, standing chest-deep in a trench) turned out to be more successful. The final depth of the trench was 150 cm; the foundation rose 1 m above ground level at the lowest point of the site (a total of 51 m³ of concrete was used).

The pillow and reinforcement were made in accordance with the project. We made it just in time for the first snow. During the thaw, they dug a basement (3.5 × 5 × 2.2 m) under one of the future kitchens - and froze until spring.

In March 2009, having already missed construction, they began to make formwork for the ceiling between the basement and the future room, and soon they filled it (18 cm thick). Thus, the foundation for the load-bearing walls was ready.


Next stage. 75 m³ of gas silicate blocks 40 cm thick were brought, which with our hands, under the strict guidance of a familiar mason, were slowly transformed into walls. We made the lintels above the windows ourselves (by pouring a reinforced strip of concrete into a cut groove along the upper edge of the blocks placed close together), and we made a reinforced concrete belt between the floors.

The foundation for the partitions was made shallow. Here we made a mistake - we did not take into account the clayiness of the soil and did not backfill with sand, as a result of which in the first winter frost heaving lifted the partitions, and they, being in places tied to the load-bearing block walls, developed cracks at the joints. Which, however, did not happen again, since the next winter the house was already heated. The ceiling between the floors was made of wood - beams 200 × 100 per edge every 80 cm.

Then the second floor began, and behind it the gables. We were afraid to tackle the roof ourselves and turned to specialists, who completed it in 2 weeks and $2120.


They laid vapor and waterproofing films, insulation (between the 2nd floor and the attic), and left a manhole. The roof covering is metal tiles (roof area 140 sq. m, the most affordable configuration is gable).


We decided to make the partitions on the second floor plasterboard, and taking into account the prices of the profile, we replaced it with wooden blocks, sawn from inherited boards.


With the arrival of spring, we ordered windows (double-glazed windows 6-4-4 for sound insulation, since there is a railway nearby), finished the wiring and built the frame of the future stairs to the second floor - welded from a metal square and a corner. To give it a comfortable climbing angle, the staircase was designed so that it “cut off” part of the bathroom.


They started working on the attic only in May, which, frankly speaking, was very inconvenient - even at 20 degrees outside in sunny May weather, in the attic you feel like you’re in a steam room! We covered the floor with a board with a selected quarter - we even bought a machine for this (in the expectation that we would also process the boards for the finished floor in the house). But here we clearly overestimated the capabilities of a household woodworking machine.

By this time, we had graduated from the university and, upon moving out of the dormitory, we happily moved into a growing house - work immediately became more fun. At this point the first stage was completed, and we moved on to finishing: finishing screed, plastering of brick walls inside along beacons, gas silicate walls - without beacons, plaster outside (a total of 220 25-kilogram bags of plaster mortar were used!), plasterboard ceilings on wooden profiles... Here it must be said that July 2010 beat everything temperature records, and it was possible to work in accordance with the conditions indicated on the packaging of the plaster solution (not higher than +25ºС) only in the morning and evening.


Using a folding attic ladder system we spotted in hardware stores, we tried to do something similar - it turned out quite well! The lock was replaced with a clip of magnets for cabinets: smooth opening is ensured by several door springs. Folding into three, the ladder fits perfectly into the manhole space, covered from below with an insulated lid.

Then we took up the internal plumbing and heating system from a double-circuit boiler with an open combustion chamber with a capacity of 25 kW (by the way, during the last heating period, 150 sq. m “ate” 2830 m³ of gas). Gas was supplied to the site two years ago. When it came to introducing it into the house, it turned out that supplying gas underground required expensive design work, “introducing a new point,” etc. It turned out to be much easier to conduct it by air, on supports. Moreover, plans for the construction of a garage in the future were taken into account (and the location of the foundations, according to the standards, should be no closer than 2 m from underground gas pipelines). That's what we did.


After the main interior work, we returned to the street again: we lined the roof with soffit, insulated the foundation, plastered it, built a carport and fenced off the future tiled area (blind area).


We worked inside throughout the late fall, winter, and early spring of 2011. The ceilings, as already written, were made of plasterboard. True, we slightly shortened the scheme for its finishing: only the seams were filled with putty after gluing them with sickle and the places where the screws were screwed in, and the sheet of drywall itself was only painted.

And then the fun began - the house had to be filled with colors and gain individuality. The wallpaper was bought from Belarusian paper with the expectation that it would soon be painted anyway, and the variety of patterns and colors was pleasing - there was plenty to choose from.
The bedroom was designed in African motifs (we dream of visiting Kenya!). We made the bed with our own hands so that it was both wide and not very high, and there were drawers under it (we couldn’t find one like this in stores with a reasonable price).

The footprints of a large cat were depicted on the floor under the varnish and stain.

There will definitely be paintings hanging above the bed, someday brought from Africa itself!

The lamps for the bedroom and corridors were made from fabric and a wooden frame, as well as from threads passed through glue onto an inflated balloon.


It’s interesting that we glued the ceiling skirting boards to styrofoam, which, according to the instructions, should have set in 10 minutes. But for some reason they fell off - we had to temporarily prop them up with floor skirting boards.

We hung the curtain rods, chose fabric for the curtains, which we simply processed on a sewing machine. And the side holders were made of thick wire bent to 2/3 of the circumference, coated with gold paint. The cornices in the hallway are made from ordinary dried sticks, covered with stain and varnish.


In the gap between the wall and the ventilation shaft, shelves were installed from the remnants of chipboard after assembling the wardrobe.

After preliminary leveling, the floor in the kitchen was covered with linoleum, which we have never regretted. The table was made from a piece of chipboard, always with rounded edges. We glued a decorative film on top and wrapped the whole thing around the perimeter with a furniture PVC profile.


Then it was the turn of the tiles.


At the same time, the staircase was finished: the remains of the floorboard were used for the steps. The space under the stairs was covered with plasterboard - it turned out to be a mini-wardrobe. The railings were sawn from wooden blocks; we couldn’t resist buying balusters to start and complete the railing.
Having arrived on our land and erected a tent, we began to look for options for building a house. We didn’t want to build it ourselves - it was too difficult, it would take a long time and there was a lot to know, so we looked for specially trained people in newspapers, the Internet and among our neighbors. We talked with potential performers by phone and took notes on everything.
We found out that builders charge 50-70% of the cost of the material for the work, and the cheapest house they will build for us will cost 350 thousand rubles. The verbal description of this house did not suit us. Already roughly understanding how a frame house is structured, my wife and I drew its approximate plan - it should be a one-and-a-half-story house 6x4m (the second floor is only for the bedroom), with an open veranda and a flat roof made of metal tiles. The layout is something like this:

We calculated its approximate cost and terms - it turned out to be about 250 thousand and two months with part-time work. But none of us had construction experience, so we decided to try to build a barn, and if we could, take on the house, and only involve helpers in those jobs that we couldn’t handle ourselves.
The barn was successfully built.
The boards for the house were brought to us about a week after we finished with the barn (we had already left for St. Petersburg). Basically this is 150x150 timber for the frame, 150x100 for the floor and 100x50 for everything else.

All this was sawed into the necessary details and signed. I cut the ends of the timber with a chainsaw borrowed from a neighbor. It didn't work out perfectly, but it doesn't have to.

The foundation was already ready at this point.

One beam 150x150 weighs approximately 113 kg. I could lift only one end, but not the whole thing, so I had to involve a neighbor to carry it (they unloaded the boards without us, anywhere - next to the barn, a hundred meters from the place where the house was built). I folded the bottom harness quite quickly.

My wife made sure I didn’t die of hunger: there was always a bowl of fresh vegetables nearby.

A 150×150 beam was used as corner posts, but its length was only 3 m, so it was not difficult to lift it alone.

At the corners, all this is fastened with reinforced metal corners and 50mm screws.

The vertical posts were leveled with a bubble level and fixed with temporary bevels.

A 6-meter beam was lifted up together with a neighbor, one piece at a time: one stood on the barrel, one remained on the ground - they lifted one end, put it on the desired stand, then raised the second in approximately the same way. It was impossible to reach the second end from the ground without a barrel - you had to push it with a long stick. The beam was heavy and wide, and without any fasteners it calmly rested on one end while we lifted the other. Once the beam jumped out of my hands and ran tangentially along my back. The neighbors were horrified, although in reality there was nothing like that, there was no strong blow, there wasn’t even a graze.
In general, it was difficult, but we managed it in a few hours. There are no photographs of this process, but here is the result:

Only on the last beam I figured out how to do it alone: using reinforced corners as shelves, I raised the ends one by one by about a meter. He picked it up quite quickly (in the photo he is still about halfway up).

Inside the walls there are racks made of 100×50 boards with a pitch of about 60cm (the width of the insulation boards we chose).

For ease of work, the floor of the veranda was folded (but not twisted).

After 8 days the frame was ready.

The main weak point of the barn was the floor: it was noticeably springy, the cups on the table clinking especially noticeably. And although it can withstand a normal load (6 adults and all our things were loaded), the feeling is unpleasant. Therefore, this time we approached the floor very thoroughly: 150×100 timber was used as joists (beams on which the floor is placed).

According to the plan, the roof should be 7.82 m long, and all the boards should be 6 m, so the ridge board had to be assembled from several 100x50. It stands on four one and a half meter fragments of 100×100 timber, which rest against the upper frame.

The main part of the rafters (beams on which the roof is placed) was attached simply. The angle is 26.56°, the same as in the barn.

It was more difficult to attach something that was hanging in the air without the necessary ladder.

The frame is ready. The metal tiles just arrived.

The warm walls and roof from the outside are covered with a special wind- and moisture-proof film.

This film is sold in rolls at any hardware store.

The sheathing was attached to the rafters with a step corresponding to the step of the metal tile pattern (in the barn I did not take this into account, so some sheets were not fully attached). The sheathing is needed only to attach the roof to it; it does not perform any other function.

For the lathing, an “inch” was used - a 100x25mm board. We ordered all the boards at once, but delivered them in parts. We waited a long time for the “Thumbelt”, but we couldn’t wait and dismantled the barn, which was sheathed with just such a board.

Initially, we thought of calling roofers, but the neighbor convinced us that there was nothing complicated and he would help if necessary. The main surprise was that these tiles should be laid from left to right, and not from right to left, as we were told at the store the first time.

The tiles are slippery and walking on them without insurance is risky. The roof ladder I tried to assemble turned out to be very heavy, so I used a clothesline as a safety net.

I checked the rope on the ground - it easily supported my weight. It is quite thin, so hanging on it would be unpleasant, but this was not planned: it was always taut, that is, it constantly held me, preventing me from losing my balance and falling, and did not catch me if I fell.
The end of the rope was attached either to the ridge or to the sheathing.

The tiles are quite strong, a screw cannot simply be screwed into them - you have to punch a hole. To do this I used a hammer and one of the long screws.

When the roof was finished, it was possible to begin covering the walls and floor. The whole house was wrapped in the same windproof film:

By this time, we had already installed plastic windows. We have a large window on the veranda, 2×1.76m:

On the outside, a counter-batten made of “inches” is nailed to the frame and uprights. This creates a ventilation gap between the insulation and the outer skin to better remove excess moisture.

The sheathing is attached to this sheathing, in our case - imitation timber (something like lining, only larger).

I secured the casing with screws to prevent it from cracking - I pre-drilled holes.

By the way, the imitation timber should not be fastened end-to-end, but a gap of 1-1.5 mm should be left between the rows, otherwise with high humidity (during the rainy season) the board will swell, expand and begin to bend, tear off the screw heads and swell with waves. That’s what happened to us, we had to redo it.

The floor was assembled at the same time as the walls. To attach the subfloor, 30x30mm slats were nailed to the very bottom of the joists.

Pieces of moisture-resistant OSB board (like plywood) of the required size were placed on these slats.

The resulting insulation containers were waterproofed, and the film was secured to the wood with a stapler.

For the floor we used a denser film, which does not let anything through at all.

Then the insulation was laid - mineral wool (Isover).

The floor was covered with film on top for internal use.

Then the sheathing was laid, creating ventilation gaps, on which a tongue-and-groove board floor (35mm) was then laid.

By this point, we have a sheathed frame with windows and doors, that is, an almost finished house, just not fully insulated.

My wife did the insulation of the walls; it took several days. The technology is the same: first, insulation is laid, then the wall is covered with a vapor barrier film.

For heating, we bought a Bavaria fireplace stove. It weighs about 100 kg, it took two people to drag it, using handles screwed to the pallet.

The stove was installed before sheathing the inside of the house (the chimney must be routed through the roof, which should not be covered at this point). They placed it on a sheet of glass-magnesite so that the floor would not burn.

I cut a hole in the roof for the chimney using a grinder.

The chimney was brought out through this hole. At the point of passage through the roof (and insulation) a sandwich (double pipe with a heat insulator) is used to prevent the roof from catching fire; in other places - where there is no direct contact with flammable materials - a simple pipe dissipates additional heat. The stove could now be used, which was immediately tested.

I put a heat-resistant rubber piece called “Master Flash” on top of the pipe, and sealed the seams with bitumen sealant.

The walls inside were covered with clapboard. It seems nothing complicated, but I missed one point: the lining was nailed to the intermediate posts of the frame (10cm wide), but it was also necessary to nail 10cm wide bars to the corner posts (15cm wide) so that the ends of the lining would not hang in the air. This was not done, so the ends ended up hanging.

The solution was found to be simple: 3x3cm slats were screwed to the protruding corner of the beam, to which the lining was then pulled. It turned out quite durable and a little decorative.

By this time it had already gotten colder, and we moved into the house, despite the fact that the walls inside had not yet been lined. From the remains of a floorboard, I assembled a wide window sill on which you can sit and lie. You can still store something under it - the house is small, so we will make good use of all possible space.

Soon we installed an electric cable from a neighbor. I installed a meter in the future vestibule and distributed electricity throughout the house using extension cords.

The free space of the first floor is divided in half by a shelving unit, which at the same time supports the upper flooring on which we sleep.

That, in general, is all. We still need to finish a few things outside (sew up the corners), inside (fence off the vestibule, make a kitchen and some furniture), but overall, the house is ready, we live in it and are already spending the winter, because... It's already frosty at night.

We have a bedroom on the second floor. Useful area - 2x3m, another meter under the roof itself (pictured on the right) can be used as niches for storing all kinds of bedding (we will sew it up or make drawers).

On the opposite side there is the same compartment, still empty; in the future there will be a water tank, a pump and a storage room. The boards between them are for now for quick movement (they were made for guests); there shouldn't be any, only the stairs will remain. Below there is a vestibule and a future combined bathroom, which is now replaced by a warehouse. We haven't had time to install doors and partitions yet.

The living compartment is almost complete. A bench was made from the remains of a floorboard, on which chair cushions were placed (the neighbors gave it away). For now we are using a folding table. There is already enough space to properly accommodate guests, serve tea and treat them to the Internet.

For now we are using a camp kitchen, later we will have a homemade one. The window sill and the table next to it are another convenient place to sit with a laptop.

The veranda will be open. In the summer there will be an outdoor table and something else on it, in the spring we will paint the house (presumably rosewood). In winter, on the veranda, most likely, there will be only firewood and a grill on which we sometimes fry toast. Under the roof you can see lanterns that illuminate the veranda, and a spotlight that illuminates the path to the house. To the left of the house there is a staircase attached to reach the roof, and a directional 3G antenna is attached to it, giving us the Internet.

So we built a one-and-a-half-story house with a living area of 6x4m and a veranda of 6x2m. It could have been made more thorough and warmer, but we deliberately did not complicate it: we plan to live in this house for a year or two, then we will build a more spacious one (with room for children), and this house will become a guest house. They will rarely live in it, most of the time it will be idle, so they did not spend money on additional insulation (15 cm instead of the current 10, as the neighbors advised) - they decided that it would be more expedient to heat it more actively these two winters.
We have already received guests from Moscow, we are waiting for new ones.
All this cost us about 250 thousand rubles. Approximate estimate:


