Trees, bushes and flower beds can be crafted different ways. We will tell you about one of them.
This option is the simplest and therefore more often used. Trees are made from stranded copper wire.
The thickness of the wire must be selected so that it matches the thickness of the trunk of future trees.
The next step is to separate the wire into separate branches.
Next, you need to take a suitable piece of polystyrene foam and paint them brown (or any other color, depending on the task).
It will be good if you fix the paint with a layer of varnish, you can even use simple hairspray.

After the paint has dried, you need to coat it with glue. You can use Uranium, Cosmofen, PVA or any other. with whom you have already worked. Here you need to take into account the drying speed of a particular glue.
You can buy foliage for covering trees or shrubs or make it yourself.
You can make your own foliage from an ordinary sponge. To do this, you need to paint the sponge in different shades of green. To make the foliage look natural, you need to paint it chaotically and haphazardly. When painting, water-soluble paints are used.

When the paint dries, you can knead the sponge with your hands, or even in a blender. The main thing is not to overdo it and not grind it into dust.
Now all that remains is to coat the trunks of trees and shrubs with glue and sprinkle with the prepared foliage.

If we want to show autumn, we color our foliage in more red and yellow tones. If we are making a winter layout, we can glue cotton wool and also sprinkle it with soda or semolina.
The article was prepared by the center’s specialists
Trial lesson on layout http://bestmaket3.ru/ochnoe-obuchenie...
In this video we will show you how to make trees, bushes and flower beds for your layout. There are several options for making bushes and trees, which are mastered by the guys undergoing training in the prototyping studio. The simplest, and therefore often used, is the production of trees from stranded copper wire. The thickness of the wire, that is, the cross-section, is selected according to the thickness of the trunk of the trees depicted.
Then the wire splits into separate branches. Then, on a suitable piece of foam plastic, this could be a piece of plasticine fixed to something, into which we inserted the trunks of trees and bushes, we paint them in brown colors.
It is advisable to seal the paint with a layer of varnish. Even simple hairspray will do. Next, the branches are coated with glue. Any one you've already worked with will do. It could be Uranus, Cosmofen, or PVA. You just need to take into account the drying speed of this or that glue.
The foliage used for gluing trees and shrubs can be either purchased, from ready-made kits, or homemade.
For homemade, a regular sponge works well. It is painted in various tones of green shades quite chaotically and randomly.
After drying, knead the sponge either with your hands, or in a blender until it becomes small pieces, but not into dust. Then the trunks of trees and shrubs, coated with glue, are sprinkled with finished foliage.
If fall foliage is desired, more yellows and reds are added to the paint. Making models with your own hands is an interesting and creative process. Watch our lessons, take a full video course or an intensive course and you will succeed! http://bestmaket3.ru/
Layout lessons. Making trees, bushes, flower beds -
Hello dear craftswomen! Today I present to you how to make tree models with your own hands. I never thought that I would have to do this. The fact is that such trees were ordered for me by my dad, who makes models of Temples and churches. I promised to promise, but I don’t know how to do it! But the promise is made - it must be fulfilled. I found the video and got to work. The video on which I made my trees can be viewed here - http://yandex.ru/video/search?filmId=1IwlFm7AUXI&text=%D0%BC%D0%B0%D0%BA... . I decided to show you how I made them, especially since very often either at school or in kindergarten They ask you to make some kind of craft on a particular topic, and then my MK and the author’s video will certainly help you in this matter.
I got this tree and a few more. I’ll be honest: I didn’t think that making trees would be so exciting. Dad asked for two trees, I got carried away and made 4.

For work we will need: fine wire, a sponge for washing dishes or ordinary foam rubber, any lid or cardboard on which we will wind our wire, pliers that are usually used in beading and green paint different shades.

We wind the wire around the lid. For one tree, approximately 8-10 m high, one coil is enough. But if you want a thicker trunk and a more branchy tree, then you can use more wire. Having wound the wire in this way, cut it at one end.


Let's straighten it out.

Below we leave a centimeter and a half - two for the roots. They will continue to serve as a stand for our tree.


At the bottom we straightened the roots, twisting several wires into one. Next, we begin to form our crown, starting with the lower branches. To do this, separate 6-7 wires from the clouds and twist them in a spiral until about halfway. Next, we divide our wires in half and continue to twist them separately.


Then on each branch we leave one alone, and then twist two at a time. This is how it is shown in the photo.

Using the same principle, we make 3-4 more lower branches.

So that the branches of the second tier do not come into contact with the branches of the lower tier, we scroll the trunk up a little more.

We make a second tier of branches, scroll the trunk again and form the top in the same way as we did the rest of the branches. This is what we should get.

And this is the skeleton of the future birch tree.


Here is our tree completely covered with PVA glue (as if covered with snow. We leave our tree until completely dry, for about 2-3 hours. As soon as our tree is completely dry, we begin to paint it. Unfortunately, I didn’t take a photo of the painting process, but you can see it in the video. There is nothing complicated here. We paint the trunk and branches either with brown acrylic, or, if it is a birch, with light gray with black dots.

Next we paint our future crown. For this purpose, I took a dishwashing sponge and plain white foam. I poured some water into a bowl and added some acrylic paint different shades. I squashed it in water so that the sponge colored evenly.

She wet the sponge again and, without squeezing it out, began applying paint to the sponge with a brush: first with one shade, then with another, then with a third. It is enough to apply a little paint on one side.

And then just squeeze it in your hand, putting a glove or plastic on your hand. The sponge, as you can see, is colored unevenly, which is what we need. Since the sponge was yellow, it gave us an extra shade of yellow. This is what we got.

We squeeze out excess water from our sponge and place it on the battery until completely dry.

And this shade was obtained by dyeing ordinary white foam rubber. As you can see, this one is greener. The first, lighter sponge was used as foliage for the birch tree.


dipped in crumbs. And so on every branch. Then she let it dry, shook off what didn’t stick. Then she applied glue to the branches again, but not with a brush, but simply dripped drops from the bottle and added little by little crumbs and again until completely dry. And so on several times. This is of course more troublesome, so it is better to do as the author advises.
For making wood you will need the following tools and components:
a) a piece of copper stranded power wire, 200-250 mm long, the more wire there is, the better. Optimal diameter beam 5-8 mm.
b) a wallpaper knife or scalpel, or a blade for removing insulation from a wire,
c) tweezers, to give the desired shape to the formed branches,
d) scissors, for cutting branches to the required length,
e) paints, nitro varnish, hairspray, brush, small sawdust, foam crumb powder, photo or drawing of a type of tree.
Stripped of isolation stranded power wire. Too much long length should not be used, as it will be difficult to work with, and the excess will simply go to waste!
Stepping back from one of the edges 20-30 mm, we wind the coil to the coil there will be a root system a 3-5 mm wire, here we have it, and this lock is needed so that the future barrel does not unwind.
Holding the end of the wire at the level of the latch with the fingers of one hand, with the other hand twist the wire along the axis . This is done to stiffen the trunk.
Depending on the type of tree chosen, we begin to form branches by bending 6-8 wires to the side and immediately twisting them, as we did with the trunk. At the level of the first, lower branches, it is advisable to install another wire bandage, as we did at the root. No more bandages should be installed.
Bending back required quantity future branches, make 1-2 turns of the trunk along the axis. Thereby We fix the trunk and prepare a place for new branches.
As the wires move to the sides, the thickness of the trunk decreases, there is nothing terrible about this, and if more branches are needed, then simply insert pieces of wires either into the middle of the trunk, or into a bundle for a future branch, twisting 5-10 mm at the base of the trunk.
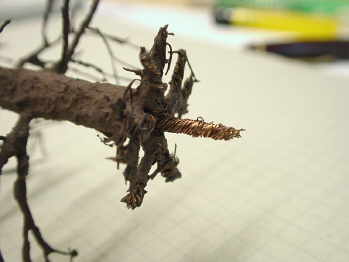
Thus, we have it turned out to be a shaggy “hedgehog” made of wire.
Now let's begin form the branches themselves, twisting the wires along their axis and moving them to the sides.
Periodically looking at the photo or a picture of a tree, or just one growing under a window, we decide on their size.
It should be remembered that fruit trees usually short, and representatives of forested areas and lonely standing trees usually tall.
Method changes in the angle of deflection of branches, using tweezers, you can shape the type of future tree . Willow, for example, has long branches and hang down in strands; oak branches extend from the trunk almost perpendicular to the trunk, just like spruce. Birch, depending on its type, can hang down like a willow.
Having finished forming the branches, let's move on to the root system. To do this, bend 2-4 wires from the wire bandage in all directions and twist them. If you need a central fastener, then simply twist 4-6 wires and do not trim them. With this pin, the tree is subsequently attached to the layout. And I myself root system cut in circles with scissors.

Now Let's move on to the length of the branches. Near the ground, and this is the first bottom row, they either almost touch the ground or do not reach it. I repeat, it all depends on the type of wood chosen! But the cutting of wire branches begins from the bottom, smoothly moving to the crown. Now the wire bands can be carefully removed from the trunk. They have already done their job and are no longer needed!
It takes about 15-20 minutes.
Next we move on to priming the wood frame. This is necessary to hide the metallic shine of the wires and ensure uniform coloring of the final color. It is better to use primer in an aerosol can, as it can be inconvenient to paint with a brush, and the layer turns out smoother.
Let the primed wood dry. Now let's apply final bark color. There is one subtlety here! If the bark of a smooth-bore tree is like that of willow, birch, poplar, rowan, or alder, then the final layer can be safely applied. And if the trunk is rough, like pine, oak, linden, then mix small sawdust with PVA glue or nitro varnish and apply it with a brush. visible part trunk and thick branches. Sawdust can be pre-painted in the desired tone. Sawdust can be replaced with gypsum, chalk, but diluted dry in nitro varnish or thick PVA.

Let the trunk dry again. And only after we have finished with the barrel, and are satisfied with its appearance, do we move on to tree landscaping.
Most the best option buy ready-made foam powder. But if you don’t have one, you can do it yourself! To do this, we take foam rubber and pass it several times through a regular meat grinder of the “organ organ” type; I don’t recommend using an electric one, the speeds are high, and the foam rubber can simply burn. You can simply use a brush-type attachment on a drill at low speeds, lightly touching the foam rubber to destroy the surface. Thus, we obtain deciduous material.
Let's move on to coloring of leaf material. It is better to use aniline dyes or gouache, or those that are diluted with water. Dry the leaves on newspaper, lightly squeezing out the lump. In an even layer, spreading on a flat surface.
Back to tree trunk. Apply a thin layer of nitro varnish, or tsaponlak, to the branches with a brush, and, without allowing it to dry, dip or sprinkle the branches with foam rubber powder. Not a lot of leaves will stick the first time! Let it dry, and use a brush to apply nitro varnish to bare areas, and sprinkle again.
We examine the tree from all sides, and where appearance There is not enough foliage, again we compensate for the shortcomings with nitro varnish and powder. There is no need to try to wet the foliage with varnish too much, it will be ugly! Let it stick, let it stick! We can add a portion of powder to the places we need and fix everything with hairspray. We spray varnish from a distance of 250-350 mm, constantly slowly twisting the wood. Before our eyes, the foliage seems to bloom on the tree, takes the desired shape and is fixed on the tree. It is better to use the cheapest hairspray, but with a strong hold.
Let the finished wood dry. You can, of course, leave it like this, but over time, under the influence of light and air humidity, hairspray loses its properties, and so that the tree does not lose its foliage, it is necessary cover it with nitro varnish from an aerosol can, as we did when working with hairspray.
Finished tree install on the layout. If it has a central fastening pin, drill a hole suitable diameter and fix it with glue, if it’s on the root system, just lubricate the lower part of the root with glue and install it on the model.
Better when making trees immediately make the required amount, and your hand gets busy, and operations are much easier and faster.