A plastic container is a universal material from which you can create many useful household items. In addition to their direct purpose - storing liquids - they make interesting and useful items, for example, brooms.
A broom is an item without which it is very difficult to imagine cleaning an apartment or cottage. You can do it yourself. All you need is a few hours of free time, plastic bottles and a little inspiration.
The main advantage is that creating such a broom does not require a lot of money. Therefore, this option is perfect for those who like to save money. All the necessary components are found in almost every home, which means that a trip to the store is not necessary. The set of tools is quite simple, and even children are allowed to work with them.
So, to create a broom you will need:

Once all the necessary elements are collected in one place, you need to get to work.
It doesn't take much time to make your own broom. It is enough to allocate a few hours of free time, and you may even be able to complete the work ahead of schedule. Therefore, in this matter everything is subjective.
The basic rule is to follow the instructions and not jump from step to step. The work must be done carefully and with special care, which will allow the item to prolong its operational capabilities. For convenience, there are step-by-step instructions. It will allow you to do everything quickly and efficiently.
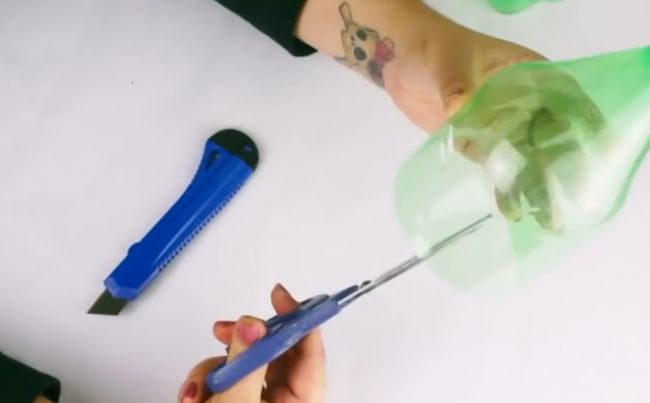
Important! The knife must be sharp and pre-sharpened. When working with it, it is imperative to observe safety precautions, especially if children are involved.
Important! The more blanks there are, the more magnificent and dense the broom’s bun will be. This will allow you to deal with contaminants more effectively.
The broom is ready to use.
There are probably few people on the planet who have never heard of plastic bottles. They store and sell a wide variety of products - from drinks to meat.
It is probably impossible to imagine your life without plastic, which is a product of the chemical industry.
Everyone knows how quickly empty containers for drinks, yoghurts and other food products accumulate. The use of plastic bottles for storing and distributing carbonated drinks, including beer, is especially popular, since such containers have excellent tightness, you can use such containers more than once, being confident that the liquid will not leak during transportation.
Another use of plastic bottles is the ability to make various types of crafts out of them, which not only young people, but also practical people are eager to come up with.
You may not believe it, but you can even make a raft out of them! Due to their volume and tightness, if properly positioned, they can easily keep the ship afloat, but it is better not to go on a round-the-world trip across the seas and oceans using this type of transport.
Even a week would not be enough to list all the types of crafts that can be made from plastic bottles, but we will talk about only one of them, which will certainly be very useful to people who have their own dacha or garden plot.
Now you will learn how to make a broom from plastic bottles.
To do this, you will only need to devote two hours of your time.
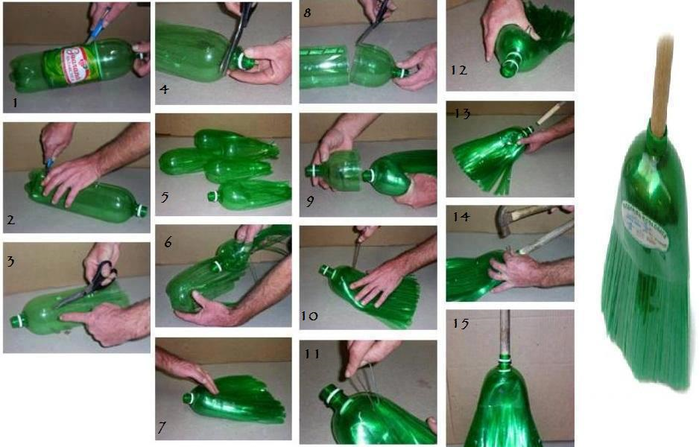
Take seventeen plastic bottles and cut off the bottom, then cut them lengthwise to make strips about half a centimeter wide. Leave approximately six centimeters to the neck.
Do the same with all the other bottles except the eighteenth.
Cut off the necks of sixteen of the already cut bottles and leave them on one.


Now on the container with the uncut neck you put the rest, whose necks have been cut off.


From the last, untouched bottle, cut off the top, stepping back approximately fifteen centimeters from the top, and put it on all the other bottles that have already been put on.


Using an awl, pierce all the bottles in two places and thread a piece of wire through them.


Twist the ends of the wire. Trim the tip of the stick, which is intended for the handle, until it can be inserted into the neck, then insert it into the bottle.


Take a hammer and a nail, then nail the bottleneck to the inserted handle.
That's all.
To begin, you must cut the bottles into spirals by first cutting off the bottom and top. We won't need the bottoms anymore, but we'll come back to the necks.
From the resulting cylinders, cut spiral shavings approximately half a centimeter wide using a sharp knife or scissors.


The resulting spirals are still not ready in terms of rigidity to make a broom. To give them a solid elastic shape, the spirals must be treated with heat.
To do this, you can use a candle, a blowtorch, a gas burner or a gas stove in the kitchen.
Straighten the spiral in your hands and evenly pass it over the fire. Choose the right speed for running the tape; the final quality depends on this. When heated, the spiral becomes smooth and twisted lengthwise.
Cut the processed straight blanks into pieces twenty centimeters long.
Since such a broom consists of separately made small panicles, let’s start making them.
Cut the necks (for example, using a jigsaw) and glue them together in pairs. Use an adhesive that does not have the statement “Not recommended for PET” on its label. To avoid choosing for a long time, you can use the usual “Moment”.
After the glue has completely dried, tightly stuff the bushings with cut straight blanks.

To prevent the blanks from falling out, pour the same glue into the base and let it harden.


You will need
Instructions
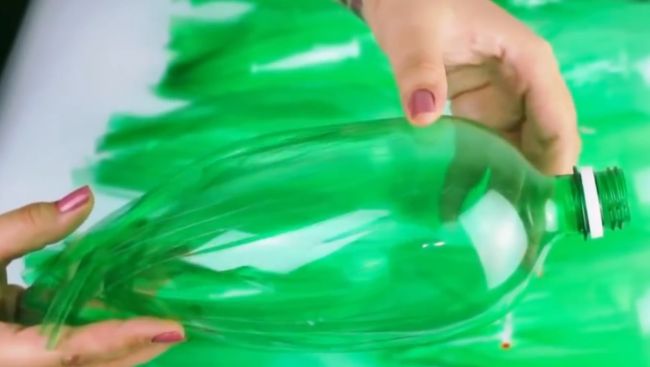
Cut off the neck of one of the bottles, stepping back about 2 cm from the smooth expansion line. This will be the basis for our panicle. Remove the cap from the neck. To cut the base as evenly as possible, use a sheet of thick paper. Wrap it around the bottle and run a utility knife along its top edge. Do the same operation with another bottle.
Remove the bottom of the next bottle. Do this as carefully as possible. The bottom edge of the bottle should be as smooth as possible. Draw the line exactly at the same level. Otherwise, the broom will not collect part of the garbage in the future.

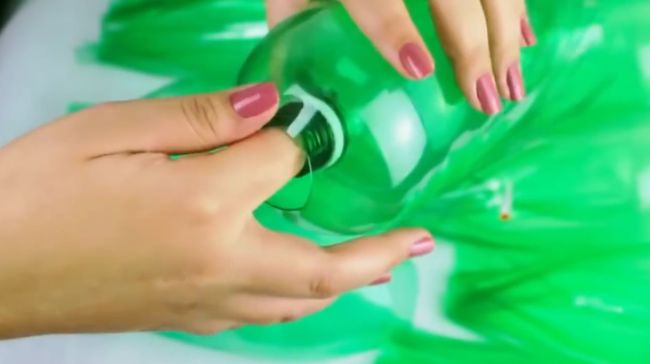
Cut the bottle into many vertical strips of 0.5 cm, not reaching the smooth expansion line at the top of about 1 cm. Cut off the neck of the bottle prepared in this way, departing 2 cm from the thread.

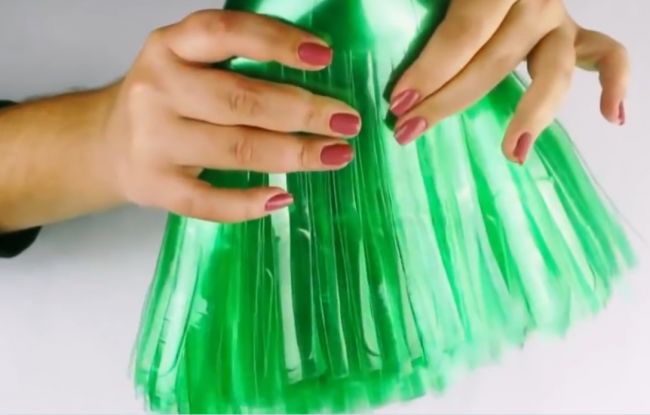
Repeat step three with all remaining bottles. In this way the working part of the future broom will be prepared. Place all the bottles cut into strips onto one of the necks cut out in the first step.

Prepare your broom handle. To do this, take a pole and thoroughly sand the wood with sandpaper. Follow this procedure as carefully as possible. Otherwise, you may end up with splinters in your hands later on while cleaning the yard.
Insert the handle pole into the second neck cut out in the first stage. First sharpen one of its ends so that it fits into the plastic as tightly as possible. Insert the pole into the neck so that its end is flush with the cut edge of the latter.

A broom is an indispensable tool in the household. With its help you can remove not only garbage, but also fallen leaves. You can make a broom yourself from scrap materials. The result is a convenient tool for cleaning your garden plot.
Making a broom from a plastic bottle is very simple. Before starting work, you should prepare all the tools and materials. For production you will need:
To make a broom from a plastic bottle, you need to prepare the material. Containers should be washed thoroughly, removing labels and remaining adhesive. One of the plastic bottles should be cut off using scissors. Its lower part must be cut into strips. The width of each should be from 1.5 to 2 centimeters. After this, you need to cut off the neck of the workpiece.
To make a broom made from a plastic bottle more fluffy, you should prepare three more containers as described above. One more blank will be required. However, there is no need to cut off its neck.

The master class on making a broom is coming to an end. All that remains is to assemble the product. To do this, you need to insert all the blanks into each other. Another bottle needs to be cut off at the top. After this, the workpiece should be put on the broom.
The same must be done with the 7th container. The resulting workpiece must be pierced in several places. The broom made from a plastic bottle is almost ready. All that remains is to secure the cut containers with metal wire, pulling it through the holes. Its ends should protrude from the back of the structure by about 3 centimeters.
To make a broom made from plastic bottles convenient to use, it should be equipped with a handle. In this case, it is recommended to use wood. It is best to take a handle from an old shovel or rake. This part of the product should be inserted into the workpiece and then secured with wire.
Now you know how it’s done. However, do not forget that such a product has some disadvantages.
In some cases, a bottle broom is simply impractical. It makes it very difficult to sweep leaves from your lawn. The problem is that plastic has insufficient rigidity. Of course, such a broom looks very original. However, it can only be used to remove large debris from paths.
Some people are trying to make the material more rigid by heating it and straightening out the curled ends, relying on the heat-shrinking properties of the material. However, this procedure also does not give results. In addition, if you handle fire carelessly, you can get burned. In addition, the process of heating plastic blanks is painstaking and boring work.

A broom made from plastic bottles can last quite a long time. However, when making it, you should adhere to some recommendations:
Plastic bottles are a wonderful and versatile material that serves many purposes. Not only do we store liquids in them, but the container can also be useful for all kinds of crafts. Some may be purely decorative, but others are useful in practice. One way to use plastic bottles is to turn them into a broom. This is a useful device that you need for your home or garden. Instead of buying a broom from the store, you can spend an hour or two making one.
Everyone has the material, but all you need is a simple set of tools. Let's find out how to make your own broom from plastic bottles step by step.
It doesn’t take a lot of money to make a bottle broom with your own hands. All the components are in the house, so you don’t have to run to the store. The set of tools is simple, and even children can work with them. What will you need for the job? Here is this small list:

From such a set of simple things, you get this practical broom from a plastic bottle.

Now that you have everything you need, you can start creating your own product.
It will take you about an hour to produce, give or take. There is nothing difficult about the work. The main thing is to follow the instructions and do the work carefully. For your convenience, we have made step-by-step instructions to help you. So, let's look at the creation step by step:


Advice! Work carefully to avoid injuring your hands. Plastic is a soft material, so it lends itself well to processing.


Advice! Don’t throw away the lower part; you can use it to make a tabletop or hanging pot, a container for pens, an owl or a ladybug.

You have successfully created a device. A do-it-yourself broom made from plastic bottles will do the job perfectly. You can use it to sweep the yard, room, paths, etc. Create several brooms and surprise your friends with your skills. To make it clearer how to properly make a broom from plastic bottles, check out this video.


