Very often, needlewomen create wreaths to decorate a room and create a festive mood. A decorative wreath can be made for any holiday. But sometimes when creating it, a difficulty arises at the very beginning of the creative process - there is no basis for the wreath. Today I will tell you about 10 ways to make your own wreath base.


The easiest and most expensive is to buy a ready-made base for a wreath in a store. Ready-made bases are made of polystyrene foam, vines, rattan, straw, and iron rods. You yourself choose the material that best suits your composition.

The second method was proposed by Igor Linnik. First, you need to cut out a stencil for the base of the future wreath from cardboard. By the way, it doesn’t have to be a ring; it can be any shape – a circle, a star, a heart.
Next, using some thick paper (wrapping paper, newspaper), you need to create volume for the future wreath. The paper must be compressed tightly and connected with a cardboard stencil using a rope or wire, carefully leveling it.
The result is a wonderful base for a wreath.

The base for a wreath is easy to make from paper, even without a stencil. Simply forming with your hands the shape you have in mind. We can say that this is a lightweight version of the previous method.

You can make a base for a wreath out of paper in another way. Roll tubes out of newspapers and form them into a ring, gluing the tubes around the perimeter.

If you are planning a small wreath, then the base can be cut from an aluminum baking dish. The shape of the future wreath will depend on the configuration of the baking dish - round, square or rectangular.

What can they do from plastic bottles? It turns out that you can also make the base of a wreath. It is necessary to cut the bottles, connect them together into a ring, fastening them with glue or tape.

The bases for a foam wreath can be bought in a store, or you can make it yourself. You can take packaging foam, or you can buy a sheet of foam at a hardware store. It is necessary to apply the outline of the wreath onto the foam and cut out the base with a sharp stationery knife.

I think these wreath bases are very cute and practical. I made the base for the heart this way.
To work, you will need pipe insulation. You can take leftovers from repairs or buy them at plumbing stores. This insulation costs pennies. You can buy insulation of different diameters, the choice is very wide.
Everything is done very simply. Cut the insulation to the required length and glue the ends together. There's just one little trick. To ensure that the base for the wreath holds its shape well and does not bend, the insulation must be folded with the seam facing outward. As a result, you will have a perfectly round wreath base. 
If the insulation is large in diameter and does not bend very well, then you can glue the ends together using a piece of pipe.

The base for the wreath can be formed from cardboard toilet paper tubes. They just need to be glued together and secured with masking tape.

Some craftsmen use clothes hangers to make wreaths. Two circles are formed from a hanger, which are connected to each other using a bandage or wire. 
If you don’t have wire hangers, then use regular plastic ones. 
When the base for a decorative wreath made by yourself is ready, you can use your imagination and decorate the wreath depending on the holiday and your equipment.
Watch a master class on making a base for a wreath from branches of deciduous trees.
Preparing for the New Year is sometimes even more enjoyable than the celebration itself. The whole family, including the youngest residents, can take part in the interior decorating process. You can decorate an apartment or house for the New Year holidays in a variety of ways, but recently New Year's wreaths, which we know better from romantic Hollywood Christmas films, have become very popular. However, fashion trends have reached us.
We have collected for you more than 40 master classes on making New Year and Christmas wreaths from a variety of materials. Well, are you ready? Then let's go!
A very simple New Year's wreath in terms of materials. You will need: New Year's tinsel, a base for a wreath (can be made of wicker, polystyrene foam, a wire hanger, etc.), dry twigs for antlers, a New Year's ball.
For such a cute New Year's wreath you will need: a foam ring for the base, glue, glitter, tape, toothpicks, white paper for the clouds.

You will have to work hard to create such a New Year's wreath. You will need: foam base, corrugated paper, paper for creating three-dimensional balls, safety pins in huge quantities.

Find out what else you can make from paper with your own hands:
The most popular are Christmas wreaths made from pine cones. However, this is not surprising: New Year, Christmas tree cones - the logical chain is visible to the naked eye. For such a wreath you will need: a foam base, blue fabric, glue, cones, acorns and maple “helicopters”.

If you want to surprise your family and guests, then pay attention to the New Year's wreath made of ties. The ties will be hopelessly damaged, so you shouldn’t hope that after the holidays the wreath can be disassembled and the ties can be hung back in the closet. What you will need to create: a ring for the base, several ties, glue, scissors.

This wreath is suitable only for those who like to drink a glass of wine in the evening and then don’t throw away the wooden corks. You will need: corks, lots of corks, glue, paints.

Making such a wreath is worth doing together with your better half. You will need: a metal base for the wreath, burlap, wooden boards, glue, paints.

You will need: a base for a wreath, foam balls of different sizes, glue, salt or artificial snow, red ribbon for decoration.

See more:
Simple, original and tasteful. What you will need: wire base for the wreath, tennis balls, dried flowers, glue, thread, ribbon for decoration.

An incredibly original decoration will be a New Year's wreath made of soft marshmallows - a chalk march. You will need: foam wreath base, toothpicks, soft marshmallows, ribbon for decoration.

To add a little sparkle to the most fabulous night of the year, you can make your own Christmas wreath with sequins. You will need: a base for a wreath, sequins on a ribbon, safety needles, ribbon for decoration, a button.

A Christmas wreath as soft as a cloud can be made from cotton balls, diluting them with multi-colored pom-poms. You will need: foam wreath base, cotton balls, colored pompoms, glue.

A delicious and appetizing New Year's wreath for the door that a kind grandfather will certainly not resist and will definitely stop by to see you for the holiday. You will need: foam wreath base, gummy candies, toothpicks, ribbon for decoration.

A Christmas wreath made of openwork paper napkins looks very delicate and truly wintery. To make it you will need: openwork paper napkins, wreath base, glue.

Master class on making a New Year's wreath for a door in a rustic style. You will need: wreath base, burlap, pine cones, glue, ribbon for decoration.

An ecological Christmas wreath can be made from the most common natural materials: wreath base, moss, cotton balls.

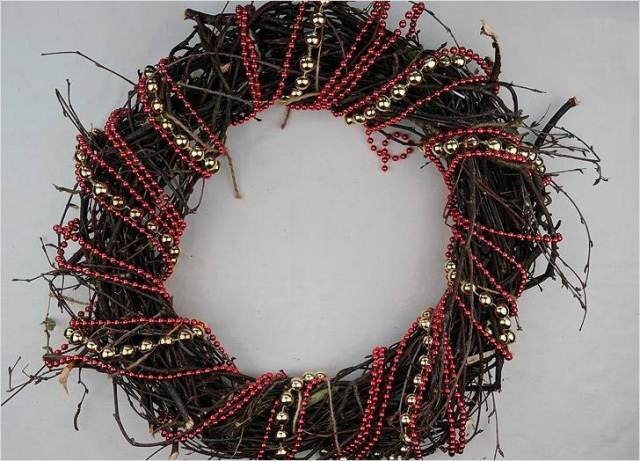
To create you will need: a base for a wreath, threads, pompons, beads, bells, felt Christmas trees for decoration.

You will need: wreath base, red ribbon, lots of candy, glue.

You will need: wreath base, ribbons, scissors.

You will need: wreath base, lollipop sticks, glue, ribbon for decoration.

A very easy to make New Year's wreath. You will need: plastic snowflakes from the store, glue, ribbon for decoration.


See more paper crafts:


To create this miracle you will need: toilet paper base, scissors, glue, red beads for decoration


You may be interested in:


You will need: base for the wreath, cotton wool, glue, thread, red lace for decoration.


Continuing the forest theme, note to you a New Year's wreath made of pine cones. What you will need: base for the wreath (a wire hanger will do), beads (the hole in the beads should match the size of the wire base), pine cones, glue, ribbon for decoration.

You might be interested in:
To create such a masterpiece you will need: a base for a wreath, white ribbon, glue, foam balls (for the eyes and mouth), a foam cone (for the nose), paint, a cardboard box (for the hat).

You won’t be able to create such a Christmas wreath quickly. Take this idea into consideration only if you have time to spare. You will have to work hard! You will need: wreath base, colored paper, scissors, glue and perseverance.

A very simple, quick to make and original New Year’s wreath made from cocktail tubes. You will need: wreath base, tubes, glue, ribbon for decoration.

A great idea for a New Year's wreath would be a craft made from photographs of the best moments of the outgoing year. The wreath is very simple and easy to make. You will need: base for the wreath, ribbon for decorating the base, photo, scissors, glue, buttons, stickers, beads, buttons, rhinestones for decoration.

To create such a masterpiece you will need: paper base for the wreath, thick paper for the stars (you can use scrapbooking paper), scissors, glue, buttons and ribbon for decoration.

This version of the New Year's wreath is suitable for older children who know how to handle scissors. What do you need? Green and red paper, ruler, scissors, glue or stapler. We fold a sheet of green paper in half, retreat about 2 cm from the edge and draw it into strips about 1 cm wide. Next, cut it (note that you need to cut from the side of the fold of the paper). We open the sheet and roll it into a ring, gluing it along the edge (where we made a 2 cm indent). You can glue them with glue, double-sided tape or a stapler. Now we close our “pipe” into a ring and secure it. The wreath is almost ready, all that remains is to decorate it (you can use colored paper, or you can use rhinestones, stickers or sequins).

And this master class is perfect for New Year’s crafts for kindergarten. In the modern rhythm of life, working mothers have a hard time; the baby himself is not yet able to generate ideas, so mom, or dad, should take care of this issue. In order not to waste precious time reinventing the wheel, we suggest using a ready-made idea and having fun doing an enjoyable activity. So, for a New Year's wreath you will need: a disposable paper plate, green paper, a red ribbon, as well as beads, rhinestones, mini pompons and other decorative elements. Cut out the bottom of a paper plate to make a ring. Well, we trace the child’s hand on paper and cut out about 12 prints. Glue them onto the ring and decorate. New Year's craft for kindergarten is ready!

Or here is another option for crafts for the New Year in kindergarten. For such a wreath we will need: a cardboard ring, green paper, a red bow (you can tie it yourself from a ribbon), scissors, glue (you can use double-sided tape). We cut the paper into strips of approximately 2-2.5 cm. We fold it like an accordion and glue the outer ends to a cardboard ring. Add a bow and the craft is ready!


On the eve of the New Year, it is customary to decorate your apartments and houses with New Year's decor. It’s not always possible to put up a Christmas tree in your home, but you really want to create a festive atmosphere. In this case, you can decorate your home with a decorative New Year’s wreath of vine twigs, which can be hung on the front door or anywhere where the wreath will delight you and create a good mood. The advantage is that it is made by hand and can use decorative elements that match your interior.
Many people will ask, “Where can I get a vine from which to make a wreath?” Almost everyone has a dacha, some live in private houses, everyone grows grapes, and if not, then ask your neighbor! I used wild grape vines for weaving; their vines are thinner than those of ordinary grapes, but they can be twisted equally. It’s very good that this is a natural material, you will be sure that it is non-toxic. You can involve children in the process, they will be happy to help you twist a wreath from a vine, or you can even weave a braid, the vine itself is very flexible, such a wreath will look quite original.
For the master class we will need:
— Grapevine (I have a wild grape vine, you can use a regular grape vine).
- Leg-split.
- Scissors.
— Glue gun (can be replaced with Titan silicone glue or Moment Crystal glue, it is odorless and transparent in color).
- Glue stick.
— Decorative apples in sugar and regular decorative red apples (can be purchased at any florist store).
— Small red beads on a string.
— Snowman (I think that there is a snowman at every home, or you can buy one in any supermarket).
— Decorative gold bow.
— Decorative red bow.
— New Year’s Christmas balls are small in size and golden in color.
— Red tinsel.
— Decorative snowflakes of golden color.

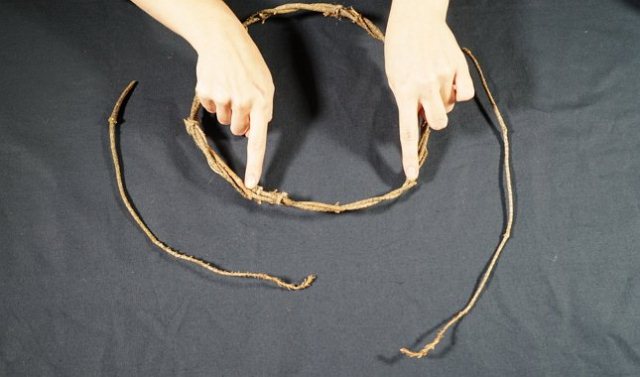
We stack the grapevines evenly towards each other. You can adjust the number of branches yourself; the more vines, the thicker the wreath will be.

Now the vine needs to be twisted to give the future wreath a more beautiful look. To do this, take the vine with both hands and twist it.

We create the desired diameter of the wreath and secure the vine with twine, leaving “tails” of approximately 15 cm.

We fix the right “tail” with twine.

We also secure the left “tail” tightly with twine.

Thus, we get a grapevine blank for a New Year's wreath.


Glue apples in sugar to the upper right corner.

Below, between the bunches of apples, we glue red tinsel, winding it onto the wreath.

We glue a decorative gold, decorative gift and a Christmas tree ball onto the tinsel.

We give the snowman a decorative gift and a golden Christmas tree ball.

We tie the snowman with twine to the top center part of the wreath. We make a loop from twine, on which you can later hang a New Year's wreath.

Glue decorative gold snowflakes to the wreath.

Glue a decorative red bow to the vine above the snowman.

That's all, our DIY New Year's wreath made of vine twigs is ready. Create with love! Creative success and inspiration!
You can choose any color scheme for the decorative elements of the wreath.


On the wreath you can attach a coin for prosperity, a horseshoe for prosperity, or symbols of the coming year for good luck.
The idea of decorating homes with wreaths belongs to the Hamburg theologian Johann Hinrich Wichern, who took in children from impoverished families, who during Lent constantly asked their mentor when the long-awaited Christmas would come. To make it easier for the children to count the days until the holiday, Johann made a wreath from a wooden cart wheel, which was crowned with 19 tiny red candles and four large white ones (this was in 1839). Every day, early in the morning, one tiny candle was lit on the wreath, and on Sunday one large one. Over time, other local residents adopted this tradition, and the making of the New Year's wreath has survived to this day!
A wreath of pine cones can be lightly painted with gold or silver spray paint to ensure a mysterious shimmer.
Of course, now you can buy a ready-made wreath in stores, but it’s so nice to make it yourself, decorate it in your own way, put your soul into it. Today I want to present to your attention options for ready-made wreaths, as well as tell you what you can make them from and how to decorate them.
The New Year's wreath on the door must be durable, so its frame must be solid. So what can you make a frame for an Advent wreath from:
✔ Grapevine;
✔ Crumpled newspapers (shape into a ring and tie with threads);
✔ Willow twigs, buckthorn, bird cherry;
✔ An old watering hose;
✔ An old hose from a vacuum cleaner;
✔ Disposable plate;
✔ Cardboard;
✔ Wire hanger;
✔ Foam tape;
✔ Finished foam ring;
✔ Dry grass tied with threads (shape into a ring and tie with threads), etc.


Wreaths decorated with satin or packaging ribbons look very elegant. To do this, you need to cut the tapes into equal pieces, for example 6 cm in length, fold them in half, and glue them one by one to the prepared base, overlapping each other. 
A drop of citrus aromatic mala on a fabric holiday wreath will fill the room with New Year's mood.
A great idea to decorate the wreath with small boxes with bows tied. Boxes can be purchased or cut out of paper yourself. We glue the resulting boxes to the base using a glue gun.
You need to prepare a flat base, you can even buy a ready-made foam ring (in the departments everything for creativity), it costs about 60 rubles. We take thick woolen threads of a suitable color and wrap the base thread by thread, you can create several layers. Additionally, the product can be decorated with Christmas balls or felt flowers.
Take a beautiful bag, pour lavender herb into it and secure it to the wreath, the aroma will be simply amazing.
You can make these cute gingerbread men from salt dough, which you can then paint in any color using a can of spray paint. And the eyes, nose and mouth can be created from real icing.
Making paper roses will not take much time, and the result will be very impressive. We take a sheet of paper, draw a 1 cm wide spiral on it, cut out the spiral, take a toothpick and start winding the ribbon from the outside, after which we simply remove the flagellum from the toothpick, it blooms a little and looks like a rosebud. Finally, all that remains is to glue the flower buds to the base.
We take a sheet of paper and trace our hand with a pencil, cut out the required number of prints and glue them onto the base, maybe randomly or overlapping.
We select interesting pictures from the photo album, cut out a ring from cardboard, onto which we paste the best family photos. 
We cut out Poinsettia flowers from red paper, glue them onto a paper base, and decorate each flower with beads or rhinestones.
A traditional wreath should include three colors: green (symbolizes hope), red (love), white (bright spiritual qualities).
A lush New Year's wreath on the door can be made from cellophane or transparent wrapping. We take a plastic bag, cut it into wide horizontal strips, on which we then make vertical cuts so that we get a fringe. Then we glue each cellophane ribbon cut with a “fringe” to the prepared base; it is better to make as many layers as possible, so the wreath will look more elegant and magnificent.
Festive wreaths made from Christmas balls look great. The balls need to be glued to the base and each other using a glue gun. At the end, the product can be complemented with a beautiful lush bow or glowing garlands.
The balls on the wreath symbolize the fruits of evil and good that Adam and Eve tasted in the Garden of Eden.
As in the case of balls, we simply glue them to the base, and also decorate them with bows, rhinestones, beads or rowan branches.
Imagine how great butterflies will look in winter; you can cut them out of paper or buy ready-made ones and then glue them to the ring base.
Buttons on a festive wreath look no less impressive; again, we select buttons that are suitable in size and color, and glue them in several layers to the base ring.
It is better to take a voluminous base, for example a ring made of polystyrene foam or a roll of newspaper. You need to glue the corks in rows, starting from the inside, and it is better to complement the product with bright details: red beads, artificial berries, a spruce twig.
If you want the wreath to be not only beautiful, but also fragrant, decorate it with dried orange slices, lemon zest, cinnamon sticks, thyme or lavender.


If you decide to make a wreath from real branches, give preference to fir or thuja, but it is better not to use spruce branches, as they dry out too quickly, crumble and are very prickly!
In essence, this product is made like a simple wreath, with the only difference that the base rings should be selected in different diameters (the head, middle and lower part of the snowman). All rings can be glued together with a glue gun or connected using fishing line. You can decorate the product with a hat, knitted hat, scarf, bow.


✔ Spruce branches are attached overlapping each other and tightly wrapped with threads at the base.
✔ Bows, nuts, acorns, and chestnuts can be glued onto super sticks.
✔ Christmas balls can be glued or passed through the pendant hats through the wire, then we wrap the wire around the base of the wreath. 

Method one. We make two wreaths of the same weight, take a long ribbon, glue or tie one part of the ribbon to the back of the first holiday wreath, and fasten the other end of the ribbon to the back of the second wreath. Then we throw the tape over the door, so that one wreath is on the outside part of the door, the other on the inside, the top of the tape can be glued to the edge of the door with masking tape (it won’t be visible anyway). Schematically it will look like this:  Second way. You need strong fishing line, masking tape and a peephole. We tie or glue one end of the fishing line to the back of the wreath. Then we throw the fishing line over the door leaf (as in method No. 1), wrap and tie the fishing line around the peephole (the inside of the door).
Third way. You can purchase several hangers with suction cups, hang the upper part of the wreath on one, and the lower part on the other, as in the diagram below:
 Fourth way. Glue the wreath with double-sided tape; to do this, glue the tape to the wreath, remove the protective films and glue the product to the door.
Fifth way. Make a hook out of metal, similar to the one in the photo below, and secure it on top of the edge of the door with a nail. Schematically it will look like this: 

Dear readers, now you know how to make Christmas wreaths, I hope you liked today’s selection! And remember, it’s better to start preparing for the New Year holidays in advance, then you will have time not only to think through the festive table, but also to adequately decorate your home! Friends, subscribe to receive news from the Decorol website, many more interesting things await you!
You can decorate your home for the New Year and Christmas not only with tinsel, pine needles and toys, but also with original wreaths. There are many options on how to make a Christmas wreath with your own hands. You can prepare a classic wreath from spruce branches or a beautiful one from pine cones, a cool one from paper or an unusual one from paper and orange slices. But if you don’t have any suitable material at hand, we suggest going to the nearest park or garden to collect or cut twigs, twigs, and vines. It is from natural materials that we will make a craft - a Christmas wreath. For needlewomen, the designers of the Zatusim website have prepared several detailed master classes that show how to make a Christmas wreath with your own hands step by step.
Making any Christmas wreath begins with preparing the base. Some people use cardboard, others wire. We invite you to learn how to make a simple base for a Christmas wreath from birch branches with your own hands.
To make it you will need:
You need to make a Christmas wreath from branches on the same day you collected them. Otherwise, they will begin to dry out and break during operation.
If it is necessary to postpone the work, we bend the rods into a ring and tie them together. Alternatively, they can be soaked in water before work.
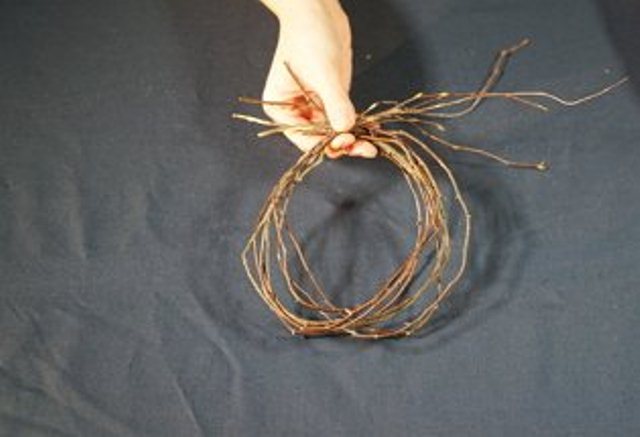
We sort birch branches by size and immediately remove excess leaves, side branches, and twigs from them.
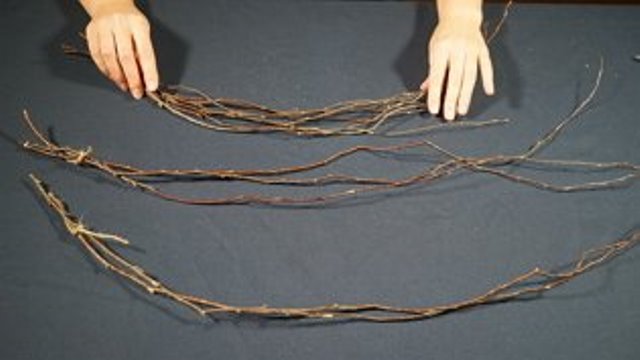
We start weaving the base with thick twigs of medium length.
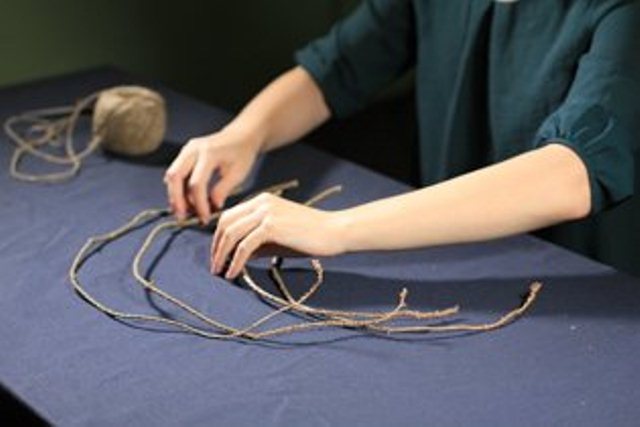
From the selected branches we form a circle. We lay out the blanks so that the thick edge of one branch coincides with the thin edge of the other.

We tie twine to the edge of one rope.

We braid the rope around the first branch.

We tie the thick edge of the second branch.

And we continue to weave the rods until we get a circle.
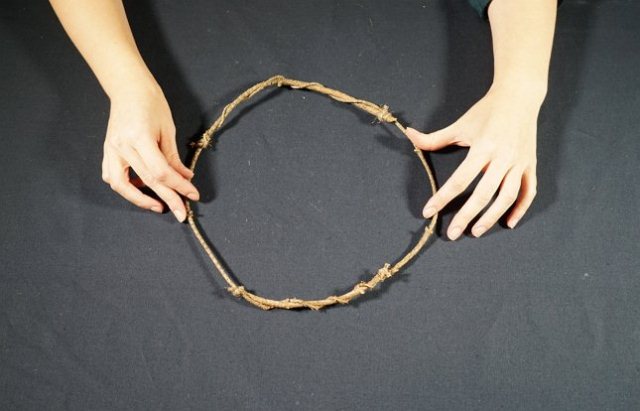
We ended up with a not entirely even frame, which we will work with. Its flaws will be eliminated in the future, so there is no point in trying to give the frame an ideal shape at this stage.
We attach another branch to the frame and secure it with twine.

We wrap the frame with a long twig.

We continue to weave a wreath from branches, adding new long rods.
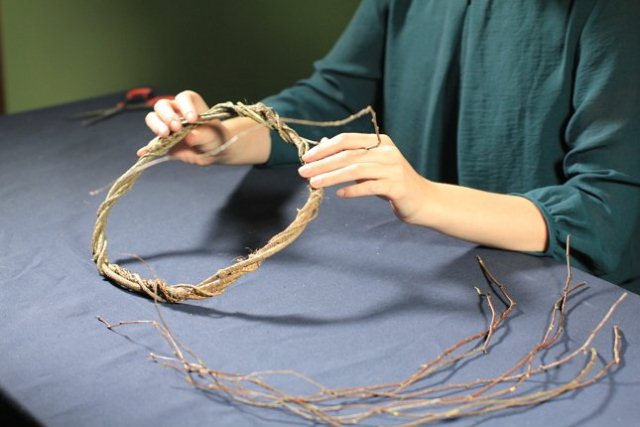
When the base becomes dense enough, you can weave the branches without tying them with twine. This will give the impression that the wreath is woven from a single vine.

Now you can level the base, giving it an even shape. You need to work with branches carefully, as they, despite their flexibility, can break.

The finished wreath can be placed under a press overnight.

All that remains is to decorate the base for the Christmas wreath made of twigs. To do this, you can use any available materials: pine needles, ribbons, bows, bells, beads.
Add a few Christmas tree decorations.

Pictures of Christmas wreaths made from branches will tell you how to colorfully decorate the craft.
How to make a Christmas wreath from branches more colorful is shown in the video:
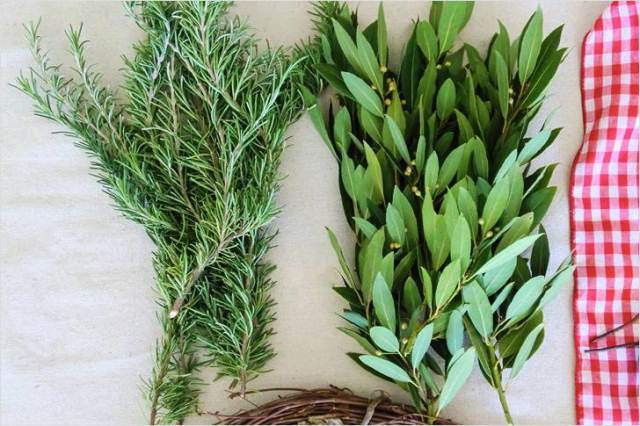
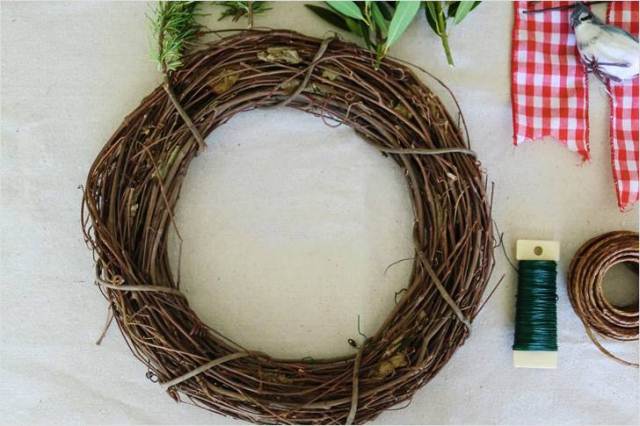
Original Christmas wreaths are made from grapevines. This material bends more easily, so weaving a wreath will not be difficult. We suggest making a Christmas wreath from vines with your own hands and decorating it with sprigs of laurel and rosemary.

To make a wreath you will need:
Tools and auxiliary materials:
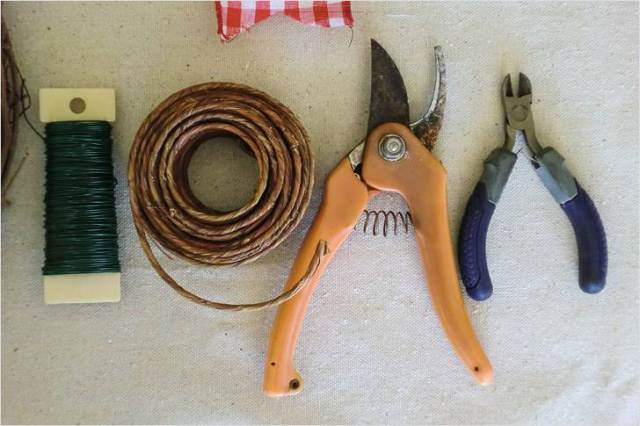
We twist the base for a Christmas wreath made of wicker.
We attach sprigs of rosemary and laurel to the frame with a thin wire. You can also put the decor on glue. But if you use wire or wire for fastening, the decor can be removed after the holiday, and the base of the wreath can be used for decoration for Easter or the next New Year.
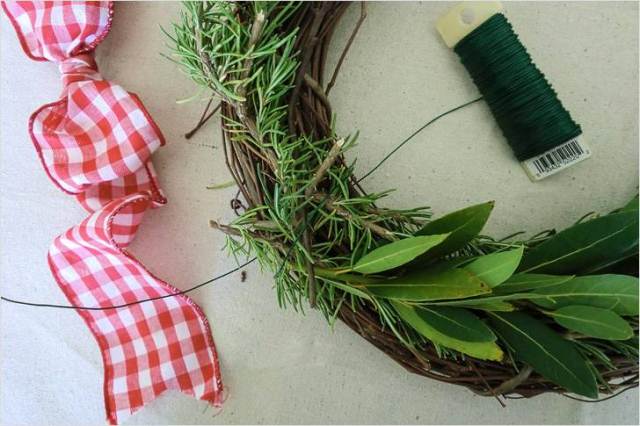
You can complement the decor with twigs with berries.
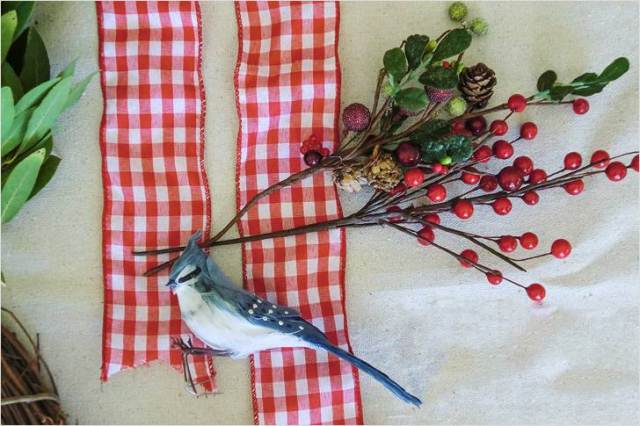
All that remains is to paint the wreath with a bow. It can be tied with ribbon. Bows made from ribbon with wire inside look original and retain their shape well.
We attach all the elements to the wreath and get this original Christmas or New Year’s decoration.

How to make Christmas wreaths based on vines is shown in detail in the video:
You can use not only flexible branches of willow, birch or vine for crafts. You can make an original Christmas or New Year wreath with your own hands from branches and sticks.

To make a colorful wreath you will need:
Auxiliary materials and tools:
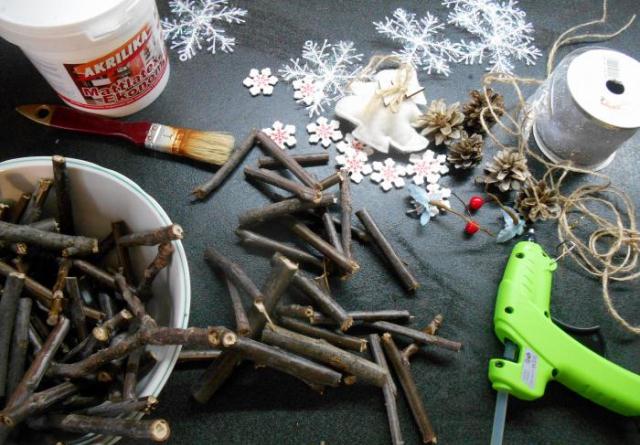
We begin to make a Christmas wreath with our own hands step by step from branches cut into sizes of 5 - 8 cm. You will need both straight sticks and curved, forked, with knots.

We paint each branch white with acrylic paint.
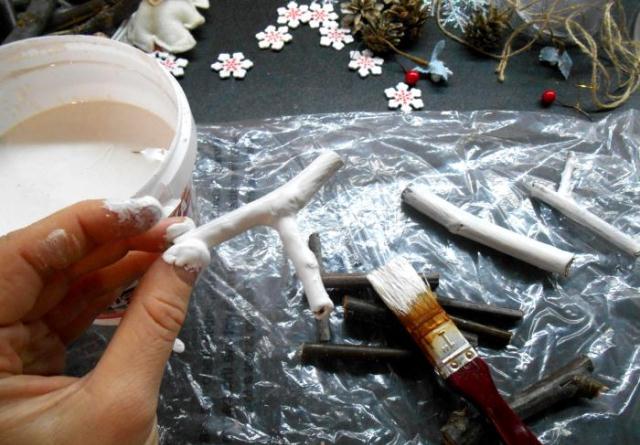
Leave the workpieces until completely dry.

The twigs will take about 1 hour to dry.

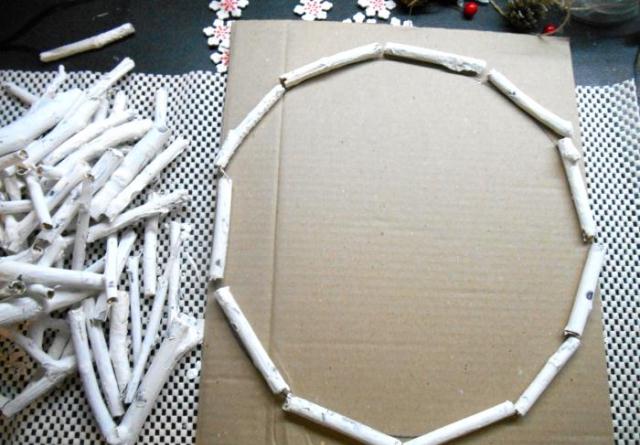
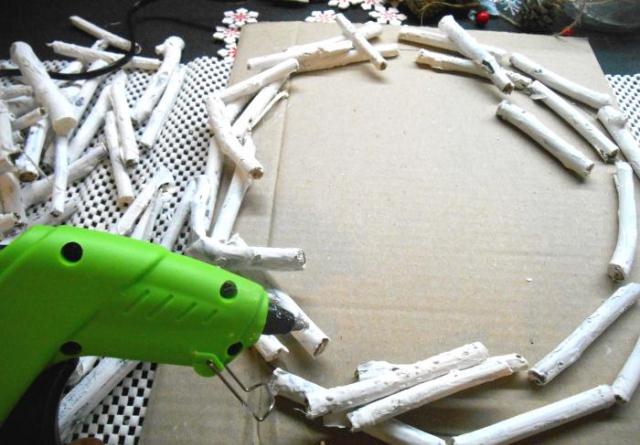
On a cardboard sheet we draw a circle along which we will lay out the base of the wreath.

We lay out sticks of approximately the same shape and size in a circle.
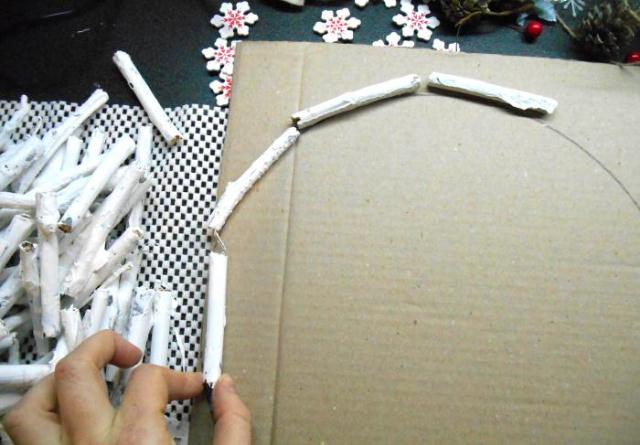
You should get a neat wooden ring.
Now we lay out the inner circle of a smaller diameter.
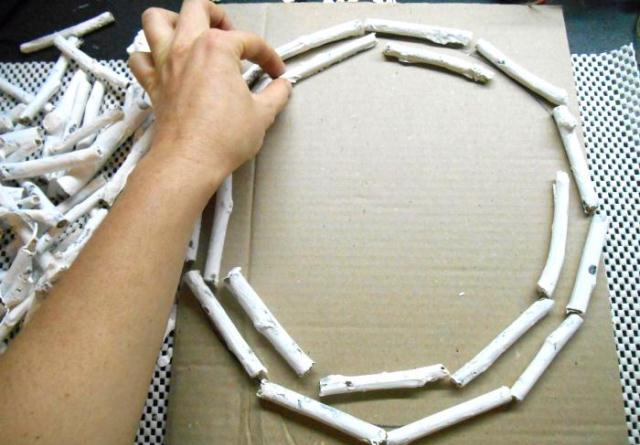
We connect the outer sticks and the inner ones with transverse branches.
You can simultaneously place several transverse rods.
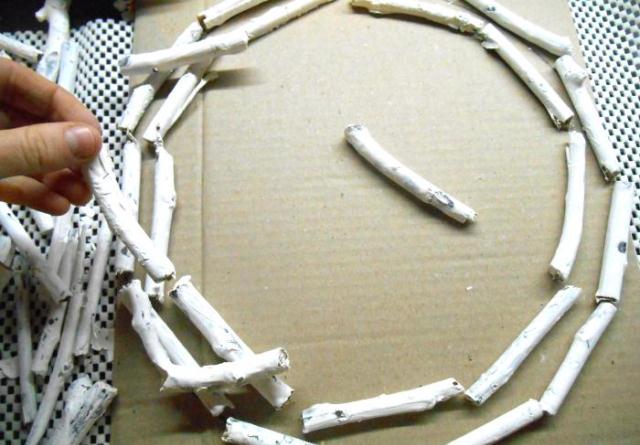
To ensure that the structure holds well, we secure the transverse blanks with glue.

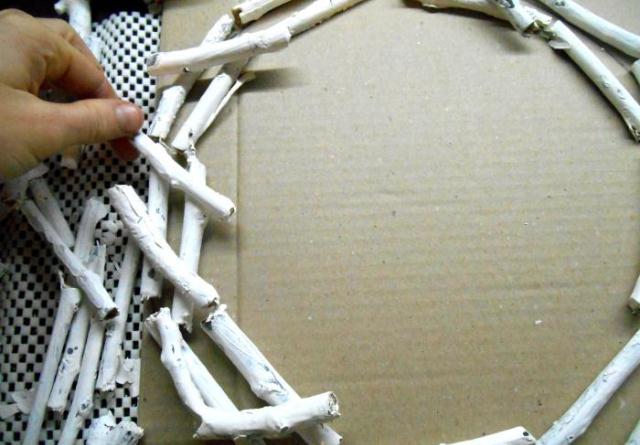
We continue gluing the sticks, giving the wreath volume.
At the end we glue the forked and uneven sticks.

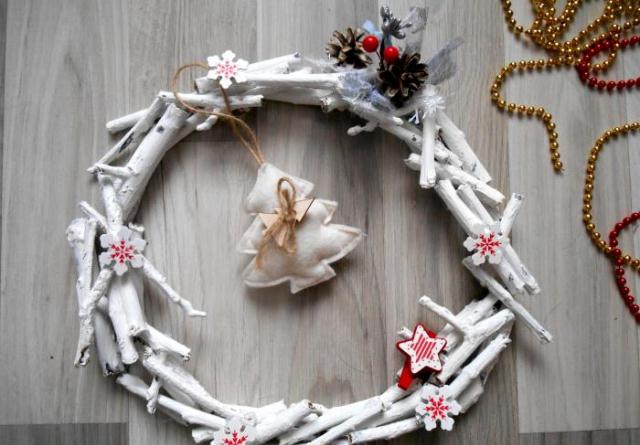
We ended up with this original wreath made from sticks and branches.

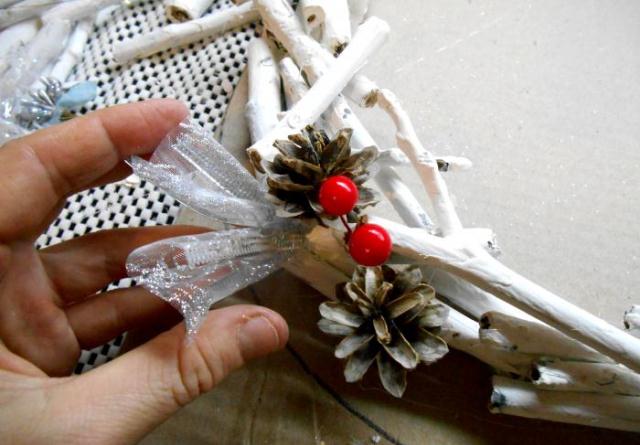
Let's start decorating the base of the wreath.

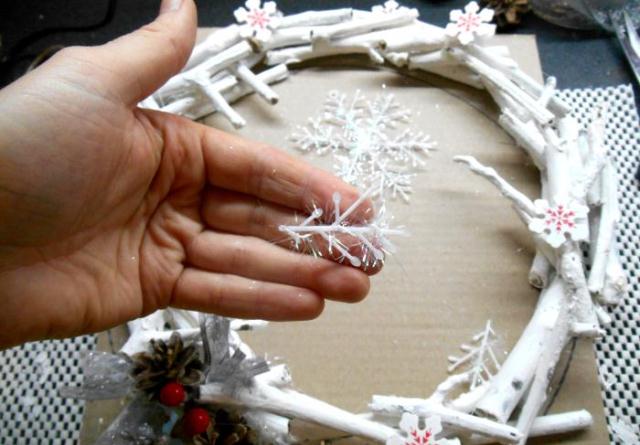
Glue snowflakes in a chaotic order.

And pine cones.

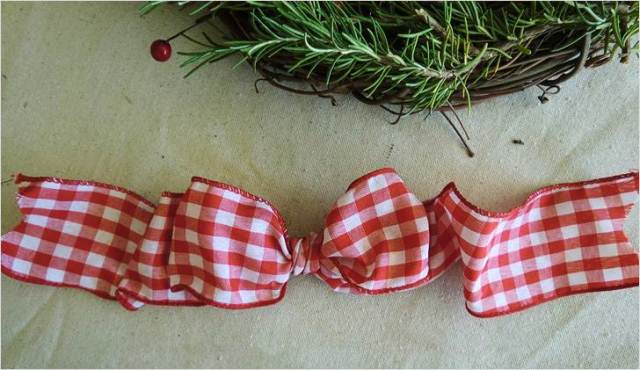
All that remains is to attach a colorful bow, which can be made from shiny braid or ribbon.
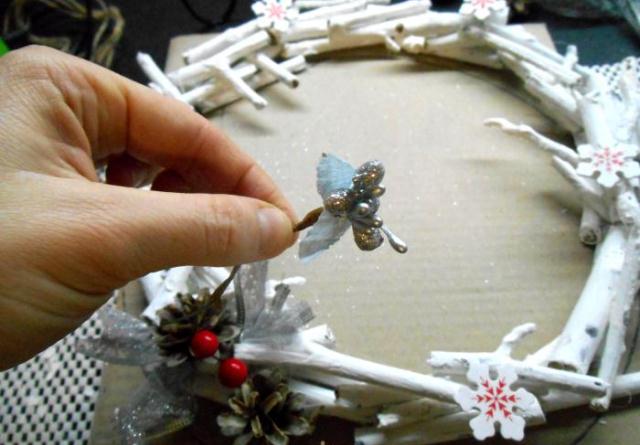
And decorate the craft with decorative elements.
Snowflakes.
We place a cool toy in the center, which we tie with twine.
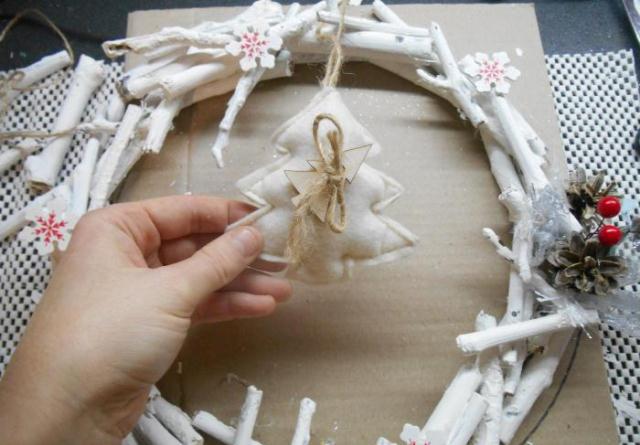
An unusual Christmas wreath is ready.
You can use sticks and branches to make unusually shaped Christmas wreaths and other New Year's decorations.
An unusual weaving of a wreath from sticks and birch branches using a wire frame is shown in the video master class:


