It’s one thing to catch a large amount of fish, and quite another to properly manage the catch. One of the popular ways of processing harvested trophies is drying and drying them.
To prevent the processing process from becoming burdensome and to protect hung carcasses from insects, use a fish dryer. In this review we will talk about the different types of these devices, produced industrially and sold in fishing stores.
Most of the material will be devoted to how to make a fish dryer yourself at home.
The simplest device for drying is a wire stretched under a canopy or an ordinary clothesline. To protect against insects, gauze is simply thrown over the fish. You can hang roach, crucian carp or bream either on wire hooks made from ordinary paper clips or by pinching them with clothespins.
This option is simple, but it is good for one-time harvesting of fish on the go or at a summer cottage. When the business is up and running and good catches are regular, you need to think about a more or less decent design.
Fish dryers can be divided into two large categories:
Each option has its own advantages. The first ones can be used anywhere: from the river bank to the balcony in the apartment.
The simplest portable dryer made in China. When folded, it is very compact, you can take it with you fishing or to the country. On the spot, you can easily unfold it and hang it on any tree branch.
The latter can be called drying cabinets; they are most often used not only for fish, but also for storing vegetables and berries, drying meat and other food purposes.
You can simply dry the fish in the fresh air, or you can do it with forced air supply from a fan. At the same time, the drying process is much more intense, and the products are cooked more evenly.
In cold weather, the drying cabinet can be equipped with electric heating elements, which will also help to quickly prepare the fish for use.
A distinctive feature of drying chambers is also the number of compartments they have. Most often, single-section options are used, but there are dryers with a large number of compartments, in some models their number reaches 5 sections.
Of the industrial models we liked, we will highlight two varieties. The first is structurally made in the form of a tall cabinet made of metal pipes, covered with mosquito netting. Similar models are produced by different companies under the brands “Mitek” and “Kedr”.

In the photo there is a dryer for meat and fish “Cedar”, products under the Mitek brand of a similar design
The second interesting model is the two-tier design IdeaFisher ECO-2. This collapsible design is also compact and easy to transport. In addition, depending on the conditions, it works both in a suspended version and installed on a table or on the floor.

The dryer is assembled on plastic corners, and the fish is strung on special skewers.
Let's move on to the most interesting part, we'll tell you how to create a fish dryer with your own hands. It must be said right away that there are a lot of designs of dehydrators. It is impossible to describe all the options for homemade designs in one article, because the imagination of our Kulibins is truly inexhaustible.
Reference! Dehydrator literally translated from Latin is a dehydrator, that is, the same as a dryer.
Most often, homemade dryers are made in the form of a wooden box covered with a mosquito net. At the same time, one of the popular variants is the one with dimensions: 500x500x500 mm.

Depending on the location conditions, the dryer is manufactured in a vertical or horizontal version
At the first stage of production, you need to prepare the required number of wooden slats, sand them and coat them with a protective compound. The coating should protect the structure from moisture and salts, but at the same time not produce harmful fumes that drying products can absorb.
Then, according to the previously completed drawing, the frame of the future dryer is assembled. Self-tapping screws and metal corners are used for installation.

For a small structure, the cross-sectional size of the slats can be 25x25 millimeters. As the volume of the drying cabinet increases, more powerful bars will be required.
On a note! The stationary dryer can be mounted directly on the wall.
After the frame is ready, begin tensioning the mesh. In this case, you need to decide how access to the internal space will be achieved. To do this, make a door or sew in a zipper.

Wall-mounted stationary dryer with a hinged door. When using this design, you need to make sure that insects do not fly in while hanging the fish.
A variant of such a homemade product is to use not a tension mesh as a covering, but a structure from modern plastic windows. In this case, you do not need to make a separate door, but use the frame from a ready-made mosquito repellent.

The structure is also based on a wooden frame. At the bottom of the dryer there are trays to collect liquid dripping from the fish.
Some of the dryers made by our DIYers have fans in their design. Air convection in such dehydrators speeds up the drying process.
Such dehydrators are made from various plastic containers or in the form of closed cabinets through which air is forced.
Let's look at the process of making a simple dryer with a fan; for this we need:
We proceed in the following sequence:

To dry mushrooms, berries or vegetables, you can install special grates.
If you need to increase the temperature in such a dryer, you can use electric mats. Similar models are sold in pet stores for keeping reptiles.
Advice! You can increase the temperature in the dehydrator by installing regular incandescent light bulbs. In this case, they should be positioned so that drops from food do not fall on them.
When the dryer is ready and the fish is caught, you can start salting it and actually drying it. The whole process requires description in a separate article, but here we will give brief advice.
A well-made dryer will not only be a reliable assistant in drying fish, but will also allow you to prepare other products, such as meat, fruits and berries, vegetables and mushrooms. In addition, it will encourage you to use it, which means it will help increase your catches.
A dehydrator is a device that is a dryer for food (greens, fish, meat, mushrooms, nuts, vegetables and fruits). This device can also be used to prepare healthier (dried, without any other processing) food, for example, various desserts, sprouted grain breads, cookies, chips, etc. Handicraft lovers use the machine to create dried flower bouquets, papier-mâché objects, herbariums and other decorative crafts. Dehydration of products in the device occurs due to the action of warm air, infrared or solar rays.
Store-bought equipment is quite expensive. They allow you to maintain a constant set temperature inside the drying chamber. Making a dehydrator with your own hands is an opportunity available to everyone to save on equipment and get a device that allows you to quickly dry food in the required quantities.
A homemade dryer can be made from an old refrigerator. This will make a good dehydrator for fruits and vegetables.
The process of manufacturing a drying installation from a refrigerator occurs according to the following scheme.
The final design is shown in the photo below.

The inner lining and insulation are removed because plastic and foam decompose when heated, releasing harmful substances.
When dismantling the insulation, you should wear gloves and a respirator to protect against glass wool (if it served as insulation).
Since the remaining tin cabinet is not particularly rigid, its degree may need to be increased by installing spacers or a galvanized inner casing.

To blow food, it is allowed to use a regular hood fan power 18 W, diameter 125 mm, only installed to pump air inside. Installing a fan heater will significantly speed up the entire process, increasing the productivity of the installation. Instead, you can attach one or two to the back wall electric heating elements with a total power of up to two kW - then the device will work like an electric dryer. In this case, a second exhaust fan should be installed in the upper part of the box.
The created unit can be used all year round. But if a regular fan is installed, then painting the case black, as well as placing the device in the sun in the warm season, helps to increase the temperature inside, which speeds up the entire process of drying food.
In order for the created dryer to work effectively, it is necessary to ensure good airflow of the product laid on the sheets. This is achieved by leaving a gap of 2 cm between the frame and the door on one side, and the back wall of the box on the other.
When using a refrigerator with conventional fans without installing heating elements, it is enough to remove only the compressor with freezer and radiator. Thus, the grooves for installing shelves on them remain, but if necessary, you need to add more. As shelves can be used:

It’s easy to come up with a variety of options for creating shelves for vegetables and other products yourself and make them from scrap materials.
If the compressor is in working order and the coolant circulation system is not damaged, then these spare parts may be useful for creating.
Creating a dryer from a refrigerator takes several hours if you have the necessary parts and tools. The design can be improved in various ways, by equipping it, for example, with temperature sensors and a simple automation system, or by experimenting with the location of the fans. To prevent insects from entering the dryer, the ventilation openings should be covered. mosquito net or gauze folded in 2 or 3 layers.
A dehydrator can be made from a homemade cabinet in a manner similar to the previous one. Only instead of a refrigerator there is a plywood cabinet. For this you will need the following materials:
It is better to use a fan heater instead of a separate heating element. The other fan will be a regular one, working for exhaust.
The cabinet must be arranged in such a way as to provide unhindered air circulation. It is collected in this order.

The fans can be connected in parallel and turned on with a switch. The structure can also be additionally equipped with light bulbs indicating the operation of the installation. The fan heater is equipped built-in thermostat. It will automatically turn on the heating element. If necessary, you can turn off one spiral to reduce the power of the installation.
The solar dryer can be manufactured in various ways. Wherein no energy costs: Vegetables or fruits are dried using the energy of the sun's rays. For summer residents, a simple design is suitable, which can be made using a hammer, saw, stapler and scissors. Work on creating the installation is carried out in the following sequence.
Also, the created structure can simply be supported on anything. A possible appearance is shown in the photo below.
In such a cabinet, by heating the metal sheet, it is achieved temperature 40-50 degrees. Ventilation ensures the removal of moisture released from the fruit.
A more complex version of the solar dryer (shown in the photo below) consists of two sections:

The front parts of both zones are covered with transparent material, for example, glass, polycarbonate.
Collector It is a box, the bottom of which is covered with a thin sheet of metal painted black. A heat insulator (mineral wool or sawdust) is placed under it to minimize heat loss. Air enters the heating zone through the ventilation holes. Then it goes up through the food shelves and out.
By installing black tubes as an absorbent, for example, painted aluminum corrugation, you can increase the temperature at which the air is heated by the collector.
For the device to work effectively, it must be constantly kept with the collector directed towards the sun.. If the collectors are installed on three sides, then there is no need for rotation, and such a drying unit will work all day. All cracks are sealed with sealant.
To create a working automated model 1 m long, 0.6 m high and 0.53 m wide, you will need the following materials:
The device diagram is shown in the photograph below.

The algorithm for manufacturing the structure is as follows.

The door must close tightly to prevent insects from getting inside.
A stabilizer is needed to maintain a constant voltage at the fan contacts of 12 V. Further improvement of the created design is possible by fan speed adjustment. It is recommended to rotate the device so that the collector and battery are constantly illuminated by sunlight.
An infrared dryer is suitable for mushrooms, vegetables, nuts and fruits. It’s quite easy to make it yourself. To do this you will need the following materials:
The installation is created in the following sequence.
As a result, after all the manipulations, you will get an installation similar to that shown in the photo below.

The lid can be the side parts of the box, or it can be made separately from the same cardboard. If you want to automate the design, you should use temperature sensor. Under his control, the light will turn on automatically.
Also in the created design you can use an incandescent lamp (its sufficient power is 60 W) or heating film, used to create heated floors. In the latter case, at home, a piece of 50 by 100 cm with a power of 110 W is sufficient. In general, the length of the fragment is selected based on the box used.
When using film you will also need:
PVC tape is laid on top of the bitumen insulation. To connect the film, you will need to solder wires and contacts.

This dryer allows you to achieve temperatures almost 60 degrees. It can be rolled up and placed on the bottom of a box made using the previously indicated method.
A dryer for meat and fish can be easily made from a plastic container. For this you will need:
The entire process of making a dehydrator for drying fish, meat and drying other products from a plastic container is demonstrated in the video:
It’s easy to assemble a dehydrator for fish, meat, vegetables, fruits and other products from scrap materials: plywood, boxes, a refrigerator. Various working old fans are suitable for blowing. In each case, you will, of course, need to think over a way to secure them, but the economic costs will be reduced. In small installations, you can use a fan from a computer, having previously provided the required supply voltage. If you automate the dryer, then in terms of functionality it will be able to compete with factory analogues. When drying meat and fish, it is imperative to prevent flies from entering the interior of the installation so that they do not spoil the products.
Every experienced fisherman has in his arsenal a device for drying or drying his catch. After all, often a specialist in his field manages to get a significant catch. Then the question arises of how to properly dispose of it. This is where a homemade fish dryer comes to the rescue, which can always be made from available materials. In addition, such dryers are often used for drying meat. And the dried product will be stored for a long time and can be consumed at any appropriate time. For a real fisherman or hunter, such a device will become indispensable.
To ensure high-quality drying, only fresh fish should be used. Frozen will not work. There is no need to clean the scales, but it is necessary to clean the insides. Firstly, without them the fish dries out faster. And secondly, they will definitely give off bitterness, which will negatively affect the taste. After all, it would be a shame to put a lot of effort into catching and eating your fish, only to end up with a spoiled product due to an uncleaned belly. Afterwards, you need to rinse the carcasses well in cold water. Next, a little salt is poured onto the bottom and the first layer of fish is placed. The fish is covered with salt and the next layer is laid perpendicular to the previous one. And so on. The more salt you add, the harder the fish will be, even to the point of being like a brick. Under-salted fish will be bland.
For drying, it is recommended to use low-fat varieties of fish. Otherwise, the shelf life of such species will be reduced to a week. They usually dry vobla, ram, sabrefish, bream, mullet, etc. And it is preferable to dry roach, ram or carp with beer. To dry, you can use an oven or electric dryer. But, undoubtedly, the preferable method would be drying under natural conditions and in a specially made dryer.
There are many instructions for making homemade fish dryers with your own hands. We will distribute them according to the main varieties, based on their designs:
Regardless of differences in design, all dryers are united by the need for free access of air inside the dryer and devices for placing fish, be it shelves or hooks.
The fish can be dried without resorting to making any structures by hanging it on a clothesline somewhere under the roof or on the balcony. Drying can also take place outdoors. But this simple option does not exclude the possibility of contamination of the product with insect larvae, and also does not protect it from flies. Therefore, it is preferable to use special dryers with walls, the manufacture of which does not require special construction skills and craftsmanship. At the same time, making a fish dryer with your own hands will not require large financial expenses.
A characteristic feature of such dryers is that they are unlike stationary structures. Thanks to this, you can find the most favorable place for exposure to sunlight and wind, and adjust the desired height and position.
The easiest way to make a hanging and drying fish with your own hands is to use an old umbrella that has retained its ability to close and stay open. You need to sew a fine mesh net to the edges of the open umbrella to a height of about a meter. Then a ring equal to the diameter of the umbrella is made from thick wire. The ring is placed inside the mesh approximately 80 cm from the edges of the umbrella and sewn to the edges of the mesh. The mesh will be pulled together at the bottom with a cord, opening and closing the dryer. The umbrella handle has no purpose in this design, and therefore can be removed, but without consequences for opening and closing the umbrella. A hook is attached to the central upper part of the umbrella (you can sew a loop) for fixing it to a tree or other objects. Finally, the fish is placed under the dome and hung on hooks, and the drying process begins. If you have some unnecessary tulle left, it will be quite suitable for this purpose instead of a mesh.

Dryers of this type are very convenient due to their compactness, as they can be disassembled when they are not needed. This type of drying is used in small apartments. In addition, a collapsible dryer can be taken with you on fishing and vacation, drying at the spot of the catch.
Frame or stationary types involve making the base of a fish dryer in the form of a box with your own hands. The photo below shows the approximate appearance of the frame dryer.

Typically the box has a wooden structure measuring 600 x 300 x 300 mm. The slats are attached to each other with corners, and the base is covered with a mesh with a fine mesh. The mesh is secured with construction staples or nailed down with planks. If you plan to hang fish, then hooks or screws are screwed into the upper part along the sides, onto which a rope or wire is pulled. Then the nails are bent in a zigzag manner, on which the fish is strung and placed in the box. The door is attached with hinges from the back side on the top of the box. You can secure the door at the front and sides with locks in the form of hooks.

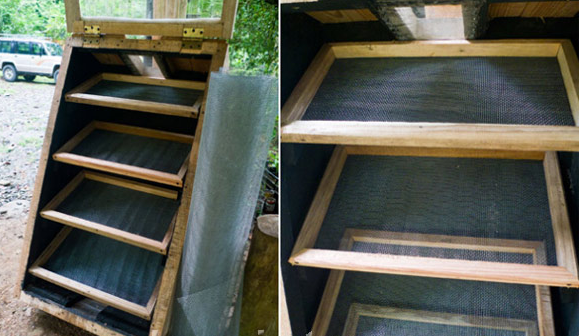
There is also a frontal version of a do-it-yourself frame fish dryer, when the door is on the front of the structure. Then the fish is not hung on hooks, but laid out on shelves arranged horizontally in several rows inside the box. The shelves are placed on the corners attached to the side walls. They are made in the shape of a rectangle, on which a net is stretched for laying out the fish.
All of the above methods for making a fish dryer with your own hands are designed for drying in the open air. But this is not always possible, or it is necessary to dry the catch in winter. It is for this purpose that we propose to consider a way to make a dryer for meat and fish with your own hands, despite the lack of favorable environmental conditions.
One of the easiest ways to speed up the drying process of fish is to use a fan. The power of the device should be selected based on the area of the dryer. Naturally, some people need to dry buckets of fish, while others sometimes prefer to treat themselves to a dozen or so products salted according to their own recipe. It is safe to say that the drying speed will directly depend on weather conditions and fan power. For large volumes, two or more fans can be used.
Among the existing methods for making dryer boxes, moisture-resistant plasterboard is used. A hole for the fan is cut in one side part, and a mesh is attached to the other side. The remaining parts of the box remain blank. On the upper part of the longitudinal sides, places are cut for twigs on which the fish will hang. Afterwards the box is covered with a lid, which can be made from a wooden frame and mesh.
It is possible to use ready-made factory boxes of the required volume from other materials for the frame.

You can also make a fish dryer with a fan with your own hands in an ordinary apartment by installing an electric fan in the exhaust shaft and attaching an ordinary frame dryer covered with mesh to it.
Such a dryer can be classified as a collapsible and fairly compact type, because assembling and disassembling it is not difficult. And when drying is complete, the two drawers fold up and take up minimal space. Transportation will also not be a problem.
So, to make a similar fish dryer with your own hands, you will first need two plastic boxes and a mesh of the size to wrap these boxes. The first box will be located at the bottom, and cellular sectors should be cut out at the bottom of the second. This box will then lie upside down on top of the first one, forming a plastic box. At the top of the box there are wooden slats on which the catch is hung. This can be done using bent nails, or you can drive nails into the sides of the slats and remove the heads. To prevent insects from entering the dryers, two bags with elastic bands at the necks are made from the prepared mesh. The bottom bag will be permanently attached to the box, and the top bag will be pulled over the box after placing the fish in the dryer. Here is a fish dryer made with your own hands.
The design can always be improved by adding, if necessary, an intermediate box with a completely cut off bottom if you need to dry a large pike, pike perch, etc. The slats can also be placed at different heights in the side cells of the drawer.

It won’t be difficult to make such a dryer by combining window dryers that sit idle in the winter as unnecessary. You just need to make a frame, attach the corners for the slats and install the door.

Of course, the main ingredient that allows you to store dried catch for a long time is salt. But if you use more than just it, you can achieve a significant improvement in taste. For example, ground 10 leaves of bay leaf mixed with black peppercorns will certainly have a positive effect on the taste of dried fish. And mixing salt with sugar in a ratio of 3 to 1 will appeal to gourmets. In hot weather, it is recommended to gut the fish before drying to prevent spoilage of the product.
We looked at the main ways to make a fish dryer with your own hands. By choosing the best option for yourself, you can save all your hefty catch and enjoy your own home-cooked fish for a long time to come.
Dried and dried fish are one of the most popular snacks in our country, and it would be strange to pay money for it if you yourself love to fish, and even boast of abundant and regular catches. The simplest version of a do-it-yourself fish dryer can even be an ordinary clothesline with clothespins on which the catch will be attached. To protect against midges, the catch can be protected with a mosquito net thrown on top, but with “production” running, this does not look serious.
A homemade fish dryer of decent appearance and the same functionality can be made at home by placing a large amount of fish in a small space and providing it with good ventilation and protection from curious insects. In rural areas, such a solution is especially relevant, since in a similar way you can dry not only fish, but also mushrooms, and even meat. There are two options for this design. Let's look at each of them in more detail.

In private homes, in most cases they resort to making a box covered on all sides with mosquito netting to protect against insects. Depending on the size, such a structure can be hung on a wall or even be multi-tiered and stand on the ground - then up to several dozen fish can be dried in it at the same time, but the likelihood of access by ground insects increases. The dimensions of the future box are determined only by you, based on your fishing abilities.
For good air access, the box should not have walls - in fact, we are simply talking about a contour frame. For its manufacture, timber or wooden slats are usually chosen, whose thickness should never be less than 2.5 cm. Moreover, in many cases it makes sense to take thicker material if the structure will have many tiers, or its volume allows you to hang several kilograms at once fish. In order not to make a mistake with the amount of material purchased, you can draw up a drawing in advance.
Just keep in mind that any relatively large box would benefit from additional spacers for strength and stability. When purchasing timber, you should take it with a small reserve - just in case.


For beauty, wood is often sanded and then painted, but it makes more sense to do the first procedure before assembling the structure, and the second after assembly. The polished slats are cut so as to make two identical rectangles, which will become opposite walls. They can be connected to each other either by several separate spacers, or by two more equal rectangles. After all this, you need to make another rectangle the size of one of the walls - it will serve as a door. For perfect correctness of all corners, most craftsmen advise using special small metal corners, sold somewhere in the vicinity of the same lumber.
When the frame is ready, if not painted, then at least varnished, because this way the wood, and even in outdoor conditions, will last much longer.
Paint and varnish must be chosen wisely: they must protect the wood from water and salt deposits, but at the same time be environmentally friendly, because toxic fumes will certainly saturate the fish.


In the upper part of the box, as well as between the struts of the lower tiers, you need to stretch a string or wire on which the fish will be hung. Determine the density of the rows and the vertical distance between the rows based on the size of the catch you can usually boast of. When choosing among twine and different types of wire, focus on the ability to withstand rain and withstand the expected weight of the catch; it is also wise to provide an easy option for replacing sagging or torn pieces.
When this stage has been passed, you can begin covering it with mosquito netting - usually it is simply cut into fragments of the required size and simply nailed to the slats in a taut state. In this way, all sides of the box are finished, except for the one left for the door, and if you plan to hang it tightly on the wall, the opposite side may also be left without a mesh. The door itself is also covered with mesh, after which it is attached with hinges to the “doorway”. The final touch will be to create a “latch” of two or three nails, but here it is worth approaching the task as responsibly as possible so that not the slightest gap remains.


If it suddenly turns out crooked, and there are still cracks, you can cover the outside with a sealant.
Many, by the way, do not want to make the door themselves, but specifically adjust the dimensions of the box to the size of a standard mosquito net for the window in order to use it as a door. Those who are completely lazy may not assemble any timber frame at all, simply connecting several of these grids together.
Some craftsmen don’t like the fact that when the door is open (at the stage of hanging fish or removing part of the prey), insects can get inside, so instead of doors they sew a zipper into the mesh. This can make the inlet hole much smaller and easier to control, but with this approach the mesh on that side usually deteriorates faster.


This design is more intended for the city - at least it not only can, but should be located inside the building, since it requires electricity to operate.
You can use any box as a frame, only now with solid walls and the ability to close tightly. You can put it together with your own hands, but it is much more popular to use large (at least 20 liters) plastic containers for something.
The ventilation grille is usually built into the lid of the box, located on top, but a small vent-type exhaust fan is installed in one of the narrow side walls, so that with its efforts the air flow passes through the entire box. The presence of an electric fan allows you to completely eliminate the lack of draft due to the lack of free air circulation in the room, therefore even the dense walls of a plastic box will not interfere with the rapid achievement of results - in most cases, this design dries the fish faster than the classic one with a mesh and fresh street air. At the top of the box there are metal rods with nut threads, which are fastened on the outer sides with appropriate nuts - we will hang fish or other products on them.


At this point, the simplest design of a home drying cabinet could be completed, but some craftsmen offer options for improving the design. So, it's no secret that For normal drying, you need not only a constant flow of air, but also a fairly high temperature, which in winter is not always achieved even indoors. A good solution to increase the temperature inside the cabinet is to use an electric mat - this product can be purchased at a pet store, as it is necessary for the comfort of most pet reptiles. You can go the other way by providing space inside the box for installing conventional incandescent light bulbs, which also heat up significantly during operation, but they will take up more space and may require numerous holes in the frame.
When installing any equipment to increase the temperature, you must remember that water flowing or evaporating from the products being dried should not get on the heating surface, much less on the electrical contacts.


Both design options are quite effective, proven over years of operation and used by hundreds of thousands of our fellow citizens, as evidenced by positive reviews on various fishing forums. Another thing is that for beginners who decide to try drying fish or mushrooms on their own for the first time, the first pancake comes out lumpy. Out of ignorance, such people often commit poor design, although the reason for the spoilage of products or their very specific taste lies not in the crooked hands of the master, but in a banal failure to comply with the catch preparation technology.
For example, there is no point in drying fresh fish - the finished product will turn out completely tasteless and few people will like it. Before sending it to the drying cabinet, the fish must be salted for at least 10-12 hours, and not any salt can be used for this - only coarse-grained salt is suitable, and iodized and “Extra” are considered completely unsuitable for these purposes.
Another common mistake is to thoroughly wash the fish before salting - although this may seem unhygienic, it should not be done. The fact is that the inhabitants of the depths are already an excellent environment for the proliferation of various microorganisms, and the increased presence of water also contributes to this, at the same time slowing down the drying process.


Experts advise just rinsing the carcasses a little, washing off clearly visible dirt and other debris from them. After this, it is advisable to dry each individual fish thoroughly with paper towels.
Dried fish in stores is almost always sold gutted, not so much out of concern for consumer convenience, but for the sake of longer storage. This is especially true for herbivorous fish, since the remains of plant food in its intestines at high temperatures can rot within a matter of days. Of course, you would still clean it before eating, but there is always the option that by that time the processes of rotting inside the carcass, without encountering the drying effect outside, will go far beyond the digestive tract of the fish. After all, when removing the giblets from dried fish, you may accidentally crush the insides, and this will definitely not make the product any more delicious.
Finally, at the stage of hanging the fish, you need to make sure that individual carcasses do not touch each other - there will be no proper ventilation in the places of contact, so this part of the catch may not be completely dried during dry harvesting. At the same time, in the process of constructing the cabinet, it is still worth pulling the string quite tightly - this will help dry more small fish at a time.

Accordingly, you should not think that during the drying process all rows must be hung strictly - when catching large prey, it is better to place it across the row.
To learn how to make a convenient fish dryer with your own hands, see the following video.
In the process of evolution, humanity has invented many ways to prepare products that allow them to be preserved for a long time. One of them is drying. Today we will dwell in more detail on the process of drying fish, the devices used for this and some of the nuances and features of the process of making them yourself.
With a successful combination of circumstances, a fisherman’s catch can be calculated not in pieces of fish caught, but in kilograms of its weight.
And in this case, there is a need to preserve the extracted product. Of course, a refrigerator can come to the rescue. But what an incomparable pleasure you experience when eating fish that you have caught and dried with your own hands.
When preparing your catch, you should remember some features. Firstly, the fish should be thoroughly salted before drying.
To improve the taste of the future product, it is better to use not only salt, sprinkling it in a voluminous container on the rows of caudates, but also add a few handfuls of black peppercorns and grind a dozen bay leaves.
Some gourmets mix salt and sugar in a 3/1 ratio. In the case of salting the catch directly at the fishing site, especially in the hot season, it is recommended to gut the fish to avoid spoilage. In this case, the amount of salt can be slightly reduced.
Secondly, during the drying process, the fish is very attractive to flies, trying to deposit their eggs in each carcass. Naturally, this “seasoning” is not to the taste of many, so it is necessary to take measures to prevent free access of insects. Let's consider several options for household fish dryers, made with your own hands from a variety of available materials.
It is a rectangular wooden box in which a fish hanging system is made. As a building material, take several slats of wood with a cross-section of 20x40 mm, cut a sufficient number of parts from them.
Connect the resulting bars at the corners using nails or self-tapping screws, trying to prevent the ends from splitting.
To protect against insects, you can use a synthetic mosquito net, which is not difficult to purchase at any hardware store.
The cell size should be minimal and not exceed 1-1.5 mm. Attaching the mesh to the frame can be done using small nails, but it is much more convenient to use a furniture stapler for these purposes.
To save cellular material, one of the walls of the drying chamber can be covered with a sheet of thin plywood or fiberboard.
Hanging fish during drying can be done on wire strings or nylon cords stretched between the bars of the dryer lid. It is convenient to directly attach the catch to hooks made from stainless paper clips.
This option is suitable for plastic lovers. You will need the following materials:

The advantage of this model is mobility, easy assembly, low weight, as well as the small volume it occupies when stored disassembled. To assemble, simply insert the frames into the connecting corners without using adhesives. We will have a side fence for the dryer.

Then we will install the same corners on the lower edges of the frames and place the bottom - a piece of panel - on them.

The next stage is to make a fastening system for holding fish from pieces of plastic corner profile. To do this, install corners vertically on the inside in the corners of the body and place four more on them in a spacer.

Place salted fish strung on wooden skewers or pieces of steel wire on the prepared hanger.

It is better to cover the bottom of the dryer with paper towels to collect the draining brine. We close the top of the structure with a lid assembled from the second piece of the panel and four pieces of the edge profile. The top cover can be non-removable, fastened using glue or a stapler.

A version of the dryer made on the basis of two fruit boxes is quite simple to manufacture. In the device, the containers are located one above the other in an inverted form. At the top drawer, you must first remove the cellular part of the bottom.
This is convenient to do with a sharp knife or side cutters. The boxes can be connected to each other using glue or self-tapping screws.
To provide protection from insects, sew two bags from a mosquito net, equipped with an elastic band at the neck. The lower bag is stationary, and the upper one will be installed after loading the next batch of fish.
To secure the catch during drying, you can use wooden slats with a cross-section of 15x20 mm, into which nails with the heads removed are driven at a certain pitch. Depending on the size of the fish, the slats can be installed higher or lower. If it is necessary to dry pike and pike perch, another intermediate box with the bottom completely removed can be added to the design. In working condition, drying from containers will look like this.
Human thought has no boundaries. To solve the problems of drying fish, various types of dryers made of different materials are used. A stationary one based on plastic window screens can be made in a different version, different from the collapsible one described above.

For the welder, a more convenient option is one made entirely on a non-demountable metal frame.

At the same time, the device can be used either suspended or installed on the ground in the shade of garden trees or a canopy. It has been noticed that it is better to dry fish (drying) in a semi-shaded place rather than in the open sun. In this case, the product will be more tender, soft and fatty.
In places characterized by large volumes of fish caught, it is advisable to use large-volume stationary dryers, which allow loading large quantities of fish up to several tens of kilograms.
Even an ordinary umbrella, complemented by a sleeve made of fine mesh, can be used by savvy fishermen to harvest fish on the go. It is enough to hang it from the nearest tree and hang the pre-salted catch of the day on the knitting needles. In Soviet times, with a total shortage, one could not even dream of a mosquito net, but people easily got out of difficult situations. Disused tulle was used as protection against insects.
Dear readers, if you have any questions, please ask them using the form below. We will be glad to communicate with you;)


