Installation process mortise sink into the countertop is very simple and you can do it yourself.
To do this, prepare the following tools and materials in advance:
screwdriver,
screwdriver,
sealant,
clamps,
pliers.
All other equipment that may be needed is available in each apartment. This is a tape measure, pencil, ruler, knife, rag, etc.
Before installation: On the countertop you need to carefully mark the place where the sink will cut into. First remove the tabletop from the furniture. Of course, it is not difficult for specialists to install sinks onto already installed countertops, but when self-installation
It is better to provide yourself with maximum comfort. The mounting hole (cutout) for the sink can be made according to the template that manufacturers provide with their products. If this is not available, it can be made from cardboard. Or take the sink itself, place it on the countertop and carefully draw an outline along its edge. Then step back inward from the marked edge by 1cm–1.5cm and draw a second contour - it will be working.

At the next stage, the hole is cut out - this is the most crucial moment. If you remove the tabletop from the furniture, place it as conveniently as possible for yourself. Then use a drill to drill holes with a diameter of 10mm in the four corners of the marked line. Then a hole is cut out with a jigsaw strictly along the lines. When cutting is complete, thoroughly clean the cut from sawdust and dust. And now the cut area, cleared of foreign particles, must be treated with sealant.
We would like to note that the type of sealant is also determined by the material the countertop is made of. If the countertop is stone, then use silicone; if it is plastic or wooden, then you can also use alcohol sealants. In order for the sealant to “set”, be sure to wait for the time specified in the instructions. 
Installation: Place the tabletop in its place and secure it. It's time to install the sink itself. It is also placed on the countertop using silicone or a sealing gasket sold with the sink. In this case, the edges of the sink on the back side are carefully coated with silicone or a gasket is glued as close as possible to the edges of the sink.
After this, turn the sink over and install it in the hole made in the countertop.


Gently press the sink using clamps or special fasteners that come with the sink. Wait a while to let the sink stick. After this, cut off the seal that protrudes from under the sink or remove excess silicone. Installation: drain fittings This stage
is in most cases final. If there are several bowls in the sink, the fittings system will be complex. Then it will be more convenient to move the stage of installing the fittings to the beginning of the work, i.e. Install the fittings before installing the sink into the countertop.
Installation of a granite composite sink The process of installing a sink made from granite composite is a little more complicated than for a mortise sink made from of stainless steel
Before installation.

If the reinforcement parts have a central part with a diameter exceeding 35 mm, then the hole for such reinforcement must be enlarged. To do this using hacksaw blade and a slotted narrow hacksaw expand the star-shaped hole (see figure). Then, using pliers, the emerging plates are carefully broken out.
Installation: The mounting clips (2), supplied separately, are pushed into the prepared slots on the back of the sink. Some sink models are equipped with clamps that are inserted into two holes. Then you need to drive in both screws (3). Then apply silicone mass (4) (layer thickness 3mm-2mm) to the sanded edge of the sink. Insert the sink into the cutout in the countertop, align it so that after fixing, all fasteners evenly cover the material around the countertop. Press down on the sink and, if necessary, remove any protruding seal. After this, tighten the opposing mounting screws securely (crosswise as shown in the figure). When using pneumatic or electric screwdrivers, use a tightening torque not exceeding 6.0 Nm.

Base: Apply a silicone bead (1) to the perimeter of the cutout. Install the sink and perform preliminary leveling. Push the fasteners (2) into the groove and level the sink again.

The last point is to remove the silicone that appears on the outside. What do you need to know about the installation process of an integrated sink?
Important condition

High-quality and competent installation of an integrated sink means accurate and correct creation of the mounting hole for it, as well as its careful sealing. It is best to use coordinate milling machines for these purposes. They are programmed, and they provide a very precise trajectory “in course and in depth.” In addition, the high speed of the tool ensures a clean cut.
To mill a groove under the edge of the sink, you can use a regular manual milling machine. The surface of its adjustable stop acts as a vertical limiter for the stroke of this tool. The diameter of the ring and cutter is an important individual parameter. They must be selected from the very beginning - then only these sizes must be used.
A template will help you cut out the correct trajectory - it is ordered from the manufacturer according to the selected diameters of the ring or cutter. The ring runs in the template and guides the cutter.

Kitchen sinks differ not only in material, but also in the installation method. Their price, installation cost, durability and ease of use depend on the latter. According to this criterion, three categories are distinguished:
As you can see, installing a mortise sink will be the most challenging task. If the invoice is most often supplied together with the cabinet on which it should stand, and the integrated one is usually produced together with the kitchen set, then it is better to entrust the mortise one to specialists.
Let's consider the main stages of such installation:
It is important to note that the process installation of a sink made of artificial stone into the tabletop involves a series important details and nuances. The presented algorithm only affects basic aspects, without which installation is impossible in principle. However, for the result to be long-lasting and sustainable, you need to pay attention to many little details, which only a professional is fully capable of. Contact the masters of GCUiER, and your kitchen will delight you with cleanliness and beauty for many years.
Application innovative technologies in the field of design has significantly expanded the range of interior solutions for the kitchen, where the equipment used must be not only aesthetic, but also functional. In accordance with existing requirements, modern kitchen should be equipped with a number of devices and accessories designed to optimize the cooking process. One of these devices is a kitchen sink, the installation of which only at first glance seems like a fairly simple task. However, given the variety of models and possible locations for its placement, it is important to approach the choice of design and the procedure for its placement in the most responsible manner. Despite the wide the lineup, the most popular are mortise structures made of stainless steel and built into the kitchen countertop. Given the popularity of these products, it would be most appropriate to consider design features this product and searching for an answer to the question: “How to install a built-in sink into a countertop?”
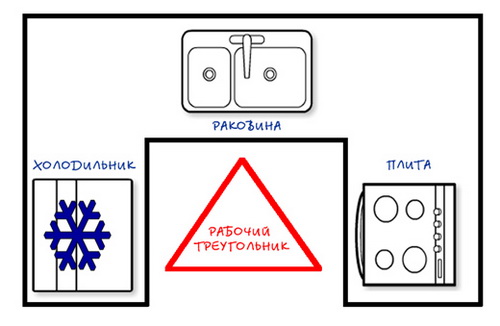
To optimize the cooking process, it is necessary to correctly position kitchen furniture and technology. Surely everyone is familiar with the concept of “ergonomics” and its basic principles, which may vary somewhat depending on the type of room. The kitchen is no exception - renovations in this area are subject to strictly defined ergonomic principles. In accordance with them, the arrangement of furniture and equipment in the kitchen depends on the order of work, and therefore, it is recommended to arrange furniture from left to right in a strictly defined sequence: refrigerator - Dishwasher(if available) - sink - stove. Between the named technical objects It is recommended to place work surfaces with cabinets.
Concerning minimum distances between objects, then certain requirements are also imposed on them:
What should you consider when choosing a kitchen sink?
When choosing a kitchen sink, pay attention to the following factors:

There are a number of requirements for installing a kitchen sink, and therefore it must be carried out in accordance with a certain technology. The choice of the required technological solution, and, accordingly, the installation method depends on the design of the sink. Let's look at the most popular design types:

Important! Experts recommend giving preference to overhead models if the kitchen set consists of separate sections. If kitchen modules are combined under a common countertop, it would be more appropriate to use built-in models.


As for overhead and mortise sinks, both are made of stainless steel with equal frequency, remaining one of the most popular at the moment. The appearance of mortise stainless steel sinks can be different - the most common are smooth sinks and sinks with a texture that imitates linen.
In addition to traditional sinks made of stainless and enameled steel, mortise sinks made of stone and mineral-epoxy composite materials are no less popular. Artificial stone is also a popular material. Sinks made from composite materials have an impressive grain structure, appearance resembling polished stone. Built-in sinks made of artificial stone make up a large group of kitchen accessories characterized by high aesthetic and performance characteristics, including resistance to scratches, abrasion and sudden temperature changes.
The shape of sinks is no less varied - along with single-bowl sinks, there are also models with several (from two to four) bowls, which can be either shallow or deep, equipped with additional dryers.

Important! Before you begin installing the sink, you need to connect the faucet, which will subsequently avoid difficulties during the installation process.


Let's consider the principle of installing a mortise sink in a countertop made of chipboard, covered with plastic on top. If you are wondering how to attach a mortise sink to a countertop made of other materials, including artificial stone, carefully read the product data sheet, where the manufacturer must describe in detail recommendations for working with this material.
Before installing the sink, check that it is complete with mounting materials. Most often, these are special clips that are mounted on both sides - on the cut end of the countertop and on the inner surface of the sink. In addition, the kit should include a tubular sealant, which will be required to seal the joints. In addition, prepare the following set of tools:


Important! To prevent a sink embedded in the countertop from becoming an obstacle to closing the cabinet doors, it must be located inside the cabinet.
Important! The size of the hole must be such that the sink fits freely into it, while tolerance from the marking should not exceed 3 mm.

Important! The corner holes should be located in the inner plane of the cutting area, and their edges should only be in contact with the cutting line.

Important! The sink should fit freely into the resulting hole (if difficulties arise, you need to trim the edges with a jigsaw).
Important! Insufficient sealing will lead to moisture entering the unprotected area of the countertop, which will cause the activation of rotting processes and the formation of fungal plaque. Subsequently, the cut edge will become brittle, which will reduce the stability of the sink and lead to its distortion.

Important! If during the work you find chips on the plastic (the front side of the tabletop), carefully coat them with sealant, and it is not at all necessary that the layer be thick - its thickness in this case does not matter.

Due to the fact that the process of gluing the seal directly determines the wear resistance and performance characteristics future headset, let's look at it in more detail.


Important! When installing the sink, press firmly on the entire surface of the structure, which will allow you to remove excess silicone from under the sides of the sink.

After securing the hoses, installation activities look like this:


The process of inserting a corner and round sink is identical to that described above, however, for both types there are certain installation features.
Features of installing a round sink:

Features of installing a corner sink:
Specifics of installing a granite sink:
Let's say right away kitchen sinks have come a long way in their development. Our parents only knew square enamel sinks. Today they are released from different materials and all kinds of forms. The sink can be made of metal and stone, composite material and ceramics.
If the kitchen is decorated in modern style, then you can choose a sink made of composite material, that is, artificial stone. IN classic style A sink made of artificial stone or ceramic will fit well.
The single sink made of artificial stone continues to be popular among consumers. It is quite large and roomy, unlike small double models. In a deep single sink you can wash watermelon or melon, pots and pans.

The sink can be rectangular or oval and corner.

When choosing sinks, you need to take into account the kitchen area.
There are sinks made of artificial stone different color, size and type. Such sinks can be made the same color as the countertop and no seams will be visible from the outside.


Sinks can be called composite sinks made of porcelain stoneware.


The ceramic look adds originality to the sink. A high-quality ceramic bowl will be resistant to scratches, temperature changes and exposure household chemicals. It will not be afraid of a hot frying pan and food placed on the bottom for defrosting. And the special coating will allow you to wash the sink without any difficulty. However, the heavy weight and fragility of the product will not go away. These factors will have to be taken into account and taken into account in operation.
As you can see from the photo above, classic version sinks are rectangular or square in shape. Favorite option among housewives, choice round shape bowls. It has been proven by practice that round models with similar parameters will be more spacious than square ones.
Designers advise choosing the color of sinks so that it matches the chosen kitchen set.


The car wash is a real work center. It is equipped with all kinds of auxiliary devices, such as a drying rack or a wing stand for hot dishes and food, and a cutting board. Watch the video on this topic and you will understand everything.
You also need to know another way to install a sink yourself; perhaps it will be useful to you, so watch the following video. Sink designs are sold in different models and they are equipped differently. You need to be able to install a mortise sink correctly into the hole intended for it. A hole is cut in the common table top or in the table top of the cabinet.
The sink itself can be installed above, below, or at the same level as the countertop.

Exquisite gloss, ease of installation and maintenance, a variety of colors and shapes – these are the advantages of artificial stone sinks that will appeal to any housewife. It is worth noting that sinks made of artificial stone are in one price category with stainless steel products. Although the first option is certainly the most stylish and presentable.
Cast sinks made of artificial stone can effectively transform the interior of a kitchen of any style. The main thing is that the tabletop is also made of artificial stone and, if possible, repeats color scheme sinks The main feature of a cast sink is that the stone sink is glued to the countertop - resulting in the effect of a single surface.
If this is an element of special sophistication and uniqueness, then overhead sinks made of artificial stone are the most common type of plumbing products. According to statistics, every fourth urban family uses them, which suggests the practicality and convenience of this type of sink. A significant advantage of this type of sink is its ease of installation. Overhead sinks have special edges that cut into the countertop. It is worth noting that for the overhead version of the sink it is not necessary to have a stone countertop - an artificial stone sink will ideally be installed on any surface of the main table.
Installing a stone sink does not require any special skills, however, you need to know the following features:
Before installing the sink, turn it over and mark the place on the countertop that you will cut out. Optimal distance from the edges - from 5 to 11 cm, otherwise the operation of the sink will be inconvenient. When tracing the edges of the sink, do not forget about the sides: in the end you should end up with two circles (or squares) - the cut line and the line of the sink itself. For further work you will need an internal line. Once the area is prepared, clean the edges of sawdust and other fine particles– this will allow you to most effectively get rid of micro-cracks. If the edges are clear of sawing residue, apply silicone and install the sink.
Installing an overhead sink is even easier. The main thing here is that the size of the sink matches the cabinet. IN in this case there is no need to cut anything out. Simply apply silicone to the edges of the sink and secure it to the countertop.
If you are going to buy a sink made of artificial stone combined with a countertop, we advise you to contact professionals, since such installation can only be done by professionals.