Making interior paintings with your own hands is very exciting. In this case, the most accessible materials are used, such as: buttons, paper, lemon, feathers, balloons, cupcake packaging.
Feel like real modern artists by creating an amazing canvas. It will be light and airy, as it is created from feathers.


Floating butterflies will certainly lift your spirits.


Just like in the presented photo, make the left outline of the picture fuzzy, as if it were hovering butterflies that were gradually landing here.


Try this fun craft with your kids. After all, they can also create original paintings with you. Each butterfly can be painted and glued to the canvas.

You should have several rows of hearts. Paint the block and tie the top parts of the fishing lines to it.
Now you can hang such a beautiful panel above the bed in the bedroom or on the wall in another room.


The following design solutions will be suggested by waste material. After all, wine corks are usually thrown away, but you can make a lot of interesting things out of them. This is the kind of work created based on this material.

To get such beautiful interior paintings, you can only use:
The next picture doesn't need a frame. You simply glue the corks in rows onto the main surface and you can attach a card here to congratulate your loved one.
If you have a lot of unnecessary buttons accumulated in your household, then you can also make interior paintings from them.

The following will also decorate the interior.

You can confess your love in the most unexpected way. Paint the wooden surface, when dry, glue pink heart-shaped buttons here. Seeing such a sign of attention, the person dear to you will certainly be happy.


If you prefer light colors, when you take a white base, draw the trunk here with a marker or brown pencil. You can give free rein to your creative imagination and lay out this part of the tree using threads of this color. Glue buttons that will turn into colorful leaves.

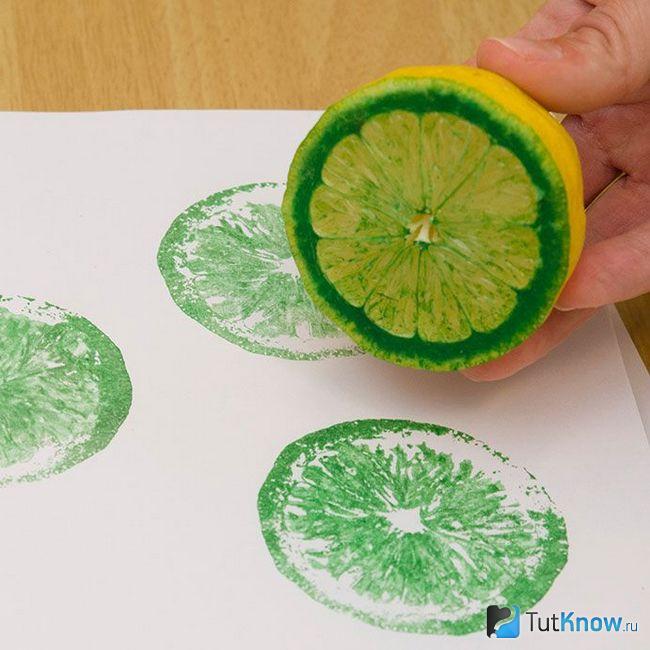
Just dip a daisy or other flower in paint and it will turn into a wonderful printing tool. You will lean the plant against a white sheet of paper and create original designs.

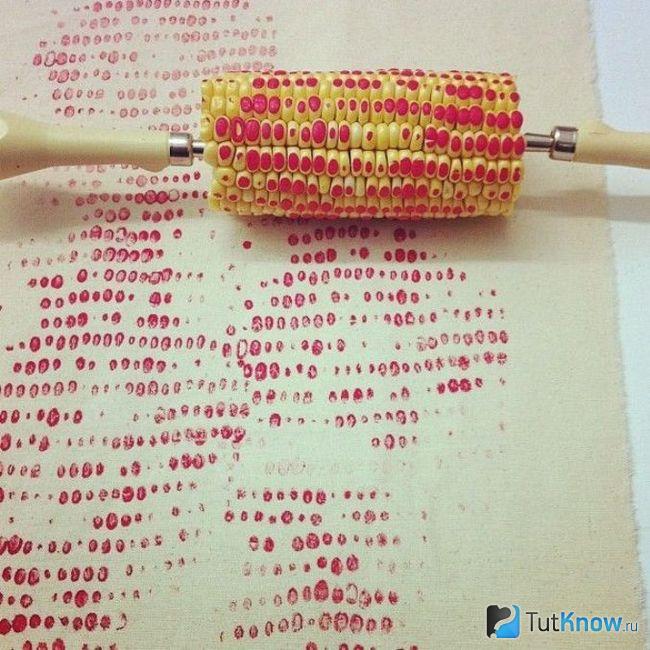

If you want to draw your favorite teddy bear, but you can’t do it, then you can make a print. To avoid damaging the toy, use water-washable paint. Dip the bear here and place it on a piece of contrasting paper.

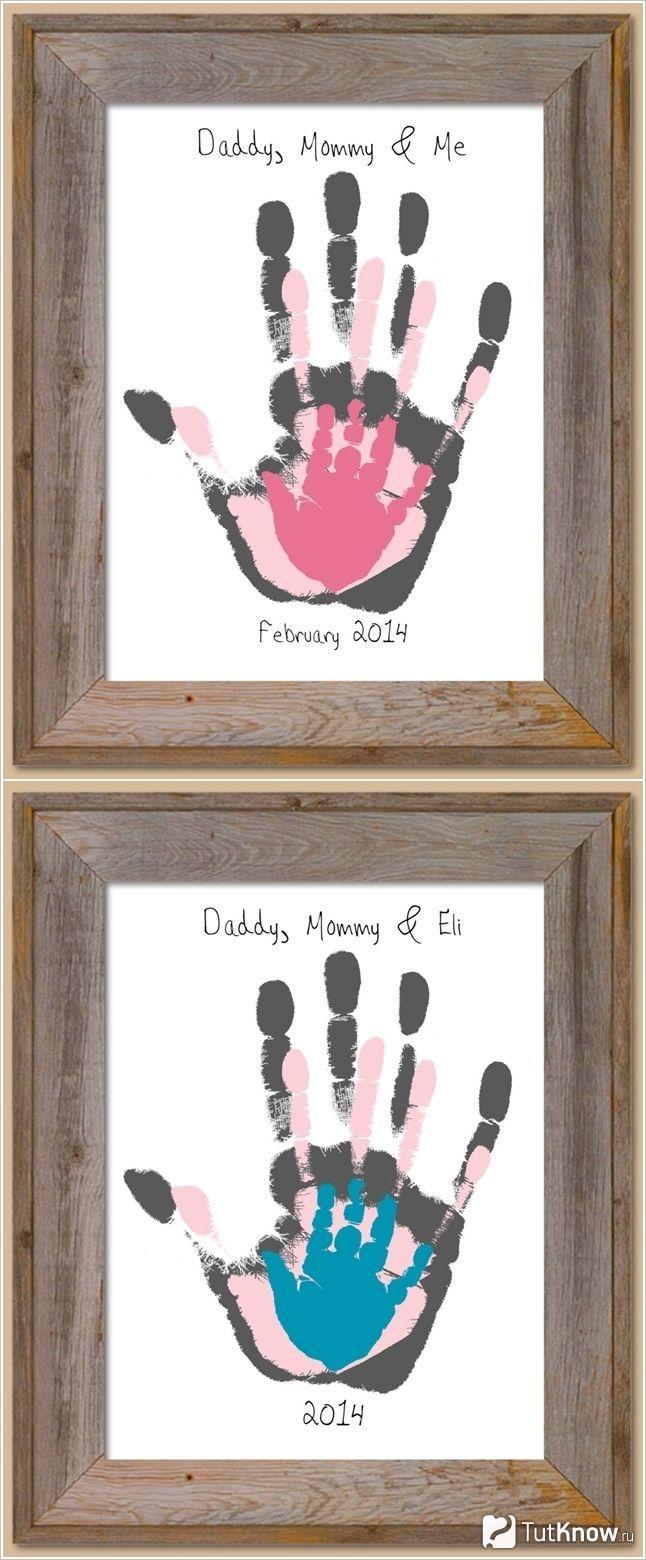
If you want to make a picture as a keepsake, then invite all family members to do similar manipulations. In this case, the largest palm should be printed first, and then the next ones are arranged in decreasing order. Use different colors of paint so that each print is clearly visible.
That's how long it will take to create your next masterpiece.

You will create the next painting just as quickly. Such works will appeal to lovers of glamor.
If you don't have glitter, then you can shred the broken Christmas ball. To do this, cover it with a cloth and gently knock on top with a hammer.
If you liked these interior paintings, then create the next one using almost the same principle.
If you have even less time, then you can make a panel in the same minimalist traditions as Malevich’s black square.

Even leftover fabric will give you interesting ideas.

If you have small scraps left, then you can make a voluminous flower like this.

If there is some braid left over from needlework, you can also use it. See what kind of interior paintings you can create with it.


Here are some interesting works of art that can be created in a matter of minutes from available materials. If you want to see how others make interior paintings, then your wish will be granted right now.
A three-dimensional painting made of paper is often popularly called a 3D sculpture in a frame. There are a huge variety of techniques for creating such 3D paintings and panels - from papier-mâché from pieces of paper, to voluminous appliqués from colored paper, and what kind of landscapes can be made from toilet paper! And as soon as we started talking about 3D, it’s a very exciting activity: creating three-dimensional drawings on graph paper, from which anamorphic illusions are obtained. You can also make stunning multi-layered pictures from paper.
Cutting out large multi-layered paintings from plain paper - interesting hobby. If you decide to try your skills in this part of the art, start with simple paper paintings, the production of which will allow you to become familiar with the details of this type of craft.
We offer an easy and detailed master class, which will help you make a large picture cut out of paper with your own hands. This requires very little time, and the materials needed for the work can always be found at home.
For work, we will need:
 Before creating the picture, we will treat the wooden frame with white paint. It is easier to use aerosol paints. Remember that the front part of our product there will be a back side of the frame. While the paint dries, you can move on to creating the background. To do this, cut out a rectangle from blue material. It must completely fit the internal dimensions of the frame.
On a white leaf, we will depict several trees with different intersecting branches. To make cutting easier, let's shade a couple of intersections with our pencil. Under the first leaf put a second sheet. Let's move on to cutting out the marked areas. After this, separate the leaves and trim the cuts with a knife.
Slowly fold the edges of both sheets to increase their volume. We will also tuck the tree trunks, creating small cuts and fixing them with our glue. This work is easier to do with an awl. Glue a couple of pieces of foam onto the bottom sheet, and then attach the second sheet to it. Space begins to appear between the paper snowdrifts, which gives the effect of layering and volume.
Now, using our stationery perforation knife, we make a couple of dozen round “snowflakes”. In the same way, cut out a couple of circles (circles) of different sizes from multi-colored paper. If we don’t have it, let’s start working with liquid glitter and make circles.
Let's cut out the moon from the material in the form of a circle and animal figures, from yellow we make stars.
On the third leaf of our white material, we depict a tall tree with thin and long branches, and slowly cut it out. When all the details are done, you can move on to assembling the “cut-outs,” as paper paintings are also called. To do this, you need to glue the layers of paper on top of each other one by one.
Our three-dimensional fake is done, it’s time to frame it. Measure the center at the top of the frame and screw the wire into the loop. Then we will pass a wire or rope through the loop so that the product can be hung on the wall. Glue a couple of strips of large tape inside the frame and place the picture evenly.
Craft completed! Now you can safely decorate your home with a paper painting you created yourself.
As you can see, with a little effort and patience, you can create unique paintings.


 For making 3D paintings we will need the following materials and certain simple tools:
Conclusion. Don’t be afraid to start making paper crafts; after simple products, you can start making paintings of flowers, and then you can also sell them.
Having decided on the style, you can begin to select materials for the future work:
Advice! Don't throw away old children's drawings, scraps of fabric, magazines, decorations– all this can become part of the picture. Store them in a separate box, periodically reviewing and arranging them together.
The easiest way to create an original painting for your interior with your own hands is to paint it. The subject is limited only by the imagination of the creator. Even if you have no artistic skills, you can create a masterpiece: use abstract techniques, study master classes and photos of finished works.
Oil, watercolor, and acrylic paints will become faithful assistants in creating paintings for the interior. As a base, you can use either professional canvas or regular thick paper or a primed board.
Advice! You can draw inspiration from nature if there are picturesque places near your home. If you are unlucky with either the location or the weather, feel free to draw your household, pets, fruit compositions - whatever. The accuracy of the reproduction of reality does not play any role, the main thing is to approach the process with soul.
Modular paintings are suitable for almost any room: from kitchens before living room, but it is important to select appropriate images. If you don’t have the time to create a masterpiece with your own hands, then we have good news for you - today you can buy them in any specialized store!
The technical side of the issue is taken care of by a photo workshop, which can print a suitable image on almost any basis: canvas, paper, ceramics, etc. These can be ordinary posters depicting interesting places, people, ornaments.
Advice! A poster is not just a picture, it must convey a certain idea, correspond to the interior, the theme of the room and the character of the owners of the house. Recently, pin-up and retro style posters have gained particular popularity.
If the poster is large-format, you can divide the image into several segments and, when combined into a single canvas, play with the joints, making it look like a modular picture.
If there is a child in the house, then you can scan his drawings and select the ones that match the color, shape, etc. Such a poster can be complemented by a photo of the artist himself. All that remains is to print the poster and place it in a frame that matches the color and style.
Collage of old and new family photos You can hang it as a picture in the bedroom or living room, and posters depicting the corresponding paraphernalia and fruits are suitable for the kitchen. Finally, it is worth noting that it is recommended to choose posters and panels for the kitchen in rich and bright colors, however, no one forbids you to go against the rules and create stylish ones.
From all kinds of scraps, fabric with beautiful patterns, ribbons, braid or lace, you can create real masterpieces in patchwork style with your own hands. Fabric paintings are most often made using the appliqué technique. The basis is taken of dense textiles with discreet and inconspicuous patterns (stripes, polka dots, etc.), and the main elements are cut out from bright shreds.
Most often, kitchens and children's rooms are decorated with textile works, since these rooms are characterized by a certain simplicity present in the appliqué.
Advice! From felt, flannel and other fabrics that hold their shape well, you can cut out fruits, animals, cars, and houses. You can safely combine different textures and patterns on fabrics, use braid, decorative cord, and buttons for decoration. For the living room, you can make a textile picture from crinkled silk with abstract patterns.
With their help, you can create original things by sewing or appliqué. This type of fittings is often used to depict leaves on trees. Buttons can be glued in an original way inside any contour, for example, a silhouette butterflies or cats. In sewing stores you can select parts of various shapes, colors and materials and lay them out, like a mosaic, according to a pre-prepared pattern. Such button creations will fit perfectly into the kitchen, however, they can also be used for the living room and bedroom.
Advice! Buttons can be glued around the perimeter of the picture frame, giving it individuality.
Often, after renovation, large pieces of beautiful wallpaper remain, which are useful for making unusual interior paintings.
The theme of this step-by-step master class is an extremely beautiful New Year's paper painting, which you can make with your own hands using the templates we provide. The soft lighting gives the painting a special charm. hidden between paper elements.
A DIY New Year's paper painting that works on the principle of the play of light and shadow is an original way to beautifully highlight your interior on the eve of the winter holidays!

This painting consists of several layers of paper, cut according to a pattern and placed in a thick frame at some distance from each other. On the back side the structure is illuminated by LED strip. Different layers of paper together create a landscape that is a play of light and shadow and turns the craft into a “magical” winter fairy tale!

If desired, the elements in the picture can be further “customized” and some “special” effects can be added that will make the image even more realistic!

Materials and tools:

So, let's quickly get down to the creative part of our plan and an exciting activity, because as a result of the work, a wonderful decoration for the interior awaits us - a New Year's picture made of paper.
The first thing you need to do is prepare the design for the decoration you want for your painting. You can draw it or design it on your computer and then print it out. Since we are not very good at drawing, we chose the second option.
We decided to go with 4 separate layers, one of which would have a pattern of water reflected from top to bottom.
An important condition for this design should be the complete absence of “flying” objects: all your silhouettes should be attached somewhere in the scenery. For example, the last deer in our design is connected to the top of the bell tower; trees, snowman and deer are connected to the earth, etc.
Be sure to include frames of the same size on all layers to help hold everything together!
Be sure to put all the layers together before assembling and make sure that they fit together perfectly and all their parts are clearly visible (unless you want them to be visible). To differentiate them, we printed each layer in a separate color.

Below are the templates that you just need to download and print on your printer.
Template 1

Template 2

For pattern 3, you simply need to cut out half the sheet. Don't forget to leave a frame!
Template 4

When you're done preparing the layers, print them separately and transfer each one onto thick white paper. To do this, attach the printed layer to the window and place the paper on top. This way you can easily see and trace the contours of the landscape.

The third layer has simple geometric shapes, so we just held it with our free hand (see next step).
Once you've finished tracing the outlines of all your layers onto the white paper, use a sharp utility knife to cut them out.

Initially remove the parts you no longer need. Cut them out slowly and carefully, trying to be as precise as possible.

Be careful with narrow seams in your design, as they can easily break or be removed by mistake. At this point, use a durable backing or some scrap surface that you don't mind scratching.

As you can see, our third layer is a regular rectangle with one half cut out and no design. This is because we wanted to create a water reflection effect in this area.

Here's how it works: this layer will be located behind the lake layer and before the last layer with the moon and the top-down design. The paper goes into the third hidden layer, but when the light is on, the reflection will appear on the top layer. The effect will be very soft, and the play of light will not be as pronounced as it would be otherwise.
The reason we cut out the first half of the layer is because we didn't want the moon to be bright, but later we realized that it could be cut out not at this level, but at the fourth one! You see, our New Year's paper painting has already gradually begun to take on beautiful shapes and silhouettes.

Now you need to cut out some cardboard spacers to create space between each layer for the light.
Cut individual strips of cardboard to the length and width of your frame. Alternatively, you can make entire cardboard frames to fit your frame for each layer separately. The second option requires large pieces of cardboard, so we used the first. In any case, make the width of the frame somewhat thinner than the frame in paper layers, and then your cardboard will not be noticeable from the side in the finished craft.

Glue strips of cardboard around the back of the first layer.

After this, attach the second layer on top of the strips, on the front side of the cardboard frame.


Repeat steps until you have glued the fourth layer.


As you can see. It is precisely due to the multi-layering that our New Year's paper painting looks like a three-dimensional 3D image.
Now you need to beautifully design the landscape. Of course, you can use a pre-made frame, but we'll show you how to make your own!
To make the frame, cut 4 wide strips of cardboard the same width and length as your craft. These strips should be slightly wider than the thickness of the layers, since you need to save some free space on the wrong side for the LED strip.

Measure the thickness of the cardboard at one end of each strip and draw a line.

Using a cutter, carefully cut out this piece, but make sure that the bottommost layer of cardboard remains intact.

When you've finished doing this on all the strips, apply a little glue to the cardboard layer at the end of the strip and attach the second strip perpendicularly to it.

Do this with all 4 strips to create a rectangle.

This is a simple trick to hide edges and make your work more aesthetically pleasing.
To make the back, simply cut a rectangle of cardboard the length and width of your frame.

Paint this piece of squirrel with paint or cover it with a piece of paper (like we did).

To make our New Year's paper picture look complete, we need a frame. So we drew a new frame on a piece of cardboard measuring the length and width of the painting. This cardboard was already white, but you can paint it if you want.

Apply a little glue around the inside of the frame and carefully press the landscape into it. Slowly lower the landscape down until it reaches your desired position.

We placed our New Year's paper picture a little away from the top of the box so that there was free space between the frame and the first layer.

Cut a small slit in the back of the box for the cable to fit through the frame. Try to make it closer to one of the corners.

Don't forget to glue a cardboard frame to the top of the window to complete your shadow painting!
Measure the inside of the box around the perimeter and cut a piece of LED strip according to the measurements. Apply the tape to the inside of the window, starting from where you made the cut.
Connect the strip to the power source using an adapter or welding.

Place the back of the frame back in the box with the white side facing in so you won't be able to see any brown spots through the cut layers. The back fits perfectly into the box, staying in place when closed, and you can remove it whenever you want.

Plug in the LED strip and admire the amazing result! With the thick white paper and space between each layer, the light bleeds through the layers very nicely!

Your DIY New Year's paper painting is ready! How do you like her? You can not only use our templates. but also choose your own. Let us know in the comments what you did. Merry Christmas and Happy New Year to you!

If you liked creating this New Year's paper picture, then here is a video with another good creative idea:
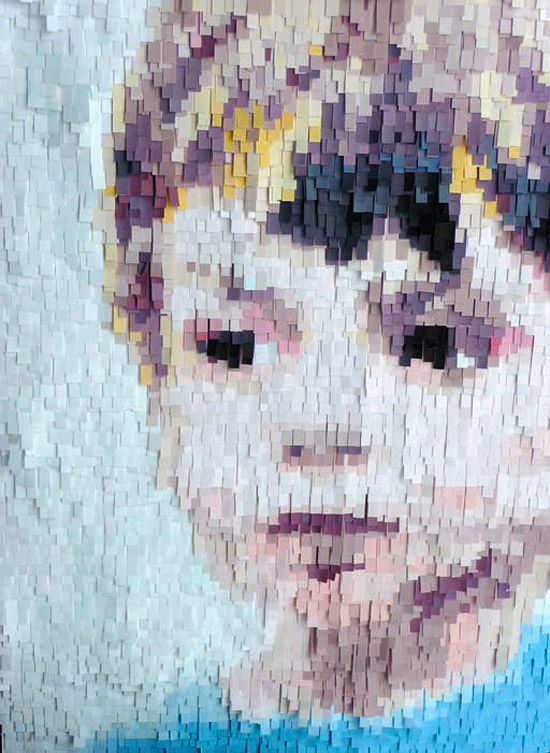
Incredible and fantastic paintings from pieces of paper by an amazing non-professional French artist, sculptor and photographer Nathalie Boutté inspired me. I wanted to tell you how to make such a picture out of paper. The enormous possibilities of this ordinary and at the same time unique material are revealed in her wonderful colors in multi-layered paintings.

Nathalie began creative searches and experiments with various types and textures by studying the various properties and well-known techniques for working with paper. Her experiments with origami and work with three-dimensional compositions led her to the creation of an interesting technique of three-dimensional applique from strips and pieces of paper.
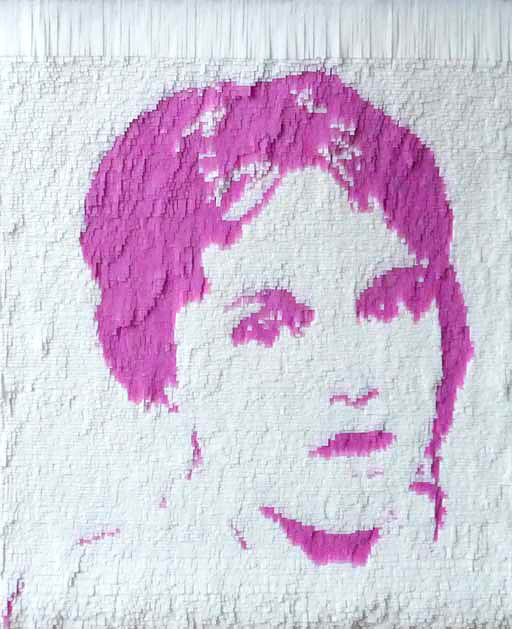
The possibilities of the material and this technique allow you to create very original works. Portraits made from many layers of paper turn out surprisingly alive and spiritual.
Nathalie's works show that any person who has the desire to create and implement their interesting and unusual ideas can achieve success and recognition. It is important to figure out how and what to do and have a fair amount of patience. The exciting process of creating a paper painting with your own hands is very simple.
To work with this technique, you will need a few materials:
- white or colored paper. Currently, there is a huge variety of types and textures of colored paper that can be purchased in stores for artists. You can take newspaper in combination with white paper.
- glue;
- scissors;
- paints and brushes. If the desired shade of paper is not available, then you can create works by making stretch marks of the desired colors on white paper with paints and cutting out strips from them.
Before starting work, you need to decide on a sketch. You can draw it, or you can use a photograph or a ready-made drawing, onto which stripes of the desired color are glued layer by layer.
A good idea, to properly organize the work process, would be to pre-cut strips of the desired size and color from paper and arrange them by color.
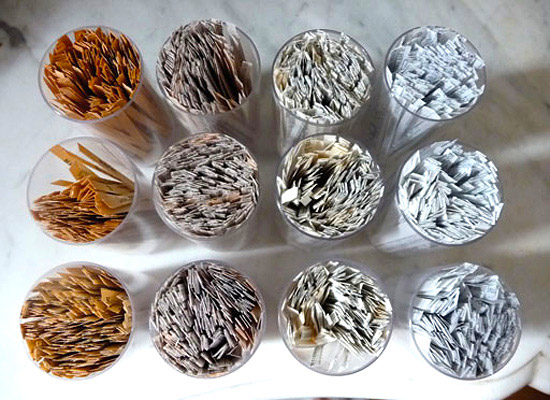
Then you won’t have to take time off from work, frantically search for the right color and be distracted by cutting out additional strips. If there are extra stripes left, no problem. If you are making pictures from cut up newspaper, it’s too much and you don’t mind throwing it away. Yes, in the end, everything will come in handy around the house and you can make other crafts from cut-up strips of colored paper or newspaper. After all, working with paper and this technique are very exciting. Once a painting is made, it is difficult for creative people to stop.

Based on the idea of a particular work, we choose the color or texture of the paper. You can work with tracing paper or thin rice paper, then you get the effect of airiness and the flight of real wings. Look how effectively and simply you can make paper wings using this technique.

When using thicker types of paper, greater saturation of the composition and interesting volume will be achieved.
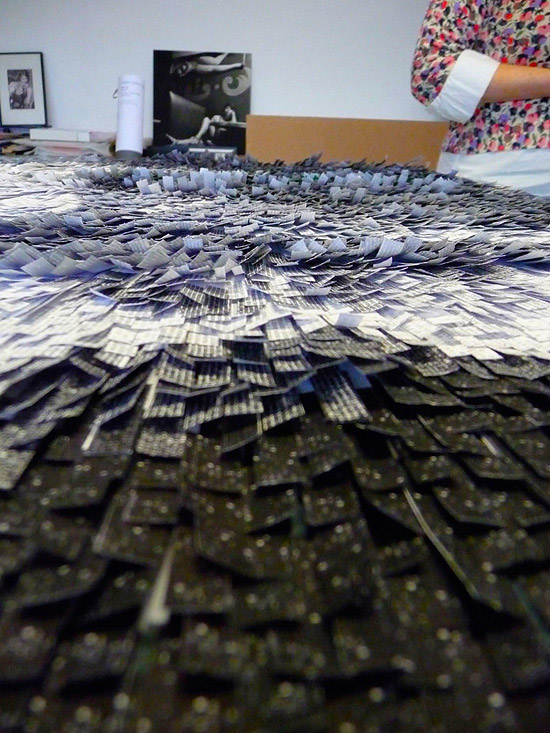
The technique of creating such works consists of painstaking selection and gluing, row by row, strip by strip of the desired color.
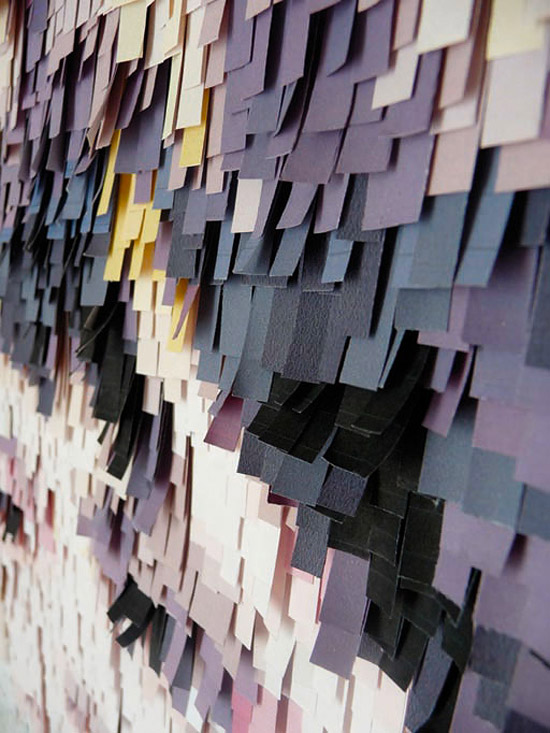
Such a voluminous, abstract applique looks very impressive.

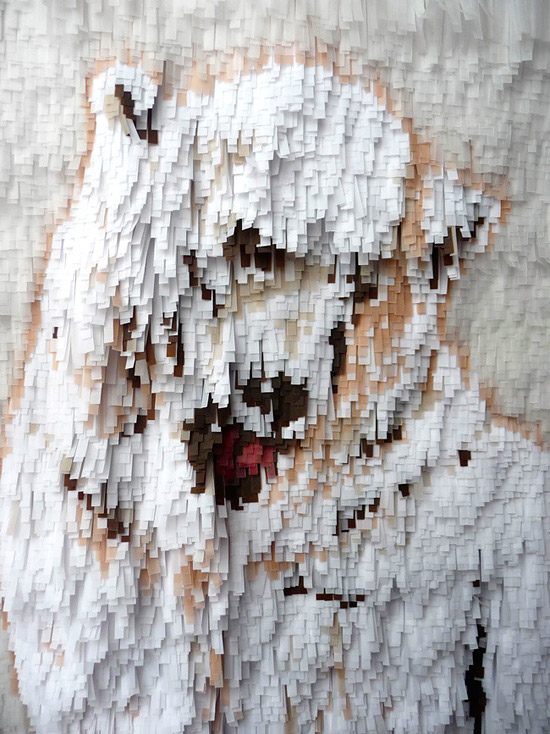
The combination of strips of paper of different densities and colors, as in this image of a bear, creates the illusion of a real three-dimensional animal. If you touch it with your hand, you can feel its fluffy fur. The work can be fluffier if you stick the strips tighter and fluff them up.
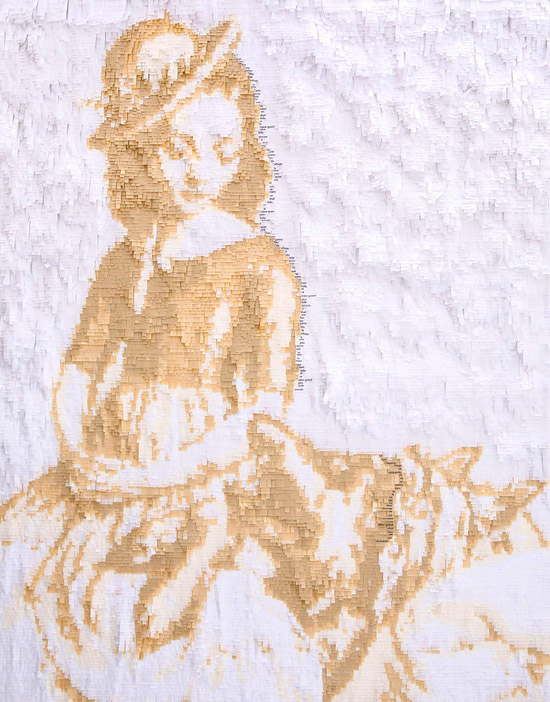
You can draw portraits using this technique. They turn out so touching and mysterious.
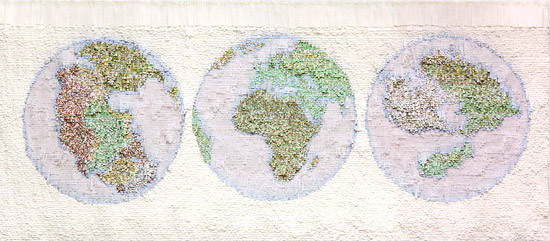
A three-dimensional map of the world will decorate the interior of a nursery. It will be both beautiful and educational.
Strips of paper can be either the same size and length, or different. By experimenting with their sizes and sticker density, you can get interesting effects in creating volume.
In addition, paper is a living material. She will continue her life in work. Due to internal stresses in their structure and sensitivity to moisture, the strips can bend differently over time. And if you like cutting and gluing together such spectacular pictures, you can try your hand at a little similar technique. Only in this case the pieces are glued completely, in discord, filling the contours of the drawing; the technique, in my opinion, is easier and suitable for children in its simplicity.
And I thank Nathalie for these wonderful works and interesting idea.
When copying materials, an active link to the site is required!


