Today we will be with you make a machine(see also ) from ordinary plastic bottle. At the same time, it will drive with the help of a jet engine, for which we will install an ordinary balloon(read).
Construction of the machine It won’t take us much time, so for those who like quick results, this craft is just for you.
Materials for creating a car from a plastic bottle
In order to make a car we will need 1 liter plastic bottle, four large buttons (wheels), it will be nice if you have four wheels with axles from an old car, suitable size. You will also need: a balloon, 15 cm of plastic tube, thread, a sharp knife, scissors.

First, we cut four holes for the wheels in the plastic bottle; the holes should be cut so that the axes of the wheels are parallel. Then insert the wheels as shown in the picture and check if they rotate easily. After this, we cut two holes on the top of the bottle and in its bottom for a plastic tube. Having inserted it into these holes, we put a balloon on the top edge and tie it tightly.
Because machine made from a plastic bottle ready, all that remains is to check its driving performance. To do this, we inflate a balloon and, placing the machine on the floor, release it. The jet stream of air will begin to push the car, and it will pick up a speed quite decent for an apartment.
If desired, you can make certain tuning of the car: paint it, make a spoiler, etc. It all depends on your creativity.
And now we invite you to see how a car made from a plastic bottle drives.
June 15th, 2017
Plastic products are used everywhere because they require less investment to create than products made from other materials. However, discarded plastic can take hundreds or even thousands of years to decompose, so it is important to recycle it or avoid plastic altogether.
The second option is very difficult to implement today, so recycling comes to the fore. Plastic can be sent to special factories for recycling it, or you can make useful things out of it. In this collection you will learn how to plastic bottles make various useful things for the home and garden.
You will need:
Plastic bottles
Foam rubber
Knitting needles
Ruler
Scissors
Sewing machine
1. Wash and dry several plastic bottles covered with caps. Gather all the bottles in a circle and secure them together with tape.
2. Cut two circles from cardboard to cover the top and bottom of all connected bottles. Tape these circles to the connected bottles.
3. Prepare two rectangular pieces of foam rubber and one round piece. Rectangular pieces need to cover the side of the collected bottles, and a round piece top part. Secure everything with tape.
4. Make a cover for your seat from any fabric. If you like to knit, you can knit a cover.
It will be more convenient for children to wash their hands.
1. Cut the bottle into the desired shape.
2. Sand the edges with sandpaper.
3. Hang on the faucet.
Photo instructions
Video instruction
There are many ways to make bird feeders, but this one is designed for cats and dogs.
You will need:
2 large plastic bottles
Scissors
1. In the middle of one bottle you need to make holes slightly larger than the neck of the other bottle.
2. The second bottle needs to be cut in half crosswise.
3. Fill the bottom with food.
4. Connect the parts and open the lid.
You will need:
Plate, round plastic or thick cardboard
6 two-liter plastic bottles
A wooden or plastic rod (you can use a straight branch) suitable diameter and length)
Super glue
Spray paint and glitter (optional)
1. Making the base for the craft. To do this you need a plate, ceramic or glass plate. In the middle of the plate you need to enlarge the hole to 10 mm using a drill.
2. You will also need to use a drill to make holes in the center of the three plastic bottle pieces you will be using. It's easier to drill from the inside out.
3. Cut off the bottom of each of the 6 plastic bottles. Place 3 parts on the rod and secure with glue. Glue the remaining parts to the base (plate) around the rod. If you wish, you can spray paint everything.
It is worth noting that the rod is held on the base thanks to a plastic part that is glued to the plate, as well as to the rod itself.
4. If you wish, you can decorate your vase.
And here is a version of a wicker basket made from plastic cocktail tubes:
1. Remove the label from the plastic bottle.
2. With stationery knife cut off the bottom of the bottle.
3. Start making cuts on the bottle, leaving 1 cm between each.
4. Cut off the neck of the bottle.
5. Repeat steps 1-4 with 3 more bottles. Leave one bottle with a neck.
6. Place all the cut neckless bottles on top of one necked bottle. You will have a blank for a broom.
7. Cut off the top of one bottle and place it over the resulting blank.
8. Make two holes through all the bottles and insert wire into them and wrap the ends.
9. Insert a stick or rod into the neck and secure with a nail. You can also use glue.
Video instruction
You will need:
Several large plastic bottles or canisters
Stationery knife
Scissors
Marker or pencil
Strong thread.
1. Cut a suitable hole from a bottle or canister using a utility knife and/or scissors. It should not be too small for everything to fit, or too large for the plastic structure to fall apart.
2. Start connecting the bottles with a strong thread. Start with two, then add two more already connected to them, and so on. Tie strong knots. You can also try using hot glue or superglue (Moment glue).
3. Assemble a design that is convenient for you. You decide how many rows and “floors” to make. However, it is worth knowing that the higher the structure, the less stable it is. You may need to secure the entire structure with rope again.
4. It's time to put scattered things on the shelf.
1. Remove labels and wash bottles.
2. Cut off the bottom of each bottle and unscrew the caps.
3. Place the bottles on a long, straight branch, stick or rod.
4. Do wooden frame house (greenhouse).
5. Repeat steps 1-3, making the required number of bottle rods. After this, all the rods need to be attached to the frame of the house.
*Alternatively, you can simply connect using wire required quantity bottles and attach the bottles collected in a row to the frame of the house. In this case, there is no need for a rod and no need to remove the caps from the bottles.
* The greenhouse can be made more airtight by covering it with bubble wrap.
Video instruction
Plastic bottles - perfect material for various kinds of crafts. They are free, there are many of them, you can just stamp whatever you want. So in this video, the author made a children's model of a car that moves under the influence of a motor and a propeller.
Plastic bottles
Wooden sticks
Motor from CD or DVD drive
Cocktail straws
We take a plastic bottle and cut off the top part with the neck and cap. We make a propeller from it using scissors. Heat it with a burner or lighter and bend the blades. The propeller is ready.
Now we take a flat plastic bottle, cut off 2 pieces of tubes of the required length and glue them to it using a heat gun. From traffic jams and wooden sticks from the land we make 2 car axles with wheels. We push them through the tubes on the body of the car model.
We disassemble the CD drive and remove the engine from it. Glue the propeller to the engine axis using hot glue. We glue the motor itself with the same glue to the top of the machine in its rear part.

Using scissors and cardboard we create seat with a seat inside the car. We insert the battery into the trunk; it will be pressed against a plastic protrusion cut from the body of the bottle and protruding from it.
The car will rush, driven by the wind accelerated by the propeller.
There is a more serious one in another article.
In a simple model of a PVC machine, only parts from bottles are used - 4 caps and the container itself. Additionally, chopsticks for sushi and rolls are still used.

A car for a child can be made to move if you use a couple of additional parts - an elastic band, which is easy to adapt and you will get a self-propelled vehicle for the baby.

One of the options for decorating a gift for a child...
I did that a long time ago little boy a machine made from a printer cartridge (!) and it turned out to be very durable, considering the loads that the machine experiences in the sandbox. Well, making something similar to a car out of a plastic bottle is simply necessary for every self-respecting DIYer, especially since all the main parts of the car are present in a set of PET plastic bottles. The shape and size of PET plastic containers have many variations, which means that machines made from plastic bottles can be very diverse. And if you consider that the vast majority of plastic bottles are actually containers for food products, which can be filled with sweets, then such a machine will become a gift for a holiday or family celebration.
Idea
The main thing in any car is the wheel, and the wheel should be available. If there is a reliable wheel, then a durable toy car will be made. It would be natural to use a cap from a plastic bottle as a wheel, but the cap still needs to be secured to the axle somehow so that there are no radial and axial runouts during rotation of the wheel.
This trouble can be avoided if you use several specially selected caps from plastic bottles (). Best results allows the use of a conventional shortened cap ( outside diameter 30mm) and caps from plastic milk bottles (45mm). Both caps () are about 10mm high. The cap of a plastic bottle can withstand pressure of several tens of atmospheres; from the inside of the bottle it can protrude not only, but also.
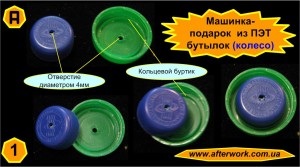
Home distinctive feature The larger cap for the production of the wheel (green) has an annular inner collar (). The inner diameter of the ring collar is exactly equal to the outer diameter of the smaller cap (blue). If you align the caps with threaded parts towards each other and drill holes in each along the axis, you will get a reliable wheel for a future plastic car, capable of withstanding radial and axial runout on the wheel axles of a future toy car made from plastic bottles.
Materials and tools
Job
The work of making a car - a gift from PET bottles - should begin with the most important thing - the wheels, and the most important thing in our business is to make the wheels the same and symmetrical on each axis of the wheelbase.

During the production of wheels, the exactly in the center all plastic caps (as in this case ()) selected to receive the wheels of the car - a gift, holes for installing the future wheel on the axle (). It is better to drill with outside caps as, because the plastic deposits formed during such drilling will be hidden inside the resulting wheel, and the lock washers will fit more tightly to the caps and minimize loosening of the wheel on the axle in different sides with time ().

When all the wheels are ready, we move on to building the wheelbase and installing the axles that carry the wheels. The “squareness” of a plastic bottle is precisely what is needed for the convenience of installing the wheel axles () in one plane and minimizing the distance from the wheel to the surface of the plastic bottle as the car body. The axis is installed traditionally through two side holes melted into the body with a burner, as in the case of such a product (). I do not recommend drilling a plastic bottle mechanically, the hole turns out torn and quickly becomes loose.

Each wheel of two plastic caps is framed on both sides along the axle with metal washers (), and the end of the axle rod is melted on both sides like the head of a plastic rivet, which blocks the wheels from falling out. In principle, the main parts of the gift machine are already ready (), all that remains is to strengthen the imitation and decorative elements, which primarily includes the cabin ().
The cabin is made from the bottom of the same plastic bottle as the body of the machine and is attached to the body closer to the wheels using 4 plastic rivets (), which are installed from the inside with such a device ().
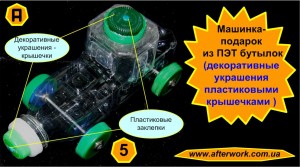
Before installing the cabin on its top, it is reasonable to install a “spare wheel” in the form of two plastic caps - components of the wheel secured on top with a through plastic rivet. Similarly, to push gifts inside the case, you can decorate with a lid of a different color () and a smaller size. Such decorations give the car a look somewhat reminiscent of a Formula 1 car.


