Fabric is a universal material. You can use it to sew clothes, household items, toys, paintings, and jewelry. Not long ago, crafts made from scraps of fabric came back into fashion; craftswomen create fantastically beautiful things with their own hands, which are sometimes so unique that they are impossible to repeat. This article will talk about patchwork techniques. We’ll also look at several master classes on making useful little things for the home.
The first fabrics appeared before our era. Natural materials were used to create fabrics; people learned to process them and weave fabrics. Such natural fiber sources include cotton, wool, silk and linen.
Visson is the finest linen fabric produced by the weavers of Ancient Egypt. During excavations of tombs, it was found that fine linen was used to mummify the ancient pharaohs. Woolen fabrics were made by spinning thread and then woven into cloth. The thinner the thread and the softer the fabric, the higher its price. Wool and flax were the main materials that our ancestors used to create clothing. In Rus', coarse cloth served as material for peasant clothing, and thin fabrics were used exclusively for ritual purposes - preparing a dowry and wedding dresses. Silk was produced by Chinese craftsmen. The finest thread of this precious material was produced from the cocoon of the silkworm. You could pay with your life for stealing a secret. The Chinese princess, who married the Indian monarch, brought with her precious cocoons and helped spread sericulture in India. Due to the different composition of the water in which the silkworm cocoons were dipped, Indian silk was coarser and more rustling.
The birthplace of cotton is India. Thanks to the campaigns of Alexander the Great, cotton fabrics found their way to the Mediterranean. Later, this country became an English colony, and the finest calico fabrics found their way into the rich homes of the English. Calico fabrics were so valuable that ladies treasured every scrap of precious fabric. That's when it was born patchwork- a type of patchwork. The women assembled a mosaic from pieces of fabric, each trying to bring something of their own.

In Russia, patchwork appeared with the beginning of the production of inexpensive cotton fabrics with printed patterns. In order to save money, housewives collected small scraps and made various things for the home from them. The Russian patchwork technique is distinguished by its simplicity. It is most often based on motifs of geometric shapes. They are collected into strips, which are then stitched together to form the finished product.
Looking at the rich patchwork patterns, you involuntarily think about the complexity of their implementation. The patchwork process itself is not too complicated, but it requires precision, time and patience. If you intend to get a beautiful and neat product, use patterns and take your time. It is not at all necessary to use an ornament to make crafts from pieces of fabric; it is enough to simply choose a color scheme and carefully sew the pieces together, and from the resulting fabric you can cut out parts for the future product.
The center of activity of any housewife is the kitchen. This place of your home can be decorated with products made from scraps. You can create a small pot holder or hot stand, chair covers, beautiful curtains.

We invite you to familiarize yourself with a master class on making oven mitts for the kitchen. Its direct purpose is to protect your hands, but why not make the potholder a decorative element? The simplest pattern to make is the “Well” pattern; even novice needlewomen can do it.
To complete the job you will need:
If you decide to use new fabric for the potholder, wash it first to check for shrinkage. The fabric is cut only along the grain so that it does not stretch during the sewing process. Prepare strips of material and base.

Cut a square from the first strip and secure it to the base with a pin.

Do the same with the second stripe. Using a sewing machine, sew the pieces together.


Take the second piece of fabric again and measure out a strip of length that will fit the two sewn squares.

Stitch it in place and turn it right side out.

Continue stitching the scraps until the base is completely filled. Carefully iron the potholder and trim its edges.


For the “frame” of your potholder, you need to sew strips without a base.

Leave a small hole so that the potholder can be turned out.

Open the back side of the product by placing the resulting square on the fabric.

Don't forget to sew in a loop.

Place the pieces face to face, cut out the filling and sew as shown in the photo.


All that remains is to unscrew the potholder and stitch the hole.
Note. Be sure to stitch along the entire perimeter; a beautiful and neat seam in the form of a frame will appear on the back side. Steam the product a little with an iron.


A beautiful potholder for the kitchen is ready!

Using this sewing principle, you can easily make a stand for a hot blanket or even a large blanket. You just need to sew the resulting squares into strips and connect them together. This is painstaking work, but the result will exceed all your expectations.

You can start laying the pattern not from the edge, but from the center.

Once you have mastered simple sewing, you can move on to more complex techniques.
The fabric can be used in children's creativity. An excellent decoration for a child’s room will be not only pillows made using the patchwork technique, but also fabric appliqués created by the hands of little needlewomen.

To create such a picture you need to take:
First, prepare the fabric. It needs to be starched and ironed. Choose an interesting story with your child. Cut out the parts from the selected template and glue them to the base. This activity will bring many benefits to children:
The result of the work will be an excellent decoration for the children's room and a source of pride for your baby.


Making such crafts will help you create your own interior and fill your home with cozy and useful things.


A selection of videos from this section of the article will help you create crafts from scraps of fabric.
Almost every housewife has a lot of small scraps of unnecessary fabric in her house. Don’t rush to throw them away, because you can create real masterpieces with your own hands from scraps.
You can combine a variety of materials, but it is advisable to combine a fabric that matches the color and texture. In addition, the patchwork should match the trim, as well as the overall color and style of your home.
Even from small scraps of fabric left over after sewing a large item, you can make a lot of useful and pleasant little things that will decorate the interior of your home and delight your beauty And unusualness and can serve as a toy or educational aid for a child.
Sewing such a craft will not require large economic costs and technical skills, but it can bring a lot of joy.
From scraps you can make not only small cute crafts, but also bedspreads for furniture or even furniture upholstery. Such a patchwork furniture cover will make the interior of a house or apartment unique and will allow you to create your own inimitable and original pattern, emphasizing certain places in the interior. To do this, you can use ready-made color schemes, or you can develop your own - it all depends on your desire, taste and imagination.
 Before you start sewing a throw or upholstery on a sofa or chair, you need to consider the following features of this process:
There is no need to decorate all the furniture in the room in patchwork style, one is enough. armchairs or a sofa for the room. Otherwise, there will be too many color accents, and the room will look ridiculous.


We strive to give our children the best. You can decorate your favorite child’s nursery using patchwork crafts, accessories or a small piece of fabric. 
The design of a nursery can be decorated using:
 Of course, for boys and girls the design and nature of scrap crafts will be different. For boys Interior decor elements are best done in blue and beige tones, and girls- in white and pink.
There should be few bright elements of red or orange, otherwise they will irritate the child. However, in moderation, such bright sewing details will bring an atmosphere of cheerfulness and energy to the room.

Toys made from multi-colored scraps can not only decorate the interior, but also become your child’s favorite for the coming years.
 From unnecessary rags or narrow strips of fabric, you can make an original knitted rug with your own hands without sewing. To do this, it is recommended to follow the step-by-step scheme:
If you successfully mix several colors, you will get a bright and original element of interior decor.
 From small scraps You can make charming flowers to decorate clothes, bags and interiors.
Below we provide a master class on making several types of such decorative elements.
 To make such flower you will need strips measuring 40x11 cm and 24x5 cm, as well as a lace piece of 31x4 cm. The finished product will need to be 12 cm in diameter.
Each strip of fabric is sewn in the shape of a ring. Fold the resulting rings in half and iron them with a hot iron. The open sections of all rings are gathered using basting stitches. All received parts are sewn on top of each other in layers. A button is sewn on top.
 To make this type of flowers you will need scissors like zigzag. It is necessary to cut out 5 pieces of round fabric with a diameter of 11 cm with these scissors. Next, cut out 3 strips 35 cm long and 1–2 cm wide.
You can slightly fray the edges of the fabric so that excess threads fall off. All the resulting circles are superimposed on each other and folded in four.
The resulting corner is sewn up at a distance of 1 cm from the edge, and the resulting petals are straightened. Strips of fabric are sewn from the back to the center of the flower. They need to be folded in such a way that the ends of different lengths are obtained.
This charming flower can be used to decorate a bag or sofa cushion.
 For the manufacture of vintage decorations in the form of a rose will require 2 strips of fabric 50 cm long and 6 and 3.5 cm wide. Both strips along one side are sewn with basting stitches and gathered together. A narrow strip is collected into a dense bud, and wrapped on top with a wider strip. All parts are fixed at the base.
From such a flower you can make a charming hair tie. To do this, you will need an elastic band and a piece of thick felt with a diameter of 2–3 cm. 2 small holes are made in the felt circle, like a button.
The ends of the elastic are inserted into these holes and tied. The knot is applied to the folds of the fabric and fixed. The edges of the felt circle are tightly sewn on top.
 To make this decoration you will need a strip of fabric 60 cm long and 12 cm wide, as well as a strip of padding polyester with a smaller width.
The fabric strip is sewn in half, and a strip of padding polyester. You should not iron the edges of the strip, otherwise you will not get the desired effect.
The open edges of the fabric strip are gathered with basting stitches and gathered slightly. One of the short sides of the strip is folded inward and sewn with a hidden seam. The other side is rolled up into a tight bud. The edge of the fabric is folded to the middle of the rose and hemmed to the base.
Nowadays, fabric is used not only for room decoration, for its intended purpose, but also in the form of various homemade elements and crafts: soft toys, paintings, decorative items, flowers and decorations.

To decorate the dining table, do-it-yourself fabric crafts are suitable, for which you will need the following: skewers, colored fabric strips, threads to match the ribbons, needles, a glue gun, scissors with a wavy or zigzag blade, beautiful buttons or beads.

Now follow these steps sequentially:
For fabric decor you will need: stretch or lycra in bright colors, a decorative chain, fasteners or miniature locks, a glue gun, wire cutters and scissors.

Now we begin the process itself.

Fabric preparation. Cut the fabric into strips 1-1.5 cm wide. Take them by the edges and stretch them lengthwise so that the edge is wrapped in the form of a cord.

Weaving process. You can weave in various ways without restrictions or established rules. You can even use the technique of weaving baubles, or use knitting needles (crochet), or simply weave braids.
The more confusing elements there are, the more spectacular and fashionable it will look. Don't forget to leave small ends for attaching them to the chain.

Attachment to chain. Attach the woven creation to the chain, choosing the required length of the necklace. Make a clasp or lock on the chain.

Fabric toys are still in fashion. For example, a couple of tilde bears, he and she. To do this, you should prepare: 2 pieces of white calico. 30x30 cm, a piece of calico with a fine pattern in blue, a piece of calico with a fine pattern in pink, threads of appropriate colors, padding polyester (silicone or holofiber), a simple pencil, scissors, needles, cutting paper, sewing machine (but you can sew by hand) .
White calico must be repainted light beige. For him it’s darker, for her it’s lighter. The following mixture will help you with this: dissolve 3 tsp in 3 cups of boiling water. coffee and 1 tsp. PVA glue and rock salt.

You need to immerse the fabric in it and hold it for dyeing until the mixture cools naturally. Then straighten the fabric, dry it and iron it.

To get a light tone, instead of coffee, use 2-3 tea bags.

Prepare patterns for the future product in advance and cut the fabric according to them. Control the direction of the fabric during the cutting process.

Sew identical paired elements on a machine or sew by hand. The hearts need to be stitched and turned out through the hole left for this.

It is enough to leave no more than 3 cm of fabric at the seams; it is better to trim off the excess.


We stuff all the resulting elements with padding polyester or similar material. For your convenience, it is worth doing this during the process of stitching the elements.
Do not over-stuff the arms and legs of the product so that it can be easily seated.

The elements of the product must be sewn from top to bottom. First the ears to the head, then the head to the body. The paws are secured with hidden seams and threads to match the fabric to make them invisible.

The eyes and nose of the bears must be embroidered with threads in the form of knots. Highlight the cheeks with regular decorative blush. Patches and hearts are attached to finished products, having previously been stuffed with padding polyester.

Basically, flowers are made from worn children's clothes made from natural cotton fabrics, since children grow up quickly and the clothes remain.


Bright fabrics with floral or plant colors are ideal; a graphic design will also work.

To cut fabric you will need templates. From these, cut out two large flowers, four smaller ones and one from felt fabric for the base of the flower, which will support the petals and shape the appearance.

Place a couple of the largest petals on a felt base, then, as the size decreases, fold the remaining small petals in four.
Fix the petals together either by hand or with a machine. To decorate the center, cover the button with fabric and sew in the center. A regular button, beads or beads will also work.

As a craft for your home, create a fabric panel. This is not at all difficult to do. All you need is desire and imagination, and this can be realized with the help of available materials.

You can create many DIY crafts from denim: jewelry, toys, bags, wallets, paintings, etc.


Fabric crafts can be given to children, relatives, friends and acquaintances. A gift made with love and with your own hands is the best!


Fabric is a universal material. You can use it to sew clothes, household items, toys, paintings, and jewelry. Not long ago, crafts made from scraps of fabric came back into fashion; craftswomen create fantastically beautiful things with their own hands, which are sometimes so unique that they are impossible to repeat. This article will talk about patchwork techniques. We’ll also look at several master classes on making useful little things for the home.
The first fabrics appeared before our era. Natural materials were used to create fabrics; people learned to process them and weave fabrics. Such natural fiber sources include cotton, wool, silk and linen.
Visson is the finest linen fabric produced by the weavers of Ancient Egypt. During excavations of tombs, it was found that fine linen was used to mummify the ancient pharaohs. Woolen fabrics were made by spinning thread and then woven into cloth. The thinner the thread and the softer the fabric, the higher its price. Wool and flax were the main materials that our ancestors used to create clothing. In Rus', coarse cloth served as material for peasant clothing, and thin fabrics were used exclusively for ritual purposes - preparing a dowry and wedding dresses. Silk was produced by Chinese craftsmen. The finest thread of this precious material was produced from the cocoon of the silkworm. You could pay with your life for stealing a secret. The Chinese princess, who married the Indian monarch, brought with her precious cocoons and helped spread sericulture in India. Due to the different composition of the water in which the silkworm cocoons were dipped, Indian silk was coarser and more rustling.
The birthplace of cotton is India. Thanks to the campaigns of Alexander the Great, cotton fabrics found their way to the Mediterranean. Later, this country became an English colony, and the finest calico fabrics found their way into the rich homes of the English. Calico fabrics were so valuable that ladies treasured every scrap of precious fabric. That's when it was born patchwork- a type of patchwork. The women assembled a mosaic from pieces of fabric, each trying to bring something of their own.

In Russia, patchwork appeared with the beginning of the production of inexpensive cotton fabrics with printed patterns. In order to save money, housewives collected small scraps and made various things for the home from them. The Russian patchwork technique is distinguished by its simplicity. It is most often based on motifs of geometric shapes. They are collected into strips, which are then stitched together to form the finished product.
Looking at the rich patchwork patterns, you involuntarily think about the complexity of their implementation. The patchwork process itself is not too complicated, but it requires precision, time and patience. If you intend to get a beautiful and neat product, use patterns and take your time. It is not at all necessary to use an ornament to make crafts from pieces of fabric; it is enough to simply choose a color scheme and carefully sew the pieces together, and from the resulting fabric you can cut out parts for the future product.
The center of activity of any housewife is the kitchen. This place of your home can be decorated with products made from scraps. You can create a small pot holder or hot stand, chair covers, beautiful curtains.

We invite you to familiarize yourself with a master class on making oven mitts for the kitchen. Its direct purpose is to protect your hands, but why not make the potholder a decorative element? The simplest pattern to make is the “Well” pattern; even novice needlewomen can do it.
To complete the job you will need:
If you decide to use new fabric for the potholder, wash it first to check for shrinkage. The fabric is cut only along the grain so that it does not stretch during the sewing process. Prepare strips of material and base.

Cut a square from the first strip and secure it to the base with a pin.

Do the same with the second stripe. Using a sewing machine, sew the pieces together.


Take the second piece of fabric again and measure out a strip of length that will fit the two sewn squares.

Stitch it in place and turn it right side out.

Continue stitching the scraps until the base is completely filled. Carefully iron the potholder and trim its edges.


For the “frame” of your potholder, you need to sew strips without a base.

Leave a small hole so that the potholder can be turned out.

Open the back side of the product by placing the resulting square on the fabric.

Don't forget to sew in a loop.

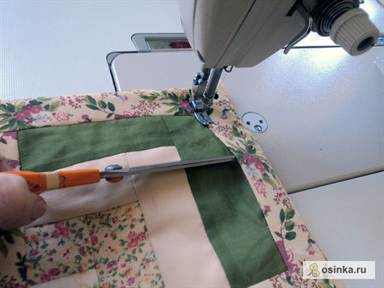
Place the pieces face to face, cut out the filling and sew as shown in the photo.


All that remains is to unscrew the potholder and stitch the hole.
Note. Be sure to stitch along the entire perimeter; a beautiful and neat seam in the form of a frame will appear on the back side. Steam the product a little with an iron.


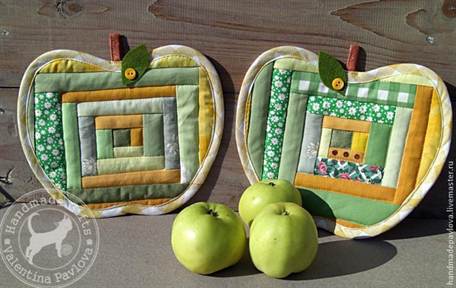
A beautiful potholder for the kitchen is ready!

Using this sewing principle, you can easily make a stand for a hot blanket or even a large blanket. You just need to sew the resulting squares into strips and connect them together. This is painstaking work, but the result will exceed all your expectations.

You can start laying the pattern not from the edge, but from the center.
Once you have mastered simple sewing, you can move on to more complex techniques.
The fabric can be used in children's creativity. An excellent decoration for a child’s room will be not only pillows made using the patchwork technique, but also fabric appliqués created by the hands of little needlewomen.

To create such a picture you need to take:
First, prepare the fabric. It needs to be starched and ironed. Choose an interesting story with your child. Cut out the parts from the selected template and glue them to the base. This activity will bring many benefits to children:
The result of the work will be an excellent decoration for the children's room and a source of pride for your baby.
Patchwork crafts for the home will help make your interior unique and reflect the individuality of the owner. Their production does not require a large amount of materials. Moreover, you can use fabrics that have been lying around for a long time.
Patchwork or patchwork technique is a branch of needlework that was formed due to the need to use so-called “fabric waste”.
Nowadays, technology has turned into a work of art. Patchwork is a type of needlework that is suitable even for people who are not familiar with sewing. Simplicity, freedom for creativity and the embodiment of a wide variety of ideas are what characterize this direction.
Main types of patchwork:


Modern patchwork techniques allow each craftswoman to choose the most suitable option for herself. Among them are:
You can read more about decorating your home with your own hands using available materials in ours.
First you need to decide where exactly to start. Maybe it will be a pillow or a cozy blanket for the cool season? Regardless of the chosen technique and type of patchwork, you should always have the following on hand:
We bring to your attention the most popular products that are perfect for home decoration. Choose any option you like and get to work.
You can read about how to make an original basket from newspapers for decoration in ours.
Experienced needlewomen use a sewing machine for patchwork, but if you don’t have one at hand, you can try it by hand. A pillow made from scraps is a small product, so sewing it without a machine will not be difficult. First, you will have to pin all the parts together with pins, and then sweep them away.
To make a beautiful pillow from multi-colored triangles, you will need to add to the basic set of tools a holofiber filler, 4 - 5 colors of fabric, as well as a hidden zipper 45 cm long. The result will be a pillow measuring 45x45 cm. Once everything you need is prepared, you can begin to work. 

Important! When cutting out a pattern, you need to make an allowance of a centimeter on each side for stitching.


The pillow made from “Windmill” blocks looks original. Each block of this product consists of four squares of the same size, and they, in turn, are assembled from three triangles.
Before you start work, you need to stock up on everything you need. As for the fabric, it is better to use contrasting 3 colors, then your pillow will look brighter and more attractive. In addition, in addition to the basic set of tools, you will need a zipper 50 cm long, thin synthetic padding for the lining, fabric for the back of the pillow that will remain solid, and material for filling the pillow. 


The most popular product that looks so attractive in patchwork style is a blanket. The variety of patterns, images and ornaments will allow you to create a unique piece of furniture. Before work, you need to be patient, use your imagination to the maximum and choose the right technique.
How to refresh the interior of a room and choose the right color of curtains for wallpaper and furniture can be found out by reading our guide.
To make a picnic blanket you will need 20 fabric squares of different colors 25x25 cm, fabric for the back side 130 cm long and a seal of the same length. So, let's get started:


Advice! You can use all your imagination and decorate the blanket with additional elements. For example, you can add decorative stitching along the seams.
You can experiment when sewing napkins. You need to approach this activity with confidence, including your imagination and giving free rein to even the most daring ideas.
After reading our master class, you will be able to prepare a festive table and pleasantly surprise your guests with creativity. Napkins in patchwork style will always be original, bright and unique. We suggest you familiarize yourself with the technique of patchwork sewing a napkin measuring 14x24 cm.
To make a hexagonal holiday napkin, you need to prepare the fabric and all the necessary tools. Now you can begin the sewing process. 


You can learn more about the hexagonal patchwork technique from the video master class.
When creating paths and rugs, not only fabric scraps can be used, but also pieces of animal skins, carpets and other things. A patchwork style carpet is a good solution for decorating any interior. Different shades can be used for the product, there are even options made in the same color.
In the article “” you can find out how to make an unusual and at the same time delicious gift for your family and friends.
The “Tradition” table runner will fill your home with comfort. The product is made from 36 types of fabric, embroidered with gold thread and decorated with stitches.
To create an attractive table runner, in addition to the standard set, you need to add as much fabric of different shades as possible, fabric for the backing and filler (non-woven fabric, felt or padding polyester).


This version of the tablecloth is interesting; it combines patchwork and appliqué. As a result, each side will have its own separate floor. The diagram is based on a square consisting of two triangles.


This tablecloth is devoid of complex elements, so it will not take much time to create it. To make a charming tablecloth for a tea table, you will additionally need prepared fabric scraps measuring 25x25 cm and, if necessary, a lining.
It’s easy to make a product in the patchwork style; you just need to use your imagination to the maximum and be stocked with time and patience. For beginners, it is recommended to use ready-made templates; this will make the work easier and the product will certainly turn out smooth. Experiment as much as possible and then patchwork-style products will acquire a touch of individuality.


