LED floodlights are a very popular thing today. But, like any electronics, spotlights break down relatively often.
Today's article will be devoted to repairing LED spotlights with your own hands.
All the theory on the design of LED spotlights and terminology, and here is practice for home craftsmen.
First of all, you need to make sure that 220 V power is supplied to the driver. This is Azy. Next, it remains to decide what is faulty - the LED driver or the LED matrix.
Let me remind you that the word “driver” is a marketing ploy to designate a current source designed for a specific matrix with a certain current and power.
In order to test the driver without an LED (idle, without load), simply apply 220V to its input. A constant voltage should appear at the output, a value slightly greater than the upper limit indicated on the block.
For example, if the range of 28-38 V is indicated on the driver unit, then when it is turned on idle, the output voltage will be approximately 40V. This is explained by the principle of operation of the circuit - in order to maintain the current in a given range of ±5%, when the load resistance increases (idle = infinity), the voltage must also increase. Naturally, not to infinity, but to some upper limit.
However, this test method does not allow us to judge whether the LED driver is 100% serviceable.
Subscribe! It will be interesting.
The fact is that there are serviceable units that, when turned on idle, without load, either will not start at all, or will produce something unclear.
I suggest connecting a load resistor to the output of the LED driver to provide it with the desired operating mode. How to choose a resistor - according to Uncle Ohm's law, looking at what is written on the driver.

LED – driver 20 W. Stable output current 600 mA, voltage 23-35 V.
For example, if Output 23-35 VDC 600 mA is written, then the resistor resistance will be from 23/0.6=38 Ohms to 35/0.6=58 Ohms. We choose from a range of resistances: 39, 43, 47, 51, 56 Ohms. The power must be appropriate. But if you take 5 W, then it will be enough for a few seconds to check.
Attention! The driver output, as a rule, is galvanically isolated from the 220V network. However, you should be careful - cheap circuits may not have a transformer!
If, when connecting the required resistor, the output voltage is within the specified limits, we conclude that the LED driver is working.
For testing, you can use a laboratory power supply. We supply a voltage that is obviously lower than the nominal voltage. We control the current. The LED matrix should light up.
There are situations when there is an LED chip, but its power, current and voltage are unknown. Accordingly, it is difficult to buy it, and if it is working, it is not clear how to choose an adapter.
This was a big problem for me until I figured it out. I am sharing with you how to determine from the appearance of an LED assembly what voltage, power and current it is.
For example, we have a spotlight with the following LED assembly:
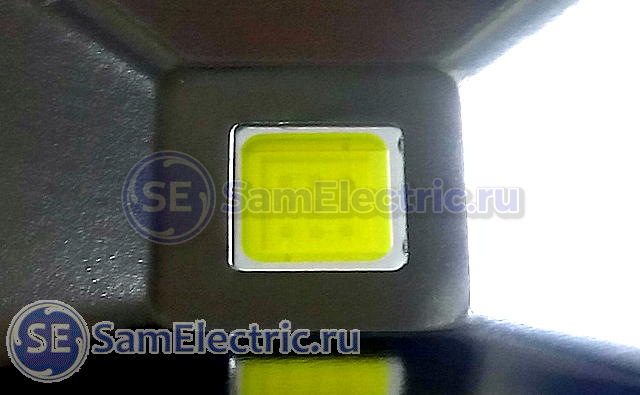
9 diodes. 10 W, 300 mA. In fact - 9 W, but this is within the margin of error.
The problem is that the LED matrices of the floodlights use 1 W diodes. The current of such diodes is 300...330 mA. Naturally, all this is approximately, within the margin of error, but in practice it works accurately.
In this matrix, 9 diodes are connected in series, they have one current (300 mA), and a voltage of 3 Volts. As a result, the total voltage is 3x9 = 27 Volts. For such matrices, you need a driver with a current of 300 mA, a voltage of approximately 27V (usually from 20 to 36V). The power of one such diode, as I said, is about 9 W, but for marketing purposes this spotlight will have a power of 10 W.
The 10 W example is a bit atypical due to the special arrangement of the LEDs.
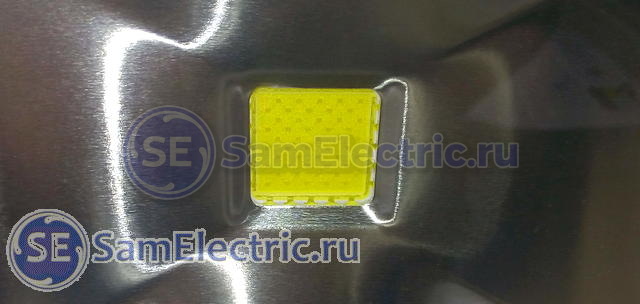
Another example, more typical:

You already guessed it two horizontal rows of dots of 10 pieces each are LEDs. One strip is, offhand, 30 Volts, current 300 mA. Two strips connected in parallel - voltage 30 V, current twice as much, 600 mA.
A couple more examples:
Total - 50 W, current 300x5 = 1500 mA.

Total - 70 W, 300x7 = 2100 mA.
I think there is no point in continuing, everything is already clear.
The situation is slightly different with LED modules based on discrete diodes. According to my calculations, one diode there usually has a power of 0.5 W. Here is an example of a GT50390 matrix installed in a 50 W floodlight:

LED floodlight Navigator, 50 W. LED module GT50390 – 90 discrete diodes
If, according to my assumptions, the power of such diodes is 0.5 W, then the power of the entire module should be 45 W. Its circuit will be the same, 9 lines of 10 diodes each with a total voltage of about 30 V. The operating current of one diode is 150...170 mA, the total current of the module is 1350...1500.
Anyone who has other thoughts on this matter is welcome to comment!
It is better to start repairs by searching for the electrical circuit of the LED driver.
As a rule, LED spotlight drivers are built on a specialized MT7930 chip. In the article about the Design of Spotlights, I gave a photo of a board (not waterproof) based on this microcircuit, once again:

LED floodlight Navigator, 50 W. Driver. GT503F board

Attention! Information on driver circuits and a little more on repairs!
There are no special tricks when replacing the LED matrix, but you need to pay attention to the following things.

When repairing an LED module consisting of discrete diodes, first of all you need to pay attention to the integrity of the soldering. And then check each diode by applying a voltage of 2.3 - 2.8 V to it.
If you need quick repairs, then the best thing, of course, is to run to the store across the street.
But if you are engaged in repairs on an ongoing basis, then it is better to look where it is cheaper. I recommend doing this on the well-known AliExpress website.
I'll end here. I encourage my colleagues to share their experiences and ask questions!
Outdated halogen floodlights have recently been widely replaced by LED lighting systems, which have higher efficiency, but the cost of such devices is much higher.
Craftsmen know how to assemble an LED spotlight with their own hands. To do this, you will have to buy the necessary parts, prepare tools and master simple skills.

Diode spotlights or LED devices are very economical in terms of energy consumption, require minimal maintenance, and their luminous elements operate for up to 50–90 thousand hours. The devices are suitable for outdoor use and do not deteriorate due to weather conditions, dirt, or dust. The quality of the emitted light is very high.
Is it possible to make a LED spotlight with your own hands? The design of such equipment is quite simple, so you can try to assemble it at home. Serious damage to a homemade spotlight usually does not occur, and anything that breaks can be repaired yourself.
The device will consist of the following parts:
The matrix of the device consists of diodes attached to the board and protected from damage by special polymers.

Before starting assembly, it is necessary to clarify the electronics features of the LED-based floodlight. This will help to perform the work correctly and eliminate the impact of high temperatures on the active zone of the device. The fact is that solid-state semiconductors are highly sensitive to such changes, which causes their degradation and loss of dopants. Ultimately, a critical increase in temperature (from +60 degrees) causes a decrease in lighting intensity or complete breakdown.
The design of a simple LED includes the following components:
A high-power LED includes a conductor, a heat sink, a crystal, a lens, and a cathode. It must be remembered that the power of the diode increases the risk of premature wear due to overheating. When creating a homemade product, it is important to provide a good heat removal system, correctly divide the emitter into several parts and install them correctly (in series or in parallel). In simple spotlights you can make only 1 emitting element.

It is equally important to stabilize the network in terms of current, otherwise overheating cannot be avoided. The current must be regulated by the applied voltage and limited by resistors on the diodes. When creating a circuit for an LED device, a strict calculation is made: if the voltage is exceeded, the LEDs will soon deteriorate, and if the voltage is too low, they will shine dimly.
To assemble a high-quality device, you need to buy all the necessary components in advance. Some can be found in the garage of car enthusiasts, others can be obtained from friends.

To work you will need the following tools:
LEDs are the main element of a lighting device; without them, the main function of the device will not be performed. Their quality should be given the closest attention when purchasing. All LEDs within one device must be strictly identical in type and technical parameters (volt-ampere characteristics).
It is recommended to immediately purchase a sufficient number of spare diodes (up to 10), which will replace products damaged during installation. Unsuccessful installation is not uncommon, and buying with a reserve will save you from inconvenience.
There are three main types of LEDs:

Housings for spotlights can be purchased in an online store or in a specialized department of radio engineering and electronics. Their cost is quite low. You can “shake out” an old halogen lamp using its body as a basis. Both options are good because you don't have to invent a reflector that already exists inside. The price of a simple halogen lamp will be 150 – 200 rubles, and replacing the filling with LED will allow you to get powerful lighting equipment.
You can make the case yourself, but its aesthetic properties will be lower. To ensure a high degree of protection from dust and moisture, you should take an old car headlight. Aluminum radiators are used for excellent heat dissipation - they make high-quality cases.
To place a couple or more LEDs and matrices on one board, it is better to make a housing made of tin or thin sheet steel. After bending the box, the edges are polished and the seams are connected with rivets. The product is primed on top and metal enamel is applied. You can continue to work with the workpiece only after it has completely dried.

After collecting the diodes, you need to think about applying voltage. Household current sources are not used; you need a special LED driver that supplies a pulsating stable current.
LEDs do not require high voltage (220 Volts) for power supply; 3.2 – 12 Volts are enough for them. If you apply more voltage to the device, you can simply burn it. It is to eliminate such consequences that any spotlight must have an LED driver. Its purpose is to stabilize direct current.
For almost all homemade LED spotlights, a driver for LED strips or interior lighting systems is suitable. It is purchased in advance in ready-made form, the number of diodes is calculated according to the technical parameters and a circuit for their connection is developed. It will depend on the output voltage and stabilization current.
Such devices are used on spotlights that are built on LED matrices. For small devices of low power, you can use power supplies of general household value with an output pulsating current of 0.5 - 1.5 A, a voltage several volts higher than the direct voltage of the LEDs. To stabilize the current, LM317 microcircuits are used, and for devices of higher power - LM350, LM338.

The procedure for creating the finished product is as follows:
To connect to the network, you must first place the power cables in the right place. It is important not to reverse the polarity of the wires, otherwise the diodes may burn out or not work. A driver must be installed to stabilize the voltage. The joints of the wires are insulated with corrugation or a plastic cover. The finished structure is fixed on the street.
As a result of such actions, a homemade spotlight with directional lighting and high brightness will be ready. The downside is that with an unstable voltage, the reliability of the product will be lower, since surges can cause diodes to burn out. Mounting two resistors with a resistance of 1 - 2 Ohms will help correct this defect. This will allow you to get a truly high-quality design no worse than those sold in the store.
Surely many of you, like me, have accumulated several non-working power supplies, and ten-watt LED matrices have also been lying around for a long time. Finally the time has come for them to connect)))
To create this spotlight we needed:
LEDs 10W 9-11v 9pcs.;
- processor heatsink;
- computer power supply (any);
- non-polar capacitor with a total capacity of 14 microfarads 400 volts (any 400 volt capacitor, I have one starting capacitor of 12 microfarads and another 2.2 microfarads 400 volt film. You can simply dial 14 microfarads of any film for min 400 volts);
- Diode bridge (unsoldered from the power supply);
- Capacitors 2 X 560 µF 200 volts + 2 X 470 µF 200 volts (soldered from power supplies);
- Fuse (can also be removed from the power supply).
The scheme is the simplest, everything here has a large margin of safety and there is practically nothing to break.
Assembling this circuit is not difficult.
And a few words on how it’s done.
I glue the LEDs to cyanoacrylate super glue, oddly enough, but its thermal conductivity is excellent and holds tightly, only in case of replacement, of course, you will have to work hard (but we have built in a large power reserve, so this does not threaten us)

We screw the radiator with screws and make an air duct to the radiator from cardboard.

We make a reflector and cover the window with transparent plastic from the CD box.


And this is how much power we got.

After warming up, the temperature does not exceed 40 degrees Celsius.

And especially for tough specialists - testing at 240 and 250 volts.

Nothing burns out, and the LEDs still have a decent power reserve.
Everything is reliable - you can repeat it.

And of course it makes sense if you have the parts in stock.
The cost of LEDs on ebay is approximately 200 rubles, and the LED spotlight in our store is about 10 times more expensive.
So it makes sense to make such lighting for your home or garage.
Thank you for your attention.
Until LED products fully enter our lives and production is fully on track, the price of LED lighting equipment will continue to bite. But why wait or, even worse, overpay, if you can assemble a spotlight of the required power with your own hands according to our instructions.
If you intend to use LED technology, it would not hurt you to learn about some of the intricacies of working with it, which can partly be called disadvantages. On the one hand, LEDs are compact, economical and durable light sources, but on the other?
Solid-state semiconductor elements are critically sensitive to high temperatures in the core. A phenomenon called degradation is the loss of dopants from a semiconductor, resulting in a decrease in luminous flux or eventual failure.
 a) design of a conventional LED: 1 - anode; 2 - cathode; 3 - conductor; 4 - crystal; 5 - plastic lens
b) design of a high-power LED: 1 - housing; 2 - conductor; 3 - heat sink; 4 - crystal; 5 - lens; 6 - cathode
At temperatures above 60 °C, the LED degrades very quickly and the 50 thousand hours declared by the manufacturer ultimately turns into 3-5 thousand. And the more powerful a single LED, the higher the likelihood of it quickly aging due to overheating. Therefore, when developing lighting devices, the main focus is on a high-quality heat removal system, as well as dividing the emitter into several points and their correct arrangement.
Another feature of LEDs is that they can only pass a limited number of electrons per unit time. The network supplying the LED must be current stabilized, otherwise severe overheating and associated negative consequences will occur. The current in the power circuit is regulated by the applied voltage and is limited by a resistor on each of the LEDs. When developing a connection circuit, you need careful calculation: set the voltage too high and the LEDs will quickly fail, but set it too low and they will only light at half power.

The simplest spotlights have only one light-emitting element, but in high-power devices it is recommended to distribute the load for more efficient heat removal. In such cases, the connection can be serial, parallel or mixed. The first is not entirely safe: if one of the LEDs burns out, it can either break the circuit or bypass it. With a parallel (and especially mixed) connection, there is a high risk that after one consumer is disconnected from the circuit, the current in the supply network will increase to unacceptable values.
There are three types of LEDs that are wise to use in making floodlights. Please note that when assembling a lighting device from several LEDs, they must be identical both in type and in current-voltage characteristics. It is also recommended to purchase up to a dozen spare diodes as a repair kit and in case of damage during installation.
LEDs in the form of a plastic capsule with pin terminals are suitable for the manufacture of small spotlights and flashlights. This is the cheapest type of product, and the final product will ultimately be relatively easy to repair.

The second type is ultra-bright white LEDs on a metal substrate. They should be used in high-power lighting devices; it is quite easy to remove heat from them.

Another type of LED is high-power LED matrices. It is not recommended to independently manufacture spotlights with a matrix power of 20 W or higher: simple measures will not be able to effectively remove heat.

There are a number of solutions for the body of a homemade spotlight. If a high degree of dust and moisture protection is required for a street lamp, then a car headlight is suitable. The rim of the lamp base will need to be cut out and secured over the panel with the LED matrix. The disadvantage of the method is the limited power of the spotlight, given that only one matrix will fit in it.

If you place several LEDs or matrices on one printed circuit board or mounting panel, the housing can be made of tin or sheet steel. On the workpiece, mark the development of a truncated pyramid: a square in the center and identical isosceles trapezoids on the sides. Don't forget to leave a "tongue" on one of the sides of each trapezoid to join the petals together. Also, in the smaller base of the trapezoid, you should leave a rectangular strip of about 15-20 mm, and in the center of the square, cut another one with a side 20-25 mm smaller.

When the pattern is ready, sand the edges, bend the body and rivet the seams. Prime the inner surface, cover it with white non-gloss spray paint and leave to dry for 2-3 days. From the front side of the case, place a square piece of glass of suitable dimensions diagonally and lean it against the curved shelves from the inside. Apply a generous amount of white silicone along the contour of the glass and coat the seams of the case with it.

Fasten the mounting panel or board using eight 4 mm bolts, having previously drilled holes along the edges of each shelf on the narrow side of the case. To ensure the plate fits tightly, use a PVC foam door seal. Tightening the bolts won't be easy; their heads are inaccessible, so use a pair of locked nuts on the end.
If you chose LEDs with pin terminals, you will need a PCB plate to mount them. Think over the layout and draw current-carrying paths with a permanent marker. The anodes of all LEDs (long tails) can be assembled onto one ground bus. The cathodes are also collected at one point, but a current-limiting resistor should be connected in series to the power circuit of each LED.

Its calculation is simple: subtract the LED voltage from the supply voltage and divide by the maximum permissible current. To be on the safe side in case of source voltage fluctuations, the permissible LED current can be deliberately lowered to 90-95% of the nameplate value.
 An example of an LED matrix circuit of diodes with an operating voltage of 3 volts and an operating current of 20 mA
The approximate supply voltage for one LED is 4 V. If the source produces more, it is advisable to turn on the diodes in a mixed circuit, where garlands are connected in parallel, each of which has one LED for every 4-5 V of voltage. The permissible current for such a series assembly is determined as the sum of the permissible currents of each, and the forward voltage remains the same, provided that this parameter is the same for each LED.

Having placed the elements and drawn the paths, etch the PCB plate in a solution of citric acid (30-50 g), 3% hydrogen peroxide (100 ml) and table salt (2 teaspoons), periodically checking the degree of dissolution of unprotected areas. Drill holes for the pin leads with a 1.5-2 mm drill, drill eight holes to attach the board to the case, and then carefully tin the current-carrying parts with solder and rosin.
 You can also use circuit board for LED matrix
If you assemble diodes or matrices on a cooling substrate, they are mounted using a hinged method. An aluminum comb-type radiator should be selected as the mounting panel. Each LED is attached using two or three holes, mark them all at once and drill from the back of the radiator with a 2.5 mm drill.

For fastening, use short 3.5x11 mm self-tapping screws for metal profiles, but without a drill at the end. Before fixing the diode, apply a small amount of KPT-8 thermal paste to the substrate.

The cathode (-) and anode (+) of LEDs with a substrate are marked, the connection diagram and calculation of protective resistors are the same for all types. The elements should be connected to each other using a piece of telephone wire. To avoid unnecessary work, the anodes can be immediately soldered with short jumpers to the body of the aluminum radiator.
After assembling the LEDs, you will be left with two terminals, which would be nice to apply voltage to, but where will you get it from? Household power supplies are of little use here; to power LEDs, you need an LED driver that produces a pulsating direct current of a stable value.

For most products, a driver for interior lighting systems or for LED strips is suitable. It is better to purchase a power source in advance in order to use it to calculate the number and connection diagram of diodes according to the output voltage and total stabilization current.
For small crafts, you can use general-purpose power supplies with an output pulsating current of 0.5-1.5 A and a voltage 3-5 V higher than the forward voltage of the diodes. You can stabilize the power supply using the LM317 chip; for more powerful spotlights, use LM350 and LM338, respectively, increasing the power of the source.

The current limitation of the microcircuit can be adjusted by changing the resistance of the resistor. Its rating is defined as 1.25/I, where I is the current of the LED or assembly.
Today, the entire range of LED floodlights available on the market can be divided into 2 groups: inexpensive, low-quality and branded products of good quality with high cost. It is worth noting that the second group is actively counterfeited by unscrupulous manufacturers from China, which seriously complicates the choice.
In this article we will look at how to make a 220 V LED floodlight with your own hands, the quality of which is several times higher than that of cheap Chinese-made products.
All materials used in the assembly are available in hardware stores and departments selling electronic components. As a last resort, they can be ordered through online stores. The main part is the body of the halogen spotlight.
If the floodlight is planned to be used outdoors, then the degree of protection of the housing must be at least IP67.
Next you will need double-sided rectangular fiberglass foil. Its size depends on the internal dimensions of the halogen spotlight housing. To attach the PCB, you will need an aluminum plate, which will also serve as a heat conductor between the LEDs and the spotlight body.
For more efficient heat removal from LEDs, it is recommended to use the thinnest fiberglass laminate.
We will install 100 LEDs. To power them, you will need a set of inexpensive radio elements, the selection of which will be discussed below. To install components on a printed circuit board, you will need a standard amateur radio tool. In addition, the ability to make homemade printed circuit boards, thermal paste and wires will be useful.
As a power source for an LED spotlight, we will use a circuit with a quenching capacitor, as the simplest and most accessible solution for everyone. Its principle of operation has been discussed many times before. Therefore, we will indicate only the main nuances that you should pay attention to. At the input of the power supply there is a non-polar capacitor with a capacity of 1 µF for 400 or 630 volts. A 1 MΩ resistor is connected in parallel with it. You can connect any other resistor with a power of 0.25 W or more with a resistance of 240–1000 kOhm. Next comes a diode bridge assembled on four inexpensive 1N4007 diodes (I arr = 1 A, U arr = 1000 V). It can be replaced with a diode assembly with the same parameters. The rectified voltage is smoothed out by a 10 µF 400 V polar capacitor.
The LEDs on the floodlight's printed circuit board are divided into two series-connected groups of 50 pcs. in each. The LED circuit does not use limiting resistors.
When connecting the power source to the LEDs, a multimeter was installed between them in current measurement mode. The result showed 38 mA in both branches or 19 mA in each, which corresponds to the previously calculated data. At a mains voltage of 220 volts, the current through each LED will not exceed the nominal value of 20 mA.
 The printed circuit board is manufactured in a standard way using a laser printer and does not require special precision. The reverse side of the board remains untinned for better heat dissipation. The mounting holes must be placed so as to ensure reliable contact with the radiator.
LED floodlight board in Sprint Layout 6.0 file:
Let's start assembling the spotlight by installing LEDs on the printed circuit board. To do this, you can use either a soldering station or a simple low-power soldering iron.  Upon completion, you should check the correct installation and functionality of each LED separately, using a multimeter in test mode.
The next step in assembling an LED spotlight with your own hands is soldering the power supply using a hinged method. The location of the radio components must be thought out so that they fit in the compartment where the power cable is inserted. To avoid short circuits, we insulate the exposed areas with heat shrink tubing. We check the performance of the power supply first at idle, and then with a load (LEDs).  After a successful short-term start-up, we move on to the final assembly of the LED spotlight. First, we make a radiator in the form of a corner from an aluminum plate.
  In such a way that one of its shelves is adjacent to the inner wall of the spotlight, and a board with LEDs is attached to the second.
  In order to increase heat transfer at the contact points, we apply thermal paste, after which we carry out final assembly.
A clear advantage of the design is the ease of assembly and availability of the parts used. As a result of the operations carried out, a homemade directional LED spotlight was obtained using SMD 5050 LEDs with a luminous efficiency of 18 lm each. In total, the luminous flux of a homemade spotlight will be approximately 1600–2000 lm. The exact value of illumination must be measured with a lux meter. It depends on the load current and the color temperature of the LEDs used.
The absence of a limiting resistor is a minus of the considered electrical circuit, due to which its reliability in regions with unstable network voltage is sharply reduced. A significant voltage surge will cause the LEDs to burn out. Therefore, we recommend slightly improving your homemade spotlight by adding two 1-2 Ohm resistors to its power supply.  Don't forget that LED lighting continues to progress, offering new models of solid-state light sources. In particular, the place of SMD LEDs can be taken by a COB matrix, the retail price of which is already available to a wide range of consumers. The COB matrix simplifies installation, reduces the size of the board, and reduces the overall production time of the spotlight at home.
But the heat will have to be removed from the multi-chip chip using a fan, which means the power supply will have to be modified. For these purposes, a computer cooler is suitable, for which there is enough space inside the case. But in this case, the spotlight cannot be used outdoors.
Another progressive step will be the replacement of copper-plated textolite with aluminum foil. In fact, this three-layer material is made of textolite, on one side of which copper is applied for etching printed conductors, and on the other - aluminum for heat dissipation. It is ideal for building modern high-power LED lights and floodlights.
Summing up, I would like to note that every person who is “friendly” with a soldering iron and electricity can construct a homemade spotlight using LEDs. And assembling such a homemade device will not only decorate your leisure time, but will also become an economical lighting device in the household.
Read also


