Sliding doors for dressing room drawings. DIY sliding doors for a dressing room video. Purchasing a ready-made solution
One of the heroines of the well-known film argued: “What difference does it make where you sleep? The main thing is where your dresses hang.” In this opinion, despite being too categorical, there is a considerable amount of truth.
We make sliding doors ourselves.
Dressing room: luxury or necessity
Things also need living space, just like their owners, so a special room for storing things is not a luxury.
Advantages:
- order - it becomes possible to sort things by season, materials, frequency of use and level of wear, as well as separate the clothes of one family member from the things of another. Support established order in a separate room it is much easier than in several, densely filled bedside tables;

- service life - properly stored items do not lose shape or undergo deformation, so the service life of the products increases;
- access - shirts, jackets and trousers disappear, laid on the back of a chair under the pretext of wearing them tomorrow anyway. Free access to any thing saves both time and nerves;
- saving space - a dressing room, even if part of the room had to be fenced off to organize it, allows you to get rid of a lot of small pieces of furniture used for storage. Every cubic centimeter up to the ceiling is used in the dressing room: you just need to choose the right equipment.

Flaw:
- In order to build a dressing room with your own hands, time and effort are required.
Organizing a dressing room
- Pantry or niche - this option requires minimum costs. We need components: shelving, hangers, drawers and doors. It is recommended to install sliding ones: a swing design is much more difficult to install. In the photo there are sliding ones that cover a niche.

- Part of the room - if there are no such premises, then you can use the living room. Minimum dimensions – 2 sq. m. with a depth of 1 m, do not reduce the room to a critical size, and the ability to fence off a corner allows you to change the proportions while maintaining a sense of perspective. There are two ways to fence off a room: by installing plasterboard walls or sliding doors as a partition. The last option is easier to implement with your own hands.
- Attic - a dressing room can be arranged either against a low or high wall. It is recommended to use shelving and racks rather than cabinet furniture, so as not to visually reduce the space. In the same way, you can equip a niche under the stairs to the second floor.
Previously, this niche had a built-in wardrobe with doors that looked very cheap. There was always a desire to install something more decent. Studying prices for ready doors coupe, upset me, they were too expensive. I decided to make these doors myself. What came of it, I will tell you in this article.
I assembled the doors completely myself, with the help simple tools and a special jig called the Kreg Jig. Kreg Jig is essentially a jig for drilling at an angle. I was given this conductor for my birthday. In the article I will also show you how you can use a jig for drilling at an angle. I was pleased, the jig is easy to use and the result looks professional.
Stage 1: Planning
It's been about a year since I made and installed these doors, so I don't have the original drawing left and can't show it to you. Therefore, I will simply describe the preparation process.
I measured the width and height of the opening to the dressing room and drew a sketch of it. To ensure that two sliding doors overlap, you need to determine the middle of the opening and draw it on a sketch. Now you need to determine the width of the board that you will use to make the doors. I bought a board called an aspen shelf board. For the lower horizontal jumpers I used the entire width of the board, for the vertical posts I cut the boards lengthwise. Now to determine the width of the door, to the distance to midline added ¼ of the width of the board, i.e. half of half. This ensures that we have the necessary overlap between the two doors. In fact, it didn’t work out perfectly, since the opening itself turned out to be crooked.
You can make almost any design in the middle of the door. I chose the design so that it would resemble the Japanese “Shoji” screen that we had in our bedroom. For filling, the usual cellular polycarbonate. Now it is sold in almost any construction hypermarket. This material allows light to pass through, but is not so transparent that your items in the closet are visible. Compared with ordinary glass, cellular polycarbonate is very light, easy to work with and looks great, especially if you make internal lighting.
List of materials
- Board
- Cellular polycarbonate
- Sliding door mechanism
- Self-tapping screws
Tool list
- Roulette
- Square
- Level
- Drill
- Craig Jig
- A circular saw
- Pendulum saw (crosscut)
Stage 2: Assembling the frame


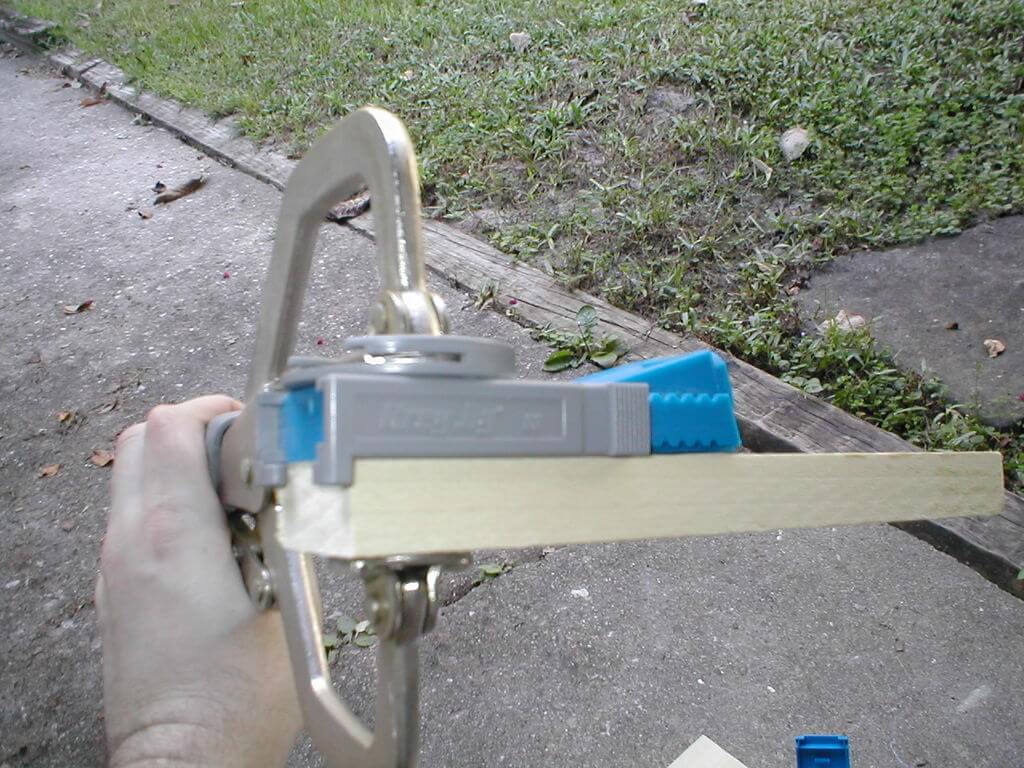


Now the fun begins. The conductor I mentioned earlier plays main role. The kit includes the necessary clamps and screws, but there are few of them, so you will have to purchase more. The included screws have a special head, so that is also included in the kit. I will not write detailed instructions on using the Kreg Jig, everything can be seen in the photographs. I'll just leave a few notes.
It is better not to do the frame assembly on the floor, as I did. Since the bars can move relative to each other and ultimately the frame will be deformed. It is better for the corner you are working on to hang from the table. The boards will lie in the same plane and after leveling with a square, you can twist them. It is very important to maintain a right angle!
Stage 3: Installation of compartment doors


I bought a kit for sliding doors at the nearest hardware store. The kit included a top rail and 4 adjustable hanging casters.
Mark and drill holes in the opening to attach the guide.
To attach the rollers, you need to step back from the edge of the door a certain distance; if it is not indicated in the instructions, then estimate by eye how much will be enough to evenly distribute the weight of the door.
The kit also included a bottom track to keep the doors from swinging, but I still haven't used it. If you use it, you don’t always need to screw it to the floor; perhaps it will be enough to secure it with double-sided tape, in case you want to change something in the future.
Stage 4: Internal “drawing”


A separate room specifically designed for storing clothes, shoes and other things is no longer a luxury. A wardrobe is an excellent solution to the problem caused by the lack of sufficient space for clothes, shoes and textiles.
Previously, we tried to buy huge wardrobes, hangers, several bedside tables so that there was room for things. And still the problem did not go away, because it is enough in very rare cases. Sometimes it’s easier to hang a clean, ironed shirt on the back of a chair in the evening so that it doesn’t get wrinkled in a crowded closet until the morning, and you don’t have to iron it again to wear it to work. Hangers at the entrance to an apartment with a mountain outerwear They don’t look very nice, to put it mildly, and they’re inconvenient to use. Large wardrobes and chests of drawers are stolen a lot usable space, which could be used to greater advantage. That is why you need to arrange a dressing room with your own hands in the form of a separate room.
For this mission, you can allocate a part of the corridor, if its area allows, a niche in one of the rooms, etc.
- With a room designed for storing clothes, you can forever forget about the mess that constantly reigned in your home. Household items can be easily separated from those intended for work or leisure. Jackets will be stored separately from T-shirts and shirts. The clothes of one family member will not intersect with the things of the rest, thereby creating clothing chaos.
- The service life of clothing will automatically increase several times. All things require that they be stored correctly. Repeated folding in the nightstand and constant ironing do not have the best effect on the condition of the clothes. This accelerates wear and tear, which in turn leads to unplanned additional costs for purchasing new items. With a dressing room where everything will be stored properly, this problem will become irrelevant.
- Access to things will be greatly simplified. You won't need to sort through all the shelves to find the item you need. Now, in order to take what interests you, you will need to open the dressing room and go to the section where the thing you are interested in hangs. A huge plus is that it will not need to be ironed before putting it on.
- If there is a separate section of the room intended for clothes, there is no need for chests of drawers, bedside tables, cabinets that have the same purpose. A well-equipped dressing room uses all the space, from floor to ceiling. Therefore, you can really fit everything into it, and you can get rid of empty furniture and thereby free up several square meters.
There are some drawbacks, but fortunately there is only one. To make sliding doors with your own hands you need to spend quite a lot of labor and time.
Selecting material for making compartment doors

To assemble compartment doors, the following main types of material are used:
- Tree. It is durable, resistant mechanical stress a material that can bring comfort to your home and decorate the interior.
- Sliding plastic products. The advantage of plastic is its price, the disadvantage is its fragility and instability to shock, which is very important for families with small children.
- Glass compartment doors look very beautiful and add their own flavor to the interior. It is recommended to use impact-resistant glass, as regular glass is dangerous to use.
- Compartment doors, made in the form of a mirror, perform two functions at once. This material is chosen by most for installation in the dressing room.
If you plan to make from scratch sliding structures do it yourself, then you need to choose materials that can be easily processed at home, and will not require additional complex equipment for this.
Preparing to install sliding doors
Do-it-yourself installation of compartment doors begins with preparation. First you need to decide on the place where you want to make a dressing room. A lot will depend on this, for example, how many sashes will have to be installed for convenient operation.
Next, you need to take accurate measurements of the niche, corridor or room where you plan to install compartment doors. The number of sashes will depend on the width. If it does not exceed two meters, two moving doors will be enough. With a width of two to three meters, one fixed sash can be added. If the distance is more than three meters, you should make two movable sliding doors and two fixed ones.
Mechanism for sliding system You can make it yourself, but it requires a lot of time, special equipment and experience in such work. Therefore, it is recommended to buy it. You can save on door leaves, which you can easily make with your own hands. It will be necessary in hardware store buy slats for the frame and material for filling compartment doors.
How to install sliding doors with your own hands: work procedure

- Based on the measurements of the opening, we determine the size and number of leaves for the compartment doors. At the same time, we take into account the content, frame and elements sliding mechanism. It will be best if you prepare the appropriate drawings.
- We assemble the door frame with our own hands and insert the filling, securely fastening all the elements.
- We attach the working mechanism to the sliding sashes, namely rollers, clamps, etc.
- We set the sliding doors aside and proceed to attach the top rail. To do this you will need a hammer drill, a screwdriver, dowels, and self-tapping screws.
- Now you need to determine where to install the bottom rail. To do this, place it on the floor at the intended mounting location. We take one door and insert it into the upper guide, then into the lower one. Using a level, check verticality door leaf, if necessary, move the rail. When we are satisfied with the result, we mark the place where it is attached and remove the door. Now you can fasten the rail with self-tapping screws to the floor.
- Once both tracks are attached, the sliding doors can be inserted.
After completing all stages, the design is ready for use. You can equip your dressing room with all the necessary shelves and hangers, and then use it and enjoy it.
- a convenient invention that allows you to organically fit a “room for things” into the interior of a “room for people.” They can be installed indoors limited space, thereby saving about a meter of space. Such designs are suitable for both large dressing rooms and compact sliding wardrobes, acting not only as a functional detail, but also as an original decoration.
Advantages and disadvantages of sliding doors
Wardrobe systems with sliding doors have become quite common in interiors. modern apartments. If space allows, a whole room is set aside for a dressing room, in which shoes and clothes, hats, handbags, ties and other personal items are freely placed. When there is not much space in the apartment, sliding wardrobes are used, which are also closed with sliding doors.
pros
Why are modern housewives so attracted to sliding structures? It's simple, they have a number of advantages over standard doors:
- Saving space. By installing a sliding door, you will not have to worry about whether there is enough space around for it to open. The doors will move apart different sides and will not go beyond the opening;
- Safety. Those who have small children understand this perfectly. The baby will not be able to stick his finger between the door and the opening and pinch it. In addition, the sliding doors will not slam shut even in a strong draft;
- Easy installation process. With a small set of tools and some simple skills, you can install sliding doors in your home yourself. dressing room. There will be no need to change the opening, since you can order a sliding door exactly the size you need. If any element fails, you can easily select a new part;
- Decorative. In addition to the practical function, which sliding doors cope with with a bang, they perform an aesthetic function. A variety of designs, a wide range of materials and a rich palette of colors allow you to make the door an important part of the interior.
Minuses
Sliding doors also have a number of disadvantages, knowing about the existence of which before installation, you can minimize them.
So, to negative properties sliding doors include:
- easy passage of odors. When planning to create a dressing room, try to place it away from the kitchen;
- fragility. At frequent use the structure may become loose. Doors with cheap glass are not particularly durable either. However, if used properly, the system will last quite a long time. In addition, there is always the opportunity to replace a failed part;
- noisiness. There is a slight rustling sound when opening the doors. But you can probably get used to it. Plus, the closet door is only used a few times a day.
Variety of sliding doors
Sliding doors can be classified according to the type of construction and the materials used for their decoration.
Types of structures
The name sliding door hides a whole range of structures that are installed and function differently. Thanks to such variety, you can easily choose a door that will suit any dressing room.
- Pencil door. The essence of this design is that the door leaves go into the wall. This perfect option for small apartments.
- Sliding sliding doors for the dressing room. The doors are located on rollers, thanks to which they move apart and run over each other. This is the same principle that is used when closing sliding wardrobes. It will be appropriate when only part of the room is allocated for a wardrobe.
- Techno door. It moves in the same way as sliding doors, but does not have bottom rails. Ideal for interiors with flat, smooth floors and no thresholds. It is also good when there are children - the little ones will not cling to the lower fastenings.
- Book door. This type of construction owes its origin to the eastern screens. The doors fold and slide away. This design requires a little more space.
- Slidingaccordion door for the dressing room is an improved version of the book door. The main difference between them is the number of wings: the accordion has more of them, and they are narrower.
- Roto door. Perhaps the most futuristic design. It is based on rotary mechanism. In other words, the door can rotate around its axis, opening in different directions. However, such a model does not require less space than a regular door.

Materials, decor and additional functions of sliding doors
For the manufacture of sliding doors they use different materials. It can be valuable types of wood, glass or mirror, plastic, chipboard, etc. When choosing a model, many owners are guided not only by the quality of the material, but also by its decorative properties, allowing you to brighten up a room, and sometimes even hide a number of its shortcomings.
- Wooden doors. For special chic, you can use wood from expensive tree species, however, today chipboard or MDF are more often used. This material is lighter not only in weight, but also in processing. It goes well with glass, mirror and plastic and allows you to achieve a decent result for a reasonable amount;
- Models made of glass and mirror. If wooden doors give solidity and are used, as a rule, in
One of the heroines of the well-known film argued: “What difference does it make where you sleep? The main thing is where your dresses hang.” In this opinion, despite the excessive categoricalness, there is a large grain of truth.
Making sliding ones doors on your own.
Wardrobe: luxury or necessity
Things also need living space, just like their owners, so a specialized room for storing things is not considered a luxury.
- order - it becomes possible to sort things by season, materials, frequency of use and level of wear, and also to separate the clothes of one family member from the things of another. Maintain established order in private room very, very simpler than in several densely filled bedside tables;

- service life - properly stored items do not lose their shape and are not subject to deformation, thanks to this the service life of the products increases;
- access - shirts, jackets and trousers disappear, laid on the back of a chair under the pretext of having to wear it the next day anyway. Free access to every item saves both time and nerves;
- space saving – wardrobe, even if for its organization it was necessary to separate part of the room, it allows you to get rid of the mass of small furniture items used for storage. In the dressing room, every cubic centimeter is applied to the ceiling itself: you just need to choose the right equipment.
Flaw:
Organizing a dressing room
- A storage room or niche - this option requires little investment. Required components: racks, hangers, drawers and doors. It is recommended to install sliding ones: a swinging design is quite more difficult to install. In the photo - sliding ones, covering the niche.

- Room part - if there are no premises of this type, then you can use the living part. The smallest sizes are 2 square meters. m. at a depth of 1 m, do not smaller room to a critical value, and the ability to separate the corner allows you to adjust the proportions while maintaining a sense of perspective. There are two options for separating a room: by installing plasterboard walls or sliding doors instead of a partition. The final option is easier to do with your own hands.
- Attic - a dressing room can be arranged either against a low or high wall. It is best to use shelving and racks rather than cabinet-type furniture, so as not to visually create less space. In the same way, you can equip a niche under the stairs to the second floor.
Doors to the dressing room
Accessories for retractable systems are purchased in the store building materials. Basically, this is a set of 2 guides and four roller hangers. It is recommended to acquire limiters to protect the door leaves from opening too sharply.
Do sliding design with your own hands is quite possible. It is better to select materials that are as light and flexible in finishing as possible: without experience and equipment for professional work making a mirror door tightly is simply unrealistic. It would also not be a good idea to use glass: impact-resistant or tempered glass requires complex tools, while a simple single glass is dangerous.

It will not be difficult to create a door frame from wood - poplar, apple or pine. It is necessary to select well-dried wood, otherwise ready product during shrinkage, it becomes deformed.
For inserts, you can use plexiglass, all kinds of plastic sheets or specialized paper. IN latest version it turns out to be a good imitation of inter-wall partitions in a minimalist decorative style. The photo shows a version with a wooden frame and translucent plastic inserts.

Manufacturing doors
- The opening of a niche or the distance between 2 wall surfaces is measured if the room part is fenced off.
- Parameters are calculated sliding door
, and the drawing is created. If the option of dividing partitions is implemented, then when making calculations it is necessary to look at the length of the future room. If it is not more than 2 meters, then 2 moving doors will be enough. Under conditions that can reach 3 or higher, the option with 2 fixed and 2 movable sashes looks much more practical.
- The drawing marks the horizontal and vertical components that form the frame of the sash, and determines their dimensions.
- For the door frame, it is recommended to choose a timber with a thickness of 20-25 mm. Transverse and oblong strips should be thinner.
- The frame for the door is assembled, the components are fixed with self-tapping screws. It is imperative to check the connection using a square. It is recommended to assemble the frame off the floor.
- The strips are fixed to the frame according to the drawing. The product is painted, if necessary, and varnished.
- The insert material is placed on the other side of the sash. Plastic is attached using self-tapping screws; paper or fabric can be fixed with glue.
- Mounted on the floor bottom guide. The top one is installed on the wall, strictly parallel to the floor.
- Rollers are mounted on the door frame - at an equal distance from the corners. If a single-track design is implemented, then the rollers are fixed exclusively to the part on top of the sash, and bottom guide not present.
- The door leaf slides into the upper guide, and then into the lower one.
On video manufacturing process retractable doors with your own hands is presented in more detail.
How to make sliding doors for a dressing room with your own hands


