The photos, which can be considered a small advertisement, show how beautiful and perfect topiaries are. A small souvenir tree will complement one interior, transform a second, and make a third brighter. And you can do these transformations with your own hands. Numerous photo and video master classes show in detail how to create a new image from the most ordinary things. How to make topiary yourself, what is needed for this, and what subtleties should be taken into account?
This master class is, let’s say, a universal recipe. It doesn’t matter what kind of topiary you are going to make; this master class will describe in detail each stage and its variations.

The first thing work usually begins with is the search for materials. Craftswomen who make more than one craft with their own hands are accustomed to stockpiles. Making stocks means purchasing not just one item, but five at once. This means that you should not pass by beautiful chestnuts, rowan branches, and dried flowers. Take everything home to your handmade treasure chest.
The same goes for possible decor - scraps of fabric, beads, buttons, rhinestones, ribbons, threads. All this can become the basis for decorations that you make yourself.

Tips for beginning craftsmen:
If you have already created at least one successful topiary, think about the fact that the process is worth filming. This could be a photo or video, but such material may be useful to you again, and you can place it on special resources and, by the way, sometimes they pay for it.
So, next you need to make the topiary elements directly. They usually start with the basics. The base is what the crown will rest on. And the crown in the case of a souvenir tree is its main part. Therefore, the base ball must be made strong, reliable, and solid. You can buy a ready-made foam part; this blank will fit any tree.

But you can make a ball with your own hands:
The latter method is more often used if the basis for the crown needs to be made not of a ball, but of a heart.
The crown must stand on something. In a tree, this mission is carried out by the trunk, and the souvenir tree follows the same path. Different workshops offer different options. Some say that only branches can be a beautiful, natural trunk. Others use both wire and aluminum cable for this purpose.

If you look in detail at any photo master class, you will see that the most unexpected things are used as a trunk. For example, sushi chopsticks.
To create the trunk you may need:
Yes, it is the handles that can become the trunk - if you remove everything unnecessary from them, leaving only the elegant vertical part, this could very well become the trunk for some elegant money tree.
Basically, what serves as the basis for the trunk has to be decorated - painted, wrapped, glued, etc.
The tree usually stands in a pot. The easiest way is to buy a new one, which you won’t even have to decorate. But it happens, you look at a photo, and you want to do everything exactly according to this photo.

For example, from a simple penny plastic cup you can make an exquisite pot with your own hands.
The master class is very simple:
You can attach a small photo to the pot with a decorative clip, for example, where you are together with your loved one, or with the one to whom this tree is intended as a gift.
The souvenir tree may have an unusual shape. More than one tricky technique is used to create various shapes. You can do unusual things with your own hands, and few people will guess how you did it in the first place.
To design figures you need:

We usually talk about designing figures when we mean making garden sculptures. Such unusual landscaping is captured in numerous photographs. The figures require certain manipulations with knitting or carpentry wire. You will get topiary sculptures, entire compositions of green figures.
Making them is not so easy, but modern devices have made the process easier. So today, the production of figures is simplified by purchasing special figured meshes or metal frames. They are put on the plant, which, of course, is thus limited in growth. When shoots make their way through the mesh, they need to be trimmed.
This way you can get several elegant figures on your site. For beginners, there is advice - take simpler frames for the first time, do not try to build several figures at once, this requires care and a certain skill.
A souvenir tree, a tree with an ideally shaped crown - numerous master classes tell you how to create such beauty yourself. If you live in an apartment and don’t have your own plot, then start bringing your dream closer step by step. First, a figured tree at home, on a table, and then it can be scaled in a natural environment.
Happy plans and their implementation!


Topiary is a small decorative tree with a rounded crown. This method of decorating garden vegetation came into our culture from Ancient Egypt, where they first began to give trees an unusual shape. Over the centuries, the craft has grown into a decorative art, the fruits of which are increasingly found in modern interiors. At the same time, you can make a tree of happiness with your own hands in literally one free evening.
Topiaries with cute crepe paper buds are often used to decorate wedding or birthday parties. Many brides even prefer to use artificial analogues of flowers for a bouquet, because such details will definitely not spoil at the most crucial moment, and besides, they are not at all inferior to natural peonies or roses.
So, to make crafts with roses, stock up on the following materials: corrugated paper of the selected shade - for the inflorescence; scissors; glue; pencil; green tape for the trunk; strong thread (can be replaced with small wire); ruler; Styrofoam; a stick for the trunk (for example, a Japanese chopstick, a pencil, a branch); newsprint or other thick paper; pot for indoor plants.
To get a standard size topiary, prepare 30–40 flowers. Cut strips 3–4 cm wide and 35–45 cm long for each rose. Bend the ribbon lengthwise by a third, and then wrap the top section at an acute angle and repeat the turns three times - this is how you form the middle of the rose. Continue making turns until you have twisted the entire strip. Fix the tip with glue, and fasten the lower part of the flower with wire.
The base sphere can be purchased ready-made or formed from newsprint. Wrap the newspaper ball tightly with thick thread. Please note that the paper blank must be larger than the size you want to obtain, as the thread will significantly reduce it. Glue the flowers securely to the sphere.
Take your chosen stem stick and wrap it in twine or green duct tape. You can use corrugated paper by cutting long strips out of it, applying glue to the inside and wrapping it around the base. Place the ball on the barrel or secure it with glue.
Use polystyrene foam or alabaster as a primer. In the latter case, fill it, leaving 2–4 cm from the edge, and insert the barrel. In this case, the stick must be held until the solution becomes dry. Decorate the finished ground base with fabric, tinsel or beads - as you like. Ready!


Coffee topiary is a wonderful gift that will decorate any corner of your home. It is environmentally friendly, beautiful and, moreover, also has an incomparable delicious aroma. It is not difficult to make - follow the basic instructions. Additionally, you will need 150–300 g of coffee beans, brown acrylic paint for coating and, if desired, decor. All other materials and tools are standard, as for any other topiary.
You can perform the classic version without intricate shapes and decorations, the result will be elegant and laconic. But if your heart yearns for creativity, we offer several original ideas:
— The craft can take the form of a flowering tree and become an excellent present for a girl, mother or teacher;
— Try decorating the tree with dried fruits and placing it in the dining area;
- Use summer motifs and decorate the work with small birds and butterflies;
- Create a New Year's composition - a cute coffee tree. You can make the base yourself from thick paper or purchase a ready-made one;
— A man will certainly appreciate a gift in the form of a money tree. It is enough to glue coins to the ball, and a zipper around them, and decorate the remaining space with coffee beans;
— If you are thinking about a present for Valentine's Day or a wedding anniversary, make a topiary in the shape of a heart;
— A cup hanging over a saucer from which grains “spill” looks very impressive. It’s not difficult to do - instead of a stick, use wire, foam or hot glue.


Another idea for eco-decor that is popular today is pine cone topiary. It will harmoniously complement the autumn or winter composition, and it is quite simple to perform.
In addition to the standard set of materials, prepare cones, pins, and dried moss. Rinse the buds thoroughly and dry for 10 minutes in an oven preheated to 350 degrees. Prepare the trunk by painting it or wrapping it with twine. Fill the pot with mounting mixture or chopped floral foam, fix the trunk in it.
The sphere can be coated with brown paint. Use pins or hot glue to attach the pine cones to the ball. They must be fastened close to each other. Large parts need to be glued first, the rest - in descending order of size. Attach the ball to the barrel.
Cover the improvised soil with moss or other material that you like. If desired, complete the composition with additional decorations.
By the New Year holidays, you can also create an impromptu conical-shaped Christmas tree.


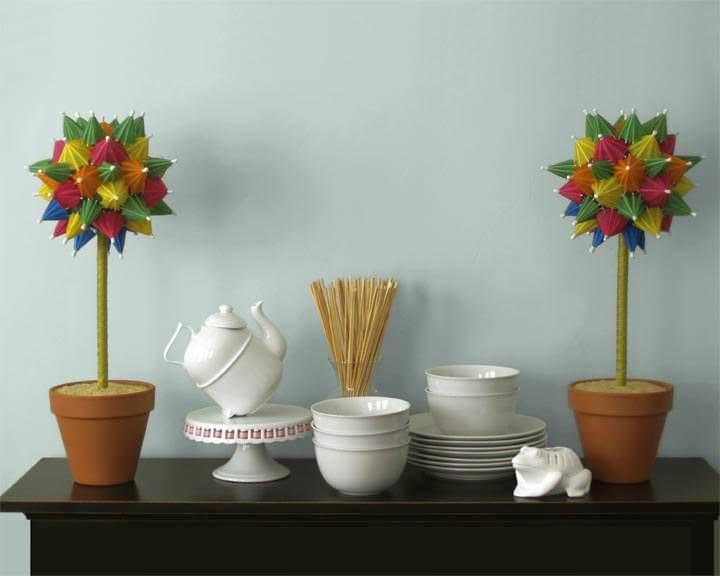
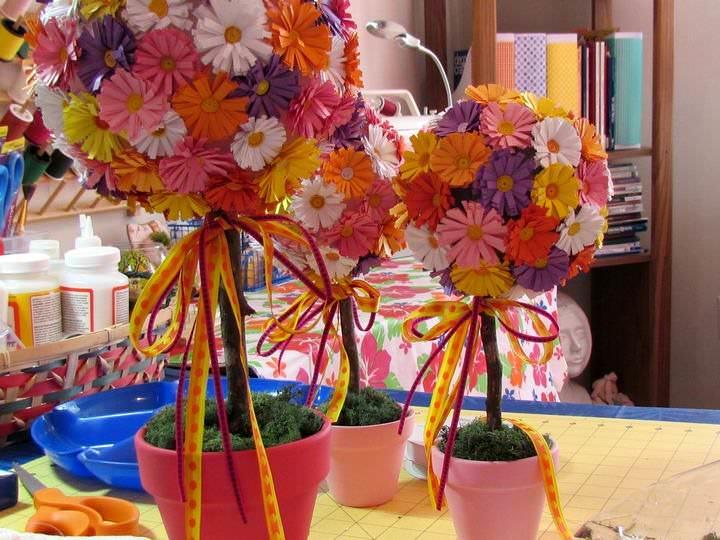
Topiary made using this technique turns out to be very cheerful and cute. It will complement the interior of a nursery or serve as an interesting decor in the dining room or kitchen. Try it yourself, it's not difficult at all.
So, you will need: thick, bright colored paper in various shades; a quilling device (if you don’t have one on hand, use a toothpick or a needle stuck into a wine cork); spherical base; scissors; a flower pot; stick for the trunk; glue (PVA and heat gun); moss or other filler to cover the “soil”; chopped foam; ribbons for decoration (optional).
Cut colored paper into wide (one color) and narrow (different shade) strips. Cut wide parts along the edges, forming a fringe. Glue narrow elements to the edge of each strip. Lubricate a thin strip with glue and use your chosen tool to twist it into a tight spiral. Do the same with the wide strip. Remove the craft from the tool.
Repeat the algorithm for the remaining stripes in other colors. Unfold the fringe and you will get lovely flowers.
Take a ball and use a heat gun to secure the flowers on it so that there are no voids left. Coat the pot with hot glue and place the foam in it. Cut a hole in the foam for the barrel, coat it with glue and place the barrel in it.
Make a hole in the crown and place it on a stick-trunk, pre-lubricated with glue. Decorate the foam soil with prepared moss or other decorative element. If desired, you can paint the pot in a bright color and also tie the trunk with a beautiful ribbon.


A topiary made of shells will perfectly complement a marine-style interior. To make it, prepare the following materials: a foam ball for the base; various shells; wire; pot for stand; cardboard; twine or thread; scissors and a hot glue gun.
To make a topiary crown, prepare: a foam ball, shells and white sisal. Using a glue gun, glue the entire surface of the sphere and wrap it with sisal. Prepare the shells and then attach them to the sisal with glue, leaving small gaps. This way you should cover the entire surface of the ball.
For the barrel you will need wire, thread or twine, scissors and a glue gun. Shape the wire into the desired shape and wrap it tightly with thread or twine. You can make several trunks using different colored threads and different bends.
To make a topiary pot, prepare a clay pot, foam plastic, cardboard or paper, ready-made trunks, scissors and a heat gun. To secure the trunks, place foam in the pot. Then secure it with hot glue. Glue the finished crown to the trunk and stick it into the foam placed in the pot. Glue thoroughly using a heat gun. For strength, fill the empty space in the pot with crumpled paper, glue it and cover it with a circle of cardboard. Later you can cover it with sisal or small shells.
Attach two shells to each other and place a “pearl” in them. This way you will get a wonderful decoration for the pot. Next, decorate the base of the pot as you wish. Using a satin ribbon, you can make bright accents and strew the crown with the same “pearls”.


(18
ratings, average: 4,22
out of 5)
 Recently, topiaries, or European trees, have become increasingly popular. This is a great way not only to decorate your home, give it incomparable comfort and individuality, but also a great leisure activity for all family members.
Once upon a time, and to this day, the art of topiary is widely used in park design and denoted a garden with short-trimmed trees framed by garden sculptures. Today, this name also means a small artificial tree, and such a unique miracle is easy to make with your own hands.
Another name for “topiary” is the tree of happiness. The explanation for this metaphor has its roots in the Ancient East. For a long time, the ball in many religions was considered to be the personification of the sun, creation, infinity and perfection. Eastern religions associate sunrise with hope, the beginning of life, spring, childhood and happiness. By giving topiary as a gift, you seem to be giving a piece of life and happiness to someone dear to you. According to the rules of Feng Shui, a tree brings joy to a home.
Topiary is not the personification of any specific plant that exists in nature. This fairy tree embodies the author's wildest fantasies. Its crown can have not only the typical shape of a ball, topiary shapes can be made in the form of a heart, cone, etc.
 Making a European tree is not only a hobby, but also an entire art. However, anyone can make topiary with their own hands. Its height ranges from 15 to 50 cm. The materials used in the manufacture of the tree are extremely diverse; it can be made from any available natural and artificial means: from berries and fruits, dried flowers or spices, to paper, plastic, coins and other materials . You can even make a topiary out of artificial grass.
The minimum basis for making wood is four required components:
A stand or flowerpot serves as a base for placing the tree. As a stand, you can use not only a flowerpot, but also an unusually decorated jar, cup, glass or other container that matches the general idea.
The basis for the composition is a ball, personifying perfection, or a foam figure of any other shape. For the base figure, you can use other materials at hand. Usually they buy a ready-made base at a craft store, which significantly saves time.
To make the barrel you will need wire (preferably thick). As a rule, the wire is wrapped with twine; braid and decorative tape are also widely used.
Making a crown is perhaps the most interesting and creative moment in the entire work process. There are almost limitless possibilities for realizing the most daring and original ideas and fantasies.
The materials for making the crown are:

Bonsai trees serve as a wonderful home decoration not only in the living room, but also in the kitchen, bedroom and other rooms. A tree that glows in the dark will not only be a decorative element, but will also serve as a practical night light. A European tree made from fresh flowers is a wonderful gift for any occasion.


So, let's make topiary with our own hands. Let's look at the process of making a coffee tree as an example. Topiaries made from coffee beans are very popular not only because of their appearance, but also because of the wonderful aroma of coffee spread around.
Characteristic features of a coffee tree:

Necessary materials:

Topiary made from coffee beans– a wonderful and stylish gift for a man (husband, colleague, etc.).
Ideas for European trees can be taken from the Internet, craft magazines and catalogs, or use your own imagination. There are many options for execution. You can create a whole topiary garden at home. Anything can become a decoration for a tree; you can safely combine various materials, creating unusual shapes for the base, inventing fantastic figures or sculptures for decoration.

Make an original topiary You can do it yourself for any occasion, from New Year's to an anniversary or other celebration. Or you can create works using this technique without any reason, but as leisure for the whole family and a wonderful time together for adults and children.
 The art of topiary finds its wide application in landscape design, decoration of the territory of a country house, cottage, and garden. Initially, topiary art was a technique of curly cutting of trees and shrubs. As a result of such cutting, plants are given any shapes (balls, cones, etc.) or ornaments; from them you can create various figures and entire green sculptures (animals, people, fairy-tale objects or structures, etc.).
Creating topiary with your own hands at home or on the site is not particularly difficult. Should always start from simpler forms and, improving your technique and art, move on to creating complex figures and compositions for the garden. The main thing, as most garden sculptors note, is patience, love for plants, careful and proper care for them.
At first, topiary simply referred to a garden in which ornamental trees were trimmed short with adjacent garden sculptures. In the current understanding, topiary means an original small tree. If you want to quickly get a small tree with the perfect shape, you can make it yourself.
At least four elements are needed for this craft. Such a small list is just a base, without which a sort of flower globe on a stem will not work.

Required items:
The main craft is usually a ball. Man has an inherent desire to comprehend perfection, and strict geometry sometimes brings him closer to this. But in the photo you can see other forms of topiary, for example, a heart.
Today, a foam blank is used as a base. In order not to make the ball himself, the master buys several at once in craft stores, and this, of course, simplifies the work.

For the trunk, thick wire is usually taken, it needs to be wrapped with twine (twine is used most often), or with decorative braid or ribbon.

The most interesting stage of work, where great opportunities open up, is the manufacture of the crown. Paper is often used, from corrugated paper to multi-layer napkins. Creating such a crown requires care.

Fabric crafts are also interesting; in the photo you can see all the nuances of this work. The now popular felt is widely used in the creation of topiary; cotton and satin ribbons are also used.
The fabric crown will be complemented by beads, seed beads, and buttons. Whatever the crown is made from, the most interesting works can be made from pistachios. European wood (as these products are also called) turn out to be very natural. True, you will need a lot of pistachios, unless you are planning to make a mini-tree.

In addition to pistachios, coffee beans are actively used. This technique is in such demand because it can kill two birds with one stone. The bonsai tree will not only be beautiful, it is important that it also emits a special aroma.
A separate story is topiary made of different thicknesses of threads. Usually the threads serve as the basis for the future crown. To make such a tree, you need to wrap a balloon with threads, and it is important that the threads sit on the glue. The balloon is then deflated (just poke a pin through it) and you are left with a round, porous figure of thread. Such a thread globe. Just wait until the glue dries!

Other threads can be used to decorate the trunk of a tree. You should not use the same threads from which the globe is made. The structure of such thread structures is used not only in the creation of topiary. This is often how a lamp is made - quickly and easily.
Coffee beans themselves are an excellent decorative material. In their color and texture, they are not inferior to the decor made of glass beads, beads, and even the incredible aroma is associated with the benefits of coffee.

There is also such a fashionable type of coffee topiary made from coffee as a coffee gentleman. This tree has handles, a butterfly or a whole tailcoat, and a cylinder on the head-crown.
Coffee topiary is characterized by:
The grains can be spray painted or varnished.
The main stage of making the base for the crown is already known to you. The crown may not necessarily be in the shape of a ball. If a “heart” topiary is planned, the base is made using a cardboard template covered with crumpled paper or cotton wool.


Modern paper napkins are more of a decorative product than a household one. The structure of the napkin and the pattern inspire craftsmen to widely use these same napkins. Including in the manufacture of topiaries.

How can you use napkins in this case:
Napkins are also a good material for decorating a tree trunk or a pot. And here you will need to use decoupage techniques. New Year's topiaries made from napkins and textured Christmas trees are especially elegant.
This topiary will be an excellent winter decoration, and pine cones are somehow related to autumn decor. Most often, the cones themselves are subjected to decorative processing. So, for topiary they are often painted with golden spray paint (or silver). And with the help of a simple bleach, ordinary buds can be turned into snow-white without any coloring.

Pine cone topiary is most often a tree with a round crown covered with cones. Sometimes the crown can be heart-shaped. New Year's topiary can be made in the form of a snowflake from cones. In this case, it is advisable to cover the snowflake with artificial snow. This can be ordinary coarse sea salt fixed with PVA glue.
As an autumn craft, this topiary also includes chestnuts, acorns, nuts and leaves.
Let's take a closer look at the process of making a tree of happiness from pine cones in an autumn theme. A foam ball will be used as the base, which can be replaced with a homemade ball made of any material.


Satin ribbons are an inexpensive and accessible material that can be used at different stages of topiary making. Most often, ribbons are used as additional decor. They are tied around pots, trunks, and bows made of satin ribbons complement the crown.
But this type of topiary is also popular, as a souvenir tree with flowers made of satin ribbons.

The principle of creating such a tree is simple:

The video master class will show the process of making a tree from ribbons in more detail.
An autumn tree or a souvenir topiary decorates the house like nothing else, if you want to bring accents of the lyrics of autumn into it. Most often, natural materials are used, which can be found literally under your feet.
Cones, chestnuts, acorns, dried flowers, berries, rowan and, of course, leaves are actively used.

This type of topiary is popular as a tree with a crown of roses made from leaves. To prevent the leaves from wilting, they can be soaked in a glycerin solution. True, this process is not so simple, if only because for two to three weeks glycerin will be absorbed into the leaf through a slightly cut twig. And then the leaves will dry for another three weeks.

Topiary can be made as follows:
Instead of a round crown, there may be a heart-shaped crown. And this, in turn, could be a photo frame where a canvas of shells frames a photograph from a seaside holiday.
MK with step-by-step photos will show you how to make topiary from shells in detail.


Corrugated paper is cheap, and the number of handicraft items where it can be used is huge. Making topiaries also could not do without the use of corrugated paper (or crepe paper).

Having made the required number of flowers from corrugated paper, they are glued to the base ball with a hot-melt gun, forming a flower crown.
Corrugated paper has the most wonderful property - it is flexible and stretches well, making the petals incredibly lifelike.
The topiary itself is often called the money tree, although it was originally considered the tree of happiness. But you can also turn such a lucky souvenir into a money symbol - for this you use either coins or banknotes (souvenir, finite).

Coins can become a beautiful crown decoration. You just need to take ten-ruble coins that appear to be gold. They do not need to be additionally decorated, varnished or undergo other procedures. Coins are glued on according to the principle of scales, first one coin, then two more on top of it, so that the first one is in the middle. And around these three coins others are stuck.
The money tree of their bills also looks great, but the bills need to be presented gracefully. Buds, rolls, “birds”, etc. are formed from them. This money tree is an excellent gift option for a young family that has yet to build their family budget.


New Year's souvenir trees are special topiaries that can be made from a variety of materials. Most often, topiaries are made in the form of a Christmas tree, that is, the usual round crown is replaced by the shape of a Christmas tree.

Cones are used as materials for New Year's topiary:

New Year's topiary is a special decor. The use of rhinestones, beads, bugles, buttons, braid and satin ribbons is welcome. As a pot, you can use cups that are decorated with cotton wool, New Year-themed napkins, tinsel, etc.
Almost anything can make a great decorative base for topiary. You can combine materials, create eclectic trees, etc.

Examples of topiary:
Sometimes not the most ordinary materials complement traditional topiary.

European trees serve as excellent home decorations. For the kitchen, the living room, and other rooms, such trees will serve as natural decor. And e If the material from which the topiary is made is difficult to surprise anyone today (although it is possible), then it is definitely possible to impress with the form.

Topiary Ideas:

You can create a real mini-garden from such trees at home with your own hands. You can take pictures from the Internet, video instructions, and kitchen decor catalogs as a basis.


An exquisite and original decoration for a house, a summerhouse, or a veranda is topiary, an amazingly beautiful tree with a well-shaped crown. The word came to us from sunny Greece and literally means "tree of happiness".
The art itself, as researchers believe, is also of Greek origin and initially involved giving the crown of a living tree an unusual shape and then decorating it with ribbons, flowers, and figurines. Perhaps this is how representatives of a beautiful ancient civilization paid tribute to the distant Olympian gods. Then art was revived in France; the premises of the Palace of Versailles are still decorated with exquisite artificial trees.
In order for the tree of happiness to bring coziness and comfort to your home and protect your family, you should make your own topiary, with your hands, with love. Anyone can make this miracle thanks to step-by-step video master classes for both beginners and experienced ones. The creator’s imagination is limited only by his desire; your own tree can be created from various materials: fabric, coffee beans, herbarium and decorated to your own taste: buttons, beads, Swarovski stones. The size is most often small, but if desired, the creator can make a huge topiary a couple of meters high! The variety of master classes will help you complete it in one day!
 You can select several varieties of homemade miracle trees A. Depending on the installation location, they differ:
According to the material of manufacture topiaries are surprisingly diverse:
Topiary can be created from almost any material, it all depends on the author’s idea.
This unusual accessory will become a real decoration for any room, will add a touch of originality to it and will constantly improve the mood of the owners and guests. And, most importantly, even a beginner can make it without any problems. So, do-it-yourself topiary for beginners (step-by-step photos are available in a wide variety on the Internet) is an excellent option for adding uniqueness and creativity to the interior. How to make it yourself? Our master class will help.
First of all, you should select the necessary materials:

In various videos you can see how it is done DIY topiary made from coffee beans. Let's describe this process step by step.

The result is a beautiful coffee topiary, an excellent gift for colleagues or friends; such a product, as is commonly believed, will attract income to the house.
Even a beginner can make such a miracle tree, and the materials necessary for creativity can easily be found in every home. Can help a novice creator detailed master class. So, we need:
A small glass or flowerpot in which the tree will be located.

Important! When choosing a branch, you can use any shape, but it itself must be dry and strong.
We will describe the work sequence step by step (you can watch the video on the Internet).
The result is a very beautiful and elegant product that will become a real decoration for any room. Using the same principle, topiary is made from cotton pads, but, unlike napkins, they are already round in shape and do not need to be cut out.
In numerous videos you can see how easy it is to create an exquisite decoration for any room using satin ribbons. Let's describe a step-by-step algorithm. The following materials will be required:

The stages of work are as follows:
The resulting product will become a real talisman of any room and will improve the mood of both the owners and their guests.
Many people are interested in how to make topiary from natural material with their own hands. Let's consider. Autumn topiary is very beautiful, which can be decorated with real berries, small fruits, and lush flowers.
For autumn topiary you will need the following materials:

The procedure is similar to those described earlier: prepare a mixture in which the tree will “grow”, connect the crown ball to the base, then proceed to decorate. There are several ways to decorate a topiary:
 Dry grass, pine cones, pine needle branches, and rose hips will help fill the gaps. To make the product look beautiful, the pot and “trunk” should be painted with bronze or gold paint. In summer, you can use fresh flowers instead of leaves, creating a unique, exquisite composition, an excellent birthday gift. For those who want to work with a large amount of natural material, can be used shells, pine cones, acorns, dried flowers, beautiful pebbles, straw.


.jpg)


