 How to make a serving table on wheels with your own hands
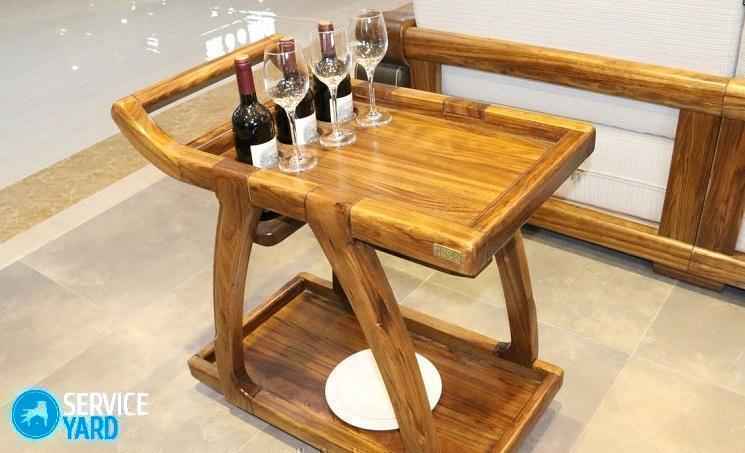
Serving table- this is, of course, not an essential thing, but it is so convenient when you need to bring food from the kitchen for everyone, to watch your favorite show on TV or just drink tea with friends on the veranda of your dacha, and you need to bring cups in your hands in several stages .
 The dimensions of the table are as follows: height - 0.9 m; width - 0.4 m; length - 1 m.
This table is made from leftovers wooden materials. You will need two long sidewalls with a length of 0.7 m and a section of 15 by 25 mm; two short sidewalls 0.6 m long and the same cross-section; 17 pcs. connecting strips 33 cm long; two legs 87 cm long and 15 mm in diameter; 2 pcs. holders for wheels 110 cm long; handle 35 cm long; load-bearing elements of the axle and the wheels themselves with a diameter of 25 cm.
First, we select the wheels and axle for them. We cut out the elements of the table from wood and sand them thoroughly.
We assemble the frame from the sidewalls, connecting strips, supporting elements of the axle, legs, wheel holders and handles.
We fasten the parts with PVA glue and self-tapping screws. The grooves in the wheel holders must be made very precisely so that load-bearing element the axle held tightly.
The suspension axle can be made from a wooden rod with a diameter of 22-25 mm and a groove of about 28 mm can be made in the casing so that the axle can move freely.
The table drawers are made of 15 mm thick plywood. External surfaces can be decorated wooden planks. The suspension axle must be firmly attached to the box, because it is a holder and a handle at the same time.
The screws and bolts that fasten the table parts must be recessed into the wood.
The movable axle is attached with screws to the underside of the support bar of the holder.
We cover the table with paint or two layers of varnish.
You can make a serving table with your own hands using boards and perforated boards available in hardware stores. metal corners. The final product will look stylish, fitting perfectly into modern kitchen. And if you have ever tried yourself in something similar, for example, done, then this project will not seem difficult to you.
Note: Since perforated corners can be of any length, you have the right to make a serving table of a height and size convenient for you. These parameters largely depend on the purposes for which this piece of furniture will be used. If, for example, as coffee table, it will be lower. But if you are planning to arrange a place where the serving table will serve as the same island, then it should be taller and larger in size.
— 4 corners 38x38 mm, length 79 cm (for vertical corner posts);
— 6 corners 38x38 mm, length 53 cm (for short edges of shelves);
— 6 corners 38x38 mm, 90 cm long (for long edges of shelves);
— 2 shelves 90x53.5 cm, thickness 26 mm (in in this case, from laminated boards);
— tabletop 120x60 cm, thickness 26 mm (laminated board);
— 4 furniture rotating wheels with a braking mechanism;
— 4 wooden bars 7.5x10 cm, 35 mm thick for mounting wheels;
— cutting board 30x30 cm, thickness 26 mm;
- hacksaw for metal;
- bolts, nuts, washers and spring washers;
— connecting plates;
— a tool for tightening bolts and nuts (for example, a socket wrench);
— shaped cutter with a rounding attachment 6 mm;
— a drill with the necessary attachments for screwing in screws, a 3 mm drill;
- a circular saw;
— impregnation for wood;
— screws 25 mm and 50 mm;
— drill attachment for drilling 90 mm holes;
- clamp, flat strip;
- fine-grained sandpaper;
- chisel;
- furniture fittings.
Step 1. Cutting corners

Using a hacksaw, cut the corners for the future table to the selected dimensions. For convenience, you can secure the corners with a clamp before cutting, and place the hacksaw blade at a slight angle to the plane of the corner (as in the photo).
Note: Vertical posts can be made to other lengths.
Take the short horizontal parts of the table (corners 53 cm long). For each corner on one of its planes (sides), step back 40 mm from the opposite ends. Make a cut in these places to the middle of the corner (fold at an angle of 90 degrees). Having made a cut from each edge of the corner along its rectangular fold, remove the resulting pieces of 40x38 mm. This is necessary so that when the short and long horizontal parts of the table come into contact, there are no overlaps on which wooden shelf will lie unsteadily.
Step 2. Assembling the table frame

Assemble the table frame by bolting the long and short horizontal corners to internal parties vertical corners. Do not overtighten the nuts at this stage. Under the top shelf (where the tabletop will be attached), screw to vertical posts connecting plates - two per rack. This will allow the structure to be stable during operation.
Step 3: Leveling the structure

On at this stage check that all corners are perpendicular. Measure the diagonals - they should be the same. Now you can tighten the nuts tightly, fixing correct form frame.
Step 4. Adjusting the table top and shelves

Most likely, for the serving table that you plan to make with your own hands, you will not find shelves and tabletops in the store required sizes. Therefore, you will have to adjust their sizes yourself. To do this, take measurements, draw cutting lines and attach them to the in the right place straight slats. Please note that the rail should not touch the cutting line, but be from it at the distance at which the saw is placed from the edge of the tool. Check everything again. Now make the necessary cuts.
Step 5: Rounding the Edges

Use a router bit to round the edges of the tabletop. Sand with fine sand sandpaper. Paint the finished edges with a wood stain of the appropriate color (in this case, walnut).
Note: If you chose unpainted boards to make your own serving table, you can paint them along with the finished edges at this stage.
Step 6. Attaching the boards

Center the tabletop relative to metal frame. Drill holes with a 3 mm drill bit in the places where you need to screw in 25 mm screws. Drill and screw in screws from the underside of the shelves.
Step 7: Attaching the Wheels

Using a chisel, use a chisel to make a hollow 2 mm deep and 3.5 cm wide along the long edge of the block (see photo). One side of the corner should be hidden in it so that the block adheres perfectly to the bottom shelf. Attach the bars to the shelf with 50 mm screws. Attach the wheels to the bars.
Step 8. Attaching the cutting board

Step back to the center of the table from two adjacent edges of the tabletop by 30 cm. In this place, use a drill attachment to drill a hole with a diameter of 90 mm.
Note: Do not throw away the sawn circle, but screw it onto the underside of the cutting board. Insert the sawn circle into place and watch how the cutting board rotates on the tabletop around its axis.
Cover everything wooden surfaces impregnation, which can be used to treat surfaces in contact with products.
Step 9. Finishing work
Now is the time to equip your mobile table with convenient accessories. Attach them to the side or bottom of the tabletop. In this case, a paper towel holder, a glass holder, a ladle holder, a bottle opener and two metal towel handles are used. Place a bucket for food waste under the sawn hole in the countertop.
Well, your DIY serving table is ready!
I made my first serving table several years ago for my wife’s birthday. After searching for pictures online, I found the one that I liked best. I drew a rough sketch from the photograph and did everything based on it. The table fits into our everyday life so well that I didn’t even expect it. It is used as a coffee table, as a serving table, and as a snack table for a computer. And in Lately I started using it near the barbecue as an auxiliary one. The presence of wheels allows you to quickly move it around the veranda, transport meat, place spices and other attributes nearby. The only drawback was that I had to carry the table from the house to the veranda and back. Therefore, it was decided to make another such table.
This time I decided to make the preparatory process more thorough. Dimensions were taken from the existing table and drawings of all the details were made. The technology and sequence of operations have been thought out. And now I invite you to make such a table with me.
For the top and bottom tabletops we will need furniture board. You can make it yourself, or you can buy it ready-made at hardware store. In the drawing, I deliberately did not indicate the width of the tabletops, since it will depend on the width of the purchased panel. The size should be about 420mm. But a few centimeters in one direction or another will not play a big role. The main thing is that the width of the lower and upper tabletops coincide. All other dimensions will remain unchanged, except for the length of the handle, but I will talk about this later. I came across a shield with a width of 410mm, a length of 2000mm and a thickness of 20mm. This should be enough for the main parts.
The entire marking and manufacturing process is described in videos. You can see drawings and dimensions on this page.


A serving table is a convenient and practical piece of furniture, in which functionality and decorativeness are used. The folding version can be used at home, in a restaurant, and in office space. There are many models on sale, but it is quite possible to make a serving table with your own hands. How much it is really necessary and how successful a design idea can be - we will talk about this in this article.
This amazing furniture attribute performs a variety of functions:
Important! A convenient ergonomic design, equipped with wheels and comfortable lifting tabletops, will help get rid of the annoying running from the living room to the kitchen and back. It is enough to load everything you need onto the table once and bring it where you need it.
Design advantages:
Important! The main advantage of a folding serving table is its ergonomic design details.
A DIY serving table on wheels is a fashionable furniture accessory. Thanks to it, a new, more constructive and functional interior appears in the atmosphere of the home.
When arranging a room, you should consider several nuances:
Important! The most effective model is on wheels; such a unit has improved mobility. A variety of materials are used for their production; the shape can be the most bizarre. The most inexpensive option is a plastic folding serving table.
The design may include special shelves, hooks, and a cutting board. Wheels can be large or small, there can be two or four.
To make a serving table with your own hands, drawings can be found in specialized magazines or on the Internet. Let's consider making a simple model, with two tabletops and a handle for transportation on one side.
First of all, you will need to prepare the following tools:
To make a table on wheels with your own hands, you need to prepare the following materials:
Important! The lumber must be dry, otherwise the frame will cease to be strong and stable, cracks and gaps will appear in it.
The serving table includes an upper and lower base, which are connected to each other by vertical posts:
Important! All workpieces require pre-treatment with sandpaper. After assembly, leveling the surface in some places will not be possible.
Important! To make it more convenient to fasten the frame with screws, you should use clamps.
Important! To align the boards between the table legs, you need to temporarily secure a board of the same thickness using clamps.
Important! In stores, swivel wheels are presented in a huge assortment. They are distinguished by design, material and construction. The recommended diameter is at least 80 mm.


.jpg)

