How to make a paper chess board with chess. Master class with a detailed description
Materials and tools:
1. Paper for drawing A-4 or drawing paper.
2. Colored paper, corrugated cardboard.
3. Ruler (50cm), pencil, scissors, cutter.
4. Magnets, adhesive tape, glue.


Berdnik Galina Stanislavovna, primary school teacher of KEI KhMAO-Yugra "Laryak boarding school for students with disabilities".
Description: Chess is not only a game that gives children a lot of joy and pleasure, but also an effective, effective means of their mental development. The process of teaching the basics of a chess game contributes to the development in children of the ability to navigate on a plane, the development of analytical and synthetic activities, thinking, judgments, conclusions, teaches the child to remember, compare, generalize, anticipate the results of his activities and Practice has shown that a well-organized process of teaching chess gives a lot and gifted children, and conditionally ordinary, and weak, and children with various functional disorders. Therefore, it is desirable to start learning the wise game as early as possible, but, of course, at a level accessible to the child.
The master class provides a detailed description of the manufacture of a paper chess game and paper chess pieces using a magnet.
Purpose: ready-made demonstration material is necessary in the lesson when studying any topic of the subject of chess.
Target: Production of demonstration material on the subject of chess.
Tasks:
1. Repeat the concept of "figures on a plane". Develop design abilities.
2. Development of children's ability to visual modeling.
3. Cultivate the desire to make the product with your own hands.
4. Cultivate the habit of working independently, carefully, bringing the work begun to its logical conclusion.
5. Develop compositional skills and aesthetic sense.
Materials and tools:
1. Paper for drawing A-4 or drawing paper.
2. Colored paper, corrugated cardboard.
3. Ruler (50cm), pencil, scissors, cutter.
4. Magnets, adhesive tape, glue.

Description of the manufacture of visual aids
"Chess and the chessboard".
1. To make a chessboard, prepare 2 sheets of A-3 drawing paper. The standard sheet size is 42 cm by 29.7 cm.
The photo shows half of the chessboard. For easy storage of the manual, prepare two such parts. They were glued from the wrong side with a strip of wide adhesive tape.
Also, you can make a chessboard from a single piece of whatman paper. After marking in pencil on the base of the squares, prepare figures from black or gray paper. Make sure that the black square matches the markings on the white sheet of paper.

The color of the chessboard is not fundamentally important. You can combine yellow and brown or yellow and green.
2. A thick white strip of paper was glued to each half of the chessboard. We will place letters and numbers on it to determine the location of the chess pieces.

3. You can print on a printer, you can write beautifully with a felt-tip pen or marker on a white strip of a chessboard.

4. Placed and carefully glued, in the appropriate place, numbers and letters.

5. For greater aesthetics, the chess fields were bordered with a thin strip of corrugated cardboard.

Here, closer you can see the corner of the chess half.

In the same sequence, we make the second half of the chessboard. We connect the halves from the wrong side with tape.
Now, you can fix it on a metal board with magnets.

6. Let's start making chess pieces.
Pre-print on the printer pieces used in chess.
Chess pieces templates:

Figures can be of different colors and shapes, for example:

We liked the streamlined shape of gray-yellow shades more.
Glue the printed thin sheet of paper onto thick cardboard.
It is advisable to "laminate" each figure with a wide adhesive tape. This will give strength and longevity in the use of didactic material.
Important advice! If you decide to use adhesive tape, then first you need to glue it directly onto the figure, and only then cut it out. So, the outline of the figures will turn out to be smooth and durable, and the details themselves will look neat.

7. Glue a piece of magnet on the wrong side of each figure. You can use Moment glue.

8. Our pieces are ready to take the initial position of the chess game.

Closer view of the chess troops.


We use this demo material in every lesson.

You can name moves, rearrange pieces, solve any logical problems. Explain and find ways to solve winning moves.
Thank you all for your attention! I will be glad the usefulness of the material provided.
Good afternoon, dear readers of the blog, pump your brain. As promised, the continuation of the selection of unusual chess sets.
1. DIY chess
There are many people on our planet who know how to work with their hands. So one of their representatives made chess for himself. And he made them from the insides of his computer.
Under the board, of course, the motherboard was used, and the figures are made of chips of various types. The chips were selected in two colors - black and green, although some still had to be tinted. The whole structure was installed on bolts screwed into the holes at the corners of the board.
Pawns are made of capacitors. Rooks from transformers. The remaining figures are made of several elements each of motors, parts of a hard disk, coils, batteries.
But this version, according to the creator, is not yet the final version. If he manages to collect enough chips he will make a board with an adjustable size.
"Eat a piece" is a fairly common expression in the amateur environment, although opponents will not gnaw each other's pieces. But in the PI.K.DA chessboard project by the Argentinean designer, you can “eat” a piece not only figuratively, but also literally put it in your mouth and drink tea.
The author of the project decided that since the game of chess often drags on for a long time, it makes sense to combine the game with the opportunity to eat. But since all the players are different and their tastes are different, it was decided to shift the choice of snacks on the shoulders of the players themselves. As a result of this decision, all the pieces on this chessboard were made in the form of baking molds. So everyone can bake their own figures to taste or cut them out of sausage, ham, cheese, vegetables or fruits. And exchange armies with the enemy.
And the chessboard itself is made in the form of a tray on which you can put saucers for molds successfully eaten during the game and napkins.
Seafood dishes are very common in Thailand. In the form of seafood, the Cambodian/Thai Chess Set chess pieces are made.
In all the sets I have previously described, the main changes concerned the chess pieces. But the creator of this set decided to change exactly the board and created three-dimensional chess. The only thing that is a little alarming in these chess is the practical convenience of playing them.
In order to be able to play them without making a large number of mistakes, you need to sit over the chess in order to see the entire field. When playing, you need to be extremely careful when moving the pieces, because it is very easy to knock down one, or even several at once.
5 Sex Shop Chess
This chess is suitable for those who believe that the intellect is sexy, and the brain is the most important erogenous zone. Just because the Vibrator Chess Set is a chess set whose figures are made in the form of sexual toys. New York designers received a very unusual order. A high-end erotic goods store asked me to create erotic chess. And here's what they got.
Each piece of this chess set is a sex toy, a vibrator. A variety of different forms allows any girl to find a figure to her liking,
This set costs not even a little - 7000 US dollars.
Here is another original chess set, in which the figures are made of electronic vacuum tubes with a luminous part corresponding to its value. When the lamp is in one of the sockets, it burns, if it is pulled out, it goes out.
Chess pieces are often made in the form of various objects, historical characters or fairy-tale creatures. I present to you another option, but already close to our real life: businessmen against officials.
Here you can find many representatives: an oligarch, a judge and a president, representatives of our valiant army and personal bodyguards, a tax inspector is able to eat any manager. There is even a horse with a memorable nickname Dollar.
These chess are for night gatherings. For a boring night train ride when the lights are out and the passengers are asleep. Designers slightly changed the color of the figures, now they are not the usual black and white colors, but blue, green and red. Each chess piece glows with its own LED, and an adapter and sockets are included for portability.
And of course, there were holes inherent in the knuckles, which at the same time tell the players how the piece moves.
This chess is built on the principle of a toy in which you need to insert the figures into the slots on the playing field. Chess pieces are just plastic cards with familiar images.
Their main plus is that you can play in any weather and under any circumstances. If necessary, the playing field can be turned over, all the pieces will remain in their places.
This chess is especially good in nature
Unusual? Yes. Elegantly? Yes. Comfortable? Yes. Thanks to the new design with shelves for figures, you can not only enjoy the ancient game at the table, but also hold chess tournaments in front of the audience.
1. From 6mm birch plywood, cut four 83x610mm blanks for dark cells A and six blanks with dimensions of 51 × 610 mm for light cells B (Fig. 1).
Note. We chose birch plywood due to its lack of voids and relatively thick face veneer, which allows for small chamfers on the edges of the cages.

2. Glue together two pieces of 19mm MDF board, 152x152 and 64x152mm, to make an L-shaped stop-stop (photo A). Fasten this stop with a clamp in front of the saw blade and adjust its position using a blank for light cells. IN to saw off pieces 51 mm long. Then make 32 dark cells A 51 mm long. Use the rest of the blank for dark cells as a template for a new stop-stop setting. In the same way, cut out 32 light cells B 83 mm long.

With the light-celled workpiece B placed next to the saw blade, adjust the rip fence so that the offcut stop stops touching the workpiece as shown at left. Lock the rip fence and saw off 32 pieces from the blank for dark cells A, placing its end against the limit stop, as shown on the right.
3. Make small chamfers on the front side of all cells A, B using a sanding block or small planer. Then proceed to tinting dark cells (see section "").

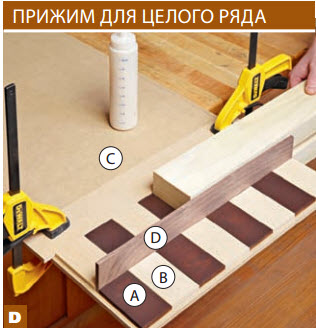
Press cells A, B one at a time, using a separate clamp for each of them. A piece of MDF board, fixed with clamps parallel to the edge of the backdrop C, will help to align them.
1. To determine the width of the heel WITH, dock in one row four dark and four light cells A, B, measure the row length and add 12 mm. Cut a backdrop from a 6mm MDF board WITH specified dimensions (Fig. 1). Draw lines parallel to one short and two long edges, departing from them 6 mm to indicate the boundaries of the playing field. Glue the first row of checkerboards along the top edge of the backdrop, starting with the lighter checkered area in the top left corner. (photo C).
2. Cut out seven 6mm shelf planks from walnut boards. D. Glue the edge of one shelf to the backdrop C close to the first row of cells A, B (Fig. 1).

Carefully install the clamping device so that cells A, B do not move, and, squeezing its ends with clamps, leave it until the glue dries.
The dimensions of cells A, B and shelves D may differ from those indicated, so the position of shelf G may change. Mark it on the walls of the case after assembling the playing field A-D.
3. To glue the next row of cells in place A, B, make a clamp by gluing two 38x76x457 mm bars with a 12 mm spacer at one end (photoD). Continue gluing cages and shelves D to the back WITH until the completion of the assembly of the playing field. Note. Apply the adhesive in a thin layer to avoid squeezingsurplus, due to which the clamp can stick to the cells.
1. From 12 mm walnut boards, cut out the side walls according to the indicated dimensions. E, top bottom F, shelf G, cornice H, base I and false panel J. Select a 6 mm deep groove on the inside of the sidewalls, top and bottom to insert the heel counter WITH (fig. 1 and 2). Then cut 12mm seams along the ends of the side walls.
2. Insert the game board A-D into the side wall tongue E by aligning the top row of cells A, B with a shoulder of the top fold. Mark the position of the shelf G (photo E). Saw out grooves in both side walls for inserting a shelf.
3. Dry (without glue) reassemble the body to check all the parts surrounding the playing field and adjust them if necessary. If the dry assembly is successful, apply glue and fix the body with clamps.
Brief advice! DTo glue the case, you will need a lot of clamps, so it is advisable to divide this operation into stages: first, glue a shelf and a game board to the side walls.first margin, and then reattach the top and bottom.
1. Saw the side walls out of 6 mm walnut planks TO, anterior and posterior walls L and bottom M (Fig. 3). Make 3mm tongues and grooves in the sides of the box (Fig. 3 And 3a, photoF). Then saw out 3 mm folds along the ends of the front and back walls, as well as around the perimeter of the bottom. After assembling the box dry, check the connections of the parts, then glue and fix with clamps.

2. When the glue is dry, tilt the saw blade 35° and file the back of the box from the top (Fig. 3a). With the saw blade upright again, take the sawn-out fall panel J and make a cross cut in the middle with a depth of 3 mm (Fig. 3). Glue the false panel to the front wall L.

Wrap the drill with a piece of masking tape, stepping back from the tip 19 mm. When the flag touches the board, the required hole depth will be reached.

With one setting of the sawing machine, it is possible to cut not only the tongues in all the walls of the box K, L, but also the grooves in the side walls K.
3. Insert the drawers into the case A-G and drill holes for the axle pins to be installed later. To make the box rotate freely, place a 1.5-2.0 mm thick gasket under it (we used a steel ruler) and fix one side of it with small wedges. Using a 6mm center point drill, make a hole 19mm deep (Fig. 4, photoG). Then make the same hole on the other side. Drill 3mm holes in bezel J to install push button knobs (Fig. 3).
 Add decorative details
1. Mill 10 mm radius fillets along the ends and front edge of the eaves H. Glue it on top to the body, aligning the side overhangs (Fig. 1). Mill 10 mm fillets on the outer edges of the base I and glue it to the bottom of the case.
2. Make two mounting strips N, sawing a piece of board measuring 19x152x406 mm lengthwise at an angle of 45 °. Glue one of the strips to the back (Fig. 2).
3. Spray on a colorless finish (we used a semi-gloss nitro lacquer), and after drying, install the push-buttons.
Brief advice! Before installing brass axle pins, insert wooden dowels in their place and make sure that the box rotates freely.
Prepare two 19mm brass pins with a diameter of 6mm and insert them through the holes in the walls E into the axial holes of the box J-M. Finally, fix the remaining mounting plate to the wall N to hang your game board, arrange chess pieces (no more than 76mm high) and invite your opponents to the tournament!

 How to make chess cells dark
To achieve a deep and rich dark color on light woods such as birch or maple without obscuring the texture, use a combination of stain and stain. Here is how we stained the dark A cells: using a foam brush or cloth, water-soluble Cuban mahogany aniline dye was liberally applied, allowed to soak in, and then wiped off excess liquid. Water causes lint to rise on the wood, so after drying, we lightly sanded the parts with #320 sandpaper before applying the stain again. A few hours later, when the surface of the parts was completely dry, the stain gel was applied liberally with a cloth swab, allowed to soak for several minutes, and then wiped off the excess and left to dry overnight.


A chessboard is perhaps the most common and popular item for those beginners who are starting to master the skills of veneer. Making your own chessboard doesn't require a high level of skill or sophisticated equipment, but tools nonetheless. must be of high quality and well sharpened.
In order for a do-it-yourself chessboard to be in no way inferior to a purchased product and have an aesthetic appearance, care must be taken that there are no gaps at the joints of the parts - this can only be achieved with the help of impeccable sharpening of the veneer knife. For this reason, the tool is the first thing to take care of before you get started.
To make a chessboard you will need:
We make two square templates from 5 mm thick plywood, which will determine the width of the cut veneer strip. With the help of double-sided tape, we attach these template squares at the ends of the support rail on the cutting board. We lay a sheet of veneer on the board, resting its edges against the support rail and template.

Steel ruler, so as not to slip, we also rest our edges against the template. Moving a sharp knife along the ruler, we cut strips of veneer. At this stage, it is important to remember that the veneer is cut in several strokes, not one at a time.

Next, squares are cut, laying strips of dark and light veneer on the board. For convenience, an additional support rail with a thickness of about 3 mm can be fixed on the board. Be very careful when cutting across the grain, as light veneer is usually easier to cut, but in a dark veneer the knife blade can get stuck. To make the playing field, you will need 8 assembled strips of 8 squares alternating in color. It should be remembered. that the size of the playing field depends on the size of the chess pieces.
The sticker of the field elements will be greatly simplified if the dark and light squares are first connected to each other with a transparent adhesive tape or even just a strip of plain paper. The bordering of the playing field and the finishing of the ends of the chessboard are performed with narrow strips of veneer. It is convenient to cut out such strips on a cutting board if you install small support pegs of the desired size on it.
An important point: when cutting strips to border the playing field, the ruler should be located strictly at an angle of 45 degrees. Any deviation from this value will adversely affect the appearance of the product.