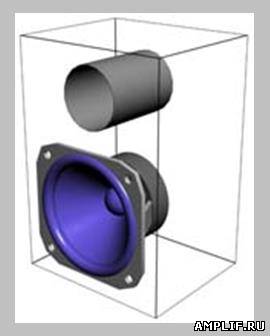
I want to provide my project, so to speak home audio complex. At the beginning, I had absolutely zero knowledge of acoustics; I didn’t even know how to assemble ordinary class A amplifiers, let alone amplifiers for a subwoofer. Interest arose after an even greener radio electronics engineer than me came to me and offered to make a subwoofer. I didn’t want to seem like a layman and went to Google to find something on this topic, but either I Googled badly or really useful information there wasn’t, in general I didn’t dig up anything useful, I went to the forums, gleaned information there and got down to business. First of all, we need a low-frequency speaker, I’ll warn you right away - our sub is low-budget and not very powerful, I only found 35gdn-1m-4 in my store, it looks like this:
Also known by the secret Soviet code name 25gdn-1-4. I don’t know why two identical speakers are called differently, I need to ask the Soviets, because I don’t know what was going on in their heads when they came up with this. Its characteristics are as follows:
1. Closed box(ZYa, closed box). The simplest case in design and manufacture. Widely used acoustic design. It is a sealed box. The radiation from the rear part of the speaker diffuser is closed in the housing and, in fact, is not used. All energy is converted into heat. Often, to combat this, filling is used in the language various materials padding polyester, wool, mineral wool and so on. A significant disadvantage is the extremely low efficiency, since only one side of the speaker emits sound. To get big sound pressure This case requires powerful speakers. The main advantage of this design is best quality sound. The bass of the subwoofer in a closed cabinet is soft, clear and fast. EBP 40-60

2. The main principles of operation of a bass reflex enclosure- make the radiation from the rear part of the diffuser work to your advantage. To do this, the internal volume of the housing is connected to the atmosphere using pipes or slots. A port (pipe or slot), contrary to popular belief, does not create a “draft” or “blow”.
The operating principle is somewhat different. The port contains a certain volume of air. Together with the air contained in the box, as well as the moving speaker system, this creates an oscillatory system, the oscillations of which coincide in phase with the oscillations of the diffuser. In other words, we force the radiation from the rear part of the diffuser to work in our favor, adding up with the radiation from the front part.
Thus, the efficiency of the system essentially doubles. Configuring the bass reflex enclosure, both by selecting the volume and by using the area and length of the port. The downside of this design is the lower sound quality compared to ZY. The bass is more spread out and boomy. To increase the sound quality, the design uses many tricks, such as the use of a port without rotation, a port design in the shape of a prism, rounding the ends of the port, and so on. EBP > 50
3. Passive radiator(passive radiator, passive radiator). The principle of operation of this design is the same as that of the phase reflex. The difference is that instead of a volume of air in the bass reflex port, a passive radiator is used, which is a speaker without a magnet and voice coil. The advantage of this design is better sound quality since the passive radiator does not introduce distortion, unlike the bass reflex. from EBP > 50

4. Bandpass(bandpass, bandpass) 4 orders - Body divided into two parts internal partition. One part is a closed volume of air, like in a closed box. The second part communicates with the atmosphere through a port. Due to the concentration of radiation in a narrow frequency band, it has more high efficiency than that of a phase inverter, with more high quality sound. EBP 40-60

As you have already noticed, the complexity in manufacturing the case increases according to the principle: further more. Since I’m, frankly, a bad carpenter, I chose the simplest option - a closed box, for which I received a cradle from my father, who said that bass reflexes rule and sent for it.
Bass reflex in principle the best option for this purpose, the dynamics, as I later realized due to resonant structures and other incomprehensible riffraff, did not go into detail, and I don’t advise you to, because the forest there is impenetrable, and I can already get lost in three pines. Then a problem arose with the size of the case, I went back to Google and again found nothing, then I read somewhere that the larger the case, the better, and went to the workshop to make a miracle out of plywood. Why plywood and not chipboard? After all, chipboard saws better. I was really too lazy to stomp 200 meters behind her, and, to be honest, I was tight on money. The dimensions of the box were as follows:

Drawn in Paint, the dimensions were taken from heaven, but it turned out to be about 40-50 liters, which is generally the salt for this speaker. Serves as a bass reflex sewage pipe glued to assembly adhesive and reinforced with two planks. Its diameter is 5 cm and its length is 15 cm.
Once the box is put together, not literally put together, it is better to fasten it through the aluminum corners, otherwise there will be a lot of cracks and the bass will be bad. Then we buy a sealant, not silicone, not a bathtub, but a regular installation sealant, white. And at the joints and cracks we seal everything. On the sealant they usually write how long it takes to dry, but I don’t know how it goes. Next, we take the back wall of the box and match the size of the terminal block that you will buy, by the way it looks like this:

We cut out a hole, insert a terminal block, secure it with self-tapping screws, and seal it. After everything has dried, you need to insert the speaker and fasten it with self-tapping screws, then seal it in the same way, and wait until it dries. Then we connect the terminal block and the speaker with wires, preferably using solder. So as not to tear it off later. In the front wall below the speaker we cut a hole along the bass reflex (pipe). We insert it, fasten it with glue, and two boards across them are also glued:

Again we seal everything and everyone so that it does not blow through. We wait until it dries. Having finished tormenting the plywood, I suggest closing the back cover with a pair of self-tapping screws, and using a generous amount of sealant at the joints, because remember: cracks = garbage, not sub. Finally we can start working on the amplifier. I propose to build it on tda2051, it provides good power, and for state employees it has a unipolar circuit connection in order to use a regular power supply. Here is the circuit itself, don’t pay any attention to what is written on the tda2050 circuit, the switching circuits for amplifiers like tda20xx are all the same and differ only in output power. It’s just that tda2051 screams more powerfully.

I just want to warn you right away, place the microcircuit on the radiator, and the larger it is, the better and safer, the legs of the microcircuits - amplifiers are kept on the Chinese word of honor and it is not recommended to fiddle with them, if they fall off, you can’t put them back, but it costs 150 rubles, plus you will have to pay for it and go ahead, you will buy 2 of them at once, just for every fireman. Use electrolytes at 36 volts, also for safety. Replace C1 with 100 nf, 2.2 uF seemed too much to me. There is no need to force the entrance; in terms of nutrition, I advise you to supply electrolytes with a larger capacity and larger in size, otherwise there may be a background from the block.

In general, a P-filter would work very well here in order to reduce all the hum. The amplifier case was taken from an old CD drive, which bears the proud name of Pioneer. There are holes cut in the back for the audio input, power and two wires going to the terminal block.

By the way, for aesthetics, you can upholster the subwoofer with drape, which is what I actually did. The drape additionally dampens the sound, which increases the quality factor. The whole thing is powered by a power supply from a charger for a screwdriver and has a voltage of 21.7 volts, of course it’s not so hot, give it free rein, they will eat even 35 and not choke, it will work even better, but don’t get carried away, remember that amplifier microcircuits are capricious guys , and they can make a bang, or just burn out.

I don’t recommend painting the speaker with paint from a spray bottle; personally, for me, it started to eat the rubber surround, which became thinner and it was eaten away, I had to change the suspension, thanks to the narrow-eyed brothers for the paint, which included at least half of the periodic table. I wish you success in the assembly, your S9018.
At first glance, making your own speakers is quite simple. However, this is misleading. First of all, it should be noted that the models are manufactured with various elements. Depending on them, the device parameters and sound quality will be different.
There are special requirements for computer speakers. You can also make a model for your car or studio yourself. IN in this case It is very important to follow the instructions. First of all, for assembling speakers you should consider standard scheme models.
The speaker circuit includes drivers, pads, diffuser and crossover. Powerful models use a special bass reflex. Amplifiers can be installed with field-effect or switching transistors. To improve sound quality, capacitors are used. The woofer is matched with the amplifier. The dynamic head must be attached to the seal.

Single speaker speakers are very common. To assemble the model, you will first have to deal with the body. Plywood is often used for this purpose. At the end of the work it will have to be sheathed. However, the first step is to make the side posts. For this purpose you will have to use a jigsaw. you can choose a small power.
The inside of the plywood is necessarily stitched with vibration-proof tape. After fixing the speaker, the seal is fixed. Glue is used for this purpose. Next, all that remains is to attach the diffuser. Some people make a separate shelf for it and fix it with stacking screws. To connect the speaker to the plug, a terminal block is installed. How to turn on speakers? For this purpose, a cable is used from the terminal block, which should lead to a power source.
Speakers with two speakers can be made for home or car. If we consider the first option, then a pulse type diffuser will be required. First of all, durable plywood is selected for assembly. The next step is to cut out the bottom post. Models with legs are very rare. To cover the veneer, you can use regular varnish. There is no need to glue vibration isolation tape to the front pillar. The diffuser is mounted under the speaker. To make a hole in the panel, you need to use a jigsaw. The bass reflex is fixed at back wall. Some manufacture devices with horizontal speakers. In this case, the diffuser will be located at the top of the structure. Speaker wires are of the two-core type.

Speakers (homemade) with three speakers are very rare. These devices are most suitable for the multi-channel type. To assemble the model, first of all, sheets of plywood are selected. Some also recommend using veneers. However, models from natural wood They are quite expensive on the market. The speakers should be installed horizontally. The device will also require an amplifier.
To fix it, use metal corners. To connect the plates you will need tightening screws. In some cases, the plates are secured with glue. Next, the model will have to be partially covered with leatherette. The next step is to install the terminal block. In order to fix it on the body, you will need to make a separate hole. It is also important to note with regulators. Microcircuits for them are used of the capacitor type. When the speakers produce noise, you need to change the diffuser.
Speaker drawings for studios assume the use of powerful speakers. The diffuser is most often used of the pulse type. Many experts recommend installing two amplifiers. For normal operation you will need a zener diode.
With the aim of self-assembly For speakers, the body is first made. Round holes are made on the front panel for the speakers. You will also need a separate output for the bass reflex. The design of the columns is quite different. Some people prefer to varnish the surface of the case. However, there are models covered in leather.

Speakers for computers are often made with one speaker. To assemble the model, veneer sheets of small thickness are selected. A hole for the speaker is cut out on the front panel. The bass reflex must be located at the rear of the housing. If we consider low-power models, the amplifier can be used without a resistor.
To adjust the speaker volume, special crossovers are used. These elements are allowed to be installed on a bass reflex. If we consider devices with a power of more than 100 W, then amplifiers can only be used with resistors. Some people select pulse diffusers for the model. At the end of the work, the terminal block is always installed.
Available with two or three speakers. To assemble the model yourself, you will need sheets of plywood. In some cases, varnished veneer is used. To fix the speaker, you need to make a hole in the panel. The next step is to install the bass reflex. Some modifications are made with low-frequency cores. If we consider speakers (homemade) of low power, then the bass reflex can be installed without an amplifier.
In this case, a multi-channel crossover is used to control sound. Some specialists install terminal blocks behind the bass reflex. If we consider speakers with a power of more than 50 W, then the microcircuits are used for two amplifiers. The diffuser is installed as a standard pulse type. Before fastening the case together, it is important to take care of the vibration-proofing layer. For the terminal block, you need to make a separate hole on the plate. Some people believe that the body must be cleaned. The wires for the speakers are of the two-wire type.

Portable speakers with an open case are quite easy to make. Most often they are made with one speaker. Holes are made on the back panel of the device with a drill. The plates are directly connected with tightening screws. The diffuser for such devices is suitable for pulse type. Bass reflex units are often installed with one amplifier. If we consider powerful portable speakers, they use a resistor crossover. It is attached to the bass reflex. Many experts recommend installing speakers on a seal.
Speakers (homemade) with a closed housing are considered the most common. Many experts believe that they are the best in sound quality. Bass reflex devices for devices are suitable for the operational type. The woofers are installed in the holes. For the purpose of assembling the case, ordinary sheets of plywood are suitable. It is also important to note that there are modifications with cores. If we consider high-power speakers, the terminal blocks are installed in the lower part of the housing. The design of the models is quite different.

Assembling 20V speakers is quite simple. First of all, experts recommend preparing six sheets of veneer. They should be varnished at the end of the work. It makes more sense to start assembly by installing the speakers. The bass reflex is used as a pulse type. In some cases it is installed on pads. Experts also recommend using rubber seals.
Power supply to the speakers is provided through the terminal block. It is attached to the back panel. The bass reflex can be installed either with or without an amplifier. If we consider the first option, then the cores are selected of the phase type. In this case, the woofer does not need to be used. If we consider speakers without an amplifier, then they use a crossover. At the end of the work, it is important to clean the body and varnish it.
Speakers (homemade) rated at 50 W are suitable for ordinary acoustic players. In this case, the body can be made from ordinary plywood. Many experts also recommend using natural wood veneer. However, it is important to note that he is afraid of high humidity.

After choosing the material, you should work on the speakers. They must be installed next to the bass reflex. In this case, you cannot do without an amplifier. Many experts recommend selecting only low-frequency crossovers. If we consider modifications with a regulator, then they use a pulse diffuser. The terminal block in this case is installed last. You can always use leatherette to decorate the speakers. More simple option is considered to be coating the surface with varnish.
100 W speakers are suitable for powerful ones. In this case, the bass reflex is taken only of the pulse type. It is also important to note that the amplifier is installed with a crossover. Many experts recommend using veneer to assemble the case. It is better to install the woofer on a pad.
From this manual you will learn how to use speakers in text documents, how to align text in columns and change the distance between them, how to add breaks between columns.
Most often, the column element is used in newspapers, magazines, brochures and flyers. In particular for printed edition The format with columns looks more attractive and professional.
You can create one, two or three columns of the same size. Then, as you type, you will automatically move to the next column when the previous one ends, unless you manually insert a column end. You can set the width of the columns and use the usual formatting that is used in regular text documents.
Online course "Word from simple to complex" Master the basics text editor on high level. It doesn’t matter if you are a beginner or already work with Word, with our course you will become a real document guru!Note that unless you first select the specific area of text you want to turn into columns, all text following the cursor is converted into columns.
When columns are created, by default they have an alignment similar to that of the text. And often this is left aligned. This is not the best option for columns, so it is better to format it to fit the width.

The text is spaced evenly within the columns. And the distances between the columns became more clear. These values can be changed.


If you want to set columns of different widths, this is done in the same “Columns” dialog box. To set each column an individual width, you first need to uncheck the checkbox "Columns of equal width". After this, the width and spacing values for each column will become available for editing.
Assembling a speaker at home is not that big of a deal. difficult task, as many might think. Possessing necessary materials and information, you can not only get a good, high-quality speaker with clear sound, but also save a decent amount of money.
First you need to buy or make your own sound amplifier.
This is a very simple way to build an audio amplifier. Absolutely anyone can assemble such an amplifier without much effort.
Crown connector;
Krona 9 Volt;
1 Watt speaker with 8 kOhm impedance;
Mini-jack 3.5 mm;
10 kOhm resistor
Switch;
Chip LM386;
Capacitor 10 Volt and 220 µF;
Soldering iron.
Step 1
Place the chip on the table. In order not to confuse the sides and to correctly solder all the wires to the microcircuit, you need to pay attention to the hole on one of the sides of the microcircuit. This hole needs to be positioned away from you, as shown in the image:

Step 3
The positive contact of the connector must be soldered to the second contact of the switch.

Step 4
The fifth “leg” of the microcircuit must be soldered to the positive contact of the capacitor.

How a cat can ruin your life

What happens if you look into a person's eyes for too long?

13 signs you're wasting your life but don't want to admit it

Step 5
Connect the remaining contact of the capacitor using a soldering iron and cord to the positive contact of the speaker.

Step 6
Having made a jumper as shown in the picture, you need to solder the negative contact of the speaker to pins 2 and 4 of the microcircuit.

Step 7
Solder a resistor to the third pin of the microcircuit.

Step 8
Disassemble the mini-jack, connect the left channel to the right and solder the resistor to the remaining channel through the wiring.

Step 9
Connect the minus of the mini-jack to the minus of the speaker using a wire and a soldering iron.


What happens if you stop washing your hair frequently?

10 Signs You've Been Visited by an Angel

What is the best position to sleep in?
Step 10
Solder the negative wire of the connector to the negative terminal of the speaker.

Step 11
The speaker for the future speaker is ready! Now all that remains is to test. If the speaker does not work, then it is worth reviewing the previous paragraphs to correct errors.
Now let's start making the column itself.
Polypropylene pipe, the diameter of which is equal to the diameter of the column or slightly larger;
DVD or CD disc;
Drill;
Hot melt adhesive;
Scissors;
Drill or screwdriver with drilling attachments;
Sandpaper;
Step 1
Cut the pipe, leaving a small bulge for the connector. Before you start cutting, you need to mark this bulge on the pipe according to the size of the connector itself.

Step 2
Draw a circle on the disk in the center using a polypropylene tube. This circle needs to be cut out with scissors and the edges smoothed with a drill. Using scissors, make two small indentations on the disk not far from each other for the wires.

Step 3
Insert the amplifier into the tube. If necessary, carefully fix it with hot glue from the inside.

Step 4
Drill a hole above the convexity for the switch, equal in size to the switch itself or slightly smaller.

Step 5
You need to unsolder the wires from the switch in advance in order to insert the wires into this hole, and then solder them back. Then insert the switch into the hole. If necessary, secure with hot glue on the inside.

Step 6
Hot glue the disk, having pulled out the wires in advance, to inside tubes. And also fix the connector on the bulge with glue. It should look like the image shown:

Step 7
Use a drill to trim off all excess protruding parts, helping with sandpaper.

Step 8
The column is ready! If desired, you can decorate it with stickers or carefully paint it with spray paint.
All that remains is to test it. You need to insert the crown into the connector and connect the mini-jack to the device. The result is a portable speaker with very high quality and clear sound.

The Word text editor allows you to format text in the most different ways. Latest versions this program has become so overgrown various functions, that now there is practically nothing that this text editor cannot do. In this article we will talk about how to make text in two columns in Word.
In order to make text in two columns in Word, you need to go to the “ tab Page layout" and click on the " Columns " button. After this, a drop-down menu will appear in which you can select the number of columns you want to place on this page.
The following options are available in this drop-down menu:
In addition, in the drop-down menu there is an item “Other columns". This item opens additional window, in which you can adjust the width of the columns and the space between them.

You can also set the size of the columns using the ruler located above the page.

The second method of creating columns in Word can be considered incorrect, but it is often more convenient. For this method tables with invisible frames are used. Go to the “Insert” tab and use the “Table” button to create a table with two columns.

After the table has been created, place the cursor inside the table and go to the “ Working with tables – Designer" Here you need to change the line type that is used to draw the table boundaries. To do this, open the drop-down menu and select “No border".


This line is visible when editing a document, but is not displayed when printing it.
If you are using Word 2003, then in order to make text in two columns you need to open the menu " Format - Columns" After this, the “ Columns” window will appear.

In this window you need to select the number of columns and click on the “OK” button. If necessary, you can adjust the width of the columns, the spaces between them, and other parameters.


