It is unlikely that anyone will agree to deny themselves the pleasure of taking a shower in the open air, allowing them to freshen up after a hard day. working day. In this article we will tell you how to make a summer shower with your own hands from various materials(made of polycarbonate, metal profiles, brick, wood), we will show the exact dimensions, and also provide photo and video instructions.
Such an approach to the manufacture of a shower structure will allow you to save on expensive materials, and what is equally important - to produce a structure that best suits your individual preferences.

The place for the shower is chosen, as a rule, in an open place, located at some elevation above the general level of the suburban area. Since energy is used to heat water in structures of this type sun rays– the place for them should not be located in the shade of trees and other high-rise objects.
It is known that on our summer cottages summer shower cabins of the most varied architecture are traditionally built (including quite original designs). Moreover, all of them can be reduced to the following execution options:
Let's look at each of the above options in more detail.

The inside of the shower stall should be comfortable enough to easily bend, turn around and stand freely. Therefore, you can start from these sizes:
These sizes are quite convenient. Taking into account the thickness of the walls, the room will be slightly smaller. In this case, the shower stall itself will have an average size of 1 × 1, as well as a dressing room of 0.6 × 0.4 m.

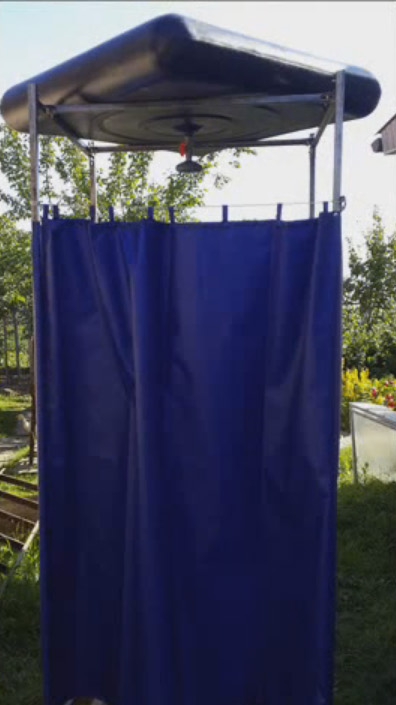
The simplest shower design made from scrap materials contains a tank with a built-in tap, a standard shower head and a regular watering hose. Such a simple structure is installed near the house, and the tank is mounted on the wall or roof of the building at a height slightly higher than human height.
The location of the tank should be chosen in such a way that the sun's rays linger on it as long as possible during the day.
After fixing the collection container, a valve tap is built into it, onto which a hose of suitable length is put on with a shower head installed at its end.
The convenience of this option summer shower is that in this case you can do without installing a separate shower stall. The main thing you should pay attention to is to properly protect the wall and roof of the house from the destructive effects of moisture accumulating near the tank. For this purpose, the area of the building in the area where the latter is located should be insulated using special water-repellent impregnations or simply covered with several layers of ordinary oilcloth.
Note that this embodiment has natural disadvantages, which are as follows:
Taking into account all the listed disadvantages, the use of such structures is, as a rule, limited.

The process of building a summer shower made of wood consists of several successive steps. First of all, you need to prepare the place. It should be well ventilated, since under the influence of constant exposure to moisture the structure can quickly become unusable. Next, you need to dig a hole 1x1 m and a depth of 0.4 m. Fill it with crushed stone. This must be done so that the soapy water does not spread over the summer cottage, but has time to be absorbed into the soil.
If you have organized the drainage of sewage waste into a drainage pit, then skip this stage of preparation.
Take boards with a cross section of 30 mm × 15 cm and make a 1x1 base. Attach 4 side beams to it, the cross-section of which is 100x70 mm. They will serve as the basis for installing the tank. They must be installed in the grooves.
To cover the frame, you can use false timber, blockhouse or lining. When installing them, leave a gap of up to 3 mm between each strip. This also applies to the first one at the base. In this case, under the influence of moisture, the product will be able to expand freely. If this is not taken into account, then the summer shower will turn into an “accordion”.
Once the sheathing is complete, you can begin painting. To do this, the entire surface should be coated with antifungal impregnation. The next layer will be façade acrylic water-borne varnish. It is applied in 3 layers.
You should not skimp on varnish, so it is better to apply it in sufficient quantity. It is important to ensure that water slides easily over the surface of the walls and does not linger in the shower. This painting is carried out both outside and inside.
To store water, you can install a 100 liter tank. The tank can be made of different materials, stainless steel, plastic, etc. You can buy a ready-made tank just for this purpose. Some home owners often find one or another container to install on an outdoor shower.
Finally, all that remains is to hang the curtain on the hooks. On average, such a shower can be built in 1–2 days.


Another option for building a shower is to use polycarbonate. To build it you will need to purchase the following construction material:
We have already discussed the general principle of constructing a frame for a summer shower made of wood above. Therefore, it is worth paying attention to some specific features when working with polycarbonate.
Any material, whether stone, wood or metal, can withstand the weight of polycarbonate. But there is one caveat. This material is distinguished by its windage, so the frame should be equipped with a sufficient number of cross-shaped, vertical and horizontal jumpers.
The thickness of the frame material for polycarbonate may be less than for wood.
The tank is installed on installed frame. Due to this, the water in it is heated by the sun's rays. Usually installed flat tank, but there are no strict rules here.
It is better to install a polycarbonate shower tank under the roof. Thus, there will be a greenhouse effect and the water will heat up much faster and cool down accordingly.
If you want to make a locker room, you will need two sheets of polycarbonate. Use an opaque one for the walls and a transparent one for the roof, so the water will heat up faster. First of all, make blanks by cutting the sheets to the required sizes.
A polycarbonate sheet can be cut with a regular knife both along the voids and across.
Be sure to sand the cut area with sandpaper. Check to see if any sawdust has gotten inside the honeycomb. If yes, then they can be removed with a vacuum cleaner. To avoid chipping when drilling holes, step back 3–4 cm from the edge. Drill between the stiffeners. Be sure to cover the edges of the sheet with perforated tape. This is done to prevent debris, dust, water, etc. from getting inside the honeycombs. As for the end part, use an end profile, H-shaped or corner.
To prevent condensation from forming inside the honeycomb, drill thin holes in several places. 3 holes per 1 m of profile are enough.


In this video you will see how to do wooden shower:
This video will tell you about the possibility of quickly building a shower:


Shower stall is an essential attribute summer cottage, designed to brighten up our stay at the hacienda. How to make a summer shower with your own hands in just one day and without spending much on building materials? We have developed step-by-step instructions for installing a collapsible design of a country hygiene cabin, which can be dismantled and stored in a protected place for the winter.
The process of making a summer shower should begin with choosing the location for its installation. We advise you to consider three points:
Based on this, when choosing a place to install a summer shower, follow these rules:

To make a summer shower with your own hands, remember some requirements, failure to comply with which can lead to instability and destruction of the structure. Firstly, do not forget that the water tank has a decent weight, and therefore the support posts must be chosen so that they can support it. In addition, they need to be securely fastened: experienced summer residents It is recommended to bury the posts in the ground, or even better, fill them with concrete.
Secondly, you will need to make a drain in the floor and ensure water drainage - for this purpose, they usually use a large diameter pipe buried in the ground at a slope. Stagnant moisture threatens you with a putrid odor, as well as an abundance of mosquitoes and midges.
Thirdly, do right choice when purchasing a tank. Metal containers are more durable, but they are heavier and the water in them heats up slowly. Plastic ones weigh much less, are easily washed out and contribute to the rapid heating of water, but have more short term services.
And now about the materials that you can use if you decide to make an outdoor shower with your own hands. Most often, summer residents make a frame (base) from wooden beams or metal pipes (profiles), and use the following as cladding:

It's time to tell and show how to make a summer shower with your own hands in just one hour. We offer the option of a collapsible cabin, which can be easily dismantled and stored until the next summer season.
To make it you will need:
Cut the pipe into 4 pieces of 2.2 m and 8 pieces of 0.8 m.
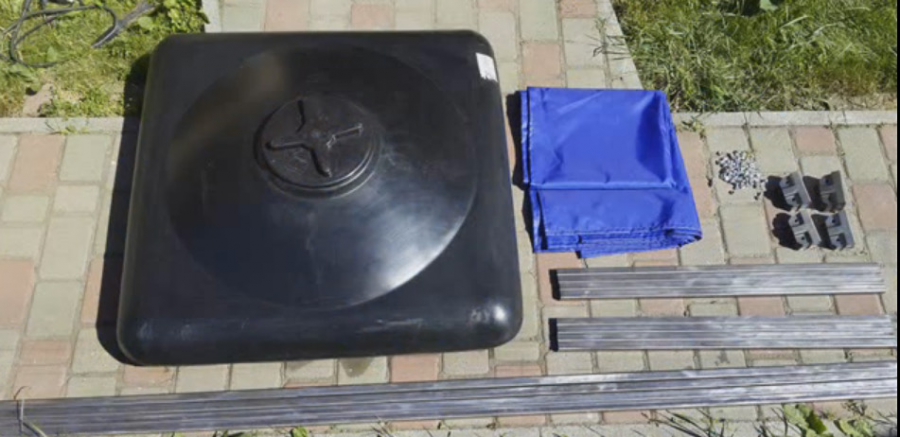
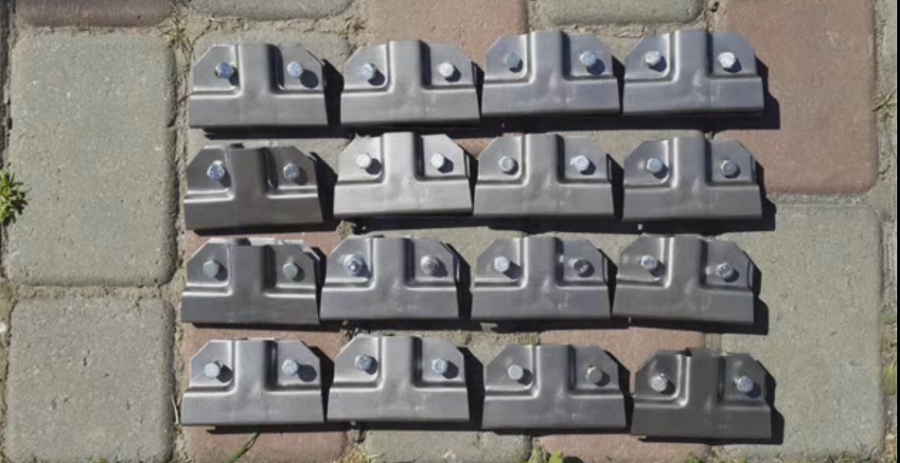
Prepare fasteners for shower assembly.
Using two 2.2 m pipes and two 0.8 m pipes, assemble a rectangle.
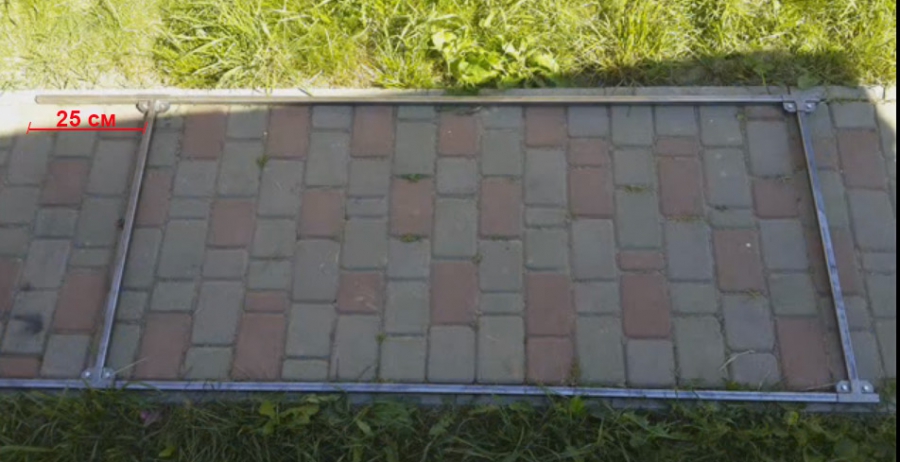
Then make a second rectangle of the same type and connect them together with the remaining 0.8 m long pipe sections.

Install the frame and place the tank on it.
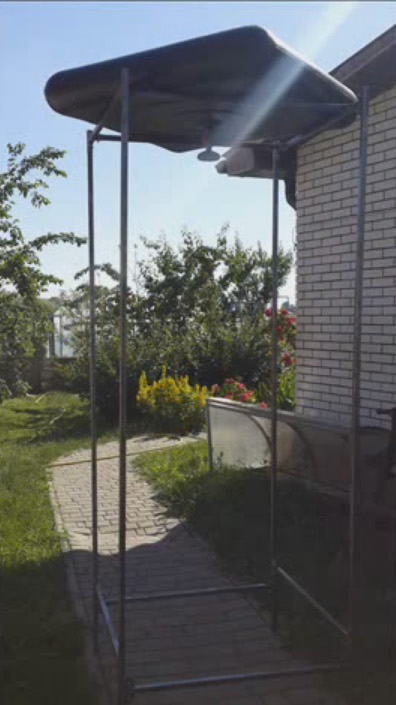
Hang the curtain and your shower is ready. You can use a wooden pallet as a flooring.
If you want a more stable and durable shower for the cottage, you can use the tips from this video:
Water procedures in the open air are very useful, so many adherents of relaxation and hardening decide to make a summer shower for a shower in the country with their own hands, or at least install a ready-made cabin on the site. This article will help you understand the design features, select the correct dimensions and installation location, draw up a preliminary diagram and complete all stages of construction without errors.
Types of autonomous toilets. Choosing a place to build a toilet in a summer cottage
If you intend to build a capital shower for your dacha with your own hands from brick, it is advisable to use a strip type of foundation. A trench is formed along the perimeter of the future building. The optimal depth is 0.5 m. Next, the formwork is installed. At the bottom of the trench, it is necessary to form a sand-crushed stone cushion 0.1 m thick. After this, reinforcement is laid and concrete is poured. This must be done so that the finished foundation rises above ground level by about 0.1 m.

When the base has completely hardened and dried, it will be possible to begin construction of the sewer system.
There are several ways to organize sewage system in the shower stall. The choice of construction technology depends on several factors:
If used as a foundation for a summer shower at the dacha monolithic slab, then before filling it is necessary to lay a system of plastic pipes with an elbow. The slab is formed in such a way that there is a slope on all sides towards the drain hole. Sewage pipe is taken outside the shower and connected to common system drains. You can connect the drainage system to a drainage well.

Helpful advice! To build a similar sewer system for a cabin installed on a different type of foundation, it is not necessary to fill the floors with concrete. It is enough to buy a summer shower for your dacha with a tray made of acrylic. This element will serve as the floor.
With connection to the sewer system - the best option for big family, since the pit will not be able to accommodate the volume of wastewater that will be generated during operation. If the structure is designed for 1-2 people, a drain directly under the cabin will be sufficient. But this type of system is suitable for areas with loose soil, when the shower is installed on a columnar or pile foundation. This option can also be used on a strip base.
First you need to remove a layer of soil 0.5 m deep. The formed depression is filled to half its height with gravel or stone. The remaining part is covered with crushed stone fine fraction. After the cabin structure is assembled, a pallet made in the form of wooden lattice. The system is designed in such a way that wastewater passed through the drainage layers and were gradually absorbed into the soil.

Sometimes owners of summer cottages lead the sewer pipe into the garden, which cannot be called a good decision. If you still resort to a similar method, it is advisable that the place where the water is drained is well heated by the sun. Otherwise, the liquid will accumulate, and a swamp infested with mosquitoes will form around the shower.
To build a cabin for a homemade shower, any available materials can be used.
Suitable for these purposes:
Each type of material has its own advantages, features and properties.

There is a little trick that will help you save money during the construction of a shower house. To reduce costs, it is enough to use one of the blank walls of the building as a side for the booth.
Before building a budget-type summer shower, you need to attach a small water container equipped with a watering can to the wall. Here you can install elements that accompany comfort, for example, hooks for clothes, shelves, etc. At the top of the future structure there is a partition. It is fixed on the wall of the building. As front door a tarpaulin or film (necessarily opaque) can be used. The curtain is hung using rings.
The floor is arranged so that the drains are diverted as far as possible from the foundation part of the house. To do this, the platform is concreted or you can get by with installing a pallet made of acrylic.
Helpful advice! If you use the inner corner of a building that has L-shape, you can avoid building the sides of the cabin altogether. Their function will be performed by the walls of the building.

The most common version of a country shower is a cabin made in the form wooden house. This type of building is considered one of the most affordable. Wood is easy to process. At the same time, it retains heat well, which is a definite advantage if the shower will be used in cold weather.
To build a summer shower in a private house with your own hands, it is advisable to use wooden beam. To make the corner posts of the booth, you will need material with a cross-sectional size of 10x10 cm. A tank designed for 200 liters of water is installed in the upper part of the shower, so the beam must be thick enough to withstand such a weight load.
To hang the door, you will need to install two additional posts in the front of the booth. These elements are placed between the corner posts. To make them, you can take a beam with a section size of 5x5 cm.
To form a slight slope angle for pitched roof cabins, it is recommended to install the front corner posts 0.2 m higher than the rear ones. This will not be required if a square-shaped tank is used as a container. IN in this case the racks are mounted at the same level.

All supports are attached to wooden frame bottom trim. For fixation it is necessary to use hardware and metal corners. At the top of the structure, the strapping is done in a similar way. To secure the posts more firmly, you can use spacers. On top harness The frame part of the booth forms the basis for mounting the container. In this case, you need to read not only the size, but also the shape of the tank.
To cover the frame part of the building, you can use a 2 cm thick board. This material is also suitable for making a door. You should lay the boards in one row and knock them together using two jumpers. To prevent the door from skewing, the structure can be strengthened obliquely, using a long rail. Door frame for a country summer shower it is made of boards, the thickness of which is 4 cm. It is recommended to use self-tapping screws as fasteners.
When the booth is completely ready, it can be opened with a colored varnish composition. WITH inside the entrance is curtained with film, otherwise the doors will swell from moisture.
Helpful advice! Often a large barrel for a shower in a country house is used for construction. By installing a watering can over the structure, you can get a budget option wooden cabin.

Since wood is subject to deformation changes under the influence of moisture, many property owners are thinking about how to make a shower in the country with their own hands from more practical and resistant materials, for example, polycarbonate. The frame part of the cabin is made in exactly the same way as in the case of a wooden shower, however, the material must be used metallic profile. Optimal size sections – 4x6 cm.
The frame part of the cabin is formed using racks and jumpers between them. In this case we use metal elements, so to fasten them you will need welding machine. Moreover, the assembly order can be performed in several ways. In the first case, the frame part is welded separately, after which it is installed on the base and secured with anchor bolts. The second method involves concreting the racks while pouring the foundation. Then the harness is formed and spacers are attached.
It is advisable to use polycarbonate as a casing for showers. sheet material 1 cm thick. On metal frame it is secured with hardware, which must have sealing gaskets.

At the last stage of shower construction, a tank is installed. You can make the container yourself using any container made from of stainless steel or plastic. To do this, it is necessary to form a hole in the bottom, the diameter of which is 1.5 cm. A piece of pipe, threaded on both sides, is attached to it using nuts. The length of this element should be 30 cm.
You need to make a hole in the center of the cabin roof where the pipe will be inserted. After installing the tank, a tap and a watering can made of plastic are screwed onto the free end. Then the container is firmly fixed to the frame of the frame part of the booth, filled with water and covered with a lid.
To create a heated summer shower for your dacha, just install a heating element in the tank. Of course, natural energy from the sun can be used to heat water. In this case, there will be no electricity costs. However, the sun's rays are not able to heat a large volume of liquid. In addition, not every region has the necessary climatic conditions.

On the Internet you can find many diagrams necessary for connecting a heated summer shower to electricity. The advantage of these devices is that the water in the tank warms up quickly enough, regardless of the time of day and the weather outside. In this case, a person can configure himself temperature regime. If you attach a piece of foam to the hose, the warmest water will flow into the watering can. For the same reason, liquid is drawn from the upper zone of the tank.
Helpful advice! To speed up the process of heating the liquid, you can add a coil to the circuit.
To simplify the construction technology, you can buy a ready-made outdoor shower and install it on a prepared base. The cost of cabins varies and depends on various factors.
The price of products is influenced by the following points:

Average prices for ready-made structures
| Name | price, rub. |
|
Metal frame and PVC fabric |
|
|
Garden shower |
|
|
Garden shower with water heater |
|
|
Garden shower with water heater and changing room |
|
|
Polycarbonate construction |
|
|
Cabin with 130 l tank |
|
|
Cabin with 200 l tank |
|
|
Cabin with 130 l heated tank |
|
A wide variety of materials suitable for construction, as well as manufacturing technologies, allows any summer resident to acquire a comfortable and convenient shower in the country. Moreover, you can make a booth yourself from improvised materials or purchase it ready-made in a specialized store.
In hot weather, a summer shower for a dacha is not a luxury, but a necessary outbuilding. A shower gives you the opportunity to freshen up and wash off the dirt after gardening work. The presence of a shower on the site ensures a comfortable stay at the dacha, especially if there is no body of water suitable for swimming nearby. When designing a country shower, take into account its size, the materials used and the place where you plan to build it. The cabin should be quite spacious so that you can comfortably place everything you need and move freely. A comfortable shower height is 2.5 m; the most common cabins are 190/140 mm and 160/100 mm. Want more details?!
For a garden summer shower, it is better to choose a sunny place away from other buildings. In the sun, the water heats up quickly, which is convenient if you plan to build a shower without heating. If the tank is painted black, the water will heat up faster. Also consider making the water supply to the shower convenient, preferably automated. Climbing up a ladder with a bucket of water to fill the tank is not the best way.
So, the place for the shower has been chosen. Now you need to prepare the base - remove upper layer soil, level the area and fill it with sand. For creating the right basis Markings are made using pegs driven into the corners and a rope stretched across them.
The shower can be lightweight design, or maybe a capital building. The type of foundation depends on the materials used. If the shower is brick, use concrete foundation, the depth of which must be at least 30 cm. Before you start pouring, prepare a place for the pipes - you need to lay a log wrapped in roofing felt. Pouring the base with concrete is carried out using guides and a level so that it is level. When the base is ready, laying can be done. A brick shower will be more hygienic and aesthetically pleasing if tiled. But this is an expensive, time-consuming option.
This option will allow you to build a summer country shower without resorting to high costs. After all, if you come to your dacha only in the summer, you can get by with a simplified option. For example, build a canvas shower using a metal frame.
A metal frame will require the most expense, but will still cost much less than brick. To build a frame shower you will need: a canvas sheet (3/5 m), a metal profile (18 m, 40/25 mm), a plastic shower tank, preferably black (volume 50-100 l), a shower head, a ½ drain and a faucet with such a thread. Parts such as a watering can, nuts, brackets, taps, gaskets and washers are very popular materials, which is why they are often sold in one set, which is especially convenient.
It is not difficult to build a canvas shower, it is convenient and functional, for the winter the canvas can be removed, the frame can be covered with cellophane so as not to rust
A design similar to this is a shower for a summer house made of flat slate. It has exactly the same frame, but in this case the profile replaces the square (40/40 mm).
Water from the base of the shower should flow towards the drain pipe, and a shield (usually made of wood) is placed on top, on which a person stands and performs hygiene procedures.
If you don’t want to build a shower yourself, you can buy a ready-made one - for example, with a polycarbonate cabin, or a completely open one, and enjoy water treatments right in the garden
Advice. It is better to drain the water with a waterproof layer - lay PVC film, hydroglass insulation or roofing felt on an inclined embankment. The slope is made in such a way that the flow from the shower is directed towards the trench or drainage tank. Well, if the drain is ventilated, it will dispel unpleasant odors.
The problem of water drainage today can be successfully solved using a septic tank. When installing a septic tank, you should not place it directly under the shower stall. In the summer, when large volumes of water are consumed, the septic tank may flood, and the drainage may not work well, resulting in unpleasant odors. It is better to arrange the drain at a distance of several meters from the shower, and place a septic tank nearby.
Advice. Plants that grow well in moist soil will be appropriate near the shower - they will perform a drainage function.
With quite high altitude the shower structure must have a stable base. To build a summer shower with a strong structure, you can make a pile foundation from pipes. The pipes must be 2 meters high (diameter 100 mm), and holes one and a half meters deep must be drilled in the ground for them. The pipe should rise approximately 30 cm above the soil level. The dimensions of the timber for the frame are 100/100 mm.

In order to drill holes for supports, you can call a fence installation team; the work will take about half an hour
A rectangle is measured on the ground according to the size of the shower, and foundation supports are installed at the corners. The next stage is installing the timber and tying the pillars. It is convenient to assemble the frame on the ground and fasten the structure with long bolts. Then the dressing is done inside frame structure- these will be the floor joists in the shower. Rigid elements are placed between adjacent pillars in the thickness of the wall.
The floor can be made with gaps between the boards to allow water to drain. But sometimes you have to take a shower in cool weather, and air blowing into the cracks will not add comfort. You can also install a tray from which water will be drained through a hose. A shower consisting of a dressing room and a bathing compartment, which can be separated by a bath curtain, will be more convenient. In this case, the locker room should be separated by a threshold to avoid water leakage.
As external upholstery, lining, sheets of moisture-resistant plywood, and fiberboard are most often used. If all the buildings on the site are made in the same style, the shower should not be too different from them.
If you expect to use the shower not only during the summer heat, you need to insulate it. It is most convenient to use polystyrene foam for this. Waterproof materials should be used as interior decoration - plastic, PVC film, linoleum. Wood paneling needs to be sanded and painted.

A water tank is installed on the roof of the structure. It can be connected to a water supply or filled using a pump. It is good to equip the barrel with a plumbing valve that will shut off the water when the container is full
In order for the water in the tank to heat up better, you can make a frame for the tank that acts as a greenhouse. It is made according to the dimensions of the timber container and covered with film. In such a frame, the water in the barrel will remain warm, even if the sun hides. The wind will also not cause its temperature to decrease.
As they say, it’s better to see once:
The summer shower drawings below will help you choose right size, pick up suitable material, visualize exactly what kind of shower you want to see on your site.

Options for covering the shower with different materials: boards, clapboard, moisture-resistant wood panels, Various types tanks

There are simple devices that allow you to use the shower more comfortably: a – a float intake will take warm water from the top layer; b – a tap driven by a foot pedal (a line from the pedal is thrown through the block, it is attached to a pull-out spring and to a tap that opens at a right angle, which will allow you to use water economically); c – an improved scheme for connecting the heater to the water tank will allow the water to warm up and circulate evenly

Heated summer shower: 1 - tank, 2 - pipe, 3 - tap for supplying water from the tank, 4, 5 - blowtorch, 6 – watering can, 7 – tap for supplying water from the watering can
Choosing a design, materials, working on a drawing - important points, which should be given attention so that the shower creation process is continuous and error-free.
Install a garden shower personal plot recommended in the following cases:
The presence of a garden shower significantly increases the comfort of relaxation on suburban area, you can wash in it after working in the beds, etc. It is impossible to list everything in one article possible options When arranging a garden shower, each owner can make changes depending on preferences, skills, characteristics of the site’s topography and financial capabilities.
To make it easier for inexperienced builders to choose the best option for a garden shower, we present a table of the most commonly used designs with brief description their characteristics.
| Name of structural element | Technical description |
|---|---|
| Frame | Can be made from wooden blocks or rolled metal. The dimensions of the bars are approximately 50x50 mm; slats measuring at least 20x30 mm are used to make side stops. It is better to make a metal frame from square or rectangular pipes measuring at least 20x20 mm. |
| External surface cladding | All types of lining are suitable, including natural ones. Widely used are profiled metal sheets, honeycomb or monolithic polycarbonate. The cheapest options are plastic film or thick fabric. |
| Water drainage | Some options may have special septic tanks, and most do not require storage tanks. Several tens of liters of water are quite successfully absorbed into the soil, especially if its composition is sandy or sandy loam. |
| Water tanks | Both metal and plastic containers. The best option– buy shower containers in specialized stores. Minimum container volume 100 liters, external surfaces needs to be painted black. |
| Water heating | Sunlight or combined with the use of electric heating elements. It is recommended to make a specific choice taking into account the climate zone of residence and the time of use of the shower. |
Garden shower
The construction of a shower consists of several stages; compliance with them allows you to avoid many troubles.
The conditions for placing a garden shower listed below will increase the comfort of its use and reduce the volume construction work and increase the time of use. These conditions are considered universal and must be taken into account when constructing any construction option.
After the issues with the location of the structure have been resolved, you should decide on the size and type of structure, and materials of manufacture. As we mentioned above, the choice is huge and depends only on the owner of the site.
Instead of building a frame, you can place the shower head on one of the walls of existing buildings, having previously taken special measures to protect it from moisture. There are options for placing a shower rail in an open space (vertical support, tree branch, etc.).
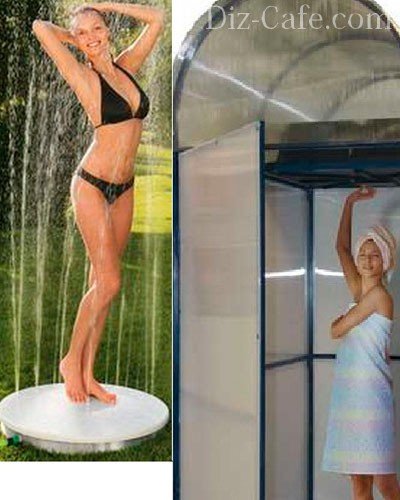
An original solution - the water tank is installed on the ground, and the supply is ensured using a special device, the so-called “treadmill”. It looks like a rubber mat with built-in water supply pumps. You need to press on them one by one with your feet, water is sucked out of the container and supplied under pressure to the shower head. Exercise and shower at the same time. Great option, can be installed anywhere in the summer cottage. To set up such a garden shower you do not need any construction skills, materials or time.
In this article we will dwell in detail on two more complex, but also more comfortable options. To build these structures you need building material and a little time and experience. The frame materials are wood or profiled steel. Standard sizes structures 100x100 cm around the perimeter and 220 cm in height. You shouldn't reduce it, it will be inconvenient to wash. If you want to make a separate place in the shower for changing clothes and storing bath accessories, you can increase the perimeter of the structure.
Step 1. Make the markings concrete slab grounds. To simplify water drainage, it is recommended to leave a recess in the middle of the shower for natural moisture absorption. It must first be removed from the ground fertile layer, pour a sand cushion 10–15 cm thick, compact and level the area.
Step 2. Prepare the formwork. You need to make two square boxes. One with a square side of approximately 100×100 cm, the second inner one with a square side of approximately 60×60 cm. The height of the formwork is at least 10 cm; for manufacturing, use boards approximately 20 mm thick and 10–15 cm high. If you are afraid that the boards will bend under load concrete, then reinforce the formwork around the perimeter with wooden or metal pegs. Check the corners with a square; the formwork can be assembled using ordinary nails.
Step 3. Place the formwork on the prepared site and check its position. The small box should be located exactly in the center of the large one.
Step 4. Prepare the concrete for pouring. For manufacturing you will need cement, sand and gravel in a ratio of 1:2:3. Accuracy of proportions of great importance does not have, the strength is quite enough for small loads. Fill the formwork with concrete and use a level lath to level the top surface horizontally. Allow approximately 10 days for the solution to set.
Step 5. Dismantle the formwork and begin making the frame. It will require bars measuring 50x50 mm or more; the amount of material can be easily calculated. It is necessary to add the length of four vertical posts to the sum of the two perimeters.
Step 6. Make a base for the vertical posts. The bars can be connected in half a tree; a jumper should be made in the middle of the base; it will serve as an additional support for the wooden shower grate. Make sure that all corners are right; you can connect the bars with nails or self-tapping screws. The base bars (frames) should lie approximately in the middle of the concrete slab; the specific dimensions do not matter.
Important. Be sure to soak the base several times with an effective antiseptic. There is no need to install waterproofing between the frame and the concrete; it will only cause harm. The fact is that water gets on top of the insulation and cannot be absorbed into the concrete. Consequently, wooden structures contact with water for a long time.
Step 7 Saw off the vertical posts to size, you need 4 of them. It is better to cut with a hand-held electric saw; if you don’t have one, you can use an ordinary hacksaw.
Step 8 Begin installing the vertical posts. For fixation, it is better to use galvanized metal corners. They greatly simplify and facilitate the work and guarantee proper stability of the structure. It is impossible to install vertical racks yourself; hire an assistant. Temporarily secure the racks with any pieces of boards; later they will be replaced with real stops. Constantly check the verticality of the racks, use a level.
Step 9. Make a second square from the bars, the dimensions are identical to the first, a water tank will be installed on it. If the container has a large volume, then you will have to install several additional jumpers; the distance between them depends on the size of the container.
Step 10 Using corners, secure the top square to the vertical posts. Check all frame elements with a level and correct errors if necessary. You can place wooden wedges at the joints; this will not affect the strength and stability of the structure.
Step 11 One by one, remove the temporary spacers and install the permanent ones. Use the same bars as for making the frame. The length of the spacers should be equal to the distance between the vertical posts; saw the ends at an angle of 90°. For fixation, use the same galvanized metal corners. Spacers are the most critical component of the frame; take all measures to ensure maximum strength.
Step 12 The frame is ready - start covering the side surfaces. Any material can be used for cladding. You can make doors to enter or use a retractable curtain. If the cladding is solid, then windows should be provided under the ceiling. Leave ordinary holes; you can cover them with glass or film. Sheathing sections on external corners It is recommended to seal it with smooth edged boards.
Step 13 Place a container of water on the roof of the frame.
Practical advice. If you plan to take a shower in rainy weather, then the roof should be covered with a piece of metal profile, and a hole should be made under the outlet of the shower head.
Step 14 Paint wood surfaces with durable exterior paint.
You can install electric heating elements in the tank to heat water, but you must certainly follow the rules of the Electrical Regulations.
To make the frame you will need a metal profile pipe, an angle grinder, a welding machine, a tape measure and a level.
After manufacturing, it is recommended to protect metal surfaces from corrosion processes with paint for exterior use. The amount of metal is determined based on the dimensions of the frame, as we described above. It is better to use a purchased water container; the length and width of the structure are adjusted according to its size.
Step 1. Draw a sketch of the frame indicating the length of each element. Take your time, carefully consider ways to strengthen the vertical posts. To strengthen loaded units, you can use pieces of rolled sheet metal with a thickness of at least 1 mm. Prepare squares or triangles with a side of 10–15 cm from it. Make sure that the angle is right and the cuts are even.
Step 2. Cut the blanks with a grinder. It is necessary to cut in compliance with all safety regulations; the grinder is a very dangerous tool. If you have many identical parts, it is recommended that you first accurately measure and cut one, and then use it as a template. This increases the accuracy of the elements.
Important. Make sure that the cutting disc rotates in the desired direction. At correct installation sparks should fly towards the master, but some people find it inconvenient to work this way and change the direction of rotation. This is very dangerous; while biting, the grinder is thrown onto the worker, which can cause serious injuries. It is impossible to hold the tool with your hands; the ejection force is too great.
Step 3. Start welding the frame. In order for the weld to be strong, maintain the welding conditions. The electrode thickness and current indicators depend on the profile parameters. For the frame, it is enough that the pipes have a wall thickness of 1–2 mm; such rolled products have the required physical strength and will fully withstand the load of a water tank. For welding, we recommend using a Ø 2 mm electrode; make sure that the slag is evenly blown off the surface of the molten metal and the seam is continuous.
How to weld a structure correctly?
Thus, you can independently prepare two side planes of the frame; all that remains is to connect them into single design. It is very difficult to do this alone; it is better to call an assistant. One will hold the elements, and the second will weld them. You need to constantly check the corners, don't rush. Practice shows that reworking an incorrectly welded frame always takes much more time than carefully checking the dimensions and spatial position during the preparation of structural elements.
It is better to make vertical posts and a platform for the tank from a rectangular or square pipe, with the same dimensions as the round one, they have significantly best characteristics physical strength for bending and compression. As jumpers, in addition to sheets at the corners, you can use any wire rod, square or reinforcement. There are pieces of profile pipe of sufficient length left - use them.
Step 4. At the bottom, weld a platform for the sheathing boards. The dimensions do not matter, it is intended only for support. The grille can be made non-separable or assembled from individual elements. For manufacturing, take smooth lumber; the thickness of the boards or slats should support the weight of the washable ones. If you have thin materials, then make several jumpers for them.
Step 5. Install the frame over the shower location. It could be concrete platform or ordinary temporary stops made of stone. The second option is preferable for several reasons. Firstly, there is no need to deal with earthen and concrete works. Secondly, at any time, if necessary, the shower can be moved to another place.
Metal frame - old lattice, wound with wire
If you weld legs with support platforms made of sheet steel at the bottom of the vertical posts. The dimensions of the platforms are approximately 20x20 cm, this is enough to guarantee the stability of the structure. Such a platform makes the shower more mobile when moving; for installation you only need to slightly level the ground under the supporting platforms; this work takes a few minutes.
Practical advice. Many people are concerned about water drainage. If your booth is located next to the entrance of the house, and everywhere on the plot sidewalk paths, then it is recommended to make a dirty water storage tank. If the shower is located at the back of the buildings, then you don’t have to waste time and effort on building outlets. For hygiene procedures, 10–15 liters of water is enough for one person, this a small amount of It will be absorbed into the ground on its own without any problems. For complete peace of mind, you can dig a hole under the shower under 2-3 car tires, water will accumulate in it. After moving the frame, the tires are removed and the hole is filled with earth.
Step 6. Align the cabin, make sure that the racks are strictly vertical and the platform for the container is horizontal.
Step 7 Clean the surface metal structure from rust, oil stains and dirt, check the stability of the frame with your hands. Everything is normal - you can start painting. Choose the color of the paint as desired, the main thing is that it is suitable for painting metal surfaces and for outdoor use. Don’t be too lazy to do the painting very well, use brushes, carefully rub the paint into the frame. If one layer is not enough for uniform coverage, you will have to repeat.
Metal frame coated with primer
Step 8 Set to upper platform container for water, attach a shower head. If desired, you can make an additional outlet for dialing warm water for various economic purposes.
Water supply through a tee with taps on taps
If there are no doors in the cabin, and only a plastic curtain is hung, then the wind can blow it inside the cabin. This creates some inconvenience when taking a shower. There are several ways to correct the situation:
If you want to increase the comfort of taking a shower, then it is better to attach a door. For its manufacture, you can use both lumber and rolled metal. The design of the doors is elementary; they are hung on vertical side supports.
When making the frame, think about this point; little material and time will be required, but the convenience of using the shower will increase significantly. The compartment also needs to be equipped with wooden gratings for the feet.
Silicone mat to prevent feet from slipping on wet boards
If children will use the shower, be sure to install a shower head with a flexible hose for them. Place the water supply switch tap at such a height that children can reach it without any problems.


