Any piece of land, be it a cottage or a farm, must be surrounded by a fence. A fence usually performs several functions at once: security, functional and aesthetic. But not every fence can fully comply with these parameters. Often, the unreliability of a structure lies precisely in the materials from which it is made. Therefore, their choice requires careful study of the issue. This article will discuss the features of constructing a fence from corrugated sheets.
Today there is big choice building materials, which makes choosing very difficult. The most popular are universal materials that can be used for different conditions. These include corrugated sheets or, in other words, profiled metal sheets.

There are few disadvantages to using metal profiles, and with an objective assessment they are insignificant and completely solvable. To prevent the fence from swaying under the influence of the wind, you need to select sheets of a certain marking with a greater thickness. Corrosion can be easily avoided by promptly treating the material with a special protective coating. And scratches can simply be painted over.
Corrugated board has more advantages than other similar building materials, and for ordinary person with a modest income living in the middle climatic zone, such fencing material is perfect.

Its main advantages are:


It should be noted that few types have such an extensive list of advantages. building materials. Without exaggeration, corrugated sheeting can be called universal and multifunctional.
But these properties can only be assessed if it is used correctly. There is an opinion that metal profile fencing is flimsy and short-lived. Perhaps the reason for the dismissive attitude is the budget price. However, this is a misconception. This building material is clearly underestimated. In addition, such a fence is often cheaper than other types.

By giving preference to a metal profile, the owner of the site will be able to quickly, easily, efficiently and inexpensively build a fence that matches his financial capabilities and taste. Despite the relatively low price, fences made of metal sheets are not inferior in quality to fences made of more expensive materials.

A profiled metal sheet must have a protective coating, which can be:


Advantages of polymer material:
Among the disadvantages, it is worth highlighting the increase in cost (by about 15%). Polymer coating provides long-lasting color and smooth texture. There are many types of polymer coating, each of them has its own characteristics.
Types of polymers:
A fence coated with this type is ideal for central Europe and Russia.


Choose suitable material quite difficult for a beginner. However, in order not to make a mistake, it is enough to adhere to the above recommendations of professionals.
The fence can consist entirely of profiled sheets. But for greater stability, it is recommended to build a fence with a plinth, that is, with a strong base. It is necessary not only to increase stability, but also to drain water that may accumulate during heavy rainfall. There are several types of base:


The option with columns divides the entire sheet of corrugated sheets into sections. And the columnar-ribbon one, in addition to the sections, also adds a foundation along the entire base from below. In both cases, you can use either cement or brick. The stone type of foundation is the most expensive, but at the same time the most reliable. However, the need for such a fence appears only when the fence is built from heavier materials, for example, wrought iron.
The calculation of the required construction tools and materials largely depends on the type of fencing and the number of sections.

Marking "H" applied to products with a thickness of more than 44 mm. This corrugated sheet is suitable for load-bearing walls, as well as for roofing and container manufacturing. Its thickness is quite large. Using this type of fence is impractical and uneconomical.
Profiled sheets with marked "NS" 35-43 mm thick is intended for roofing. They are commonly used as construction site fencing material. In domestic conditions, the increased resistance of sheets of such thickness will not be needed, so you should not stop at this option.
Marking "C" has a thickness of 8 mm and is intended for external decoration of buildings. For the construction of fences and barriers around private houses, a coating thickness of 21 mm is optimal. Despite the lightness of corrugated sheeting marked “C”, it is quite strong and stable, only slightly inferior to materials marked “H” and “NS”.


In addition to the above, there is another type of profiled sheet With marked "MP". This type is considered universal, it is lightweight and inexpensive, it is used both in roofing works, and in the construction of buildings for domestic purposes, as well as for the installation of fences. However, a corrugated sheet is best suited for a fence. With marked "C8".

Below are the parameters of the most popular brands of corrugated sheets in the form brand/total width, mm/working width, mm/thickness, mm/wave height, mm/distance between ribs, mm:
As for the length of the sheets, there are no fundamental restrictions. The seller will cut you material of any length up to twelve meters. It is also possible to obtain profiled sheets above the specified limit, but for this you may need to place a special order.

It is better to choose the height of the fence at 2-3 meters. With such a height, you don’t have to worry that someone will be able to look inside or climb over the fence and get into the site. In addition, loud sounds will not penetrate from the street, and the area will be protected from road dust.
The next step after studying existing species and forms will be the choice of material for building the fence. When selecting components, we will consider those materials that are best suited for budget designs and will not create problems when assembling the fence even by an inexperienced builder.
Corrugated sheeting marked “C” and “MP” is quite suitable. You should not buy sheets without coating, otherwise, the fence will soon require replacement or updating. Inexpensive polyester will protect iron from corrosion.

The design of the fence is not only metal sheets, but also a number of other components:


Before purchasing building materials, it is important to know how much you will need. It is enough to calculate the length of the fence as a whole and each of its sides separately, as well as the height of the structure. To determine the number of sheets, you need to divide the perimeter of the fence by the width of one sheet, and then round it up.
The height of the fence is also of no small importance, since the sheet will be attached at a short distance from the ground. The corrugated sheeting must not be allowed to rest on the ground.

Support posts can be used in either round or square shapes. However, it is better to give preference to square ones. Their size should be 50x50 mm or 60x60 mm. For round pipes, it is recommended to choose a diameter of 50 mm. The most suitable wall thickness is 3 mm.
The length of the supports depends on the height of the fence and how deep you need to dig them into the ground. The height of the fence itself will also have great importance. For example, if the depth of the pit for the stand is 1.3 meters, and the height of the structure is 2 meters high, then a pipe measuring 60x60x3 mm is approximately 3.3 meters.

Theoretically, it is also possible to use wooden posts as bases. Before installation, they must be treated with an antiseptic.
It is also necessary to pay attention to the part of the pole that will sink into the ground: it must be especially strong. It is recommended to pre-treat it blowtorch, and then with a bitumen primer.
Usually the distance between supports is 2-3 meters. In an area with strong winds it is worth shortening this period. When calculating the number of pillars, it is necessary to take into account that the supports must be placed at the corners of the perimeter and on both sides of the gate or gate.
If, however, there is a desire to build sectional fence with pillars, then it will be necessary to ensure that one sheet of corrugated sheet fits entirely into each section. It is also better to use profiled pipes as lintels. Determining the required number is simple: to do this, you need to multiply the total number of crossbars by the perimeter of the fence. Logs with dimensions of 40x25x2 mm have optimal strength parameters.

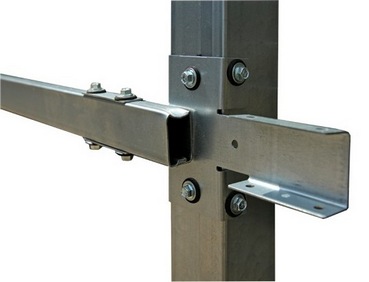
Welding will be required to connect the supports to the joists. If you don’t have a welding machine or experience working with it, you can use bolts or special fasteners – “crabs” – as an alternative. Working with them is much easier. In terms of reliability, they are inferior to welding, but are irreplaceable if quick and easy installation is required.

And the last thing you need to assemble the fence is roofing screws for metal. Suitable size– 4.8x19 mm. Their number depends on the planned size of the fence itself. For example, for sheets of markings “C” or “MP” 20 mm thick, 4 screws will be required for each crossbar.
If there are two logs, then you need 8 screws, if there are three - 12 pieces. However, such a calculation will be correct provided that the self-tapping screw is screwed correctly into every second wave. In all other cases, the calculation of their quantity is made individually.
To make the fence look aesthetically pleasing, you should choose the color of the screw in the same tone as the fence.

In addition to the main components of the corrugated fence structure, you will also need:


It is not difficult to install a corrugated fence with your own hands. Exists universal type metal profile fence with a simplified structure. However, it is important to understand that if you decide to build a structure yourself, you need to take responsibility for performing additional actions that are no less significant than the assembly itself. Before the beginning construction work It is important to imagine the type of fencing in the final version. To do this you need:
IN in this case The option of constructing a universal fence without a foundation is being considered. If it is necessary to build a fence on a foundation made of cement or brick, then for this it is necessary to calculate their number.


In general, it is more difficult to build a structure made of corrugated sheets with a concrete base. The reason for this is the additional hassle of pouring a strip foundation, as well as the cost of reinforcement and hiring a concrete mixer.
Having a mixer machine is not necessary, but it will help you finish the job faster. If the land has soft soil, it is recommended to use a strip foundation, which ensures greater stability of the metal profile fence.
The construction process itself should be considered in more detail and sequentially. So, the main stages of work:


In this case, professionals advise using a bracket. It connects the support pillar and the joist. This method is considered more expensive, but also more reliable.

If for some reason there are gaps or cracks in some places, then they need to be riveted. It would also be a good idea to purchase paint to touch up scratches that occurred during the installation of the structure.


If you want to fill the foundation of the fence with concrete, then for this you need:
To do this, you will need a flat board measuring 2.5x1.5 cm. The width of the formwork can be chosen as desired; a side of about 20 cm will look neat. Shields are attached to the sides of the trench, and they are connected at the ends with self-tapping screws. This is necessary to ensure that no leakage occurs during the foundation tide.
Next, pegs are placed in the corners of the shields for strength. The formwork should be installed approximately 30 centimeters above the intended cement pouring boundary. If the fence is planned to be made with posts, then the foundation for it must be monolithic. This guarantees the strength and durability of the structure. In this case, we must not forget about the reinforcement.
Immediately before pouring, it is necessary to check whether the support pillars are level.


If the concrete inside the pipes hardens in three days, then the foundation will have to wait several weeks for readiness, after which the formwork can be removed. Concrete will harden faster if bricks are placed on top of it 10-15 days after pouring. So the density of the foundation will be higher. During the “ripening” process, the foundation should be protected from increased moisture evaporation. To do this, you need to periodically water the concrete with water from a hose, and then cover it with any film or wood shavings.

Once the foundation is ready, installation of the fence can continue. Pouring a foundation, like building a fence, is not a difficult task, but it is energy-consuming and troublesome, so if possible, it is better to ask a friend or neighbor for help.
This kind of “nozzle” can be purchased in any size in accordance with the dimensions of the main sheet. However, there is an opinion that the untreated end of the fence is an obstacle to the penetration of thieves, because the edges of the corrugated sheet are quite sharp.

In any case, everyone decides for themselves whether to close the top end or not. You need to be prepared for the fact that even with the most accurate calculations, waste will still remain, and this, accordingly, extra costs. But these are “production costs” and they are inevitable.
Nuances when building a fence:


Although a fence made of corrugated sheets with wooden support posts is not often used, it has its place.

The combination of corrugated sheeting with forging or forged inserts looks solid and prestigious. Iron products can cause damage to family budget, but they stand out for their particular strength and reliability.

Even the most primitive fence can be made visually attractive. Therefore, if the budget is limited and it is not possible to build a fence with a metal ornament, you can do the following:
Insert strips of glass into one or more profiled sheets, which can be vertical or horizontal lines, individual “islands” in the form of circles, squares or other geometric shapes. Any glass will do: frosted, transparent, embossed, smooth, with or without a pattern.


Many owners of suburban areas are concerned about the safety of their properties. Many modern building materials allow you to choose the material for building a fence according to your taste and cost, but without sacrificing quality. In this article we will tell you how to make a fence from corrugated sheets with your own hands with posts, and also show photos and videos on installing the fence.
A metal profile fence can be of any height. Typically, for areas far from the city, a height of 3–5 m is chosen. Such a fence not only visually protects from unnecessary witnesses, but also screens out sounds from a federal highway, for example.
Construction from profiled sheets is technologically quite simple and does not require the use of expensive equipment or teams of workers.

Note! Brick can also be used as a decorative element, covering metal or wooden pillars with it.

Then you can install logs - a transverse profile for fastening the canvases. A profiled beam with a cross section of 40x25 mm or pipes of the appropriate diameter are suitable here. The number of horizontal logs depends on the size of the fence. If it is less than 1.7 m, two rows are enough. They are attached at a distance of 4 cm from the top of the future fence and from the ground. With a higher fence, the number of horizontal lines should be increased to three.
Note! The best way to fix all the metal parts together is welding.

If you use wooden beams, the service life of the fence will decrease.

Note! After installation, the entire steel structure must be primed to protect it from rust.

The last stage is attaching the profiled sheets to the joists. This should be done using metal screws 35 mm long and in increments of 500 mm. Adjacent fragments are fixed with an overlap.
This type of fence does not require special care. You may need to spray paint the canvas from time to time to hide any scratches or corrosion.
From the outside, such a fence looks solid and durable, reliably hiding the house and local area from prying eyes.


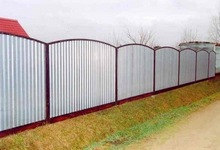
Options for fences made of corrugated sheets can be divided into metal and combined. Fences combined from corrugated sheets include several different materials.
Metal fence made of corrugated sheetsThe simplest and least expensive. Sheets of corrugated sheets are fixed to a metal frame and form a continuous strip. Perfect for the garden and garden. |
 |
Sectional or modular fences made of corrugated sheetsEach sheet is framed by a rectangular or shaped metal frame. The sections are welded to metal posts using tapes. The fence looks neater and more finished than a regular metal one. |
 |
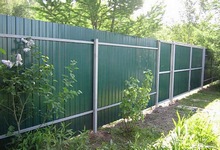
Brick fence with corrugated boardA more expensive and labor-intensive option, but it looks very solid. The sheets are fixed between square pillars lined with decorative bricks. |
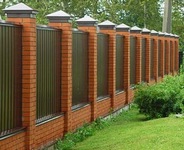 |
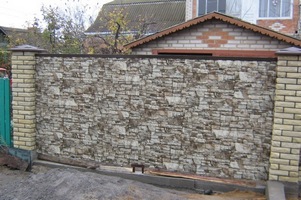
Fences made of stone and corrugated boardThe sheets are placed between concrete pillars trimmed with stone. You can also decorate a concrete foundation with stone. |
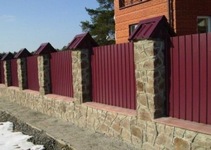 |
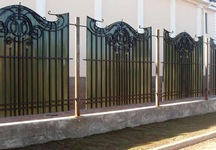
Fences made of corrugated sheets with forgingVery beautiful decorative fencing. The sheet is framed with elements of artistic forging. Each section is installed between brick, concrete or metal pillars. |
 |
Attention! When building a fence from corrugated sheets with your own hands, you should not take on combined options if you do not have the skills to pour a strip foundation and lay bricks, and also if you have a limited budget.

To build a fence from corrugated sheets, you will need the following tools:
Attention: working with welding machine requires special training. If you do not have the skills, it is better to invite a professional. You can also use installation technology corrugated fence without welding! The most reliable way to fasten logs to poles is with galvanized clamps, which are tightened with self-tapping screws.
Which corrugated sheeting for a fence is best to buy? In terms of size, everything is simple:
- fence up to 2 meters - can be purchased fence corrugated sheet with a corrugation height from 8 to 21 mm (C8, C10, C20, C21)
- a fence over 2 meters and with increased wind load - the height of the corrugation is at least 20 mm (C20, C21).
Thickness corrugated sheeting for the fence - at least 0.5 mm.
Width corrugated sheeting for the fence depends on the height of the corrugation.
Height corrugated sheeting for the fence - standard - 2 meters, the most common range is 1.8 - 2.2 meters.
It remains to decide type of corrugated sheet. Practice has shown that best option - double-sided corrugated fence— galvanized sheet with double-sided polymer coating. Such a fence will look great from any angle and, if handled carefully, will serve you for many years.

Take note! The design of a fence made of corrugated board can be made quite interesting. Today, corrugated fences imitating stone and wood are gaining popularity.

2. Fence posts made of corrugated board
Round or profile (rectangular) pipes are used as pillars. They are available with or without painting. If you want to build cheap fence from corrugated sheets, you can use used pipes, but without corrosion.

Options:
Thickness metal for pillars 2-3 mm (used pipes - 2.5-3.5 mm).
Diameter round pipe for a fence made of corrugated board - 5-7 cm.
Section profile pipe- 4*6 or 6*6
Height pipes - fence height from the ground surface + 50%
3. Cross joists
The logs are attached to the posts and will serve as a base for the fence sheets. Usually they use a profile pipe 40*20 or 40*25, with a metal thickness of 1.5 mm.
 4.
Fasteners
4.
Fasteners
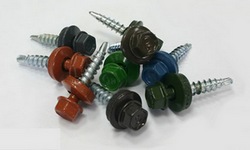
Most often, galvanized self-tapping screws are used for corrugated sheeting on the fence. They have a rubber gasket for a tight connection, and on top part A polymer coating has been applied to match the color of the sheet. The most common size of self-tapping screws for fences is 5.5x19 mm. With this length, the sharp end remains inside the profile pipe of the log.
For simple metal fence from corrugated sheets material calculation is performed as follows.
Number of sheets = fence length: useful sheet width + 1-2 spare sheets.
Number of posts = fence length: distance between posts + 1.
Attention! The length of gates and wickets is not included in the length of the fence. They also require sheets and posts. It is easier to make the frame of gates and gates to order.
Number of logs = (number of pillars - 1) * 2 (if there are 3 transverse logs, then multiply by 3).
Number of screws = number of sheets * 6 (to increase strength, the number of screws can be increased).

Materials have been purchased. It's time to learn how to make a fence from corrugated board.
The site for the fence is cleared down to the ground. If possible, you need to level the ground.
We drill holes at the corners of the fence and install posts in them strictly vertically. You can check the vertical accuracy with a level or plumb line. Between them we stretch the twine cord in 2 rows (it’s better to keep it vertical). We will install the remaining pillars along this line. It also allows pillars to be at the same level (in the absence of terrain slopes).

Along the cord line at regular intervals (standard 2.5 or 3 meters), it is necessary to drill cylindrical holes for the posts. With a fence height of 2 meters, the depth of the holes is 1 meter. The most important question when installing a fence made of corrugated sheets is: What is the best way to secure the pillars?
 1 way
1 way
Hammering into the ground with a sledgehammer. Suitable for light fences that are placed on fairly solid soil. Here the diameter of the drilled hole should be slightly smaller than the diameter of the pipe.
Partial concreting. The most optimal solution for a summer residence. The post is set level, then filled with ½ or ⅔ of the hole with soil and compacted tightly. The remaining space is filled with concrete. For strengthening, instead of earth, you can use a mixture of crushed stone and sand.
Butting. Instead of concrete, the hole is filled fine crushed stone, which is compacted by a vibrating plate. This method prevents pillars from bulging on clay soils, which occurs when inland waters freeze.
Full concreting. Suitable for light soils. The entire hole around the post is filled with concrete. A cushion of crushed stone and sand will also not hurt in this case.

Helpful advice. At high level groundwater occurrence requires waterproofing of the hole. It can be done by laying the walls and bottom with roofing felt.
Other installation methods are considered time-consuming and costly. They are suitable for permanent fences country houses. These include the installation of a strip foundation under a fence made of corrugated sheets, as well as the installation of a fence made of corrugated sheets on screw-type piles.
The logs are welded perpendicular to the posts. The places of fastenings are pre-measured.
Attention! The distance from the log to the edge of the sheet should be 20 cm.

After welding, you need to thoroughly clean the seams and apply paint to them, otherwise corrosion cannot be avoided. If you decide to install a fence made of corrugated sheets without welding, galvanized clamps will not require painting and will provide additional protection.
 The corrugated sheet is secured to two joists using self-tapping screws. The work needs to be done by two people, protecting their hands with construction gloves (the edges of the sheets are quite sharp). We fasten the sheets from the gate or wicket from the outside. First you need to draw a straight line with chalk along which the screws will be screwed. There are 4 self-tapping screws on one sheet, one jog at a time. The outer ones simultaneously overlap adjacent sheets.
Watch the video about installing corrugated sheets, which explains in detail how to fasten the sheets.
Tip: The top line of the fence can be strengthened and decorated with a U-shaped strip. It will give the fence a finished look. You can use contrasting colors.

All that remains is to clean it and enjoy the work you did with your own hands. We also invite you to watch a video where the gate construction process is shown inside and out.
A fence made of corrugated sheets is the optimal solution for protecting the territory country house or dachas from prying eyes and unauthorized visits. Fences made of this material last at least 30 years. The metal profile is extremely easy to process, and the simple installation method allows you to install a fence around the house or summer cottage quickly and with your own hands, without involving additional labor. Possessing high performance characteristics and durability measured over decades, the metal profile also performs a decorative function, with the help of which you can ennoble a private area, making it not only inaccessible to prying eyes, but also homely.
A distinctive feature of metal profiles (profiled sheets, corrugated sheets) is versatility. In addition to arranging roof slabs and erecting temporary utility structures (hangars, sheds, garages, etc.), this material was used wide application in the construction of fences and enclosures for various purposes.
The metal profile is made from cold-rolled sheet steel, which is special technology covered with a layer of zinc and a protective polymer film of various colors. The thickness of the profiled sheet is 0.4–1.2 cm. At the final stage of production, the sheet, laid in rolls, receives a certain profile (trapezoid or wave) using roll forming equipment (manual or automatic).
Good to know: The steel base and stiffening ribs provide increased resistance of the material to deformation and force, and galvanization and polymer coating reliably protect the corrugated sheet from rust and mechanical wear.
For the construction of fences, profiled wall sheets with a profile height of 8 to 44 mm are used. The final cost of the material is influenced by such parameters as:
The main advantages of using corrugated sheets in the construction of fences and fences include:
The corrugated sheet is well protected from rust, deformation, damage and climatic factors. The material is produced in a wide range of sizes, which allows it to be used for the construction of fences of any height and length.
Good to know: The lightness of the profiled sheet, as well as its mechanical rigidity, greatly simplifies the installation process. In addition, when building a fence from this material, the requirements for the strength of the supporting frame are reduced.
The disadvantages of metal profiles used in the construction of fences and enclosures include:
Good to know: Despite the obvious disadvantages, corrugated sheets have no equal in terms of efficiency and are absolutely fire resistant. The material is available in a wide range color solutions and a wide range of profile shapes and sizes, which allows you to satisfy almost any aesthetic needs of the buyer.
 Profiled sheets as decorative cladding on entrance gates
  Fence made of metal profiles on metal supports: view from the inside
  Decorative design of corrugated sheets as part of a country fence
  Metal profile fence with decorative design: inside view
  Fence made of corrugated sheets with decorative design
  A fence made of corrugated sheets on a site with a slope
  Corrugated fence with brick pillars
  Metal profile fence on a concrete foundation
It is necessary to carefully prepare for the construction of a metal profile fence. Errors during the design and installation process are unacceptable, since they entail unplanned costs of time, nerves and money.
So that the construction of the fence is carried out quickly and does not take away unjustifiably a large number of forces and resources for preparatory stage construction it is necessary:
It is important to remember: After purchasing and delivering the main material to the construction site, it must be carefully stacked and covered to protect it from premature wear and climatic factors before installation work. The location of the stacks should not interfere with the passage, passage or placement of other building materials, elements building structures, transport, etc.
If the decision to build a fence from a metal profile has been made, all that remains is to choose a material that is suitable in terms of cost and quality. To do this, it is necessary to determine the requirements regarding its protective characteristics, as well as the reliability, durability and resistance of the future fence to wear and damage.
But first it won’t hurt to pre-install:
The list of key factors determining the choice of profiled sheet for fence construction includes:
The metal profile has a special marking, which determines its main characteristics and purpose. So, for the construction of a fence, grade C (wall) or NS (universal) material is suitable. The numbers in the marking of the profiled sheet mean:
It is important to remember: The thicker the steel base and the higher the zinc content in the protective layer, the more resistant to corrosion and deformation the corrugated sheet is. However, nowadays galvanizing technology is used less and less in the production of materials. A much more reliable protection against corrosion, damage and wear is a special polymer coating, which, moreover, can be given a color and even texture that matches the purpose of the metal profile.
The polymer can be applied on one or both sides of the sheet, which significantly affects the overall cost of the material. In addition, the price of the metal profile is determined by the type of this polymer coating:
Important to know: The dependence of price on the type of polymer coating, which largely determines the durability and wear resistance of the material, is obvious. The greatest demand in the construction of fences and fences is metal profiles coated with matte polyester, which has optimal ratio price quality. Material coated with pural is also popular, since the latter provides not only high aesthetic performance of the corrugated sheet, but also increases the service life of the fence.
The strength of wall corrugated sheeting depends not so much on the thickness of the steel base (0.1 cm is enough for building a fence), but on the size, shape and thickness of the ribs (waves) of the profile. Therefore, when purchasing, the main attention should be paid to the height of the latter. For the construction of a fence in an area with normal wind loads, a material with an edge whose height does not exceed 21 mm is suitable. As for the required sheet sizes and amount of material, they are determined based on the required height of the fence, as well as its perimeter. It should be taken into account that the corrugated sheet will be mounted with an overlap.
For the construction of fences and enclosures, four grades of wall corrugated sheeting are used. Their design parameters are given in the table:
Good to know: Wall corrugated sheets are produced in sheets 12 m long, but before sale they are cut into pieces 2–3 m long that are more convenient for transportation and installation.
Before you go to hardware store for materials, you should correctly calculate their quantity, as well as determine the scope of work on the manufacture of the main elements of the fence structure. This can only be done if there is a detailed project. The latter is easy to develop independently, without involving expensive specialists.
The first and main thing that is necessary for design is the value of the perimeter of the fenced area. If it is not indicated in the cadastral plan, you will have to measure it yourself. For this you will need:
The next step is to determine the location and required dimensions of the entrance gates and wickets. It is necessary to place marks on the sides of the latter, measure the distance between them and subtract the resulting value from the total perimeter.
Having the number of sections, we calculate the required number of supports using the formula:
It follows from this that to install the fence you will need: K=13+1=14 supports.
Important to know: It is convenient to use a profile pipe of square (50*50 mm) or round (d=50 mm) cross-section as support posts for a fence made of corrugated sheets. It should be noted that the length of the supports is a composite value. The outer part should be at least 10–15 cm longer than the corrugated sheet. This is necessary to leave a gap of 5–10 cm high at the bottom and a headroom of about 5 cm in the upper part. So, for a fence 2 m high, the height of the supports will be 210–215 cm. For installation in the ground, another 80–120 cm will be required (depending on the type of soil, freezing depth and groundwater level), and if the fence is installed on a strip foundation - 40–50 cm.
If the necessary requirements for the design of the supports are met, their length will be:
L og =200+15+80=295 cm (when installing supports in the ground);
L op =200+15+40=255 cm (when installed on a foundation).
Using the height of the fence, as well as the number and length of sections, the required dimensions and number of profiled sheets are determined.
The height of the fence is equal to the length of the section of corrugated sheet. If the fence being designed has a height of 2 m, a standard 12-meter sheet will need to be cut into 6 2-meter pieces. If a profiled sheet of grade C21 is chosen for construction, each 5-meter section will require 5 such sheets and the remaining 6-meter section will require another 6 sections 1 m wide.
As a result, the total number of sections of corrugated sheets 2 m long will be:
N=n 5 *5+n 6 *6=12*5+1*6=66 segments
where n 5 and n 6 are the number of 5- and 6-meter fence sections.
It is important to remember: Installation of the corrugated sheet is carried out with an overlap. This means that each sheet will lose a little length during installation. Thus, when calculating the number and size of sheets relative to the length of the section, the value of the joint size multiplied by 2 should be subtracted from the total length of the sheathing.
For fences made of corrugated sheets, a metal profile pipe with a cross-section of 40*20 mm and a length corresponding to the dimensions of each section is used as transverse logs. At the same time, to install a fence 2 m high, you will need no more than 2 tiers of crossbars.
This means that the number of logs for the calculated fence will be:
k=k s *2=13*2=26 lag
where k c is the number of fence sections.
As a result of the research, it was found that to build a fence around the area in question it is necessary:
Next, all that remains is to re-draw the diagram of the site and apply a projection of the fence on it indicating the number and size of sections, the location of gates and gates and other important data. The construction project can be considered ready.
In order to independently make and install a fence from corrugated sheets, you need to prepare the tools in advance, which you cannot do without during the work process.
This list should include:
In addition to the basic materials of corrugated sheets and profile pipes for the manufacture of supports and transverse joists for the construction of the fence, auxiliary tools will be needed.
The list of the latter contains:
It is important to remember: When cutting metal, during the construction of a foundation or installing supports in the ground, as well as when installing crossbars and fixing profiled sheets, it is very important to follow safety precautions. This will avoid injury, as well as material damage and tool breakage. When performing work operations, you should use safety glasses, gloves and protective clothing. And most importantly: you need to prepare a free area for work, where nothing will interfere with the manufacture of fence elements, and supply electricity to it to connect power tools.
After marking the territory and preparing materials, it’s time to start construction. The general algorithm of actions is as follows:
Good to know: If the installation of the supporting frame is carried out by welding, the welds must be cleaned. You should also weld appropriately shaped plugs onto the support posts, which will prevent moisture from getting inside the pipe. It is better to make holes in the metal before assembly, although, if you have a powerful drill and a high-quality drill bit, they can be made after. Primer and paint on metal carcass It is advisable to apply it before installing the sheathing so as not to stain the new profiled sheet.
If the conditional service life of the fence exceeds 20 years or the nature of the soil or the layout of the site do not allow installation in another way, the fence is installed on a strip reinforced concrete foundation.
The foundation is poured in several stages:
Using a concrete mixer, sand, crushed stone, cement and water are used to make concrete mortar, with which the trench is filled to the required level. During the process, you should periodically check the verticality of the support posts or fix it to the formwork with a lock made from waste boards.
It is important to know: The soil will not take moisture away from the concrete if the bottom of the trench is moistened abundantly before pouring. The finished foundation should be allowed to dry for at least 3 days, after which you can begin installing the transverse joists.
If the fence is planned to be used for no more than 15–20 years, the fence is temporary, or the soil or layout of the site allows installation without pouring the foundation, the support pillars are installed in the soil.
There are several ways to install supports, the choice of which depends on the nature of the soil, the depth of groundwater and the height of the fence:
The algorithm for installing fence supports in the soil looks like this:
Important to know: To enhance the load-bearing capacity of concrete or partially concreted supports, the hole can be reinforced using thin (d=10 mm) reinforcement.
If land plot has a slope, when pouring the foundation or installing support pillars it is necessary to perform a number of additional actions. In particular, with a slight slope, the soil should be simply leveled.
When installing a fence on a foundation on an area with an average slope, the procedure will be as follows:

When installing supports in the ground on a site with a slope, the depth of the holes is adjusted in the same way: the bottom of the hole of the first support of the next level should be at the level of the middle of the hole of the last support of the previous one.
Important to know: The difference in height levels should be the same along the entire length of the fence.
After installing the support pillars in the ground or on the foundation, the transverse joists are installed. They can be installed by welding or using special “crab” fasteners.
When mounted on “crabs” in supports and cross joists It is necessary to make holes of the appropriate diameter for bolted connections.
Installation of crossbars for welding is carried out by one of three ways: logs are butt-welded on the sides of the support column, or fixed using a holder (piece of U-shaped profile required sizes).
Good to know: The location of the logs and the distance between them depends on the height of the fence. If the latter is 2 m, you need to subtract 40–50 cm from the upper edge of the support - it will be mounted at this level top line crossbars Further down we retreat 100–120 mm and mark the level of installation of the lower logs. Then the distance from the lower cross member to the ground will be: l=200–40–120=40 cm.
If the installation of the frame is completed, and plugs are welded on top of the supports, you can proceed to the final stage of construction - cladding the fence. To do this, holes for fastening elements are made in the transverse logs with a pitch equal to the pitch of the profiled sheet. Before starting work, it is important not to forget to calculate the location of the joints of the metal profile; its sheets are attached directly to each other, bypassing the crossbars.
After installing the sheathing, the fence can be decorated decorative elements. For example, by forging or beading along the upper and/or lower edge of the profiled sheet. You can also additionally protect the screw heads and bolted connections with special plastic plugs.
It is important to remember: When joining sheets with an overlap, installation is carried out on the upper wave of the profile. The corrugated sheet is fixed to the crossbars in the center of the lower wave of the profile.
The construction of a fence from corrugated sheets requires thorough preparation and, most importantly, correctly performed calculations. Then, if you do not make gross mistakes during installation, the work will not take much time and effort. For example, to fence an area with a perimeter of 60–70 m, it will take only 3–4 days, of course, provided that you don’t have to dig a lot to level the soil. The result should be a reliable and durable fence that will serve excellent protection area from prying attention and will greatly complicate unauthorized entry into the fenced area.
Fences made of corrugated sheets are used everywhere. This material is popular due to its simplicity and speed of installation, attractive appearance and affordability. If you agree with this statement and are planning to build yourself such a fence, we suggest that you familiarize yourself with step by step process its construction.
 If the site where the fence will be erected is located in the city, you need to submit an application to the appropriate authorities asking for permission to carry out the work before installing a corrugated sheet fence. The application must be accompanied by drawings of the future fence and construction estimates, legally approved by architectural and construction control authorities.
The permission received and project documentation should be registered with local authorities and only after that construction should begin.
If the fence will be erected on a site located in the suburbs, it is not necessary to obtain permission. You will only need documents confirming your rights to it.
Failure to comply with current legislation may result in a fine or demolition of the illegally erected fence at the expense of the owner of the site. Also, it will not be possible to sell such a house in the future.
 Before erecting a fence, you need to decide which ones to build. Gates can be swing, sliding, sliding. It is easier to build swing gates, but this type of gate requires extra space on the site to open it. To avoid any problems, you should choose the type of gate at the site planning stage. It is written in more detail about planning a suburban area.
 Before construction begins, it is necessary to calculate the material taking into account the perimeter of the area to be fenced and the height of the fence. Remember the overlap. It is maintained within the range of 3 to 10 centimeters.
The boundaries of the location of the entrance gates and entrance gate are immediately marked, the installation pitch of vertical supports is calculated (usually 2.5-3 meters), the area is leveled and cleared of debris.
To mark the area you will need a tape measure, cord, and stakes. The latter are installed in the corners where the main pillars will be, and a cord is stretched between them. Then, with a certain step (2.5-3 meters), auxiliary pegs are driven in between the main pegs. They don’t forget about the future gate with a wicket; markings are also made for them.
To build a fence you need to buy: 
Pouring the foundation and installing support pillars
 For fences made of corrugated sheets, two types of foundations are used: strip foundation, when a trench of a certain depth is dug along the perimeter of the marking (can be from 50 cm to 1.5 m) and filled with concrete, and local, when a separate hole is drilled for each post and also concreted. You can use a special drill for drilling. Installation of support pillars is carried out in the following order:
If you decide to make a local foundation for a fence from corrugated sheets, make recesses with a diameter of 25 centimeters and a depth greater than the freezing depth of the soil in your area.
Strip foundation is used in construction different types houses. There are deep strip foundations and shallow ones. The first type of foundation is used for houses with a basement or houses over one floor, the second - for small outbuildings and one-story houses. You can build on a strip foundation. Calibrated timber has good thermal insulation qualities and provides a microclimate that is comfortable for humans.
Country house frame-panel houses, houses using Canadian technology and many others can also be built on a shallow strip foundation. About dachas frame-panel houses read in, and it’s written about how to build using Canadian technology. Both types of buildings are erected quickly.
Installation of cross pipes (logs)
 When the concrete has hardened, the installation of transverse pipes begins. Their number depends on the height of the fence. The distance between the logs is maintained at one and a half meters. They are joined to vertical posts using a weld. If you have no experience in this matter, it is better to seek help from a specialist.
When all the jumpers are welded, they begin to paint the welded areas, thereby protecting the metal from corrosion. The top of the vertical supports is covered with plugs.
Installation of gates and wickets
 Making gates and wickets is the most difficult process. First, frame structures with diagonal or horizontal connections. The posts of the wicket and gate are connected to each other by a transverse joist to give the structure greater rigidity. Next, the assembled frames are attached to the posts and covered with sheets of corrugated sheets. You can immediately mount the corrugated sheet and then install the gate and wicket.
Fastening corrugated sheets to the frame
 The corrugated sheeting is secured with special self-tapping screws and rubber gaskets. For one linear meter of corrugated sheeting, from 12 to 14 fasteners are used. starts in the direction from the gate in both directions. The overlap of the sheets is one wave, the distance between the screws is 2 waves.
Cleaning the area
Installation is completed, you can start cleaning the area. The accumulated garbage must be collected and taken to where it belongs. You can remove the dust from the fence and begin to enjoy the new look of your site.
Fence made of brick and corrugated sheets
Installation of fences from corrugated sheets
Fence at the dacha made of corrugated sheets from the inside


