So let's get started. For our flower we will need:
First you need to make circles:

Our fabric is heavy, there is a back side and a front side.

We draw circles on the reverse side, you can even draw with a pen.

So, cut out the circles and lay them according to size.

Now we take a candle, light it and singe the edges of each circle. Just be careful. We need to scorch so that the matter does not roll up.

Take a circle and fold it in half, as shown in the picture.


We take a needle and thread and thread it along the singed ends.


Since our fabric is heavy, the petal will not tighten much, but you still need to pull it as much as possible. So we make all the petals.


We need to fold all the petals in one direction, my folded edge faces to the right.

When all the petals of the same size are pierced with thread, we need to sew the first petal with a needle, making a flower.


Now that all the petals are ready, put them in a pile.
Place a smaller one on the first large flower, smearing the inner bottom with glue.


We try to make all the petals in a checkerboard pattern.


Decorating the interior of your own home is a very exciting thing, especially if some of the decorative elements are made with your own hands. One of these decorative elements can be called curtain tiebacks, the sewing master class of which we would like to show you.
Such tiebacks can be of very different shapes, but today we will make curtain tiebacks with our own hands with an element in the form of flowers.
The most harmonious look will be a tieback that has a slightly curved shape that will fit the curtains perfectly. For this shape, we suggest using our pattern.

In this case, we will get a grab that is about ten centimeters wide and about seventy centimeters long. In this case, the pickup is slightly narrowed at the ends, reaching a width of up to eight centimeters. The edges of the pick-up can be of very different shapes, round or curly.
The tiebacks are equipped with loops on both sides, which are best made from bias tape or from strips of fabric of the main color.

And now in more detail how to make flowers for curtains with your own hands.
In our case, we will make roses, for which any light fabric such as organza or veil is perfect.
For one flower you will need blanks in the form of squares in the following quantities: one square each with sides 7cm, 9cm, 11cm, 13cm and two squares each with sides 8cm, 10cm, 12cm.
At your discretion, the number of petals can be increased if, in your opinion, the rose turns out to be thin.

Now you need to cut out the petals from our square blanks, for which you should fold them diagonally and cut off the corners.


We start with the smallest petal, which we again fold diagonally. At some distance from the edge we stitch it to the middle, then tighten it a little.

We take the second petal next in size, stitch it and tighten it. All the petals should be connected in this way.

Now this thread that connected all the petals should be tightened more tightly, while simultaneously twisting the petals in the form of a spiral.

The smallest petals should be in the center, gradually increasing in size towards the edge. Adjust the degree of contraction of the flower yourself.
After the flower has already been pulled together in the final stage, it must be carefully untwisted, after which it is gradually twisted and glued using a glue gun.

Now you need to make leaves, for which you will need square-shaped blanks with a side of 13 cm. Such blanks should be folded twice diagonally, and then pulled together as shown in the photo.


We collect the obtained parts into one composition and decorate the curtain tieback with it.

Tulle flowers are a decoration that can visually transform any, even the simplest curtains. Such products add elegance to the curtain and make it truly unique, since what you make yourself cannot be bought in any store.
Curtain decor
From this article you will learn how to make flowers from old tulle with your own hands. We will look in detail at the sequence of steps for making roses, asters and lotuses, and also find out where such decor can be used.
To make flowers from tulle, fabric of any shade is suitable, but we recommend using milky white textiles and coloring them during the creative process with batik paints or acrylic paint.
This way you will get a soft transition of tones, visually bringing the handicraft closer to a living flower.
The technology for coloring tulle petals for any craft is the same:
To make flowers from tulle for curtains with your own hands, prepare in advance all the necessary tools and materials:
We have sorted out the preparatory stage - we begin to make crafts from tulle with our own hands.
To make a lotus from tulle, we also need a piece of felt fabric, which we use as a dense base for the petals.
Sequence of making textile lotus:
On thick cardboard we draw the dome-shaped outlines of a large and small petal - this is the blank on which we will cut out the tulle.
If you are making a flower for the first time, stick to the specified dimensions - in the future, as you gain experience, you can experiment with the dimensions of the products at your discretion.

We lay the blanks on the tulle
We lay the tulle on a hard surface, place the blank on it and cut out the petals using a fabric soldering iron. In this case, we make the lower cut oblique; we will need an additional section for sewing the petal to the base.

Cutting out the petals


Trimming the bottom outline

We need 24 large and 6 small petals.
Cut out 3 even strips of tulle measuring 40*5 mm

Cut out 3 straight strips
We give the petals a shape - squeeze the workpiece in the middle with your finger so that the edges of the corner cut meet, fix the petal with pliers and, using a soldering iron or a drop of glue, secure the upper parts of the petal at the point of contact.

Let's take a blank

Squeeze in the middle with your finger

Fix the petal with pliers

Finished petals
We cut out a circle with a diameter of 5 cm from felt fabric and begin to sew lotus petals to it.

Cut a circle with a diameter of 5 cm from felt fabric
The first three layers are large petals (8 pieces on each), the last are small (6 pieces).

The first three layers are large petals
Place each subsequent layer on top of each other so that the petals are placed closer to the center of the lotus.

Place each subsequent layer on top of each other
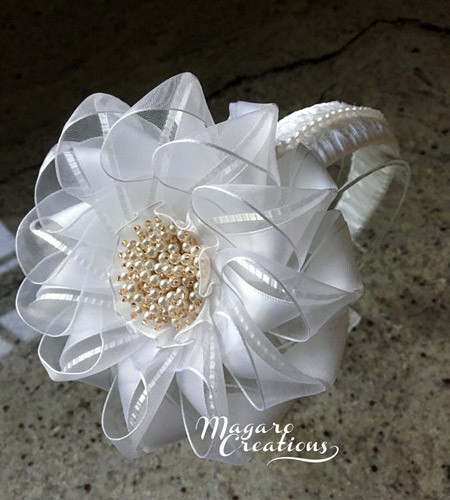
We decorate the middle of the flower with beads.


We decorate the middle with beads
We attach a bead on each side of the ribbons we have prepared and sew them to the underside of the lotus

Sew ribbons with beads to the wrong side
That's all - the beautiful homemade lotus is ready.

Ready flower
You can make an aster from old tulle using tulle, which is used as a rigid backing for the petals, making the flower voluminous and expressive.
We will need four rectangular pieces of tulle of similar size (40*25 cm) and 2 pieces of tulle fabric.

Fabric for flower
We cut out the required pieces of fabric and lay them on top of each other: tulle on top, tulle on the bottom. Next, we assemble the textiles into an accordion with a distance between the folds of 2 cm.
Having assembled the accordion, we bend it in the center and secure it with a thin rope.

Assembling an accordion
We use scissors to process each fold of the workpiece - cut it at an angle so that the aster takes on an interesting shape.

Fold in the center

Cutting at the corners
All that remains is to form a full-fledged flower from the blank - straighten the tulle around the circumference so that the aster gets a round shape. At the same time, the folds will disperse and become less dense.

We straighten the tulle around the circumference
Tulle holds its shape well, so you shouldn’t have any problems with it. Next, lift the tulle layer up.

Raise the tulle layer up
We form neat petals, evenly distributing the tulle around the circumference of the aster.

Forming neat petals
If the tulle is poorly fixed in a given position closer to the base of the flower, secure it with a drop of glue.

Ready flower
To make an aster from tulle with your own hands, you don’t need a lot of time and effort - it’s an easy-to-make flower, which, at the same time, looks very beautiful.
DIY organza roses are also not difficult to make. We recommend using thick organza as it holds its shape and lends itself better to drape.
First of all, you will need to cut square blanks for petals measuring 3-4 cm.


Cut out round petals
We process each petal with a soldering iron or burn it on a candle so that it does not fray over time. Do this carefully, removing the fabric from the fire immediately after its edges begin to melt.

We tighten the first petal and fix it with a stitch at the bottom
We cover the first petal with the next blank and secure them with a thread to each other.

We fix the second and first
In the same way, we continue to increase the volume of the rose until it becomes quite lush.

We continue to increase the volume
The result is an elegant flower that closely resembles a real rose.

Ready rose
Such floral products, which can be sewn from old organza, are a real work of art. Use them to decorate curtains, lambrequins, tulle curtains - even simple tulle with homemade flowers looks incomparably better than the most expensive store-bought items.
Also, homemade flowers can be used as decoration for clothes - sew a rose to a jacket or skirt and the old thing will sparkle with new colors. Such crafts also look great as independent accessories - decorate them with a brooch, a hair hoop or a hairpin.
WATCH VIDEO INSTRUCTIONS
Interior decoration is another area of application for homemade floristry. Form full-fledged bouquets from textile flowers, decorate pillows, upholstered furniture with them, make paintings and design compositions.
So, for walls made of foam concrete or gypsum concrete, in most cases 12 mm is sufficient. Since dowels for such holes are designed for screwing thick and long screws, dowels of a smaller diameter are inserted into the holes of large dowels, driving them in with gentle blows of a hammer. Such fasteners have another advantage: they allow a large error when drilling holes.
To attach to walls made of fragile material, it is usually sufficient to drill a hole of a larger diameter.

Sometimes it becomes necessary to select fasteners for fastening yourself, for example, when re-hanging a cornice from one place to another or when the factory fasteners are lost.
A good option in this case is to use commercial anchors with internal threads. To attach anchors, drill holes of the appropriate diameter, insert them into the holes and, by striking a punch or punch inserted inside the anchors, wedge them into the holes. Because anchors provide a stronger hold than plug screws, the number of anchors may be smaller than the number of screws designed.
String cornices are most often placed on the ceiling, although they are also suitable for attaching to walls. The installation procedure for them is as follows: we determine where it will be placed, then, attaching the fasteners to the ceiling, we mark the holes for the screws with a thin pencil.

We drill, then hammer plastic dowels into the holes and screw the fastenings with screws. Then we insert the string, fix it and tighten it using the tension device, which is located on the mount. In the most common case, the tension device is a simple tube, which, moving along the thread as it rotates, is pulled into a string.
It is good to install a string cornice where, from a decorative point of view, it is undesirable to use a large-sized design of baguette cornices. The string is much less noticeable and creates an effect in which only the texture and color scheme of the curtains are visible. But along with elegance, string-type cornices also have their disadvantages.
Showcase Potolku Body

The cornices available in the retail chain differ in appearance and method of fastening. The most optimal solution would be to purchase a cornice that exceeds the width of the window opening by 30 - 40 cm. It is not difficult to hang a cornice with your own hands.
Before making a purchase, it is enough to analyze which type of mounting will be most convenient, ceiling or wall. The material from which the walls are made also plays an important role. Having made our choice, we get to work. How to hang a cornice on the wall? During the work we will use a level, an electric drill, a screwdriver, dowels and screws.
Therefore, all necessary items and tools should be prepared in advance. Since the installation of the cornice will have to be carried out at a height, you need to take care of a piece of furniture or a stepladder that is convenient for work. It is better to work in pairs, since it is extremely difficult for one person to hang the cornice correctly. The first and main step is marking on the wall. We mark the mounting location by retreating five or seven centimeters above the window opening. We check the strictness of the horizontal line with a level. For standard mounting, self-tapping screws are usually used, which are screwed into dowels.

If there is no alternative. We choose this option. We drill holes in the wall in the place where we made the markings. We install dowels and mount brackets. It is necessary to take into account that a material such as drywall requires careful work and special dowels. Before fixing the rod on the brackets, we put rings and tips on it. How to hang a ceiling cornice? The ceiling cornice is attached in the same way as a cornice to the wall. To attach it, we additionally need a tape measure, with the help of which we achieve the same distances from the brackets to the wall. Before hanging the ceiling curtain rod, we measure the projection of the window sill.
Many models of cornices are solid canvases that are sold completely assembled. Often these products include aluminum profile types of structures. They are attached to the base directly through the frame itself.
But basically, almost all models of cornices are prefabricated. Conventionally, they consist of several elements:


Assembling a cornice is a relatively simple operation that can be broken down into several successive steps:


The algorithm for attaching a cornice can be described in several sequential steps:
If the cornice is placed in a narrow room, then it is fixed using end fastening. The installation algorithm for such products is practically no different from the previously described option. Here the only thing that changes is the supporting wall, in relation to which all the main calculations are made.


If you want to attach the cornice to plasterboard or suspended ceiling, then here you should do the following:
By and large, the algorithm for installing a cornice does not depend on the type of plane, but depends on the structure of the base, since only the fastening elements change. The process of marking and alignment remains the same.
If you are not sure that you can handle this on your own, it is advisable to consult with a specialist who will tell you how best to proceed.

Hanging it up for an experienced craftsman takes 15 minutes, but for a person who has never done this, installation can be a problem. If you want to quickly and efficiently hang any curtain rod, then you have come to the right place. Curtains come in two types: ceiling and wall.

There is no difference in installation, of course, except that the ceiling one must be hung on the ceiling, and the wall one must be hung on the wall. Having purchased what you need, you can begin installing it.
For correct and aesthetic mounting on the ceiling or wall, it is important to remember that it should be 30-50 cm wider than the window opening.
You should also maintain a sufficient distance from the top of the window to the curtain so that in the future the curtain that we will hang does not interfere with the free opening of the window. At a minimum, it should be 5 cm. In addition, so that the curtain does not touch the window frame and radiators, if any, it is necessary to take into account the insertion distance from the wall to the curtain, which cannot be less than 10 cm.
The height at which the cornice will be located from the ceiling can be varied, but if you look from the side, the closer to the ceiling, the prettier the curtains will look.

Therefore, the best distance from the cornice to the ceiling is 5-10 cm, depending on how and with what the curtains will be attached.
Return to contents
Before you install a cornice at home, you need to understand the types and features of such products. There is a wide range of products on the market; they differ in the method of fastening, design, material of manufacture, as well as the intended installation method.

You can usually hang several curtains on tire curtain rods
Among the most popular curtain rods on the market, profile ones are often distinguished. They are compact and easy to install, made mainly of plastic and aluminum. They are usually designed for ceiling installation, but in some cases they can also be wall mounted. There are three types of profile rails for curtains:
The second popular type of crossbars is telescopic. These are small, lightweight horizontal bars that are completely hidden behind curtains, so they do not necessarily have to have an attractive appearance. They are made from different materials, from natural wood to metals and plastic. They are always installed to the walls using special brackets or ordinary screws.
Rod ones - they can be rectangular or round, they are not hidden behind curtains. Fixation is carried out by ties or rings sewn to the fabric. Various types of such products can be designed both for installation on the wall and for installation on the ceiling using profiles included with the main product. They can have all sorts of decorative elements, for example, beautiful fasteners. Made from wood, plastic and metal.
In some cases, thin string curtain holders are used in houses and apartments. They are a steel cable stretched under the ceiling, onto which the canvas is hung using hooks or clips. Most often they are used in minimalist interiors and they can be mounted both to the wall and to the ceiling using brackets. Not suitable for hanging curtains made of heavy materials. To select and correctly install curtain rods in your home with your own hands, you must take into account the style of interior design, the curtains used, and the materials from which the walls and ceiling are made. This is the only way to guarantee that the installation will be carried out correctly and the repair will lead to the decoration of the room.
Perhaps the most important part of the job. In order to do it correctly, you need to start from the middle of the window opening. This is easy - a mark is placed both on the wall and on the curtain, that is, equal sections need to be set aside from the middle of the window. It is also worth considering that if the total length of the curtain is more than 2 m, then three fastenings will be needed so that the weight of the curtain cannot cause the curtain to sag or even fall out of the wall. So, the first mark is in the middle of the wall and the hanging option, the other two are indented from the edges by 10-15 cm.

Scheme of wall mounting of an aluminum profile cornice.
It happens that the drill goes into the wall like it goes into butter - there is little good in this. This means that the plaster is applied in a thick layer, and over time the curtain will simply fall out of the wall. What to do in this case? Drill the required hole and insert a wooden pin or plug there, after filling the void with liquid nails or epoxy glue.
Then you can attach the curtain without fear, but you will have to hang a light curtain. But the situation with a monolithic wall does not help the situation - you will have to drill with a hammer drill and hammer dowels into the holes. Such work is labor-intensive, but after all the effort you can buy curtains of any weight and size - the curtain is firmly held.
Scheme of types of fastening of rail cornices.
It all depends on the complexity of the chosen option, although none of them poses any difficulties. If these are plastic elements, then they usually have a flat guide through which fastening takes place, and then the entire installation is covered with a decorative part, creating a complete structure without any signs of drilling or other actions.
If the curtain is a round stick, then assembly consists of inserting one end into the groove, putting on rings and restrictive elements.
That's all, actually. All that remains is to worry about hooks or other fastenings directly for the curtains themselves - these could be rings or adhesive tape with loops - there are a lot of options. You can order loops specifically for curtain holders, it’s inexpensive and looks great.
If the wall requires the presence of a string curtain, then it is fastened in a disassembled form - first the bases are attached, also with careful markings, then the string of the desired elasticity is stretched in the open boxes, and then the boxes are closed. It is very convenient to operate such a curtain - open, tighten and close. The curtains will not sag if the string is of the correct quality. It is better to choose steel options.

How to attach the bracket to the wall
Schemes for installing a profile cornice to the wall

The procedure for attaching to the wall (as well as to the ceiling) is the same in all cases. The only difference is the choice of fastening elements, which in turn depends on the wall material.
Installation of profile cornices to the ceiling
The last two points, of course, cannot be present in the apartment as an independent wall material. But as a finishing layer - easily. When installing a hanger for window textiles on a wall, the best base for mounting is wood, concrete or its derivatives. In the presence of drywall or an impressive layer of plaster, the inexperienced layman has to be puzzled.
For mounting brackets to a brick or concrete base, ordinary dowel-nails are suitable. The diameter of the fastener, as well as its quantity, is selected based on the weight of the product and the textiles on it. Accordingly, the higher the weight, the larger the diameter of the dowels you will have to buy. For “particularly severe cases” you may even need anchor bolts. They are made of metal, so they carry high loads.

Installing a ceiling cornice to a concrete ceiling
Anchors must be installed for large curtain formats. For example, Japanese sliding structures for panoramic windows have an impressive weight due to their steel base, as well as an automatic sliding drive. In this case, you cannot do without high-quality fasteners.
But ordinary dowels are not suitable for plasterboard sheets. Here you will have to buy special drop-down fasteners. A butterfly dowel works great. Thanks to the increased fixation plane, the gypsum board does not deform under significant loads. But for heavy objects you will still have to use the same anchors. In this case, the order of work is as follows:
Be sure to keep in mind that the anchor must extend into the concrete wall to its full possible length. With this method, the reliability of the structure will be high.
The most unpleasant case is the presence of a thick layer of old plaster, which also crumbles at the touch of a finger. It is very problematic to secure anything in such a wall, not to mention a heavy curtain. Here you have two options.
If you are going to hang one light tulle in the kitchen, there is no need to drill the wall to the brick. Do the following:
This is a very reliable method of fixing the suspension in a loose layer of plaster.
But if we are talking about the full design of a window opening (lambrequin, curtain, etc.), then only anchors will help here. The procedure is the same as for installation in drywall. Upon completion of installation, gaps in the plaster must be filled with cement mortar or tile adhesive.

Scheme for attaching a cornice to a suspended ceiling
Universal curtain rods can be attached to any type of surface. Installation is carried out on walls and ceilings. The methods exist in two versions. The choice must be made based on personal preferences. Based on combination with suitable room decoration devices.
A common type of curtain fastening. They are easy to install. Can be installed by a non-professional. Consolidation does not take much time and effort. The design is reliable and can withstand heavy curtains. But the walls chosen are strong, not made of plasterboard.

Wall cornice is indispensable for suspended or suspended ceilings
A wide range of materials and styles makes the method popular. Allows you to select the appropriate design for a specific design. The planks fit into any interior.
Wall types:
Single row cornice
Double row cornice
Three-row cornice
It is important to apply depending on the number of curtains. Mix and match tulles with thick fabrics
Wall-mounted models began to be replaced due to the fact that stretch ceilings began to become popular. Ceiling mounting corresponds to the style of suspended ceilings.

Ceiling models are fixed directly to the ceiling of the room
They have a number of advantages:

Concealed ceiling cornice with heavy straight curtains
Types of designs:

Plastic profile cornice for ceiling-type curtains

A string cornice has practically no alternative when the wall near the window opening is very narrow and there is simply no room on it to place a rod
The decision to attach the curtain rod to the ceiling must be made before installing the stretch ceiling, otherwise the idea of attaching curtains to the ceiling cornice will have to be abandoned. In order to hang a ceiling cornice, the master must make special fastenings under the surface of the ceiling - wooden mortgages. Or there is another option - a hidden view built into the ceiling. With this method, the cornice will be fixed to the main ceiling, and the suspended ceiling will be attached to the stand.
When the ceiling is made of plasterboard, there are several options for mounting to the ceiling. It all depends on what type of curtain you plan to hang on the cornice. If you have heavy or multi-layer curtains, you will have to install wooden inserts, as when working with stretch ceilings. If you need to hang a very thin curtain or curtains made of tulle or organza, then you should purchase a very light plastic curtain rod and fix it after installing the ceiling using self-tapping screws screwed into dowels.
How well the preparatory work is done determines how easily it will be possible to secure the cornice and what appearance the finished structure will have. Here's what you need to do during the preparation stage:
After making sure that everything is in order, you can begin installation.
Before installing a ceiling curtain, it is recommended to familiarize yourself with several nuances:
Installation on the ceiling begins with a projection of the future location of the cornice, for which a ruler, a building level and a simple pencil are used. Mark the places where the brackets will be located
It is important that they should be located symmetrically from the window opening and walls.
Then, using a drill, you need to drill 2 (sometimes 3) holes for the brackets. A cornice is installed on them and then leveled. The last step is to fix it and attach the curtains.
Attention! If the moment of fastening the curtains was not taken into account when installing the suspended ceiling, it is recommended to use extended anchors. This option is optimal for structures in which the gap between the main and suspended ceiling is small
If the ceiling to which the fastening is carried out is made of plasterboard, then you will need to install a wooden plank (an alternative is a cut of a metal profile). The cornice will be attached to this frame using self-tapping screws.
If the curtain is being installed on a reinforced concrete ceiling, then liquid nails can be used. To do this, you will need to clean the surface from whitewash and decorative coating, level the ceiling, apply glue to the cornice and apply it to the previously prepared surface. The setting time for liquid nails is 15-20 minutes. 3 days after this fastening, you can start hanging curtains.
Installation of curtains on a suspended ceiling is carried out after arranging a special niche. The ceiling film is not attached to the wall, but to a profile located at a short distance from the window opening. The cornice will be mounted to the main ceiling.
The peculiarity of this method is that the installation of the cornice can only be carried out at the stage of installing the ceiling itself. If the installation of the stretch ceiling is completed, it will not be possible to attach it. Before starting work, it is important to make sure that the length of the timber strip matches the length of the cornice. One of the options for attaching the plank is with dowels to the main ceiling.
Before attaching the cornice to the ceiling, you need to prepare properly.
 To secure the ceiling cornice evenly, you need to draw a line on the wall on which the points for the screws are marked with a marker.
If a plinth for the ceiling was previously installed on the side of the window, you will have to get rid of it. The marking is applied at the same distance from the wall with the window, even if it is uneven, since such a defect can be hidden with the help of curtains, and besides, it is extremely rare to find a room with perfectly smooth walls. Next you need to make holes spaced 60 centimeters from each other. If the curtains are too heavy, then the step is taken less. Then the cornice is attached to the ceiling using a dowel-nail.
Important! If the cornice is too soft, then during installation it is advisable to lay metal plates between it and the ceiling. . At the last stage, the hooks are strung and the plugs are placed.
On sale you can find special dowels designed specifically for cornices. Their peculiarity is that wedging is carried out from the inside out, which is very convenient and reliable.
At the last stage, the hooks are strung and the plugs are placed. On sale you can find special dowels designed specifically for cornices. Their peculiarity is that wedging is carried out from the inside out, which is very convenient and reliable.
Curtains are curtains made of thin and soft fabric. Used to close a window or doorway. In almost all models, the linen reaches the floor, but there are short curtains. Hang separately or combine models.

Curtains and cornices should be in harmony with each other and match the overall style of the room
To curtain windows and doors, the first option is often used - classic scissors, and the rest are used as decorative decorations for the interior.

Classic curtains are most often used to decorate door and window openings
The main function is to decorate the room, but there are also significant purposes.
Combining destination functions, they become an integral part of the room. They are able to preserve the unique features of a separate room and add the finishing touch to the interior.

Curtains are a great way to give your interior a new lease of life.
Attaching to the curtain is carried out in 2 stages.
The installation begins with markings. The same distance is measured in the center. A distance of 35 to 40 cm is left from the edge of the wall to the cornice.

Marking diagram for attaching the cornice to the wall
Attention! It is necessary to maintain a distance of 10-15 cm between the ceiling and the wall. Otherwise, the cornices look awkward

The fastening points must be located on the same horizontal line, so when marking you must use a level

Mark the drilling points with a pencil
The plank is assembled not from one crossbar, but from two parts, and then hung on brackets. The joint of the planks is not visible.
The fixation points are measured. A drill is used to drill holes in the wall. The brackets are screwed on and the bar is inserted. It should have rings and hooks. If they are not there, then you need to take care of this first. But, as a rule, they are sold already as a set.
Drilling holes
Installing dowels
We fix the bar
Installing the bracket
Fixing the bracket
Place the cornice
Hang tulle using rings with hooks. How tightly it will hold depends on the strength of the clamp.

Without a cornice it is impossible to fix the curtains, so it is an integral part of the interior. To install the cornice, you can call a specialist who will have all the necessary tools and parts, but if you have everything you need at hand, you can try to organize this process yourself. Installation will take no more than two hours, so the work will not be burdensome. So, how to hang a curtain rod on the wall? Read about it below.
For installation you will need certain tools, namely:
If you decide to replace the old model with a newer one, then you will need putty to cover the holes left from the previous cornice. For the new cornice, you will need to drill other holes to avoid the mounting bolts falling out of the loose holes.
Installation is carried out in strict sequence:


Drilling walls. When the markings are made, you can attach the cornice to the wall. Drill holes in the marked places and hammer dowels into them. In houses with a brick base, it is better to use pine plugs instead of plastic anchors. In this case, the screws are screwed into a pre-installed cork base.
Cornice installations. A bracket is hung on the installed dowels, onto which the cornice is already fixed. It is hung with the curtain hooks already attached. After this, you need to install it in a level position using the tools included in the kit.
Stretch ceiling. If the room uses a suspended ceiling. then the cornice must be installed before attaching the PVC film. For this purpose, special wooden mortgages are used, which are mounted under the film. If one option is to use a hidden cornice. With this method, the cornice is fixed to the main ceiling, the tension film is attached to the stand.
Today there are many types of curtain rods for attaching curtains. There are options for mounting on the wall, ceiling, and suspended models. In each case, the choice of a specific model is made based on aesthetic preferences, interior design features and window opening design. One of the most popular options is to mount the cornice on the wall.
Several types of brackets can be attached to the wall:

Whatever type of brackets you choose, you must first decide where the cornice will be located after installation. To do this, you need to determine the distance from the ceiling and from the edges of the window opening.

To determine how far to lower the cornice from the ceiling, the distance from it to the upper edge of the window opening is divided into 3 parts. There should be 1 part of the distance from the cornice to the ceiling, and 2 parts from the top edge of the window to the cornice. So, if there is 18 cm from the edge of the opening to the ceiling, then you should take 6 cm from the ceiling, and 12 cm from the edge of the window opening.
The minimum distance from the edge of the window to the cornice is 5 cm. It is not recommended to place holes closer, because there is a risk that the concrete or brick will simply crumble and the cornice will fall.
The edges of the cornice can protrude from the side edges of the opening by 15-40 cm. This parameter has a purely aesthetic value, but a cornice that is too short or long may look unnatural.
To learn how to hang blinds on plastic windows, read the article.
Previously, when the curtains, walls, and ceilings in all the houses were approximately the same, there was simply no point in thinking about such a trifle as installing a curtain even before the renovation began: hanging it after the fact was not a problem. Now it’s better to think through some points in advance so that you don’t have to change the already purchased curtain.
Decide which mount is better in your case: ceiling or wall? And when making a decision, it is better to be guided not only by aesthetic considerations. The fact is that in some cases wall mounting is not preferable or even impossible. As is the case with thin or loose walls, for example. In such a wall, it will be extremely difficult for the brackets to hold on under the weight of the curtains, and there is a high risk that at one moment the entire structure will collapse, leaving a couple of noticeable holes in the wall.
If you decide that you want a ceiling rail or hanging curtain, think about its compatibility with the suspended ceiling: cutouts for fastening the curtain should be discussed with the workers in advance, just like the space for the rail.
It would seem that the material of the curtain matters only for interior design, but this is not so: the lighter the design, the less impact on the wall, and this is very important if the wall is thin, for example a plasterboard partition, or, again, loose. Perhaps, in this case, it is better to abandon the beautiful, but heavy metal and wooden curtains and hang string, plastic or profile ones
The width of windows in most houses is standard, but increasingly the width of the curtains can be changed to order. So, don’t try to save money by choosing a width equal to or slightly wider than the window opening: when open, the curtains will cover most of the window, preventing sunlight from entering the room, especially if you are a fan of voluminous curtains with a lot of folds.
Also look at the windowsill. Are the brackets long enough to cover it without it sticking out when the curtains are drawn? Or maybe it’s better to choose ceiling or telescopic curtains that will be attached to two walls perpendicular to the window opening at any distance from the window instead of the wall with the window itself?
And don't forget to find out how the wiring works: the wires may not allow you to hang the curtains the way you originally intended, and minor changes will have to be made to the design plan.
Telescopic curtains are convenient, since this is the only possible option for wall mounting without brackets; only, taking into account the laws of physics, they can be used without additional hangers or brackets exclusively in narrow rooms and for light curtains.

Installing a cornice on the ceiling is no more difficult than installing it on the wall. The main difference between these installation methods is that during the marking process, the selected mounting locations for the brackets must be located at the same distance from the wall. Do not forget about the presence of a heating radiator under the window; if there is one, then there is no need to place the cornice in close proximity to the wall.

The plastic cornice is attached directly to the ceiling, without brackets
The number of brackets for installing the product on the ceiling is determined taking into account its length. A curtain holder up to 2 m long can be hung on two fasteners located along its edges; for reliable installation of longer products, it is better to use 3 brackets, one of which should secure its central part to the ceiling.
A slightly different installation scheme is provided for plastic profiles on which curtains can be hung. Before installing such a crossbar, you need to make sure that it is the right size. Most often it is longer than required, in which case it will have to be shortened with a hacksaw. Next, you need to prepare it for installation by creating holes in it for fastenings. To perform such work as accurately as possible, it is recommended to use drills of different diameters - first, a blind hole is created on the outside of the cornice, equal in diameter to the head of the selected screw, and then a thin drill is used to make the hole through. It is best to start drilling from the center of the crossbar and make subsequent holes on both sides of the center at a distance of 50 cm. If you plan to hang heavy curtains in the room, the distance between the fasteners can be reduced to 40 cm, which will allow the profile to be more securely fixed to the ceiling.
When everything is prepared for final installation, you need to attach the cornice to the ceiling, mark with a pencil the places of future fastenings and use these marks to drill the required number of holes in the ceiling. After driving the dowels, apply the cornice to the ceiling and secure it with screws. Installation on a wooden ceiling is even easier - just screw the plastic profile with self-tapping screws.
Thus, installing a curtain rod at home is a feasible task for any owner; it is only important to promptly choose the product to be mounted and the method of attaching it to the wall. .
The cornice is an integral attribute of every residential building. It supports the curtains, giving them a certain look. In order for this structure to serve for a long time, it should be securely fixed to the ceiling or wall.
Modern cornices are made from various materials, but almost all of them are equipped with identical fastening systems. Conventionally, the fastenings of these structures can be divided into several types:


Depending on the location of the fasteners, the following types of fastenings can be distinguished:


Please note that rail-based structures and products equipped with brackets can be attached to these surfaces. The last option differs only in the shape of the fastener

After you have marked the installation locations of the brackets with three crosses, we proceed to drilling the sockets for the expansion dowels. The drill must be used for stone and concrete with a special tip. The diameter of the drill should be the same as the diameter of the dowel.
In almost all cases, the installation of fasteners occurs with the help of expansion dowels; they have become firmly established in life in the last decade. It takes very little time to install, it is very easy to use, reliable, and can withstand heavy loads.
First, a hole is drilled into the surface with a hammer drill, the drilling residue is blown out of it, then a plastic dowel is installed in the finished hole, lightly hammering it in with a hammer. The dowel should not protrude beyond the surface of the wall. If this happens - for example, it has a widening at the end in the form of a washer, then it must be cut off.
We attach the fastening element to the wall and fix it with screws, wrapping them in plastic dowels. In this case, a “expansion” effect is achieved when the dowel expands in the seat and is firmly clamped into the wall.
After attaching the supporting elements, you can attach the cornice itself to them, as shown in the installation instructions, but the fastening operation is the same for all cornices with the exception of small nuances. Many people can figure out how to hang a curtain rod on a wall without instructions, figuring it all out with their own heads.
I remembered the past times when my father sealed wooden plugs, into which he then wrapped screws, or simply hammered in metal dowels, which were used for shooting with a mounting gun.
The procedure for installing wooden plugs was labor-intensive and time-consuming; the installation sites had to be sealed and wait for the mortar and plaster to set. This is a small digression and excursion into past times.
Today we learned how to hang a curtain rod on a wall; the process is simplified through the use of modern tools, and this is pleasing. An elegantly designed window opening and attractive window dressing design will create a warm climate and comfort in your home.
There are dozens of varieties of curtain rods on the market that are adapted to certain fabrics. So, there are curtain rods for Roman shades, for blinds, for bathrooms. They differ in the method of fastening the canvases: baguette, telescopic, bay window, string and in materials: wood, metal, plastic, aluminum, etc. There are combined options. Rounded or even cornices with rotating elements have become a fashionable trend. Each of these types is special, there are certain requirements for fasteners and length restrictions for each of these types. Particular attention is required when attaching cornices to plasterboard-coated walls and ceilings. This convenient and modern building material is becoming increasingly widespread, and in order to hang a cornice on drywall, a special technique is needed. In addition, with a professional approach, cornices are attached in conditions of any complexity, on concrete and wooden surfaces, on walls covered with ceramic tiles, plexiglass panels and etc.
 Stages of work on the installation of curtain rods in residential and industrial premises
The service for installation, reinstallation and replacement of indoor cornices consists of the following stages: - Measurements and marking of fastening points, - Drilling holes and installation of brackets, - Fixing and leveling of the cornice.
 We provide advice on the selection and fastening of various types of cornices, and assistance in solving non-standard situations. So, in the case of uneven surfaces of the ceiling and walls, when the client nevertheless needs to hang the cornice correctly without making major repairs, the craftsmen will carry out installation with fastenings at different levels.
Craftsmen will readily install cornices for design projects of any complexity, ensuring quality and accuracy in order execution. They will redo unsuccessfully installed cornices in a short time.
 Cornice fastening service
The “hanging a cornice” service is provided as part of a multi-disciplinary range of services for the repair of premises, the advantages of which are fast and reliable order fulfillment. Professional craftsmen with at least five years of experience in highly specialized construction specialties undergo regular retraining and have the skills necessary to work with equipment and materials presented on the home renovation and construction market. Teams of craftsmen are equipped with the necessary professional-level equipment that will allow them to reliably perform work of any complexity, including non-standard orders. Customers are provided with quality guarantees, and they can order a secondary call to the address at a discounted price for the service of hanging a cornice for additional adjustment or equipping the cornices.
 Prices for services for hanging a cornice are fixed and do not fluctuate according to foreign currency exchange rates. Work prices are indicated in our price offer. To calculate costs depending on the volume and complexity of the order and discuss pricing approaches, call us at:
The service is provided throughout Moscow and the region, within the time frame and time specified by the customer. Payment is made upon completion of work.

Scheme for attaching ceiling cornices to a suspended ceiling.
There is a misconception that it is impossible to strengthen the product onto a suspended ceiling structure. You can install the cornice using PVC film and without experiencing any particular difficulties. It should be noted where the product needs to be hung.
Anyone can assume that a thin PVC film will not be able to withstand the load associated with the weight of the curtain rod. But you can find a way out of this situation. Used for the aesthetic decoration of rooms, curtain rods not only support the curtain, but also carry a multifunctional load. Cornices for suspended ceilings allow you to visually increase the size of the room, and not only serve as a basis for curtains.
When choosing cornices for tension structures, you will notice that they have few differences from ordinary ones. They look like a flat tire attached to the surface of a stretch ceiling. The use of a cornice mounted on this surface allows you to limit it on one side, and on the other, visually assign it a certain completeness. The structure itself, not counting its design purpose, must be a reliable fastening. It is necessary to mount the structure to the ceiling using a common sense approach, since the placement of the panels after their installation will no longer be possible.

Types of curtain rods.
The design of the cornice for suspended ceilings consists of two different parts. It is possible to strengthen the wall cornices under the conditions that the duralumin clip for strengthening the curtains or the hook cannot break through the film. There is a much lower risk of accidental damage with fabric ceilings, which are stronger. Strengthening the wall cornice for a tension ceiling structure is carried out regardless of how close the ceiling surface is to the cornice.
You can also use the product option for installing hidden lighting. In this case, a polystyrene profile is used, fixed to the wall with glue. An LED strip is attached to the surface of the cornice from the inside or to the wall, and the cornice serves to hide the backlight.
The first step, of course, is to decide on the type of cornice. They differ in the method of mounting and can be wall or ceiling. If we talk about the material of manufacture, they are made of wood, plastic, metal, steel, aluminum. In addition, these products may differ in shape:
Installation diagram of a string cornice.
The choice of cornice is determined by the material from which the walls and ceiling are made, and the curtains that will hang on it: their weight and design must be taken into account. .
The uniqueness of the image does not depend on the cost of the outfit, but on the exquisite little things that make it perfect. Organza flowers purchased or made with your own hands will be an ideal addition not only to wedding or evening dresses, but also to children's dresses.
Can be used as decoration for curtains, decorations for postcards and for many other small things. The use of these cute compositions depends only on your imagination. To make flowers, you need to understand how the fabric will lie in the finished product. First, let's look at the properties of fabric and types of organza.
Organza was previously made from silk, then from viscose. Modern manufacturers use polyester thread - the fabric is transparent and weightless, but at the same time rigid and holds its shape well.

This is ensured by tightly twisting two threads together, and depending on their thickness and color, different types of fabric are obtained:
Not every fabric is suitable for making flowers. For example, organza with embroidery is used to sew curtains or dresses. Matte and shiny plain fabrics are the most popular among needlewomen.


Shiny organza is a favorite material for flowers on bows,
hair decorations and brooches
Spectacular flowers for bright outfits are made from coated organza.

Sprayed organza looks festive, and flowers made from this fabric would be appropriate in a bride’s outfit
For romantic looks, fancy flowers made of gradient organza, chameleon or patterned fabrics are suitable.

Gradient organza is great for fantasy looks

Organza chameleon - for complex, iridescent colors

Gradient colored ribbon produces charming flowers that can be used to create bouquets, including embroidered ones.

A cute summer look will be complemented by a patterned organza flower.
It’s easy to create organza flowers with your own hands – the main thing is to know the basic techniques. For this purpose, Krestik has prepared a review of simple master classes.
The creation of any, even the most exquisite, flower or complex composition begins with preparing the parts and connecting them in a certain sequence. Needlewomen have come up with several techniques with the help of which floral masterpieces are born:
It is easier for beginners to master the technique using heat treatment of petals, while experienced craftswomen create their masterpieces using several techniques.

This technique is called silk floristry or Japanese technique. The ancient art of creating flowers from silk came from Japan. However, it is also applicable to other fabrics: viscose, cambric, organza. To make flowers you will need a soldering iron and a set of special brass tools on a handle. It includes round balls of various diameters - boules, as well as smoothers, knives, heels, hooks, dies and special tools for chrysanthemums, lilies of the valley and fantasy flowers.

The petals are cut out according to the pattern, starched or kept in gelatin and dried - due to this, the edges will not fray, and the petal will keep its shape.
YOU WILL NEED IT
The archive will be useful when creating them. Free download!
To give natural bends, the blank petal is placed on a special pad and passed over it with a hot tool. Then a flower is assembled from the finished petals on a string.
MK on making flowers using Japanese technique:
Preparing the petals is similar to the classical method: you need to cut the blanks exactly according to the template.

To prevent the edges from fraying and fraying, they must be processed. This will require a candle. Since organza is made of synthetic fabric, it does not burn, but melts. This is simplicity and complexity at the same time: the petal easily takes on the required shape, but it must be melted carefully, otherwise you can ruin the workpiece by melting the excess. The peculiarity of the melted edge of organza is a rounded edge of a darker shade. Thanks to her, the petals look especially charming.

The flower is assembled onto a thread, and the core is decorated with beads, beads, and sequins.
The flower will look more organic if the petals are not connected directly in the middle, but each one is moved a little.

This technique is universal because it allows you to make flowers both from blanks cut from fabric and to use organza ribbons. The point is that each petal is a fabric folded many times. Individual elements can be fixed with a thread or the edges can be melted over a flame, thus gluing them together.
The technique is most suitable for creating small flowers intended for decoration, photo frames, cards, decorating gift boxes and for implementing countless creative ideas.
Instructions for making organza flowers using the Kanzashi technique:
This technique is the first step in and an excellent option for beginning craftswomen. The organza ribbon has an edge, so the petals look neat, and only the edge needs to be treated with fire. The width and length of the ribbon depends on the intended size of the flower. Creating flowers using this technique is an excellent option for joint creativity with children.
In the techniques discussed above, the edges of the petals are subjected only to heat treatment. You can add chic with a special finish instead of melting or on top of it. This flower will become an exquisite decoration for a wedding bouquet or a delicate decoration for clothing. Let's learn how to create elegant flowers from organza, and the master class will help us with this.
For making this type of flowers, organza is an ideal option, since it is quite rigid and will withstand the load of glitter or small beads glued to the petals.

To make flowers we will need:
First step. Cut out petals according to the template. The required quantity and size depend on your idea. For a delicate cup stand, two petals are enough.

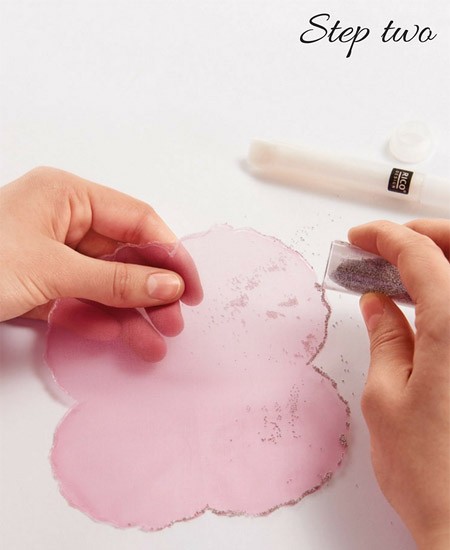
Second step. Gently coat the edges of the petals with transparent glue, sprinkle them with glitter and dry.
If you are creating a flower to decorate clothes, then it is still better to melt the edges over a candle - this will prevent the threads from fraying, and then decorate with glitter.
Third step. Using a thread to match the fabric, sew large stitches into the middle of the petal. When pulled together, folds are formed that need to be secured with additional stitches. If you are making a napkin for a cup, you just need to slightly tighten the folds and then straighten them, giving the flower some airiness.
If you are new to flower making, first practice on scraps to select the appropriate fold size.

Fourth step. Connect the finished petals into a flower with a needle and thread. The middle can also be decorated with glitter or beads. The finished flower head is glued to a wire or a wooden stick, which, if desired, is decorated with floral tape.

Here you will find the original of this master class, from which you can download the part templates!
More sophisticated and interesting flowers are more difficult to make, but carefully following the step-by-step instructions will help you cope with the task!
Master class on creating a dahlia from organza:

Master class on creating organza lilies:

As a rule, fabric flowers serve as decoration for wedding and evening dresses, hats, clutches, romantic or in the form. But mini-compositions have a special charm.
Used to decorate the groom's suit, and individual small flowers make excellent decor or photo frames.

An accordion is assembled from a strip of organza onto a thread and a needle. Then a crown is cut out of felt.

Using transparent glue (or thread), the crown is fastened into a ring and sits in the center of the organza skirt.
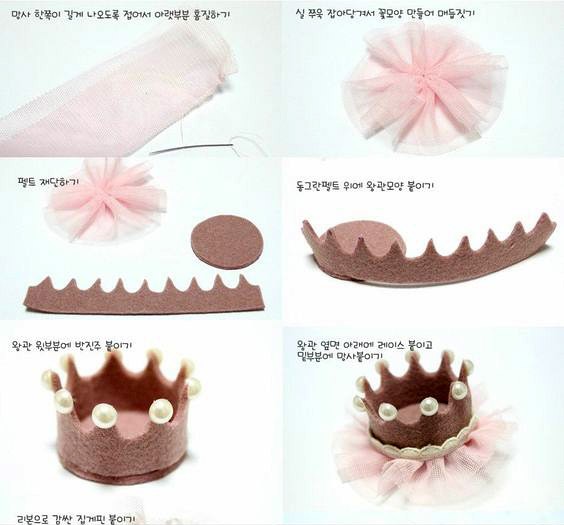
The final decor is optional: beads, lace, sparkles, pendants. The crown can be attached either to a hairpin or a clip-on clip. Your little one will be delighted!
Decorating wedding dresses is a limitless field for imagination. You can use large beads and a narrow organza ribbon to crochet a necklace or bracelet.

Organza is a great material for creating delicate, elegant or chic and catchy flowers. A variety of techniques will allow even novice craftswomen to create masterpieces.


