Transform the radiator by making a false fireplace or sleeping place out of it. Decoupage batteries and a decorative screen will turn this heating device into a work of art.


If the battery has not been painted before, it must first be treated with an alkyd primer. If there is rust on the heating device, it must be removed.

To get a beautiful bronze color, you need to mix black and red paint. If you wish, when decorating the battery, use spray paint.
If you have artistic abilities, then transform this heating device by drawing something suitable here. Look how nice these pencils look, each of them is made on a specific section of the battery.


You can use stickers that will turn the battery into a musical instrument. If you have an unnecessary button accordion whose bellows are torn, you can make another creative idea, glue one and the second part of the keyboard to the radiator.

This option is also suitable for those who have long-lasting cast iron batteries. Here's how to do decoupage in in this case. Take:

Enamel has a strong specific odor, so work in a ventilated area. It's even better if you cover your breathing organs with a respirator.


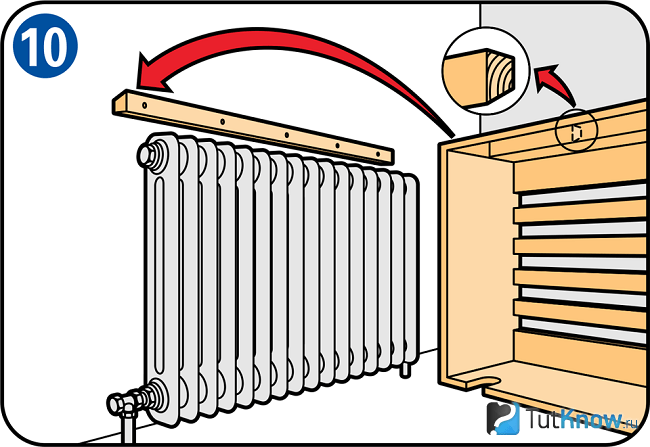
Before you start making it, prepare:


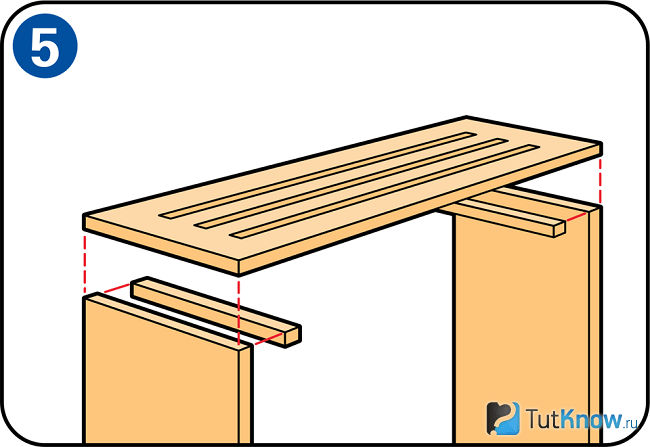
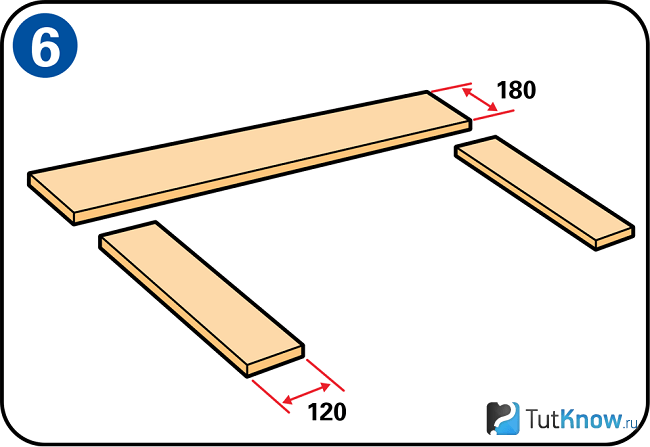
If you make the front panel yourself, then use a horizontal strip 18 cm wide and two vertical strips, each 12 cm wide. They are attached to each other using holes and dowels.


This question invariably arises among those who want to create the atmosphere of a country house in a city apartment. At the same time, you can “kill” two birds with one stone, not only create such a piece of furniture, but also hide an unsightly battery. Not everyone has it under the windowsill; for some, this heating item is mounted almost in the most visible place in the room.


If it happens that there is no putty on the farm, you can replace it with sealant or liquid nails. After these soft materials have dried, you need to smooth the surface using sandpaper.


This is how unusual and very stylish a DIY battery decor can be.
This option is suitable for those who have a lot of heat in winter. It will not be cold in such a room, the radiator is closed, but warm air will escape through the rear side openings. But if the boiler room does not work at 100%, in the cold season without hot battery there is no way around it, then don’t close it almost completely, as in the option presented above. The following idea will suit you.
To implement it you will use:


If you want to see a few examples of converting a radiator and window sill into a sleeping place, bench, table, then watch the following video collection.
If you want to carefully study how to decoupage a battery, then the next review is especially for you.
How to beautifully close the battery in a room with your own hands? In this article I will share with you tips on how to do it correctly and beautifully. What are the options and which is the most suitable? We will consider all the materials for casing the battery and the tools required for this. I will tell you about the stages of work, what needs to be done. After reading this material, you can easily close your radiator, which will make the room even more beautiful and modern. The article also contains useful videos materials.
Very often, when completing renovations, people are faced with a situation where the appearance of the room is spoiled by a battery. However, many are afraid that closing it will lead to loss of heat in the house and therefore leave everything as it is.
However, there are technologies and materials that will help not only avoid heat loss, but also give the room completeness and beauty.
Today, there are a wide variety of options and materials to Beautiful sew up the battery.
According to the features of the closing structure, experts identify the following: decorative finishing groups:
Radiators can be finished with the following materials:
Because everything larger number Since people prefer to use drywall for repairs, it is also used quite often for covering batteries. Moreover, you can sew up the battery with plasterboard yourself.

Drywall in terms of finishing heating devices gained such popularity thanks to his advantages:
When working with drywall, the following options for closing radiators are possible:
The choice of design designed to beautifully close the battery should be made based on your own capabilities and desires.
To do plasterboard box yourself, you must have the following tools with you:

In addition, to beautifully close the radiator you will need the following materials:
Once the material and design option have been selected, the work itself should begin. First of all, you need to do the final preparation of the battery, which consists of painting it. Since after the finishing is completed, this procedure will be impossible to carry out.
When the paint has dried, you can begin marking. Let's consider this procedure using the example of a plasterboard box. To do this you need:

Note! All markings should be made using a level. Otherwise, creating an even and correct structure will be very problematic.
If everything was done correctly, then at the end of the marking you will get a rectangle or square (depending on the length of the radiator). If the box will be on the floor, for example in the kitchen, then the markings on it should reflect its base.

When making a decision beautifully close radiator plasterboard wall in order to hide the pipe, markings are made in the following way:
Finishing the battery with plasterboard (or any other finishing material) with your own hands is possible only after finishing preparatory work. When the markings are ready, you can begin mounting the profile frame. To do this you need:

After creating the frame, you can begin attaching the material. Finishing with plasterboard sheets involves the following actions:
Upon completion of the installation work, the plasterboard box is ready for final finishing. It can be painted, wallpapered or tiled.
Installation of a plasterboard wall frame involves the use of longer profiles that will run vertically. In all other respects, installation work is carried out in a similar way.
You can sew up any heating device using drywall yourself. To do this, you just need to correctly mark and install. Thanks to this, your battery will be hidden from view, while it will continue to heat the room as before.
source: https://gipsportal.ru/montazh-i-svojstva/chem-zakryt-batareyu-v-komnate.html
Sewing a battery with plasterboard is actually as easy as shelling pears; a simple process will take 4 hours at most. By giving preference to gypsum boards, you get their main advantage. Drywall is an incredibly convenient material; it is easy to install and bends easily. Therefore, making a box of the desired shape for the radiator will not be difficult. Below is a simple method describing how to cover a battery with plasterboard.

You can cope with this task yourself, the main thing is to have the necessary tools and materials at hand, then the installation process will not take much time.
So, in order to cover a radiator with plasterboard, you need to correctly mount the frame from the profile. To do this you will need the following Consumables:
You can use a wall sheet of plasterboard or use the ceiling sheet left after renovation, it all depends on the size of the structure itself, as well as on your personal preference.

Structure of a plasterboard sheet:

Helpful tips when working with drywall:

And choosing paint for finishing finished design, it is also best to purchase heat-resistant. Since the heating season is long, paints may lose their brightness or, even worse, crack.
source: //www.vashgipsokarton.ru/konstrukcii/zashit-batareyu.html
Many, during repairs, strive to beautifully cover the battery with plasterboard. This is primarily due to the unaesthetic appearance of the batteries. It is very difficult to come up with and implement a successful design solution that could make the part of the room in which this element is located attractive. That is why owners are increasingly deciding to cover the radiator with plasterboard. This solution obscures the radiator from view and does not harm the heating system in any way.
In order to cover the battery with plasterboard, you will have to build a special plasterboard box. Anyone can make a plasterboard box for a battery on their own. This solution will not only cover unsightly heating pipes, but will also decorate the room if you choose the right design.
In order to create a box for a plasterboard battery, you will need the following:
How to sew up a battery with plasterboard without materials? That's right, no way! You will need the following:
And also, you probably want to decorate the structure after hanging the battery on the drywall. For decoration, of course, additional materials will be required.
The first condition for installing a plasterboard box is that the window sill should be three centimeters or more away from the battery. If the distance is too small, the window sill will have to be repositioned to achieve the desired distance. If this becomes necessary, cut out the window sill the right size, insert it under the window frame and fill it with foam from the base to the window sill. Place a weight on top for three hours. After this, you can begin installing the box.

Before proceeding with installation, it is necessary to carry out preliminary markings. It is worth remembering that a plasterboard box is a small structure and should not occupy half the room. Its parameters depend only on how large your battery is installed. Minimum distance from the edge of the battery to the edge of the box should not exceed ten centimeters. This is the shortest distance that allows you to install a removable screen on the front of the box.
What is markup for? Many people do without it, however, the markings will allow you to more accurately install the frame. Drawing markup is divided into three main stages:
After finishing the marking, you will see that you have formed a square or rectangle, depending on what shape your battery. If the structure touches the floor, then you need to draw the base of the box.

After the necessary preparatory work, you need to start creating a frame from metal profiles. You need to install profiles on the wall, floor and window sill. To secure the profile, press it against the wall with your hand and use a hammer drill to drill a hole in the profile and in the wall at the same time. You need to install a dowel in the resulting hole and secure the structure with a screwdriver.
You also need to install a profile under the window sill, but now you will have to use metal screws. The length of each screw should not exceed the thickness of the window sill. When you have installed the profile to the base and under the window sill, install the jumpers.
As a rule, by covering the battery with plasterboard, a screen is installed - a kind of decorative grille. Decide where the future screen will be placed and frame it with a size slightly smaller than the lattice parameters.
After finishing work with the frame, you can proceed directly to plasterboard covering. Drywall is a material that is very easy to process. And in such work, this parameter is simply necessary. Ordinary stationery knife enough to cut a plasterboard sheet and cut out a shape of the desired size. This is done quite easily, but after cutting there is a lot of dust left. Therefore, you should not cut plasterboard sheets next to expensive furniture.
Drywall pieces can only be screwed to the structure with a screwdriver and nothing else. Theoretically, you can do without a screwdriver if you put a Phillips bit on the drill. However, this is terribly inconvenient, so if you do not have a screwdriver, it is recommended that you purchase one before starting to work with drywall. Even after the renovation is completed, it is unlikely to be found master, which will not need a good unit, so you don’t have to spare money on tools.
After you finish the box itself, you need to start installing the perforated corners. Secure them at the corners of the structure. There are two ways to make the mount. You can simply attach the corners with a stapler, or you can directly glue them using gypsum plaster. Which method suits you best, decide for yourself.
You will find that there are many seams left on the structure, which will significantly interfere with further design processing of the box. Apply sickle tape to each seam and then use gypsum plaster again to seal the seams.
After this, you can begin to design the box. But before you begin this step, you need to do some preparation. The entire plasterboard box must be puttied, treated with sandpaper and a deep penetration primer.
Plasterboard sheets form a surface that is very easy to finish with any material. They are smooth, which allows you to glue wallpaper or paint the box without any problems. Simple painting- This is the most popular method of finishing plasterboard boxes.

Often two or more colors are used for painting. The choice of paint completely depends on the interior and design of the rest of the room. It is extremely important that the box does not stand out from the overall style.
Various patterns applied on top of already painted drywall look very interesting. It all depends only on your imagination. If you wish, you can even disguise the battery as a cabinet.
Even if you have not found any original design solutions that could beautifully fit the plasterboard box into the interior of the room, you can always simply hide the structure by connecting it to the window sill. The box will simply look like part of a solid wall, not standing out at all.
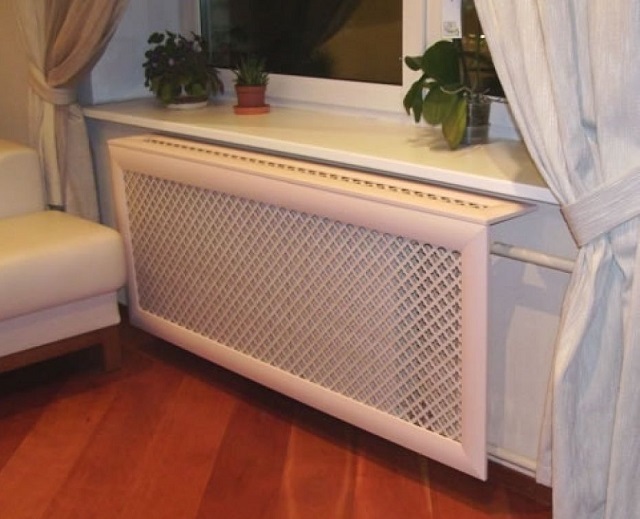
How to cover radiators so that they fit perfectly into the overall design of the rooms and do not spoil their design? But with this calculation, of course, to avoid significant losses in the efficiency of radiators? This question arises quite often when completing renovations of an apartment or house. If cast iron radiators of an old model are installed in the heating system, but there is no desire to change them, since they function perfectly, then they can be disguised with decorative screens or grilles.
These devices, we repeat, must be made in such a way that they do not interfere with the flow of heat into the room. Therefore, if you plan to make them yourself, you need to carefully consider the design. Besides, similar products You can order them at a furniture workshop, taking measurements from the place where they are installed, or you can immediately purchase them ready-made in specialized stores.
It should be noted that you can choose a model of protective and decorative screen that will not only mask the unsightly appearance of cast iron products, but will even increase the circulation of warm air from the radiators towards the room.
To choose the right screen model, you need to understand the operating principle of heating radiators and some of the patterns of transfer of thermal energy into the room.
The heating radiator, heated by the coolant passing through it, releases heat into the room in two ways. The first is natural convection of heated air. The second is thermal infrared radiation that comes from the surfaces of the heating device.
Thus, the familiar MS-140 cast iron radiators heat the room with convection currents when not high temperatures ah coolant, that is, when it is still slightly cold outside. When will the system be launched? maximum temperature heating is 70 degrees and above, then the heat entering the room occurs to a greater extent due to direct thermal radiation from the surfaces of the radiators.
In order to select or make a screen that will minimally reduce infrared radiation and will not slow down (and sometimes even improve or activate) the circulation of heated air, it is necessary to take into account some nuances:


An effective device that can be used to complement the screen design is an aerodynamic visor. This element, installed under the window sill at an angle, will direct the rising hot air towards the room, preventing it from accumulating under the plane of the window sill. Such a visor should run along the entire length of the radiator.
But that's not all. It is recommended to supplement the design with another device - a heat injector. These are two more guide plates curved towards the room along the entire length of the radiator, installed on top along the boundaries of the space between the battery and the decorative screen. This does not interfere with the operation of normal convection flow when the coolant temperatures in the heating system are low. But when the heat is high, it collects all the heat that accumulates between the radiator and the screen, and redirects it into the room with a powerful air flow, creating a kind of thermal curtain. The efficiency of the heat exchange device increases significantly, and thereby largely compensates for the losses arising due to existing obstacles to direct thermal radiation.
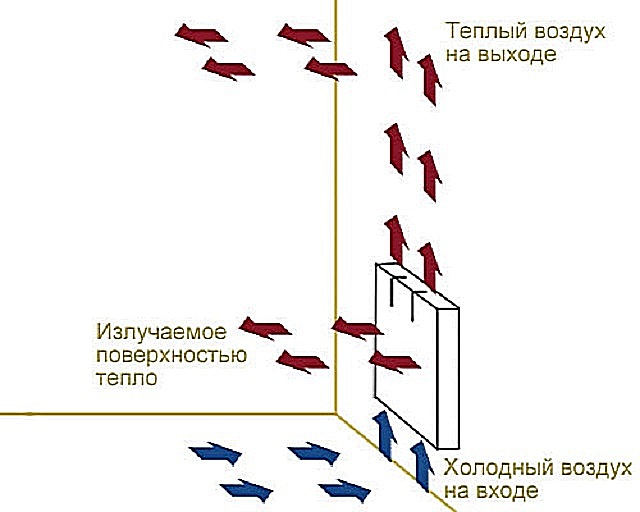
The diagram below shows a screen, complemented by an aerodynamic visor, mounted on a radiator, as well as the heated air flows emanating from it:

Thermal direct radiation is shown in the diagram with red dotted lines (item 3), ending with arrows. It is clearly visible that those of them that were initially directed towards the wall are reflected from the foil screen and redirected towards the room. They also heat the decorative panel, which, in turn, also becomes a source of thermal radiation.
Blue arrows show the direction of cooled air (item 1) entering the radiator from below, which then heats up and rises upward, again heading into the room (brown arrows, item 2), which is facilitated by the aerodynamic visor and heat injector.
Decorative screens for heating radiators are divided according to two criteria - these are design features and material of manufacture. Before moving on to their consideration, it is necessary to note two more important factors that you need to pay attention to when choosing these products:
Decorative masking panels are divided according to the method of attaching them to radiators. Today there are box-type screens and wall-mounted products.


Quite often the masking box is turned into a continuation of the window sill or even into desk or a cabinet. However, as mentioned above, such designs significantly reduce the flow of heat into the room.


The first ones are used to disguise batteries installed in a niche or areas not covered by a window sill. These screen options are hung directly on the radiator sections.
Mounted screen models are installed on radiators installed in any way, that is, both in a niche or under a window sill, and on devices protruding from the wall.

If this option is planned to be used to disguise batteries recessed into the wall, then it is necessary to leave gaps in the upper and lower parts of the niche for the free circulation of heated air masses.
By the way, many people prefer solid facade screens for the reason that they best hide the “unflattering” appearance of the batteries. One can argue with this - a neat grille, especially one that has a certain “pattern”, even with a fairly large vacuum, attracts the eye, and the sections shining through it become almost invisible. But at the same time, the efficiency of direct thermal radiation is incomparably higher.
Both screens and grilles are made from different materials. To decide on the choice of products according to this criterion, you need to consider them characteristics. It is especially important to consider temperature regime, in which the heating system operates in winter, as well as the resistance of the material to thermal loads and its environmental friendliness.

Such grilles do not completely cover the radiators, allowing air flows to circulate freely throughout the room. The screens look quite neat and aesthetically pleasing. In addition, the product meets environmental standards, and the manufacturing material is resistant to high temperatures that may arise during operation, warms up well and itself becomes a source of thermal radiation.
The enamel coating is applied to the surfaces of metal gratings using the powder coating method. Therefore, the metal is not exposed to corrosion, and the “fresh” color is preserved for a long time without fading.
Metal versions of screens are produced both in a hinged version and in the form of boxes.
In addition, this type of screen will well protect the child from serious injuries if he accidentally falls near a cast iron battery.
The screens are easy to install at the site of operation and are durable. According to the design, the product can be selected to suit any interior style. If desired or if changed color range Interior metal grilles can be easily repainted in the desired shade.
Metal screen grilles have a relatively affordable price, despite their excellent characteristics.
It should be noted that panels can be manufactured to individual orders according to specific dimensions provided by the customer, as well as taking into account the specific configuration and location of radiators.
Prices for decorative metal screen
decorative metal screen for radiators
PVC has lower thermal conductivity than metal, which is why it is combined with natural rattan, which conducts heat well.

Polyvinyl chloride is resistant to fairly high temperatures and can be easily cleaned from dust using a vacuum cleaner or wet cleaning. The material does not emit toxic fumes and will provide good protection against injury for a small child.
The screens have a fairly aesthetic appearance and can be matched to any interior design.
The cost of PVC products is more affordable than metal panels, but in terms of service life they are significantly inferior to the latter.

After tinting, wooden screens are covered with several layers of water-based varnish, or painted with special heat-resistant paints. The coating not only gives the products a noble appearance, but also protects the wood from a combination of moisture and elevated temperatures, that is, it preserves it from deformation.

If wooden screens are intended to be installed on radiators operating on the convection principle, then the top of the radiator must remain open. To do this, the panel installed horizontally on top should, like the front one, be lattice-based, since small slotted holes for a full-fledged process may not be enough to fully transfer heat from the radiator.

Wood is often combined with a mesh woven from thin rattan (rattan palm stems). This option transfers heat from radiators into the room much more efficiently than just a wooden grille. In such models, a rigid frame is made of wood, on which rattan weaving is stretched. This combination of materials gives the product a particularly aesthetic appearance. Rattan and wood, as well as those used for their decorative processing compositions are environmentally friendly clean materials that do not emit toxic fumes.
Sometimes MDF is used instead of wood to make frames, which is almost impossible to distinguish from natural material. However, you need to know that in the production of MDF they use adhesive compositions which may contain formaldehyde. When heated, fumes of this substance, which is toxic, will enter the premises. Therefore, it is not recommended to purchase this option for installation in residential premises, and even more so in bedrooms or children's rooms.
It is recommended to periodically clean wooden screens and screens combined with rattan using a vacuum cleaner.
Disadvantage (conditional) wooden products their high cost may be considered, especially in cases where they are made to an exclusive order. In many ways, the price of such gratings will depend on the type of wood used and the complexity of the planned project.

Glass screens for radiators are made in the form of flat panels with drilled holes for fastenings. They are fixed only on the wall or on the wall and floor using racks, which themselves are also an element of the screen’s decor.

Glass screens completely cover the front part of the radiators, but the top and bottom of the heating device remain open, which allows convection air flows to circulate freely. Therefore, this type of panel will be an ideal option for radiators operating on the principle of convection heating. But if they are used to cover conventional radiators, similar panels will very significantly inhibit direct thermal radiation.

Products made from glass have many advantages, which include the following:
- affordable cost - they have a lower price than wooden options screens and grilles;
— it is quite possible to install the panel yourself, since all the necessary fasteners for installation are included in the kit;
- decorativeness and variety of design of products - they can be matte, plain in various colors, with thematic and floral designs and photo collages;
- opportunity to do individual order by applying a specific design or photograph to a special film using thermal printing, which is then fixed to the panel;
— safety in operation and care of products;
— environmentally friendly materials;
- heat resistance.
But for safety reasons, it is hardly worth installing such glass screens in a nursery, where children can be very active. active games. The glass is unlikely to break, but the end sides of such a screen still pose an increased risk of serious injury.
You may be interested in information about what characteristics have
* * * * * * *
So, a lot when choosing screens depends on the type of radiators, the style of the interior, as well as the financial capabilities of the homeowner.
However, no matter which option is chosen, decorative screens will perfectly disguise the unsightly appearance of cast-iron batteries of old models, protect them from dust and dirt, as well as grease deposits if the battery is installed in a kitchen area. In addition, the panels will reduce the risk of injury to children who may accidentally hit themselves or get burned when the batteries become very hot.
The above information will be good help when purchasing decorative screens or grilles, since it highlighted all the main aspects that you need to pay attention to when choosing a product from a particular material.
We must assume that since a site visitor is reading this article, he will be interested in calculating the required power of the heating radiator (number of sections - for collapsible models). Moreover, the final value also depends on the presence and type of decorative screen.
You may be interested in information about how it is produced
The required power of a heat exchange device installed in a room depends not only on the area of the room, but also on a number of other criteria. All this is taken into account in the calculator presented to the reader.
Below are some explanations on how to carry out the calculation.
Heating radiators cannot always serve as interior decoration. Therefore, they have to be hidden, decorated with all possible ways. Let's try to figure out how to do this beautifully and correctly.


Decorating heating radiators is not as simple a task as it might seem at first glance. It is necessary not only to hide the unsightly radiator, but also to maintain a comfortable temperature in the room. Obviously, closed batteries provide much less heat, and access to them becomes difficult.
In order to properly close the radiators and not reduce heat transfer (or at least reduce it slightly), you need to understand how radiators heat the room and on what principle they work. And choose the decor so that it represents minimal interference when the batteries perform their functions.


Removable or attached screens that do not have solid fastenings are well suited for this. This is necessary so that the radiator can be accessed at any time. Such a need may arise unexpectedly, and if the battery is mounted into a wall, a plasterboard box, or covered with a screen “tightly” attached to the wall, the structure will have to be broken. It will not be possible to dismantle it without damage.


Another important criterion when choosing decor is how much it will affect heat transfer. Heating of the room occurs due to the release infrared radiation(it heats objects) and convection (it heats the air directly).
Solid screens, devoid of gaps at the bottom and top, will become a serious obstacle for both the first and the second. The best option would be perforated, carved or lamella screens that do not cover the battery either from above or from below. Or closing slightly.
In order for the air to warm up evenly, it must be able to freely enter from the bottom of the battery, pass through it and exit from the top already warm. A tightly “sealed” radiator does not give it this opportunity, which is why the temperature drops. As for IR radiation, it simply cannot pass through a solid, impenetrable screen, which provides almost one hundred percent thermal insulation of the battery.


Recently, you can see that batteries are often covered with glass screens with photo printing. Of course, such a solution has high decorative properties However, the temperature in a room equipped with such decor drops significantly.
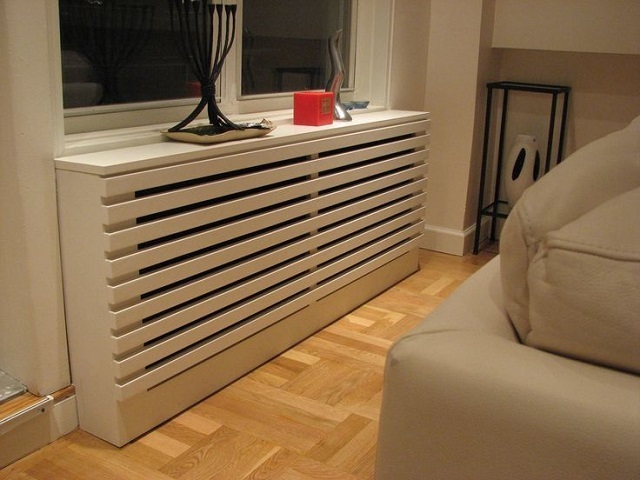
The optimal solution for any interior would be a wooden perforated or carved screen. The main thing is that it has as little continuous surface as possible and as many holes as possible to allow air to circulate freely. In addition to the fact that wood fits harmoniously into almost any interior style, it is also necessary to highlight its environmental friendliness. When heated, it will not release any harmful substances. On the contrary, when exposed to heat, wood releases essential oils, which have a positive effect on human health (of course, we are talking about natural wood).


To hide old heating batteries, it is not at all necessary to use expensive materials and designs. There are many budget-friendly ways to close unsightly radiators while maintaining high heat transfer rates and easy access to the system.
These methods include:


Of course, low cost is a significant advantage of the material, and for many it is decisive. However, we should not forget that its main function is to provide not only the aesthetic appeal of the heating system, but also warmth in the apartment. Therefore, you should not focus solely on price.
They have a good combination of accessibility, aesthetics, environmental friendliness and the ability to transmit heat. wooden structures. A simple lattice made of narrow slats, which are sold in any hardware store, can effectively hide radiators and will not interfere with their normal operation. In addition, such a solution will look natural in any interior. It is not for nothing that wood has been used since ancient times to decorate houses. Its unique natural aesthetics, the warmth and comfort that it brings to the home are still appreciated and in demand.
If you choose a metal sheet - copper or aluminum - as a background for a carved wooden panel, this solution will bring double benefits. Wood will take on a decorative function, and thanks to metal, the temperature in the room will not only not drop due to closed battery, but may even increase.


Currently, there are many ways to hide old cast iron radiators under the window. Screens from a wide variety of materials, niches, painting, mounting into the wall - options for every taste. But if decorating heating radiators in a living room, bedroom or nursery is quite simple - just choose a solution that will harmonize with the overall style of the interior - then in rooms with characteristic conditions (for example, in the kitchen, bathroom) this is more difficult to do.
For these rooms it is necessary to select a material that will withstand and high humidity , and temperature changes, and possible exposure to steam, chemical substances. And with all this it will be non-toxic. The best option would be to paint the radiators to match the walls or in a contrasting color. This method of decorating pipes is the most common in bathrooms.


As for the other rooms of the house, everything depends solely on the imagination and budget of the owners. But the basic requirements for radiator screens must be met in any case. After all, their main task is to hide unsightly heating elements without compromising heat transfer. Therefore, any screen must provide free air circulation and IR radiation. At least create minor obstacles to this.
The now popular glass screens, of course, are highly decorative, look great in the interior, but they significantly reduce heat transfer, which means they help lower the temperature in the room. This decor can be used if heating is carried out in some other way, for example, using heated floors.


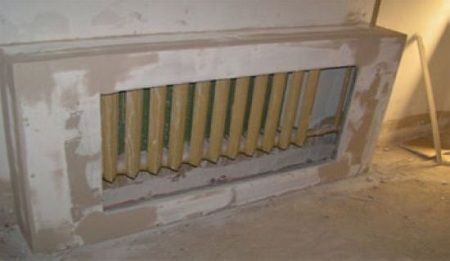
Quite often you can find such a solution - radiators are mounted inside the wall, and a small window (or two) is left behind a grill for the passage of heat. Not only does the temperature in the room drop significantly in this case, but also access to the system becomes almost impossible - to do this you will have to break the wall in the literal sense of the word.
The same applies to boxes made of plasterboard, plywood, MDF, chipboard and other similar materials. Reduced heat transfer, difficult access to the system versus decorativeness. Everyone makes a choice for themselves.


Screens made of metal – copper or aluminum – are now gaining popularity. Such models not only will not lower, but may even increase the temperature in the room. Heated by the radiator, such screens themselves act as a battery and additionally heat the room.
If the room is covered with wallpaper, the heating elements can be decorated using leftovers. By cutting them into strips and gluing them onto radiators (with heat-resistant glue, of course), you can minimum costs get beautiful element decor that will harmoniously fit into the interior.


In a children's room, you can generally give free rein to your imagination, or you can involve the inhabitants of the room in the process. Children will happily take on the task of decorating their own home and will tell you how they would like to decorate the radiators. Favorite cartoons, fairy tales, your own imagination, in which the room is not a room at all, but a ship, a tank or a racing car. All this can be used when decorating radiators.


To decorate old heating radiators, you don’t have to spend a large number of funds, effort and time. You can simply paint them. Freshly painted batteries will look good in a modern interior, such as a loft, or in a classic or soft pastel room. The main thing is to choose the right color.
The same loft - industrial style, and its color scheme is appropriate. The most commonly used is black or White color. One of them can be used to color batteries. Elements painted in a contrasting color - black on white or white on a black background - will look especially impressive.


This is unlikely to be suitable for more prosaic, calm interiors - after all, it still emphasizes the heating system, highlights it, and does not hide it. In an industrial loft this is what you need. But, for example, in classic interior it would be inappropriate. Here it is better to paint the batteries to match the walls so that they blend into the background.


Heating radiators can be decorated with paintings. Such elements will look good in a nursery and will emphasize the dynamic, active, unusual atmosphere inherent in this room.


In the bathroom, you can put the pipes in a plastic box. It would be irrational to use wood or metal in this room - the materials will quickly become unusable, and the design will have to be changed. And plastic can easily withstand the high humidity of this room. However, plastic is not suitable for the kitchen; here it is better to give preference to traditional materials.
The decor of a heating system implies not only the camouflage of its elements, but also the possibility of easy and quick access to any of its components. This is one of the most important selection criteria that must be followed when choosing the design of radiators.

Another important factor is heat transfer. But here you can resort to a little trick. A foil foam insulator hung on the wall behind the radiator will reduce heat loss by twenty times.
But it must be attached to the wall, and not just put the battery. In this case, a distance of at least two to three centimeters should remain between it and the piece of insulator.
It is not advisable to cover the elements of the heating system with boxes, hide them in niches or mount them in walls. If another option is not possible, it is necessary to provide the box with a door to ensure the fastest and easiest access to the system at any time.


Modern industry produces heating radiators that are significantly different from Soviet models, which everyone is so eager to hide or change. These are not only strictly geometric white radiators. These can be models of almost any shape and size. Such batteries do not have to be hidden or covered; on the contrary, it is customary to put them on public display, hang them in the center of the wall and show them to guests as a bright, unusual accent.
Modern radiators are a spectacular decorative element that is attractive in itself. Even simple white models have their own aesthetics. They don't have to be hidden at all. They will cope perfectly with the role of discreet, but stylish elements decorations that also perform a practical function - they heat the room.


To decorate or hide radiators in a room beautifully so that they are not a “fly in the ointment” and do not spoil the entire appearance of the room, not so difficult task. Modern materials allow us to solve this issue with minimal costs.
Vertical, horizontal, sectional, copper, cast iron - the modern market offers a wide variety of radiators for every taste.


A battery with a bright, cheerful color, such as yellow, will look good in a children's room - it has a positive effect on nervous system And emotional state person.
New models, unusual for the eyes - vertical radiators. They are located vertically on the wall and can occupy the entire height from floor to ceiling. This element looks quite stylish and does an excellent job of maintaining a comfortable temperature in the room.


A heating radiator that fits beautifully into a new interior is a rarity. Batteries, especially old cast iron ones, stand out sharply against the background of fresh wallpaper and look ridiculous in a room if its design is not made in a retro style. Think about how and what to close heating batteries, it is necessary at the stage of planning the repair, and not after its completion, when some work can no longer be carried out.
 Owners of apartments in old buildings are most often faced with the fact that the rooms have installed cast iron batteries. For efficient heat transfer, such a device is better. However, over the years of operation during the Soviet era, in conditions of shortage of materials of any kind, the only manipulations that were performed on the radiators were painting. Turning a monster covered in many layers of peeling paint into something decent is extremely difficult. In addition, at cast iron radiators not provided Ball Valves, which allow you to turn off the radiators if it is hot in the apartment.
The easiest way is to replace the radiator for a modern model and immediately install shut-off valves, which can be used to reduce the temperature in the room and shut off the water for repairs.
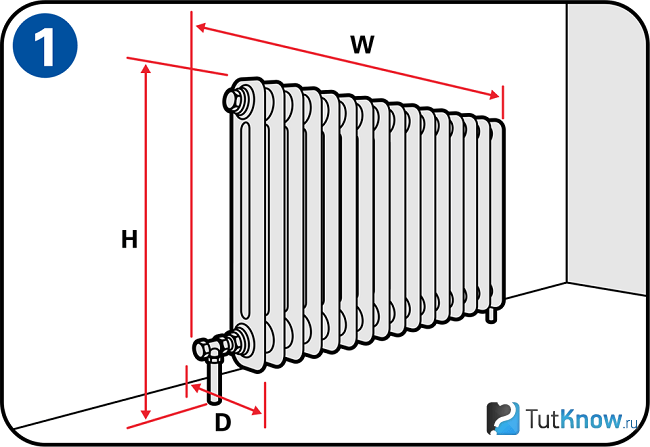
For the new radiator to work effectively, during installation you need calculate accurately place of its attachment:
If these rules are followed, heat transfer will be maximum.
 Complaints about heat in the apartment quite rare. Usually the temperature of radiators is regulated by shut-off valves, but they are not always installed. Therefore, if you need to reduce the heat transfer of a battery without taps, this can be done in several ways:
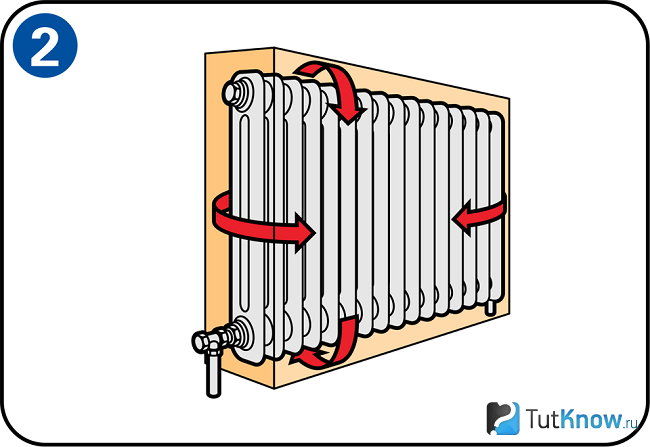
 Much more often people complain that There is not enough heat from the radiators to warm up the room. To make the radiators warmer in the apartment, you can also use reflective thermal insulation, only in this case it must be mounted on the wall behind the radiator and on the floor under it. Other methods are more complex:
If the temperature in the apartment is completely satisfactory, but you are only concerned about the appearance of the batteries, then you can use one of the decorating methods. The main thing is not to harm the heat transfer process and observe several important points:
 Typical heating radiators are painted white and look good only against white walls. If the walls are dark in color but without a pattern, the radiators can simply be repainted. Only heat-resistant paint can be used.
Drawing on the walls complicates the task. Using a stencil and paint, it’s easy to duplicate a simple pattern on a battery. If the pattern is complex, you can cut pieces from the leftover wallpaper that match the size of the sections and stick them on the radiator.
A special way to decorate a battery is decoupage. Craft materials stores sell vinyl based stickers, which do not deform under the influence of temperature. For decoupage, you can use not only ready-made patterns, but also create your own from scrap materials: fabric, paper, hot melt glue and even beads.
 Women with good sewing skills often make their own fabric radiator covers.
An alternative way to decorate is to create a special curtain for the battery. They are made of loose fabric and attached to the wall or window sill using textile Velcro. Most often, a fabric screen is made from the same material as curtains.
The undoubted advantage of such screens: minimal impact for heat transfer and basic care - the curtain for the battery, which has collected all the dust, can be effortlessly cleaned when washed in a regular washing machine.
For lovers of ready-made solutions, construction and furniture stores offer screens made of various materials. The variety of choices allows you to choose a design that will fit perfectly into any interior. The most popular screens are made of metal and wood:
More difficult to perform decor option- a box covering the radiator on all sides.
Most often, boxes are made from the following materials:
The box is often made not in the form of a simple box, but as interior items: an imitation of a fireplace, a false wall, or a section of a cabinet built under a window.
One of the most difficult decorating methods is to hide radiators as if they were not installed:
You can completely abandon batteries, replacing them with alternative heating systems:


