This year, my daughter and I very thoroughly, like squirrels, stocked up on autumn leaves, and all kinds of nuts, acorns, and pine cones. The older the child gets, the more interesting it is to make crafts from all this material - the daughter does more and more herself, and often we just do something nearby, the mother does hers, the child does hers. It is very pleasant to spend time like this. I already mentioned on FB that we made stamps out of fall leaves and apples - we were so into it! And this fall we did it for the first time "waxy" leaves - leaves preserved in stearin and wax. I had never tried this before and simply dried the leaves - in the open air, in sand, or soaked them in glycerin. I love floristry very much and am quite good at it. Now we have mastered a new technique that we are both delighted with. It is not at all complicated and gives a very effective result. Now not all the leaves have fallen off yet and you can also try to make wax autumn leaves that retain their shape and color for a long time.

I traditionally don’t take photographs of a detailed masterclass, but I can describe everything in words. Let there be just a lot of photos of the result.
So we need:
1. Fresh autumn leaves (ideally maple leaves with petioles);
2. Natural wax or stearin candles (I have the most ordinary white IKEA candles, you can use transparent candles or special kits for making candles. The final result depends on the type of wax - here everything can be found out experimentally.);
3. Baking paper or foil; (we will put leaves on it to dry);
4. The saucepan and container for the water bath are preferably wide, so that your largest leaves can easily fit in;
5. A wooden board or dish, tray, baking sheet, where the finished leaves will be temporarily stored and dried;
6. Stove, kitchen, free time and positive mood.
The process itself is as follows:
1. Melt the wax or stearin in a water bath. (Amount so that you can freely dip the leaf, approximately 1.5-2 cm from the bottom of the container.) As soon as the wax has melted, reduce the heat to a minimum to maintain heat.
2. Spread baking paper or foil near the stove - the leaves will dry on it so that they do not stick to the surface. The distance from the stove to the foil should be minimal; ideally, cover the edge of the stove with foil, otherwise you will have to spend a long time and tediously scraping off drops of wax or paraffin.
3. Take the leaf by the petiole with your hands and quickly dip it into stearin (wax). Make sure that it is completely submerged, but do not cook it in water for a long time; 6-10 seconds will be enough. Take it out and let the beads of wax drip directly over the pan. To do this, first hold it for 6 seconds with the tips down, then, if it is tight, turn it a little to completely cut off all the drops and so that no accumulated wax remains on the tips. Then quickly place the sheet face up on foil or baking paper. The sheet dries quickly - in about half a minute. Afterwards, you can immediately transfer it to the same baking sheet or dish where the leaves will finally dry out or wait their turn for use in crafts. But after a minute or two the leaves can already be used for work. Foil or baking paper must be periodically cleaned of wax drops, or a new one must be placed so that the drops do not stick to the leaves. When you put the sheet to dry, a small drop may remain on the tip and go beyond its aisles - after drying, this drop can be easily removed manually with a knife or fingers, but so as not to damage the entire coating of the sheet.
If a child participates in the process, then he must be at least 4.5-5 years old, and then he can dip the leaves into the wax himself, but only with a long petiole and after a thorough explanation by the mother of how hot the wax is. As soon as the child is tired, let him become a spectator. But in general, although this activity is interesting and fascinating, it is not for kids. My daughter made 6 leaves and then helped sort the finished leaves.
As a result of processing, the leaves become very beautiful: they retain their shape and color. It is impossible to make them absolutely even, since nothing can be placed on top when drying. So the natural curve will be preserved. But such a rich shade cannot be achieved by simple drying. White stearin causes the leaves to shine slightly, as if covered in frost or as if they were candied, and yellow maple leaves become brighter, more saturated. It is not so easy to work with white stearin - when it hardens, it can show flaws in the work - accumulations of white on the hollows of the leaves. You need to very carefully remove stearin from the leaf - practicing to make precise movements. For stearin, you need to choose smooth leaves without dents. Variegated leaves with white spots are also good in stearin. Stearin can chip off the leaves if children's fingers pick at it. But he doesn’t get down on his own. The leaves turn out to be quite fragile - as if they were made of glass or frozen, but durable. It’s a pity that the photos don’t convey the delightful sensations that arise when you hold this “wax” sheet in your hand and rustle it! After paraffin we tried natural wax. With it, the leaves do not become hard, but remain soft and take on an almost matte appearance. Of course, you shouldn’t bend them - the coating will lose beautiful view. All red leaves are very good under wax - for example, Maiden grapes. But the yellow maple leaves are not as impressive as in stearin, and they curl slightly. In general: depending on what you dip the leaves in, it turns out very different result. Since you don’t know what exactly will happen, you feel a little like a sorceress.
We put some of the finished leaves in a beautiful dish to decorate the dining room, so we could sort through them and admire them. And the other part made decorations for the windows: they tied the leaves with a thin black thread and attached them above window frame. These leaves have not lost their leaves for two weeks now. appearance. Our garlands are good both in cloudy weather and in sunny weather. In the sun, of course, they shine incomparably - like stained glass. And they rustle slightly from the breeze... But in general, from such “wax” leaves you can make anything - a bouquet, a volumetric applique, an autumn tree, a mobile, a garland - it all depends on our imagination. And the technology itself is magnificent. My daughter and I are very pleased and will continue to experiment with it next year.

Material prepared for work.

Water bath. Irgi leaves are drying nearby. Only I can dip such tiny leaves in wax - it is dangerous for a child to do this. Nearby lies a knife, with which I remove droplets of wax from the foil.

This photo and one below: - leaves in stearin.


This photo and the one below: leaves in natural pure wax.


We liked the paraffin treatment better - that’s why we made more of these leaves.

Leaves in stearin. The most spectacular and beautiful. Although many people also like waxy ones, which feel like soft, thin skin to the touch.
Those in stearin are as if candied, or in frost. They feel hard and fragile to the touch.

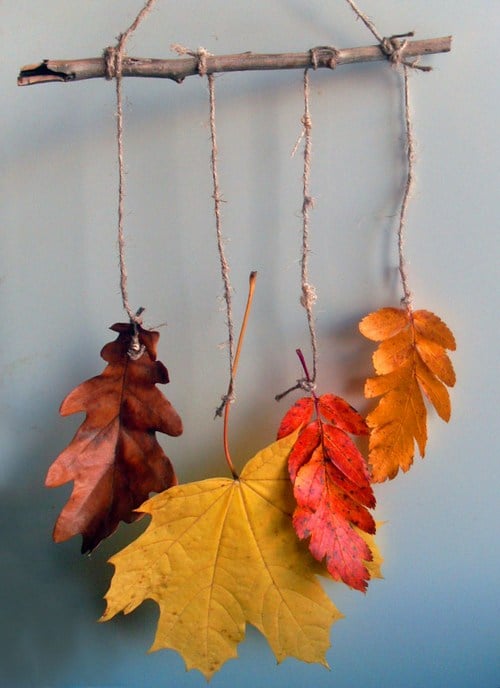
I made a wreath for the wall from leaves treated with stearin. These are the leaves of the serviceberry.


For contrast, this is how maple leaves dry at home without any treatment. My daughter was impressed.
True, we really like this bouquet: it is stylish and beautiful. In general, everyone is dried up Maple Leaf, curled up it becomes like a sculpture.

This is our composition on the window. Here you can see exactly how the leaves were tied - with a black thread behind the petiole.


Our composition is made from leaves treated with stearin. It is good both in cloudy weather and in sunny weather.


It's on another window - in the nursery.


The shadows of the leaves on the window are especially beautiful with the curtains drawn. They also sometimes “walk” around the room depending on the time of day.


The child is delighted with our “eternal” magical leaves.

You just want to catch the bright colors of autumn and hold on to them longer. Leaves are simply a miracle of shades that should be used to decorate an apartment as part of color therapy. 🙂 But how often, after bringing home some beautiful leaf, we notice that it quickly loses color and shape, and it is useless to use it in decoration.
Today the most successful ways, get water, soda, books :))

The easiest way to preserve leaves longer is to pick them directly from the branches. Not to say that the autumn leaves on the branches hold on very tightly, but still this is a great chance to preserve the bouquet in original form. Before placing the arrangement in a vase, trim the branches with a sharp knife and lightly split them. You can add a few tablespoons of glycerin or a teaspoon of sugar and an aspirin tablet to the water. Periodically sprinkling the leaves with water from a spray bottle will help the bouquet retain its fresh charm.


A skeleton in decoration is a somewhat strange combination, unless we are talking about leaves and flowers. This technique allows you to make things so delicate that you can’t believe they are of natural origin.
You need to prepare a soda solution (about 3 tablespoons per 1 liter of water) and carefully place the leaves in the solution. Boil them over low heat for an hour to two, until the leaves darken, periodically adding baking soda. Then we lay the leaves on paper and hit them with the bristles of a toothbrush. The pulp of the leaf crumbles and a cute skeleton remains. 😉 Then the sheet needs to be dried, you can paint it or leave the resulting natural shades.
Some florists prefer the dry skeletonization method: you can peel the pulp from the leaf without first soaking it. In this case, it is better to use a natural bristle brush, and the stiffer the bristles, the better.
To prevent the sheet from being too brittle after cleaning, you can spray it with hairspray.


Simple and stylish garlands greatly decorate the veranda and the house, but only if the leaves remain in their original form, without losing their shape and color. Special floral sprays or acrylic lacquer, which is also sold in spray - in construction stores.
Leaves sprinkled with this varnish look shiny and fresh, are protected from damage and do not fade. The varnish is intended for wooden furniture, plastic, glass, but it will also protect leaves perfectly :)
You can also use a special floral varnish for the leaves to make the flowers shine. Another remedy is the usual one. vegetable oil, which can be applied to the leaves with a silicone brush.


For that type of decor where smooth and clear lines are needed, the leaves can be dried using the old proven method. Place them between the pages of the book, and then move them to a new page every day. The moisture from the leaves will be completely absorbed in about a week; to strengthen it, you should dip them in a solution of water and PVA glue 4:1 and dry well. And then you can use the leaves in their original form, or paint them.
Pictures made from leaves sandwiched between two glasses look very stylish, and this decor lasts for a very long time, the colors do not fade.
From leaves preserved in this way, you can make a panel that looks like it was painted with oil paint.
Updated: April 20, 2019 by: Olga Fomina
The beauty of autumn leaves can be enjoyed not only in autumn. Some drying methods may cause leaves to lose or change color. However, there are numerous ways that help maintain color and shape for a long time. After reading this article, you will learn how to dry autumn leaves so that they delight you in the cold season, when the trees outside are bare and unsightly.
Choose bright leaves. Collect freshly fallen, bright and sufficient soft leaves. The leaves may be slightly dry, but not to the point where they break or curl at the sides. Choose whole leaves. Avoid torn or slightly damaged leaves.
Cover the leaves with adhesive on both sides. For decoupage, a white adhesive is used, which becomes invisible when dried. You can purchase the adhesive at a store that sells art and craft supplies. Use a sponge brush to apply the adhesive. Place the leaves on a sheet of newspaper to dry.
Wait until the adhesive is completely dry. It should not stick to your fingers. It should also become completely transparent on the leaves.
Repeat on the other side. Turn the leaves over to the other side and apply adhesive to them. When the second side is dry, the leaves are ready to use. This method allows the color and shape of the leaves to be preserved for a long period of time.
Take fresh leaves. Collect freshly fallen bright leaves. Coating with paraffin wax will give the leaves a beautiful shine. Dry each sheet by wiping it with a paper towel before moving on to the next step.
Melt paraffin wax into disposable tableware. 450 g of paraffin wax should be melted in a disposable container, heating it over low heat.
Remove the melted wax from the stove. Be very careful as the melted wax is very hot. Place it carefully on your desktop. Be careful not to tip the wax container over. This is especially important to consider if you have animals or children in the house.
Dip each leaf into the melted wax. Hold the leaf by the stem and dip it in wax several times. Make sure that both sides of the sheet are completely covered with wax. Do not put your fingers close to the hot wax to avoid getting burned. Repeat the above steps with the remaining leaves.
Lay the leaves out to dry. Place each wax-coated sheet on wax paper and leave until the wax hardens. Let the leaves dry for several hours in a draft-free room. After the leaves are dry, they should be special effort removed from paper. Thanks to this method, the shape and color of the leaves are preserved for a very long time.
Select fresh leaves or a small sprig with leaves. If you want to dry a whole twig with autumn leaves, give preference to this method. Select a branch with leaves that are firmly attached to it.
Cut off the end of each branch. Hammer the end of each branch to reveal fresh wood. This should be done so that the branch absorbs glycerin better. Otherwise it will not reach the leaves.
Dilute the glycerin solution. It can be purchased at the store. To prepare the solution, mix 530 ml of liquid vegetable glycerin with 2 liters of water in a large container.
Place the branches with leaves in the solution for three to five days. The twigs and leaves will need to absorb the glycerin for three to five days. Place the container with the solution and twigs in a dark place.
Remove the twigs and leaves from the solution. The color of the leaves will become brighter. In addition, they will become more elastic. You can use the whole twig or individual leaves to make various fakes.
Place fresh leaves between two paper towels. This good way dry leaves for fakes. However, be prepared for the leaf color to become duller. Place fresh leaves on a double layer of paper towel. Cover them with a single layer of towel.
Dry the leaves in microwave oven. Place the leaves in the microwave and heat them for 30 seconds. After this, continue heating for 5 seconds.
Leave the leaves overnight. Place the leaves in a dark, draft-free place and leave them for at least overnight and up to 2 days. If you notice that the leaves are starting to fade, they urgently need to be treated.
Spray the leaves with acrylic spray. The leaves need to be processed on both sides. Wait for the leaves to dry. After this, they can be used to make fakes.
Place the leaves between two sheets of paper. Unfortunately, you will not be able to preserve the color of the leaves using this method. Place the leaves between two sheets of construction paper.
Place a heavy book on the paper. To prevent stains from remaining on the book and work surface, place paper napkins or toilet paper between a sheet of paper and a book. They will absorb moisture from the leaves.
You can also dry the leaves directly in a book, but in this case you should only use an old book, which you won’t mind, as stains may remain. Place the leaves between the pages of the book. For best results, place each sheet at least 20 pages apart.
Check the condition of the leaves after a week. They must be dry. If they are still not dry, continue drying for several days.
Choose fresh leaves. Use moist, bright and freshly fallen leaves. After the procedure, the leaves will become shiny.
Dry the leaves. Place dry leaves between two paper towels. Place the leaves in a single layer, leaving some space between them. Iron each side with paper towels. Iron each side for 3-5 minutes.
Golden autumn is in full swing, the beauty in the parks is indescribable. Our whole family really loves to walk through the autumn forest, rustle the leaves, lifting whole “pillars” with our feet, arrange fireworks from them, and on the way home, collect the most beautiful ones and put them in a vase at home... Eh, only all this beauty is warm at home so short-lived. A couple of days pass and the leaves dry out, wither and begin to curl up, but I really wanted to preserve the bright colors of autumn and admire them in winter!
And now the means have been found! Welcome to the cat to find out all the “magic”, as well as fun ideas for what leaves can be used for!
Saving leaves
The simplest and known method Preserving leaves means drying them under a press. But this method is suitable if you want to make a herbarium. Simply storing it in a vase or somehow decorating a room with dried leaves does not work very well, because the leaves become too brittle. Therefore, if we want to decorate a room using leaves, then it is better to choose another method of “preservation”.
In order to “extend the life” of fallen leaves, it is best to collect “wet” (recently fallen), undamaged leaves
Method 1 – soak in glycerin

To do this, we need a baking sheet (or a deep tray), a board (which will completely fit into the tray or baking sheet, in fact, glycerin itself (a lot)
Glycerin is the best remedy to maintain plasticity.
We make a solution - 2 parts water and 1 part glycerin. We need enough solution to drown our leaves in it. The solution is poured into a tray or baking sheet, leaves are placed in it in one layer, and covered with a board on top so that the leaves are completely recessed. We leave it like this for 2-3 days, and then check it. If the leaves have become plastic, you can dry them, but if they still feel a little brittle and “dry” to the touch, then it is better to leave them for another couple of days.
These ready-made leaves are perfect for decorating a room - wreaths, garlands or just a bouquet.
You can also preserve small twigs in a glycerin solution.

How it's done:
1. Cut off small branches with leaves and immediately immerse the stems in a container with warm water. Let them sit there for about 2 hours, away from direct sunlight.
2. Make a solution of 1 part glycerin with 2 parts water (you can add a few drops of dishwashing liquid) and bring it to a boil. Then reduce the heat and simmer it over low heat for 5-10 minutes.
3. Allow the solution to cool completely.
4. Remove the branches from the container with water, and break their ends with a hammer so that a larger surface can absorb the solution.
5. Place the branches in a solution with glycerin. Keep away from straight lines sun rays and other heat sources until small drops of dew appear on the leaves. This means that the leaves have absorbed everything they can.
6. Remove the twigs and dry the leaves.
7. Hang the branches with their leaves down to dry.
Method 2 – wax paper

You will need wax paper (for baking), 2 towels, iron
We cut a piece of wax paper and lay our leaves on it in one layer so that there is space between them. Cover the top with the same sheet of wax paper. It turned out to be such a “sandwich”. Now he rips the top with a towel (a kitchen towel, not thick) and carefully, so as not to displace the leaves, iron it. NO STEAM! It is also better to place a thin towel on the surface on which we iron so as not to stain anything with wax. The pieces of wax paper should completely stick together. After cooling, we cut out our leaves, leaving small edges so that the paper remains “sealed”. The leaves are completely intact!
Method 3 – wax procedures

pic
We take paraffin wax (we used regular candles) and melt it over low heat. ATTENTION – we melt in a container that you don’t mind, it’s impossible to wash off completely hardened wax (we’ve had a special bowl for these procedures for a couple of years now).
Where the leaves will then dry, we lay wax paper (again, it’s better to lay it under kitchen towel) (or you can hang the leaves on a rope to dry).
We take the leaf by the stem and carefully immerse it several times in the melted wax.
Now for some fun ideas on what you can do with leaves.
Funny herbarium


pic
A figured hole punch is always useful

pic
Shall we play?

pic
Let's paint
pic

Drawing with prints


pic
This way you can make cards as a gift.

pic
And if you take craft paper (brown) and decorate it with many prints, then the issue of gift wrapping will be solved!
Can you make prints on fabric?

pic

pic
Using pencils


Autumn dresses the trees in gold and crimson clothes, covering the earth with carpets of incredible beauty. Orange, yellow, burgundy leaves, collected in bouquets, can enliven the interior of every home. They make great crafts. But how to preserve this beauty?
Leaves collected in the park quickly lose their chic appearance, wrinkle, darken, and crumble at the slightest touch. Therefore, after a few days you have to throw them away. And I really want them to stay in the vase all winter. But these masterpieces of nature can be preserved if you use simple technology.
I have always used three proven methods. With their help, you can save autumn leaves until spring. They are suitable for a herbarium, and for a bouquet, and for interesting crafts. You can even create paintings with their bright autumn leaves and decorate the walls of your home with them. These are the methods:
Each of these methods has advantages and disadvantages. Now I will tell you more about them.
Even a child can use this method. He will need an old thick book and beautiful autumn leaves. They can be picked up from the ground or torn directly from a tree. It is important that they are free of any defects - holes, rotting areas, tears.

It is better to take an old book that is no longer useful. The fact is that during the drying process the sheet releases the juice present in it, which stains the pages. You can also use a stack of last year's newspapers. You just need to make sure that they do not change their position while the leaf dries. Otherwise, it may become deformed or crumble into small pieces. The sheet must be placed between the pages. It is important that it is pressed down well. If this is not done, it may rot.
If there are no unnecessary books in the house, take any. Only in this case, place paper towels or napkins on the top and bottom of the leaf. They will absorb the juice that is released, and the pages of the book will remain clean. If you have several pieces of paper, arrange them so that there are at least 40 pages between them. Then they will not deform each other during the drying process. You need to wait 2-3 weeks.

This method is good for its simplicity. With its help you can dry any leaves that fit in the book. However, at the same time they become faded and not so beautiful. In addition, leaves dried in a book turn out to be very fragile. They break easily from a careless touch. They can be used for herbarium or creating applications. In a bouquet they do not look very impressive.
This method is also very simple. The good thing about it is that you can get the material for crafts in just a few minutes. A microwave comes in handy if a kindergarten or school suddenly requires you to bring a herbarium urgently.
Despite its apparent simplicity, there is no need to entrust a child with drying the leaves in this way. The fact is that the drying process should only take a couple of minutes. If the sheet is left in the oven, it will turn black and wrinkle. To a small child It is difficult to count the right time, so it is advisable that an adult do this work.
Before putting the leaves in the microwave, you need to remove moisture (if any) from them. You can dry several leaves at the same time in the oven. To prevent them from sticking together, do not place them next to each other. There should be a small distance between the sheets.

You need to place them on a paper towel folded in two layers. Cover the top with another layer of paper. Carefully place this structure in the microwave and turn on the device for 30 seconds. During this time, the leaf will not have time to become completely dry. Therefore, you will then need to turn on the oven several times for 5 seconds. The maximum amount of time a sheet should spend in the microwave is only 3 minutes. If you leave it too long, it may even catch fire. That is why such work must be done by an adult.
If you really need it, the leaves prepared in this way can be used immediately. However, it is better to give them a little more time for final drying. After microwaving, place them in a dark place overnight. It's even better if they dry for a day or two.
If you notice that the sheets are becoming faded, immediately treat them on both sides with acrylic spray.
This method is a little more complicated than the previous two, but an older child can also cope with it. To work you will need:
There is no need to take leaves that are too dry, because during the work they will curl in the corners and sides. A sponge brush and varnish can be purchased at a store that sells art supplies. Some craftsmen use PVA glue instead of varnish, but the result is much worse.
It is advisable to start processing on the day the leaves are collected. The work process is very simple. You need to carefully coat the leaves on one side with varnish and lay them out to dry. To do this, you can use not only newspaper, but also any other paper, for example, pieces of wallpaper left over after renovation.

When the varnish is completely dry, you need to apply it to the other side of the leaves and lay them out on the paper again. This technique allows you to completely preserve all the shades of autumn leaves and makes them more durable. Most often I save them this way. I like maple leaves. They are large, with carved edges, and have a long petiole. I make them up amazingly beautiful bouquets, which please the eye all winter.
I recently learned that there are other ways to save autumn beauty. One of them is treating the leaves with wax. This method is also quite simple, but only adults should use it.
You need to prepare the following materials and items:
It is better to take a white candle, because colored wax will slightly change the shades of the leaves you collected. First you need to carefully sort through them, throw away all the torn and twisted ones. The rest need to be wiped off if they are wet.

Next you need to melt the wax. To speed up the process, the candle can be cut into pieces. Melt the wax not over a fire, but in a water bath. When it becomes liquid, you need to take the leaf by the tip of the petiole and dip it in wax. It is recommended to do this 2-3 times to get a thicker layer.
Next, the leaf can be placed on wax paper or hung by the petiole on a rope using a clothespin. You need to use waxed paper, because wax can stick to any other paper. This method allows you to perfectly preserve all the shades of an autumn leaf.
IN in this case We don't need a candle. This method is not very complicated, but it requires attention. You need to prepare:
Leaves brought from the street should be carefully examined and wiped if there is moisture on them. After this preparation, place them between two sheets of wax paper and iron them.

From high temperature the wax on the paper will melt and stick to your leaves. The steam function cannot be turned on. Keep the hot iron on the piece of paper for no more than 3-5 minutes on one side and the same amount on the other.
After ironing for 5 minutes, try the sheet. If it is not completely dry yet, repeat the procedure again. When the wax on the leaf hardens, you need to take scissors and carefully trim off all excess.
This method seemed to me the longest, but it helps to preserve not only individual leaves, but also entire branches. Of course, there is no need to break the tree. Often twigs remain after autumn pruning. Sometimes they fall from the trees on their own. The leaves on the branch should hold very tightly.
You need to prepare:
Glycerin needs to be diluted with water, add a few drops to the solution detergent. Some craftsmen advise putting the twigs in water for several hours. However, you can do without this.

Their edges must be beaten with a hammer so that the liquid can easily reach the leaves. Now you need to immerse the twig in the solution for a period of 3 to 5 days. During this time, the leaves should be saturated with glycerin. After 5 days, the twig can be removed from the solution, allowed to dry and used for further creativity. This method not only preserves the color of the leaves, but also makes them more saturated, bright, and beautiful.
Choose the method you like and create with pleasure.


