Nowadays, many types of garage doors have been created that are distinguished by their convenience and reliability. The most ergonomic and comfortable to use among the available options are considered to be traditional lifting (folding) structures, which, when opened, effectively disappear into the ceiling.
Overhead garage doors are most often manufactured in two main versions. They can be sectional or rotary. Gates of the first type are structures assembled from several plastic, wooden or steel panels up to half a meter high. The connection of individual elements into a common structure is carried out using hinges. Moving parts (couplings, rollers) are made of plastic or metal. But gate guides are always made of stainless steel. The inside of lift-and-turn structures is insulated with polyurethane foam. This ensures high-quality thermal insulation of the garage.
Pivot garage doors are characterized by decent strength characteristics, simplicity and safety of operation. The disadvantage of these designs is that it is almost impossible to make them yourself. If you plan to equip your motorhome with such gates, you will have to purchase them as a set of elements in a specialized store. You can install the factory kit yourself, following the manufacturer's instructions.
You can make your own up and over gates. Their design, which we will discuss in detail in the next section, is simple and durable. The key advantage of such folding systems is high level garage protection. They cannot be hacked without noise. In addition, turning structures provide truly convenient exit. They also do not take up extra space in front of the garage, which is very important for many motorists.
Disadvantages of rotary systems:
Another disadvantage of the rotary design is that if the damage is significant, it is impossible to repair the system. The gate will have to be completely dismantled and then reassembled.
Structurally, the described systems, which many garage owners make with their own hands, are made in the form of the most durable and reliable support frame and a canvas covering the entrance opening. A diagram of such structures is shown below.

Folding gates can theoretically be built without guides. But experts do not advise doing this, so as not to reduce the operational reliability of the structure. The door leaf is made in one piece. If you have extra wood on your farm, you can actually assemble the entrance panel from it. But it is better to make the canvas from profiled sheets. This material is relatively inexpensive. And the fabric made from it provides excellent optimal protection from strangers. If the motorhome is used year-round, the corrugated sheets must be insulated with polyurethane foam.
To make lifting the web easier, we recommend using special compensator springs. In general, the movement of the gate leaf is carried out by levers, springs and rollers (the so-called hinge-lever mechanism). The system drive can be mechanical or electrical. Mechanics are considered more reliable during long-term use. Electric drive is more capricious and more expensive. But on the other hand, it is much more convenient to use (the opening/closing of the structure is carried out by command from the remote control).
Folding systems function simply and clearly. When the gate is opened, its upper part is deflected and then moves towards the beam along bearings or rollers, where it is fixed in a horizontal position (parallel to the ceiling). This system does not require the installation of external hinges, which could be cut off by attackers with a grinder. This provides unique security for overhead gates.
In addition, the sash that closes the entrance to the garage is adjacent to the supporting frame from the inside. Therefore, it will be much more difficult for criminals to pull the gate using a cable connected to a tractor or other powerful vehicle.
The garage doors are manufactured according to a strict algorithm. First of all, decide on the type of mechanism for closing/opening them. We have already talked about the hinge-lever system. It is considered the most convenient, especially if the structure is built with your own hands. The main thing here is to achieve strictly vertical installation of the guide elements.

In some cases (in particular when installing heavy and large gates), such a mechanism may not be able to cope with lifting the sash. Then you should pay attention to the lifting system, which includes a counterweight. When implementing it, a metal cable should be attached to the lower corners of the support frame and securely fixed, and run it in the direction of the pulley along the block. A weight is placed at the end of the cable. The mass of the latter is selected taking into account the weight of the structure. The mechanism with a counterweight is labor-intensive to install. Therefore, if the gate has a standard mass and regular sizes, it is better to install a hinge-lever system.
Next, develop a design design. Measure the parameters of the caravan opening for your vehicle, look at the drawings available in the public domain. Use ready-made sketches or create your own project based on them. Below we provide detailed drawing, which will allow you to create lifts with minimal time.

Then stock up on metal pins and rods, strong pieces of wood, brackets, steel corners, rigid springs, if you plan to finish the structure - also decorative elements. Now you can proceed directly to assembling the gate. More on this later.
The gate frame is assembled from two vertical wooden blocks of the required dimensions and one transverse element. These parts are connected to each other by metal plates or corners (the second option is preferable). Then follow these instructions to log in:
Now you need to install the rubber edging on the structure. If desired, additionally stick on compensator pads. They will increase the stability of the folding structure. All you have to do is secure the canvas properly in the box. The gate is ready! You can use them for 10–12 years without the need for any repair work.
When buying a car, every owner thinks about how and where to store it. Ideal place There has always been and remains a garage. Its convenience determines the quality of life, no worse than other rooms in the house. The installation of garage doors is becoming more and more convenient and practical every day due to the fact that the industry does not stand still. Classic swing gates fade into the background. Practical ones are becoming increasingly popular today. overhead gates for the garage. Creating them yourself does not seem difficult if you have minimal skills in performing such construction work. To find out how to arrange them correctly, quickly and efficiently, read this article.
To make a homemade overhead garage door, first determine suitable option designs.
Based on this principle, the following types are distinguished:

The most common type of garage door at the moment is the overhead sectional garage door. They are made in the form of panels 40-60 cm high. 
Panels are made from several types of materials:
To maximize the quality of thermal insulation, such panels are filled with polyurethane, and the surface is protected with a special coating. Between themselves individual elements fastened with hinged hinges. All moving parts, such as clutches and rollers, are made from reinforced plastic combined with steel components, and the guide skids are made from materials that do not corrode. 
The operating mechanism of sectional garage doors is quite simple - they are pulled along runners to the ceiling when opened and fall vertically down when closed.
The main advantages of such gates include the following features:

In addition to the advantages sectional doors lifting type also have a couple of disadvantages:

When determining the features of such structures, it is certainly worth noting the following nuances:

The solid-panel type garage door has a lot of advantages:


Important! The main difference between these two designs is that sectional Garage Doors needs to be mounted only as a kit, whereas all the elements of an up and over gate can be prepared and installed with my own hands.

Watch a video review of overhead gates to get a clearer picture of their operation and design.
To install any type of garage door you will need the following tools:

To correctly install sectional overhead garage doors, follow these steps in exact sequence:
The video below will help you quickly complete the task of creating overhead garage doors. Please read it carefully.
Considering the fact that the construction of this type of gate will have to be done entirely on your own, we will highlight the main stages of the work in somewhat more detail. 
Homemade garage doors are the most economical option filling the garage opening without restrictions in convenience, functionality and design solutions. 
Before you start work, decide on the choice of mechanism by which the gate is directly opened:

To properly design a garage door, do the following:

As soon as you draw up or select a sketch, purchase the following materials and tools for work:


If you want to increase the attractiveness and reliability of the door leaf, equip it with the following additions:

If necessary, strengthen the structure itself using one of the appropriate methods:

The only thing you can do to save money when choosing overhead sectional garage doors is to install such a mechanism yourself. All other points, when trying to save money, will still require sacrificing certain advantages, although some options are quite acceptable. It all depends on your personal vision of the garage design and the regularity of its use.
Check out some of the most popular solutions to reduce the cost of garage door construction:

Overhead garage doors - modern way protect your garage from burglary with a convenient and beautiful shield. Whether you entrust installation and installation to specialists or do the work yourself is up to you to decide. The main requirement for further convenient operation is right choice suitable type garage devices, competent it interior layout and compliance with all assembly instructions.
Lifting garage doors are convenient, reliable, practical design to protect the premises from entry by unauthorized persons. When opened, they take a horizontal position, moving forward slightly, forming a small canopy over the entrance.
How to make garage doors with your own hands, their advantages and disadvantages will be discussed in this article.
There are two types of overhead garage doors:

The space inside the door leaf is filled with insulation – polyurethane, which provides effective thermal insulation of the structure.
The door panels, in this case, are connected using hinges. In such products, rollers, couplings and other moving elements are made of metal or plastic; materials that are resistant to corrosion are used for guide rails.
Advantages of this design:
Flaws:
To reduce the cost you can:
Tip: If you want to install a structure of this type in your garage with your own hands, you should purchase a set of elements already prepared for assembly, and install them yourself.

The advantages of this design are:
Design disadvantages include:
Overhead garage doors consist of:
Tip: Be sure to carefully adjust the spring tension and ensure high accuracy of installation of the guides. In this case, to prevent the shield from jamming, it is necessary to set the guides strictly vertically and be sure to have both of them parallel to each other.
Before you start making overhead garage doors with your own hands, you need to decide on the opening mechanism. After choosing its type, the dimensions of the gate opening are taken, a design sketch is designed, materials and tools are purchased.
To work you will need:

The instructions for making garage doors with your own hands suggest:

Most experienced car enthusiasts prefer old swing or sash gate options, considering them the most secure and reliable due to the heavy weight and thickness of the metal. But, as practice shows, sash systems have worthy competitor, namely, folding garage doors. Popularity folding design such that today it accounts for approximately three-quarters of garage doors sold. It is worth understanding the reasons.
To understand the difference in using lift-and-fold systems and the old swing structure, you need to try them out in practice at least a couple of times to knowledgeable person the difference is visible to the naked eye:
For your information! Often, drivers decide to change regular gates to folding ones for only one reason: strong wind there is a chance of getting hit by the door on the car body at the time of departure.
Folding gates are cheaper to manufacture, they are more convenient to use, and the simple device allows you to build them yourself. But it is not possible to install such a system in every garage; at a minimum, you need free space in the ceiling above the entrance to the garage.
The structure and operating principle of the gate are clear from the diagram and drawing below:
The plane of the folding gate makes a movement reminiscent of rolling around a conventional cylindrical surface of large radius. To facilitate the lifting of a steel or wooden panel of a hinged gate, the design uses compensation springs or counterweights in the form of a load suspended on cables.
Important! Unlike swing systems, folding gates do not have external hinges that can be easily cut with a grinder. In this case, the panel covering the doorway is adjacent to the supporting frame from the inside, so it is much more difficult for attackers to pull out the garage door with a cable hooked to the tow bar of a pickup truck or tractor.
The easiest way to make a hinged gate design is from a steel angle and channel. Initially, you will need to measure the dimensions of the doorway, cut it from the channel and weld the frame of the garage doorway.
At the top of the frame, two horizontal corners with a flange width of at least 40-50 mm are welded. The length of each corner is more than two meters, so welding and assembly of the entire structure must be done “on the ground”, before installing the folding gate system in the doorway.
The angle of attachment of the corner to the frame must be adjusted according to construction level. After welding to the frame, each corner is strengthened with a temporary brace made from a board or wooden slats to avoid deformation of the structure at the time of its installation in the garage doorway.
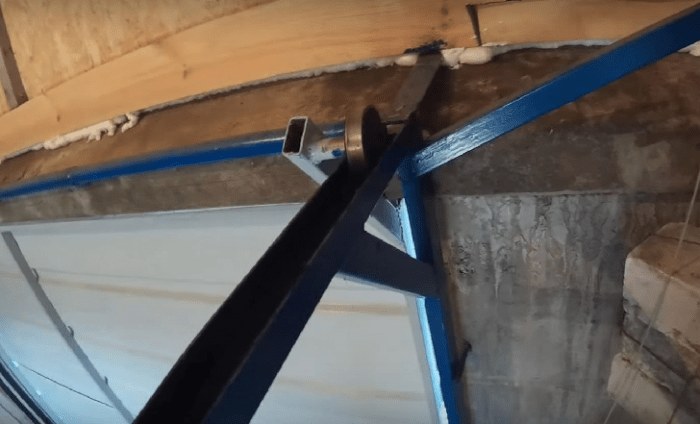
If a lift in the form of loads suspended on cables will be used in the folding gate system, one pin with a groove roller with a diameter of 30-50 mm must be welded to the upper part of the frame.
Particular attention should be paid to the manufacture of the main panel of the folding gate. Structurally, the folding panel is a frame made of a pipe or a metal tubular profile with outriggers-brackets welded to the lower and upper parts.
The tubular frame of the panel must be marked and welded exactly to the dimensions of the stationary frame. The main condition is to carry out welding in three steps so that the frame of the folding panel does not turn out like a “propeller” due to overheating.
First, the cut pieces of the profile are laid out on a flat area and fixed together by spot welding. At the second stage, the joints are boiled on one side of the folding frame, after 30 minutes they are turned over and boiled from reverse side. If the panel frame turns out to be strictly in one plane, you can attach sheet metal, otherwise you will need careful straightening using blowtorch and sledgehammers.
Before installing the tilt gate system, you will need to perform preliminary assembly of the structure. To do this, a stationary frame with welded corner guides is laid out on a flat horizontal platform. A freshly welded movable panel is placed on top of the frame, its position is aligned so that it will stand in the closed position in doorway garage.
To connect the two parts of the gate, you will need to weld oblique brackets with roller or bearing rollers to the upper profile of the panel.
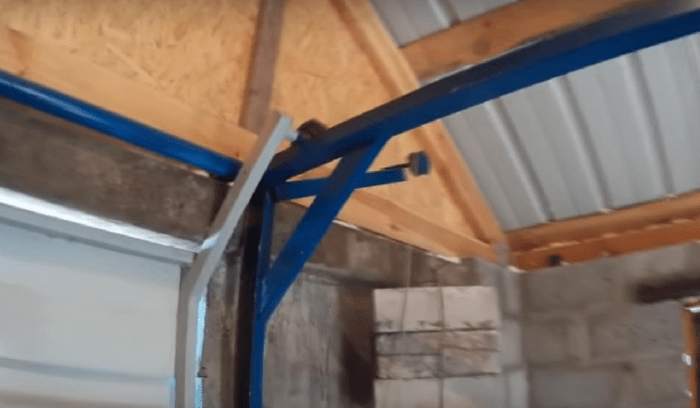
The reliability and smooth operation of the lifting mechanism depends on how accurately the supports are installed. Groove rollers are placed on the studs welded to the stationary frame. Additional L-shaped brackets are welded to the bottom beam of the panel, to which the support gate lift-lift cable will be attached.
All that remains is to install the stationary frame in the garage doorway and secure it with anchor bolts to the side walls of the garage. Subsequently, the fastening points will need to be carefully filled concrete mortar and plaster. Until the stationary frame is finally fixed, it will be necessary to align its position with the building level. Next, you need to make a U-shaped device, with which the ends of the corner guides are fixed to the ceiling.
We mount up and over gates for the garage with your own hands
Up-and-over gates are the most convenient, reliable, practical, but quite expensive type of enclosing structure for a garage. In the open position, they take a horizontal position and move forward slightly, forming a small canopy over the entrance.
Their pros and cons, as well as self-installation, will be discussed in this article.
Advantages and disadvantages of this type of gate
The up-and-over design has several clear advantages over other types of garage doors:

The disadvantages of up-and-over gates are mainly associated with some limitations and features of the design itself, which are expressed in the following:
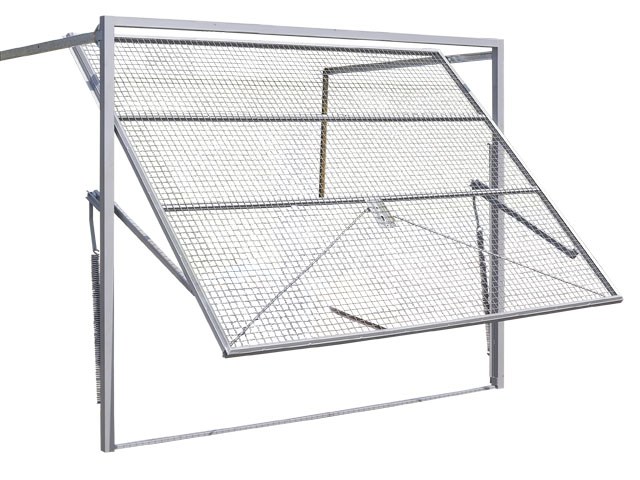
The design of up-and-over (panel) gates is quite different simple device. It consists of frames, canvas and guides along which it rotates around its axis, moving from vertical to horizontal position and back.
The basis is a steel frame, which is fixed in the garage opening or behind it and is the leading part when the gate moves. For its manufacture, rectangular pipes are usually used.
When the gate is opened, a roller mechanism and lifting arms are activated, with the help of which the gate leaf moves along the guides and is then fixed under the garage ceiling. The lower part of the canvas rises up and forms a canopy over the garage opening. The compensation springs stretch when the gate is closed, but remain free when the gate is open.

Gate in open position
The opening mechanism for this type of gate is of two types:
Control of panel garage doors can be manual or using an electric drive (usually with a remote control).
Materials for up-and-over garage doors should be selected depending on the mechanism and leaf used. For the simplest gates that you can make with your own hands, you will need (all measurements are given in centimeters):
As a canvas, you can use a board made of boards covered with metal, a solid canvas or a sandwich panel.
For self-made gates the best option is a board panel covered with galvanized iron and covered protective composition. For thermal insulation, you can use polystyrene foam, polystyrene foam or insulation in mats, and to improve appearance– veneer finished gates wood panels or plastic.

Self-assembled gates
For self-installation up-and-over garage doors will require a traditional set of tools:
The first step in installing a gate is designing it. For this it is necessary measure the opening and draw up a sketch yourself or select a ready-made drawing.
Drawing of up and over gates
After this, materials and tools are purchased and the actual work of making the gate begins:
After assembly is completed, the structure is painted to give it aesthetically pleasing, hard to reach places It is recommended to paint before assembly.

For ease of use, the canvas can be made with inserts made of translucent materials, which will increase the amount of light, and also be equipped with locking devices and security systems that protect against pinching or prevent break-ins.
Homemade up-and-over gates are the most economical opportunity to close a garage opening without limiting the functionality, ease of use and originality of their design.
On video - detailed story O self-production up-and-over garage doors:


