This article describes the basic principles of product photography required to achieve professional level. The article (in English) was published for stock photographers on the Dreamstime photobank website.
Lighting plays a vital role in photographing objects. There are two main types of shooting: on an isolated background (a uniform, often white background) and on a natural background (table, interior, other surroundings). Lighting conditions for each of these types of shooting can vary greatly; both the use of a single light source and complex schemes involving several light sources and different backgrounds are possible.
We will focus on the first type of photography, namely, photographing objects against an isolated background, since this is the simplest, most effective and most cheap way get acquainted with this direction in photography.
Isolated objects can be illuminated with either strong diffuse light (an object with little or no shadows) or direct light (an object can have deep shadows while the background remains white).
For the first option there are no specific lighting schemes; the more sources of diffused light used, the better. Below are some tips you can use when photographing objects isolated against a background. Setting up the light can be very simple: a white cardboard box with a diffused light source attached to it on top (medium or softbox large sizes, the light falls on the subject from above), the flash can also be reflected at the ceiling. Lighting staging can also be complex: multiple lights on stands plus light panels.
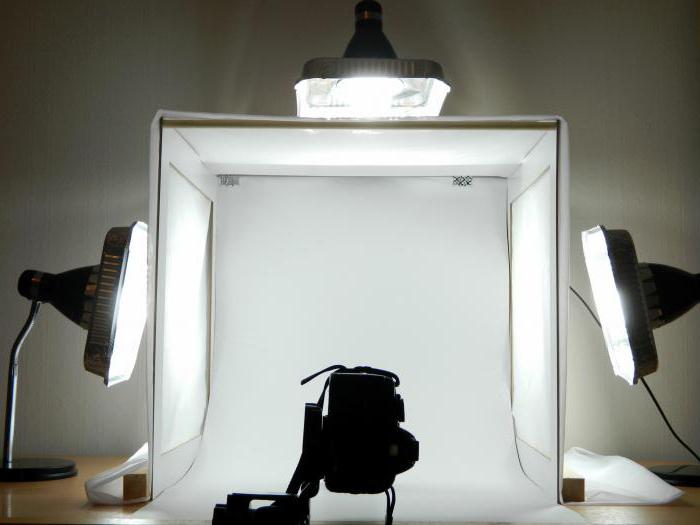
Most devices for product photography can be made independently. There is nothing complicated in making a light panel: you will need organic glass, metal or wooden frame or cardboard box, top part which needs to be cut out, leaving only its edges. Plexiglas is placed on top of such a base, and a light source is placed inside. To understand the principle of creating a panel, pay attention to how it looks in its original form:

From the number professional installations For photographing objects, object tables are most often used:

...and lightcubes:

A lightcube can also be made from scrap materials:

The direction of light is chosen depending on the subject and necessity. Nice photo can be obtained with one light source, the principle “the more the better” does not work here. Light is needed to give an object the same appearance in a photograph.
Simple lighting schemes:
Regardless of what you are using - a table or a light cube, the main light source (drawing light) should fall from the camera side, from above.

If the task is to photograph objects without shadows, it is best to use a lightcube with two light sources. You can also use a backlight, one source of which should be located under the object, provided that the surface for the subject is transparent (plexiglass), and another source should be placed behind the object: it will outline the contours of the subject and highlight the shadows formed by the main light source. Backlighting also creates an interesting reflection on the surface where the item is placed, if that surface is reflective.
Another option: a light panel on which the object is placed on top, and one light source above the object - it is best to use a softbox, the larger its size, the better.
More complex circuit lighting may look like this: the main light sources (two) are placed on the sides of the camera at 70 degrees (the position can be changed depending on the needs of the photographer). If you are photographing subjects in a room with white walls, the light from these sources can be reflected from the walls of the room, directing it towards the walls or corners of the room: this way you can get more diffused light. If you don't have a flash that can be placed under a transparent table, you can use it instead. White list paper, but make sure that the light reflected from the walls reaches this surface.

Lighting
Lighting equipment – important choice. You can use either studio flashes/heads or constant light (incandescent or fluorescent). However, mix Various types light is not recommended because they different temperature light and, accordingly, different white balance. If you are using multiple incandescent bulbs, make sure they are the same Kelvin temperature before shooting.
Softboxes are an excellent replacement for lightcubes and allow you to use fewer light sources, so every photographer should have them. Softboxes can be used both for shooting subjects against an isolated background and for shooting subjects in natural surroundings.
Types of light
Regardless of the type of subject photography: whether it’s shooting against an isolated background or in natural environment, there are several types of light, each used in specific conditions.
Key light is the main light source that outlines the shape of an object and sets the main direction of light.

Fill light illuminates the shadows that remain in the main light, reduces contrast and makes the overall lighting softer - without a sharp transition between light and shadow. Most often, a softbox is used for this type of light.

Backlight is placed behind the subject, with the subject positioned between the camera and the light source. Used to highlight the outline of an object.
Background light is used to highlight the background and allows you to separate the object from it.
Object shooting at home is possible not only in fantasy, but also in reality. Many photographers, especially beginners, think that subject photography can only be done in a specially equipped studio. But they are completely wrong. Even at home, it is quite possible to create a small but effective photo studio to take high-quality photographs.
A table for product photography is the simplest option. You can use it to photograph small objects or shoot still lifes. This table is very easy to build by hand. Even an inexperienced photographer can cope with this easy task. First, you need to buy enough large leaf white cardboard. Secondly, you need to find. For this you can take any thick book, vessel or any other thing. big size, since the support will not be visible in the frame. It is better to place a table for product photography on wide window sill. Special attention must be directed towards the incident light from the sun. After all, if the subject being photographed is in a bright stripe sunlight, it will cast rough and deep shadows on the table, which will not lead to the desired result in the photo. That is why a window that faces the shadow side is best place for organizing the object table.
There are special professional photo boxes for subject photography. Their price is quite high, so there is no point in purchasing such structures for one-time work. A high-quality photo box can be made at home. To do this you will need a cardboard box and a sheet of Whatman paper. It is desirable that the selected cardboard box has a cubic shape. Next, the bottom of the box is removed, leaving the back intact. It is necessary to make large square cutouts on the top of the box and on its sides and seal them with whatman paper. The inside back of the box and the bottom itself should also be covered with a sheet of white paper. Based on the above steps, making a photo box at home will not be difficult at all.
Subject photography at home does not require compulsory work photographer with photobox or table. It is quite possible to do without these things. Many amateur photographers choose the simplest method of shooting. Before starting work, it is necessary to determine which section of the wall of the home is the lightest. If the wall is not a single color, it needs to be covered with a background (for example, a sheet of whatman paper or a piece of fabric). The subject to be photographed must be placed on a stool, which is covered with the same material from which the background is made. It is better to photograph various jewelry on polished granite, then the beauty of the jewelry will be clearly visible in the photo thanks to the reflective surface of this aristocratic stone.

A great activity for a novice photographer is product photography at home. The right light for upcoming work, can radically affect the result of filming. Lighting directly depends on the selected equipment for work. If objects will be photographed on the windowsill, then chief sun. If additional lighting is needed, a reflector can be used. You can make it yourself using cardboard and foil. If such items are not at hand, then even an ordinary white sheet of paper can serve as additional illumination. In addition, absolutely any surface light color can act as a reflector.
Product photography at home, which uses a photobox, requires a minimum of three light sources. Thus, the object will be illuminated through the walls of the photobox from all the necessary sides, that is, from above and on the sides. The result is a great looking photo with no harsh or unsightly shadows. If you pay attention to the production proper lighting With more attention and time, shadows in the photograph can be completely avoided. Additional light sources can be table lamps or any lamps that can be found in almost any home.

In product photography, clarity and sharpness of the subject is of paramount importance. To get beautiful and contrasting photos, you need to use a tripod. This is a simple accessory that will help avoid camera vibration when shooting at long exposures. If there is no way to purchase a tripod, then you can use some kind of fixed support instead. Also, no remote control remote control With a camera, the process of filming can become quite difficult. In extreme cases, the remote control can be replaced with a cable to perform a contactless shutter release.

Product photography often involves painstaking work with composition. After all, it is not always necessary to place only one object in the frame. To correctly arrange several objects, you need to create a multi-level space. For this, various supports are used, which can be either visible or hidden under some background material. If you need to highlight one object among many others, then you need to emphasize it with the help of light or the location of the object in the foreground.
Product photography at home on a white background is the most The best decision for the beginning photographer. After all White color will help create a clear and contrasting image. For uniform illumination, the background is usually illuminated from the front and back sides. To create a clear reflection effect, glass mirrors should not be used. They make the reflection double. For this purpose it is necessary to use polished material. If you need to secure a small product while working, you can use a miniature hot glue gun. First, glue is applied to the object itself, and only then the object is attached to the background.

To make product photography at home enjoyable excellent result, it is necessary to pay attention not only to work equipment, but also on the subject being photographed. The subject should be beautifully located on an improvised mini-site for filming. At this stage, you need to make all the necessary settings in the camera. Manual mode - the best choice for subject photography. In photographs taken in automatic mode, exposure flaws are often visible. If the subject chosen for work is colorful and bright, and the background is dark or even black, then manual mode will be an excellent choice for shooting. A rather painstaking process is subject photography at home. White balance and sensor sensitivity settings are also extremely important. The ISO value should not exceed two hundred units. To reduce the noise level in a photograph, you need to lower the ISO number. This action has great importance in the work of a photographer. After all, as a result, the object in the image should look natural and harmonious.
To get a high-quality photo, you need to turn off the flash on the camera. For good results, there is enough light from a window or table lamps. After the first test shot, you need to pause the photographing process. The resulting image must be carefully examined and analyzed. If the photo contains such visible problems, such as exposure errors, unclear sharpness, incorrect lighting, then you need to correct all the errors by changing the camera settings or the light. If the repeated subject photography turned out well, then you can safely continue working.
Quite often, photographers are faced with the problem of lifelessness in their photographs, although at first glance everything looks perfect. If the photo needs to be creative, then you can make the image more dynamic. For example, you can add small sprays from a spray bottle that will create volume. An interesting addition could be confetti, feathers or even It is important that aids did not get on the camera lens. These secrets of product photography will help you achieve the necessary “air” in the final image. If the photograph should be full of colors, you can try placing it close to the subject New Year's garland. Thus, by choosing the flickering mode, it is possible to achieve interesting color accents. It is necessary to take a series of frames, and then select the most harmonious ones from them. As you work, you must constantly brush off dust from the objects you are photographing so that they look perfect in the photo. Product photography at home without expensive studio equipment is real. You just need to use the above tips and good result will not keep you waiting.
This is the first lesson in a mini-course on the basics of product photography. This mini-course is intended for those who are just starting their journey in photographing objects for various catalogs and advertising agencies.
I was prompted to write such a mini-course by the fact that most of the articles on the site on subject photography are difficult for beginners to understand and repeat.
In this lesson, I will tell you which camera settings to use for continuous and pulsed light, shoot with both, and also talk about using simple modifiers - a softbox, a reflector and a diffuser panel.
I would like to immediately make one important note: never copy exactly all the lighting schemes that are given in various textbooks and articles. Work from the subject, not from the light sources. For different but similar items you will still need to change the position of the sources, but it is important to respect general principle obtaining a cut-off pattern.
If you do not know any of the terms and definitions that I will use, I will try to provide links to relevant articles so that you can study the necessary material on your own.
To photograph objects, the following settings are usually used:
If you use constant light for shooting, then stick to next rule- decide first with depth of field and aperture value necessary to obtain it. A test “shooting” to determine the depth of field can be performed at high ISOs, since the quality is in this case It doesn’t matter, but time is saved. Don't forget to switch the value laterISO is back to minimum! To adjust exposure, use only by changing the shutter speed, do not touch the aperture, since with its help we established the necessary depth of field.
Having a tripod for product photography is a must, regardless of what light sources you use - constant or pulsed. Below I give examples of how shutter speed affects exposure.
ISO 100 f/11 1.3 sec

ISO 100 f/11 3.2 sec
With pulsed light sources (in other words, flashes), the situation will be completely opposite. In this case, to adjust the exposure it is necessary to adjust the power of the light source, that is, flashes. The shutter speed in this case does not affect the exposure, so you can set it equal to or slightly lower than the sync shutter speed (for different cameras this value is 1/160 -1/250 s). It is better not to use the aperture to adjust the exposure, since with its help we determine the depth of field. Below is an example showing that when using pulse sources Light shutter speed does not affect exposure.

ISO 100 f/10 1/100 sec
ISO 100 f/10 1/200 sec
To demonstrate the effect of various light modifiers on the final image, let's start with a hard light source - a monoblock with a reflector. If you use handheld flashes, it will simply be a flash pointed directly at the subject. I specially selected items from different surface- matte and glossy to show how the harshness of light affects them. Matte, non-glare surfaces tolerate hard light relatively well, but on glossy surfaces, unsightly sharp reflections appear. The shadows are also pronounced, with a sharp border.

Then I used the simplest light modifier - a diffuser panel. You can read how to do it in the article. You can even just stretch the white fabric by hanging it on a rope (if you are too lazy to assemble the frame). Notice how the light and shadow pattern has changed: the shadows have become much softer, the hard highlights have also softened. The advantage of a diffuser panel over a softbox and similar sources is that we can widely change the hardness of the light by simply moving the flash closer and further away from the panel. This changes the size of the light spot. But in any case, the light will be softer than from a flash without a modifier.

Next, let's try using a softbox. Please note that the hardness of the light when using a softbox depends on the distance and size of the softbox. The closer the softbox is to the subject, the softer the light. The larger the softbox, the softer the light. The flare and pattern from a softbox are different from that when using a diffuser panel. The shadows are soft, but the highlights are harsher.

Now let's place the same diffuser panel between the softbox and the subject being filmed. Notice how soft the light has become, the highlights on glossy surfaces have become more shaded.

To soften the shadows, place a white reflector to the right of the camera. Now we have filled in the shadows, as if adding an additional light source. The location of the reflector is determined experimentally. As a reflector, you can use a sheet of non-glare matte white plastic or even whatman paper.

© 2013 site
In this article, I do not set myself the task of covering all the nuances of subject photography without exception in all its diversity. Rather, I strive to help a novice photographer who is thinking about product photography for the first time (for commercial or other purposes), but does not know how to approach it.
We will talk about shooting isolated objects on a white background, since it is this type of subject photography that is most in demand in photo banks and, by a happy coincidence, is extremely easy to learn. First of all, you will need accuracy and attention to detail.
Not all objects are equally suitable for isolation on a white background. I don't want to say that you should limit yourself to photographing only simple objects - you can photograph almost anything. However, shooting some things involves considerable difficulties, both directly during shooting and during post-processing.
Let's consider the properties of an ideal object:
Thus, the ideal subjects for shooting against a white background are: Walnut; unglazed clay pot; wooden box and so on. An example of the worst object would be, say, a white long-haired cat trying to fish a goldfish out of a round glass aquarium.
Make sure that the items you remove are clean. The dust, invisible at first glance, will be clearly visible when carefully viewing the images on a computer monitor. If you are shooting a small object so that it appears larger than its actual size in the photograph, then be prepared for the fact that any dirt and dust will become intrusively obvious at 100% magnification.
To bring your shooting subjects into a marketable state, it is best to use optical brushes and microfiber cloths, i.e. those tools that do not leave marks or fibers.
On smooth and especially glossy surfaces, fingerprints are clearly visible and must also be eliminated. To avoid leaving new prints, it is sometimes advisable to wear medical gloves made of latex or nitrile before work.
Of course, dust, small stains of dirt and individual fingerprints can be removed in Photoshop. Another question is, how long will it take? In my opinion, it’s easier and faster to take care of proper cleanliness once than to then remove the same specks of dust over and over again on each of the hundreds of processed images.
I have had the opportunity to do subject photography even on fresh air, setting up a table in the middle of the lawn at his dacha. On a moderately cloudy day, the cloudy sky is a source of perfectly diffused light, quite suitable for subject photography.
Typically, isolates photographed for photobanks have a slight blurry shadow underneath them. If complete isolation without any shadows is required, then objects are placed on frosted glass or thin white plastic and additionally illuminated from below.

To isolate without shadows, I placed a piece of glass on top of four clear glasses, thus raising the cup above the paper.
And if I had not been too lazy to find frosted glass,
the reflection would also disappear.
General information about exposure can be found in the article “Exposure: Theory”. About exposure when working with studio flashes, see the article “Studio flashes”.
If you use studio flashes, you should prefer manual exposure mode, but for constant light, aperture priority mode will work.
I usually use an aperture around f/16, but sometimes you may need a greater depth of field.
Use a histogram to evaluate exposure. Your goal is to work the subject well without overexposing it. White background You can overexpose completely freely, provided that the overexposure area does not interfere with the object. Don't try to make the entire background completely white - you'll still have to etch it out in Photoshop. Just try to get as close to the final version as possible to make later editing easier.
Thank you for your attention!
Vasily A.
If you found the article useful and informative, you can kindly support the project by making a contribution to its development. If you didn’t like the article, but you have thoughts on how to make it better, your criticism will be accepted with no less gratitude.
Please remember that this article is subject to copyright. Reprinting and quoting are permissible provided there is a valid link to the source, and the text used must not be distorted or modified in any way.
Subject photography at home has very practical goals: to successfully sell your work on social networks or through an ad, to attract interest in it greatest number potential buyers or just show off your work on Instagram. One way or another I would like to receive professional quality pictures at home.
SHOOTING WITH NATURAL LIGHT
It is better to use light from the window; it is soft, does not produce harsh shadows, and its color temperature does not distort the picture. Don't shoot on sunny side(bright Sun rays give sharp shadows as in Figure 1, they cannot be saved even by a reflector, very useful article about the light), on clean slate Whatman paper or album sheet, depending on the size of the subject being photographed.
Any table can temporarily turn into a subject table for photography at home: a computer table, a kitchen table, a coffee table. In some cases, when the object is small in size, even a stool can be entrusted with the role of a table for object photography.
PICTURE 1
FIGURE 2
FIGURE 3
The window should be located to the left or right of the subject of photography (this is how we get soft filling side light), the Whatman paper should be supported on some kind of stand (backdrop) in such a way (mounting tape will help you) that strong light does not form on the sheet fold, so you will avoid unnecessary shadows from creasing the paper. On the opposite side of the window you need to put a mirror or a white sheet (I put white or shiny silver cardboard for children's creativity from stationery, hold it with stationery clothespins). The principle of light reflection gives you two full-fledged light sources on both sides of the subject, one is a window, the second is reflected light. If you look at FIGURE 3, you will see that two mirrors placed at an angle will remove more shadows, which in our case perfect option, but I still insist on your experiments and the choice that is most suitable for your needs.
If you shoot on your phone, then the automation itself will handle all the settings you need, but if you shoot on a camera, then first try the automatic mode. The camera itself will adjust to the lighting conditions and color temperature of the image (remember that in automatic mode there is room for automatic errors and the color of the same frame may have a different shade at different times).
For those who have already moved into modes further than automatic, it is worth paying attention to the correct white balance. If in automatic mode, the camera will do everything for you and not always correctly and in the way you need, then when shooting in manual modes withIt should be taken into account that we are shooting near a window and the light is daytime, which means that it is worth setting the white balance mode to daylight or a value of 5100-5300 Kelvin so that the photo is not too yellow or blue.
Important: place yourself as close to the window as possible, the table or stool should be almost close, and approximately at the same level with the window, so maximum light will fall on the objects being photographed, the table just satisfies this requirement, although even on the chair you will get a nice picture with absolutely other shadows, I again recommend experimenting and looking for yourself best option. Creativity is always a search for both oneself and best result, as well as a unique style, even in such a simple shooting.
Try to convey the real color, surface texture and dimensions of your products. The main task of photographs is to show in all details what a person is buying. The buyer must trust you and love every detail of the products.
The choice of background determines the perception of the object that is in the frame. Universal solution no: the background can contrast in color with the subject of photography, or it can emphasize it, echoing in shades. The main thing is that the background and the subject do not merge. The product should catch your eye, not what is behind it. If you don’t want to bother too much, make the background neutral: it’s harder to make a mistake.
The texture of the background also creates the mood in the frame. The same objects against a wood background warm shade and will look different on cold gray marble. Great options for the background - paper and fabric: they do not glare or reflect. However, be careful with such backgrounds; they should not steal all the attention and fit harmoniously into your account.
Post photos from multiple angles on your website. On a page on social networks too, just don’t post all the photos at the same time, this will irritate readers. Be patient and do this in different posts, alternating with other photos, this way you will have content for subsequent posts and will be able to remind your readers about the same product several times, paying attention to different details of the product.
Let's definitely general form subject with different sides, but do not collect them into collages of the same product (do not reduce the opportunity to show the product another time), if it does not have different size and you didn’t think of showing different prices or completeness with other products. Photos like #2 are not for social networks, but for a blog or website, do not neglect such angles.
Show the clothes both from the front and from the back; if you are making stylish tags, then show them separately. Take shots of details: try to convey the texture of the material, show fasteners, individual parts or decorative elements goods, and also do not forget about your beautiful packaging, it can also be shown with such frames. Stock up on useful content for your pages.
In food photography they look impressive not only general photos, but also sectional photographs. They better convey the texture of the dish and make it more “tangible” in the frame. Remember the photos of juicy burgers or cakes that will definitely appear in your feed later in the evening and whet your appetite. It's not easy to look at them at night, but that's how food photos should be!
Look at the pages of cool and popular projects and stores where marketers work well and learn from their experience.
Post processing:
I will not stop asserting that any photo, no matter whether it was taken on a phone or a camera, requires post-processing; for these purposes, there are a number of programs for a computer or phone applications. If I shoot on my phone, I use the editor directly on Instagram, there is a pretty good selection of settings that will allow you to bring out the light, or will allow you to give the greatest atmosphere to the photo if you are shooting against a dark background.
Also suitable for editing photos on your phone free apps, such as VSCO, Moldiv, Snapseed where there are even more options. There are many different settings and sliders that you can move to improve your image. To be honest, you don’t even have to delve too deeply into which sliders mean what, just move them here and there and you’ll immediately understand which one improves lighting and which one removes strong shadows or adds contrast. They often have corresponding names.
Don't rush to use sources artificial lighting, if the light from the window seems insufficient. Try setting the camera to automatic mode and leaving it motionless (I highly recommend getting a tripod for shooting with your camera, there are very inexpensive models that will make your life easier, if you shoot on your phone, it wouldn’t hurt to fix it too).
This will not only allow you to “pull” best quality in the existing lighting, but also to avoid “shaking” of the device, which will also have a positive effect on the quality of the image. If you've explored one of your camera's creative modes, you're already on your way! With the help of shutter speed and aperture, you can easily work even at the weakest natural light(cloudy day, unclear weather, etc.). There are detailed articles on shutter speed and aperture on my website.
For those who take pictures with their phones, here’s another important tip.
Before each shooting, wipe the phone lens with a soft cloth. Many people neglect this, but in vain! Fingerprints are constantly left on the lens, and this can greatly affect the quality of shooting. Conduct an experiment right now: take a photo of any object with your phone, and then wipe the lens with a soft cloth and retake the same frame. Compare the two photos and you will be surprised (this is how I found out that the camera on my phone is not broken and I didn’t “got the wrong iPhone”, not like others).


