Some pieces of furniture
Some pieces of furniture seem to have come straight out of a science fiction or spy movie: in fact, they are not at all what they seem. This cannot be said to be a modern invention - furniture with additional secret functions has been made since ancient times. Various hiding places and secret drawers are often found inside antique furniture that has survived to this day. Tables, dressing tables, chests of drawers and cabinets created by ancient masters usually had a dual purpose: they were not only used, but also money, documents and jewelry were safely hidden in them from prying eyes and intruders, which was vital in those turbulent times.

In France, in the 18th century, they even began to produce a new type of furniture - secretaries. The name itself suggests that these interior items were intended to keep the owner’s secrets. As a rule, these were miniature bureaus with many visible and hidden shelves and drawers and a folding tabletop used as a desk.
The boxes were often equipped with secret locks and secret locking mechanisms. Among antique dealers and collectors of antiques, there are many legends about untold riches accidentally discovered after pressing some inconspicuous stud inside an antique secretary. Or how an antique secretary, having changed many owners, fell into the hands of an experienced specialist who was able to figure out the location of the hiding place, searched for a long time for a way to open it, and, of course, eventually discovered a secret drawer full of ancient treasures.


But even today, the romance of secrets and mysteries has not gone away - people still like to create unexpected and original places for storing valuables. And for a number of reasons, the easiest way to do this is in furniture and other interior items. Some hiding places cannot be created without the help of a good furniture maker; in some cases, furniture is already sold with secret niches for storage, but there are also ways to reliably hide something inside the most ordinary furniture.
The simplest example is if you need to securely hide an envelope or flat package, simply tape it to the bottom of the drawer on the bottom side. In most cases, even if someone goes through all the drawers of your desk, they will hardly think to look under them. For greater confidence, use the lowest drawer so that inspecting its bottom is also physically inconvenient.
The same principle applies to hiding places under the seats of chairs, however, in our opinion, this is less reliable: chairs are often lifted to be rearranged, and they can also accidentally fall. Therefore, there is a very high probability of quickly discovering such a cache, and this one is better original way storage to be used for something not very valuable.


It is also quite common to store valuables in a piano. By its design, this musical instrument has a lot of free space inside, which can be perfectly used to place anything: from household supplies to important documents. Of course, provided that there is no professional musician living in your family who will not allow you to treat the instrument so frivolously.
Hiding places are often installed under furniture - in the empty space between the legs, which is closed decorative facade. Someone builds a convenient drawer there. Or you can simply find a flat box of suitable size, put valuables in it and put it away under the closet. You can also make the simplest double bottom inside a drawer yourself.


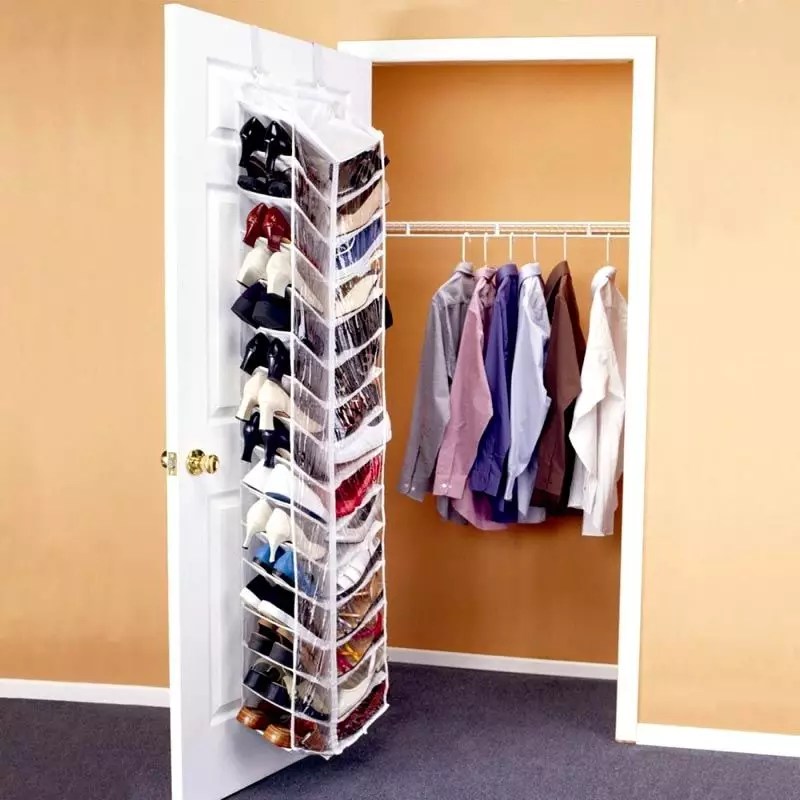
Naturally, not all ready-made furniture can be used to store valuables - most often it is simply intended for the convenient placement of ordinary household items. For example, in an ottoman in the hallway it is very convenient to neatly lay out shoes, and in ottomans or banquettes in the bedroom or living room - those things that are often used in these rooms.


The same applies to storage under the bed - you won’t get a full-fledged hiding place from this place, but it is very convenient to remove items that are not needed at the moment.


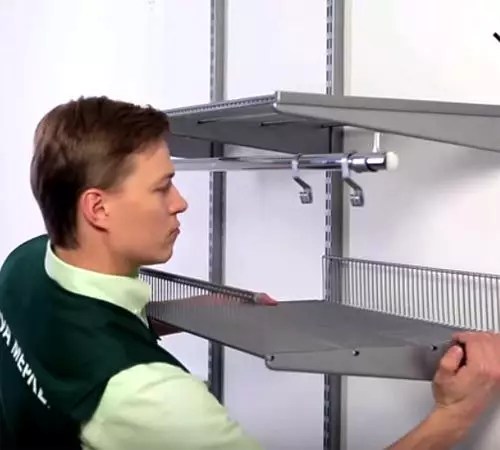
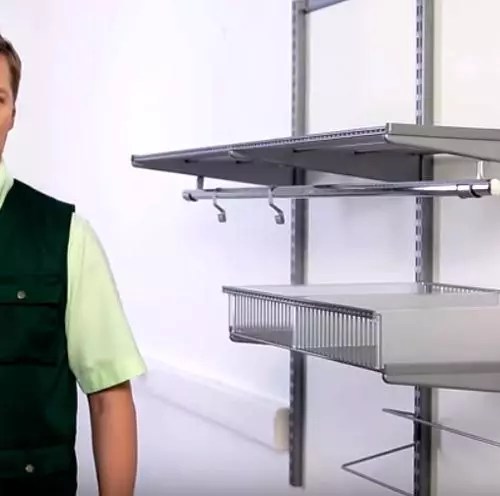
Among the ready-made furniture intended for secret storage of valuables, special shelves and tabletops should be noted. From their appearance it is impossible to guess that there is a hiding place inside.


Wall mirrors and specially designed paintings can also make excellent hiding places that are almost impossible to discover. Also, real safes are sometimes disguised as paintings.


Another way to create a hiding place at home is to purchase a secret drawer or safe disguised as an outlet.


It is very popular to place caches made from books on bookshelves. This does not require any special skills or expensive materials - the main thing is to choose the spines of the books in such a way that they look harmonious among the other publications on the shelf and do not attract attention to themselves.


You can try creating your own simple secret storage spaces inside or under countertops.


Other, more complex projects are made to order from a good craftsman. This applies to secret drawers or special secret niches for storing various furniture inside.
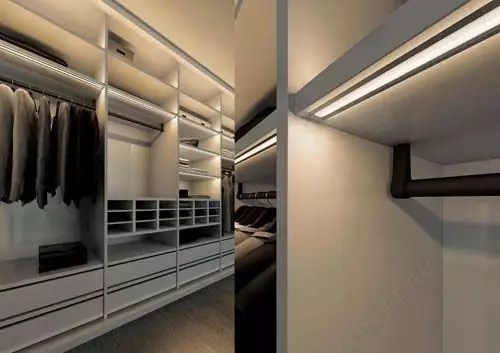
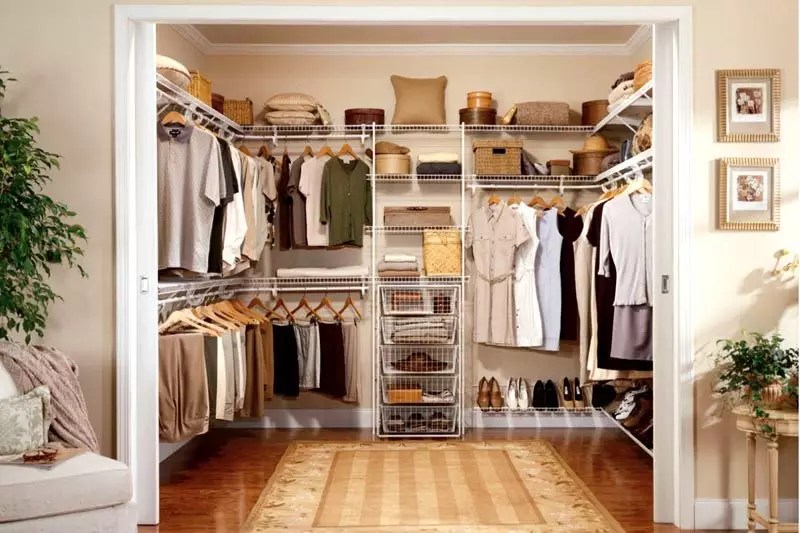
Agree, it’s quite convenient when all things are placed in one place. There is no need to run around the apartment looking for individual items; everything can be seen and tried on in one place. You can arrange it even in a small area. A rationally arranged dressing room with your own hands (drawings, diagrams and photos will be presented below) will serve you well for many years.
Our comfort depends on correct organized system storage Agree, when every thing is in its place, it is easy to find. The main rule is space and convenience. But in small apartments this is difficult to achieve. Modern technologies come to the rescue, thanks to which modern ones are reduced in size; miniature flash drives have replaced books. All this frees up additional space.
Before you plan a permanent storage system, you need to sort your things. Items that we have not used for a long time can be disposed of or sold, and for the rest we can choose the optimal dressing room.
Storage rules divide things into two rotations.
Installing a separate wardrobe is much more practical than purchasing one. It is made to order, which allows for the most efficient use of all space with ideal filling. You can install a dressing room with your own hands according to ready-made drawings and diagrams. Photo selections on the Internet will help you make your choice.
After determining the basic parameters, it is necessary to complete a drawing and layout diagram. It will help determine the location of all structures as accurately as possible. The main parameter when drawing up a plan is the area. It is she who determines the filling of the dressing room.
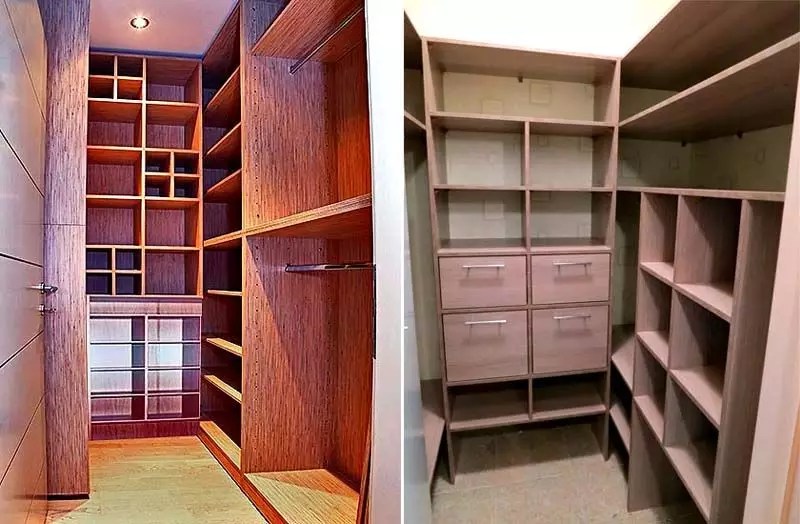
Minimum sizes should start from 4 sq.m. First you need to determine the installation location. You can allocate a separate room for this. However, not everyone has this opportunity. A small dressing room from a closet in small apartments is an ideal option.
For installation dressing room enough to arrange in any room. As clear example you can contact ready-made solutions dressing rooms in photo catalogs and choose your ideal dressing room.

As we determined, the placement will make the most efficient use of the corner of the room. It is enough to allocate an island of 2 square meters for the dressing room. Photos of interesting projects are posted in our catalog.
The partition can be done. This arrangement provides sufficient volume in a minimal area. Drywall is easy to use, the design is lightweight, and there is virtually no debris after installation.
Internal filling can be done in two ways.
Designers offer several options for corner elements, with the help of which maximum ergonomics of a small space is ensured. The installation of a spiral lintel will help increase the space and smooth out the sharp corners of the dressing room.
Advice! It is better to leave shelves in storage systems open.
In the design of a dressing room in the hallway, it is necessary to provide an entrance with a maximum width. As an option, a device that will allow you to open as much as possible and combine the storage area with the common space in one motion.

Linear layout is a simple and accessible design. The structures are built along the wall surface. This arrangement is more like a niche. The entrance can be made using an accordion door, which can easily slide to the side, revealing a small world in front of you.
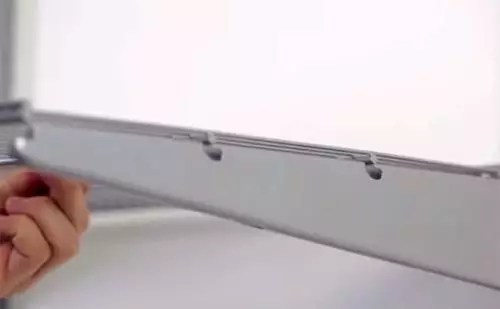
Using retractable hangers will allow you to bring your clothes closer with one movement of your hand. For a comfortable location, the dressing room is planned to be at least 1.5 m deep. It is better not to install partitions; they will take up useful space without adding any functionality.
Racks are also used for corner systems. Ready-made ideas for wardrobe room designs can be viewed in galleries on the Internet.

To create parallel placement, you only need to arrange and fill the room with furniture along parallel walls. However, not all premises are suitable for this type. For example, for walk-through rooms this is an ideal option. A completely different matter is a blind room, for which it would be more practical to place a U-shaped dressing room.
For a comfortable location, the parallel dressing room must have a width of at least 1.6 m, otherwise it will be very difficult to stay there. The racks should be located at a distance of at least 80 centimeters.
Filling can be done with end hangers and retractable panels.

This arrangement does not require partitions. It can be made an integral extension of the room. Systems in the form of shelving increase the area of the room.
Since the main cost of installing a storage system falls on the design of the partition, the L-shaped system allows you to significantly save money on the dressing room.

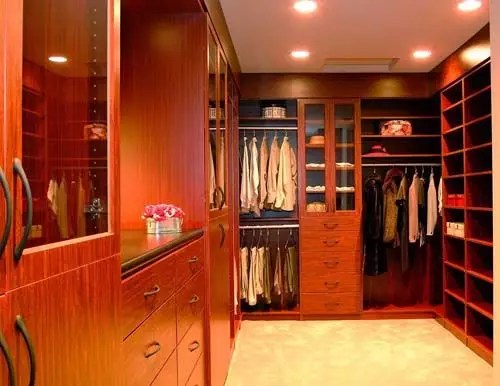
The U-shaped system is suitable for both large and small spaces. This separate kingdom owners. You can install all the elements of dressing rooms in it: closed drawers, separate sections and shelving.
Arranging a U-shaped system allows the designer to show maximum creativity when filling the space. At the same time, the main task is to create a room with maximum space. For such a system, a narrow and long room is best suited.
To fill the dressing room, the upper shelves are made wider so that rarely used items can be placed there, such as travel bags or large boxes.

The installation of a dressing room is the most successful location of the storage system. If the area allows for the installation of one of the structures, you can safely begin to implement the project. Moreover, it is quite possible to do it yourself.
For a large area, a U-shaped design can be called ideal. It will unload the room as much as possible, while leaving enough space to move around.
An interesting solution would be to install a dressing room. Partitions can be made in the form sliding structures or permanently.
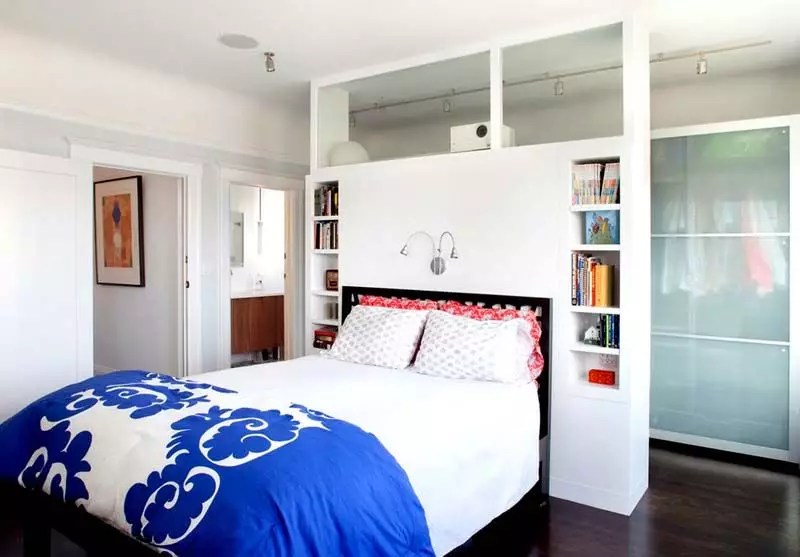
If the bedroom area is very small, there is no need to be upset. He will come to the rescue. To place it you will need only about 1 meter of the width of the room. Properly selected filling will allow you to place all your household items in it.
For narrow spaces, a corner dressing room in the bedroom is suitable. Photos of designs are selected according to the overall design.
A parallel storage system is suitable for a walk-through room. You can make preliminary drawings and visualize the final design.
Architects of the last century, when designing mass development areas, included a small storage room in small-sized apartments. Designers suggest converting it into a dressing room small size. This is the most successful option for arranging an entire room for storing things.
The placement of the storage room in the Khrushchev house was carried out with an entrance along the long side of the common room or an end entrance. Let's consider both options for reorganizing storage rooms.
Before filling the pantry, the old arrangement should be dismantled. To increase the width of the pantry, you can move the wall structure deeper into the room.
You should know! To transfer load-bearing structures, it is necessary to complete the project and coordinate it with the architecture of the area. Unauthorized redevelopment is not allowed!
A U-shaped or linear structure is placed on the enlarged area. A useful option There will be a placement of a two-layer structure. Racks or shelves for open storage are attached to a long wall surface. In front of them is a hanging bar. In order to take things from the shelf, you just need to move them apart.
It is impossible to move structures with this placement. In this case, the choice of location system must be made based on the parameters of the pantry. If the width of the room is up to 1300 mm, you can arrange an L-shaped system. Open ones are installed on the narrow side. Along the long side there is a rack with hangers and drawers for storing shoes.
For a narrower space, a roll-out hanger is an excellent solution. Open shelves for storage are rarely placed on the end surface of the room.
used things. The hanger rolls out into the common room.
You can find an interesting option for creating a dressing room with your own hands from a closet in photo catalogs and master classes on the Internet.
Good is important for the whole house and especially for the dressing room. It is advisable if the storage system is organized with a window. But, unfortunately, such placement is not always possible. Let's consider alternative lighting options to natural lighting. It is important to choose lamps with warm lighting.
| Photo | Description |
 |
|
 |
|
 |
|
 |
|
This is interesting! Furniture in small dressing rooms can be made with glossy surfaces that will reflect radiation and create the illusion of volume.
The storage system requires sufficient ventilation. It’s good if there is a window in the dressing room. However, it is not always convenient to keep it open. You can leave the doors open. But, as practice shows, this is also not always convenient. In this case, the solution would be a natural or forced ventilation device. This work must be entrusted to specialists who will select equipment taking into account the area of the room.
Correctly will relieve not only unpleasant odors storage, but also protects against the occurrence of fungus or mold.

Doors to the dressing room must be selected based on general style premises. The design must be comfortable and reliable, because it will be used several times a day. Manufacturers offer a wide range of products, the choice of which can lead to a dead end.
Each storage system has its own recommendations for choosing doors.
To install them, free space is required along the opening direction. According to the rules fire safety doors should open into the common room.
This design is suitable for small rooms. They do not require additional space. Door leaves move freely along horizontal guides. The structures are quite easy to install with your own hands. Photo wardrobe systems are located in the catalog at the end of our review.
In the first case, one part of the mechanism is fixed to the box, while the second moves on rollers. The system is in the form of an accordion or consists of several canvases interconnected by loops.
The blades move on rollers along guides. One canvas is enough for a storage room.
This is the most complex system. The canvas is hidden in a plasterboard box or in a wall surface. Externally they look very beautiful and unusual.

Manufacturers offer a wide range of fillings for cabinets and dressing rooms. After all, not only the comfortable search for the necessary items, but also the service life depends on the correct placement. Therefore, it is important to rationally approach the internal content of the storage system.
The middle compartment is selected for clothes. For placement on hangers, it is necessary to provide a height of up to 100 cm for shirts and about 170 cm for dresses and outerwear. Placement can be on rods and pantographs.
Small items are placed on shelves or in drawers.
A lower compartment with a height of no more than 80 cm is allocated. Additionally, you can install horizontal or slightly inclined shelves. It will be convenient to install retractable structures, the height of which should be at least 30 centimeters for summer shoes and at least 45 centimeters - for winter.
Related article:
In the publication of our portal you will find out what they are, what types they can be, and whether it is possible to install such structures in small apartments or whether they require a separate room.
At proper storage clothing and household items, we extend their service life. Let's take a closer look at manufacturers' proposals for rational use of dressing room space.
| Photo | Description |
 | Rods for long (up to 170 cm) and short (up to 100 cm) clothes. |
 | Pantograph is a sliding design. |
 | Fastenings for trousers with a height of at least 60 cm. Can be single or double. Hangers with tucks are suitable for skirts. |
 | Large and small drawers for storing bedding, linen, jewelry, accessories. |
 | Pull-out or stationary shelves up to 40 cm wide. To store things on the mezzanine, you can use shelves up to 60 cm wide. |
 | Boxes and baskets for storing various items that do not need to be ironed. |
 | Modular systems for shoes. Shoes are placed on them or hung visually on the lasts. |
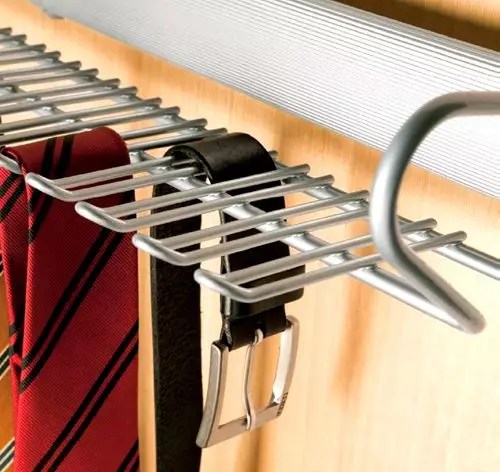 | Holders for ties, belts or scarves are usually offered with clips. |
Many furniture stores sell items for filling storage systems. It is important to first decide on the exact quantity and size of the products. A wide range of products is also available in online stores selling furniture fittings. The price will depend on the material used and the complexity of the filling.
There is no need to call a professional technician to install the wardrobe filling. Even a schoolchild can do this work. The only tools you need are a drill and. All fasteners must be purchased along with the cabinet filling.
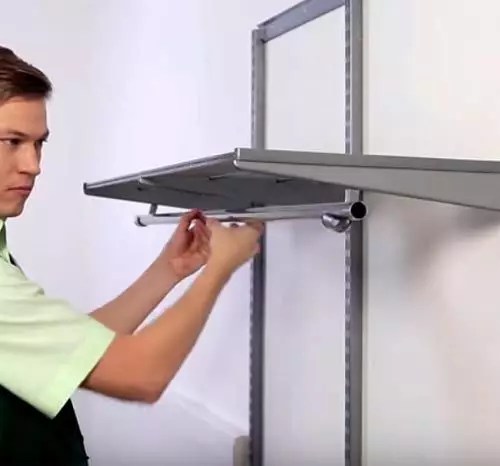
The process of installing a dressing room is not complicated. It is important to complete a drawing before starting work maximum accuracy and select all consumables and contents. Step by step process Installing an open structure will allow you to avoid installation errors.
| Photo | Description of work |
 | Necessary tools for work. |
 | We place the supporting rail at the selected height, level it using a level along the bottom side and mark the locations of the holes. |
 | Drill out the marked holes. |
 | We hammer dowels into the holes using a hammer. |
 | We fix the supporting rail with a screwdriver |
 | Installation of vertical guides into the grooves of the horizontal rail. |
 | We fix the vertical guides to the wall. |
 | We install the brackets at the selected height. |
 | We install horizontal shelves into the middle grooves of the brackets until they click. |
 | We install decorative plugs on the edges of the bracket. |
 | We connect the rod and the suspension, then install plugs on the rod and hang hooks. |
 | Similarly, we install a basket with dividing strips and a shoe rack. |
 | Ready wardrobe. |
You can watch the video master class in more detail.
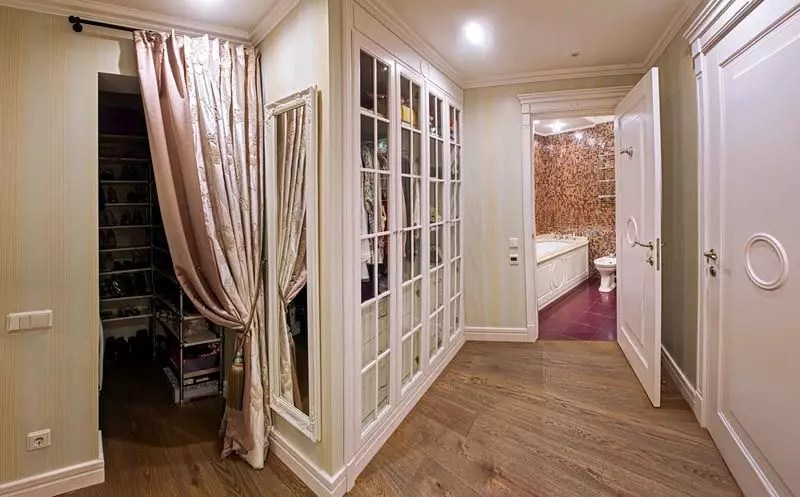
A walk-in closet behind a curtain will help hide storage areas from prying eyes. Photo examples are posted in catalogs.
A dressing room in an apartment is no longer a luxury, but a necessity of late. The speed of modern life does not allow us to waste time searching for missing things. Everything should be rational and convenient. You can install a storage system in any room. The latest wardrobe room designs can be found in the photo selection.
1 of 24


Every girl dreams of a personal dressing room. Having watched enough films about the lives of rich people, many believe that with an average salary they cannot afford such luxury. But if you are at least a little familiar with repairs, then this will not pose huge difficulties and costs for you.
You can afford a dressing room not only in a spacious apartment, but also in an ordinary one. It is not necessary to make it huge, like a separate room.

For example, a small corner dressing room
See various dressing room finishing options:
Doors

Shelves

Options for wardrobe shelves
It will be cheaper, of course, to do everything yourself; to do this, make shelves from metal mesh. It is better to use welded fine mesh. It is produced chrome-plated, galvanized, with PVC coating. Such scraps can be purchased very cheaply in the store, since they are no longer suitable for sale, but just right for shelves.

Dressing room from the pantry
Everyone chooses their own convenient storage system, but still, given the shortcomings of many wardrobe owners, I would like to give some advice.
In conclusion, I would like to note that everything is not as complicated as it seems at first glance. In addition, this is, first of all, a guarantee of reliable and durable storage of things, a guarantee of protection of clothes from fading and moths. A dressing room is a completely realizable and affordable dream.
Video on how to make a dressing room with your own hands:
Many people mistakenly believe that multifunctional furniture appeared quite recently, when it was time to furnish not luxury apartments, but small apartments. Meanwhile, history takes us several centuries into the past to tell about the emergence of one of the most interesting and functional types of furniture - the secretary. Indeed, today the secretary is as popular as it was in the 18th century, when it first appeared. Today, together with the “Dream House” website, we will plunge into the world of retro furnishings and learn a little more about this furniture.
As mentioned earlier, the secretary appeared in the 18th century, but some sources date its appearance to the 12th-13th centuries. It was behind the secretary that the ladies of that era wrote thousands of letters; in their numerous boxes they kept love messages and state secrets. Thus, the secretary cabinet easily replaced a desk, a safe, and a closet at the same time.
Modern models have been slightly modified, but, as before, they are a cabinet with drawers and a folding shelf that acts as a work surface. A large number of drawers allows you to keep all your writing utensils at hand, but at the same time, in perfect order. And secret locks and reliable locking systems protect important papers from prying eyes.


Modern secretary - desk
Originally considered ladies' furniture, the secretary quickly fell in love with the male half of humanity, becoming a workplace for emperors and kings. For example, Napoleon Bonaparte took a folding travel secretary with him on trips - when folded, it took up little space, but the desk was always nearby, even on the battlefield. And then doctors liked this functional furniture, allowing them to store doctor’s instruments and medicines in order.
Currently, desk secretaries decorate modern interiors, combining a work area and a spacious closet. The aristocratic look of furniture with a retro touch fits perfectly into both classic and modern interior styles. The main thing is to choose the right shape, color and finish of the secretary.


Nowadays, secretaries are most often made “antique”: from dark wood, with carved decor. Such furniture is perfect for both Rococo and Rococo styles, but will absolutely not fit into modern styles. When choosing furniture for such an interior, you need to change your approach and look for more laconic forms with the absence of conspicuous finishing. Such modern secretaries in small quantity are also present on the furniture market. And if previously they were made exclusively from solid wood, now this furniture can be made from MDF, laminated chipboard, finished with veneer. And only a few can afford a secretary made of solid wood.


Secretary – antique furniture
Antique secretaries, as a rule, are large in size, they are made of expensive wood, have a rich dark color (brown, burgundy) and are decorated with carvings. Such aristocratic furniture, which emanates solidity and chic, is ideal for classic interiors.


Art Deco style secretaries have elegant shapes and are most often made in black or white. And writing cabinets in country style are, as a rule, simple in shape, unfinished, and sometimes have scuffs on the body.

In modern interiors, the secretary is sometimes part of a furniture set and represents one of the “wall” sections. It’s kind of built-in, which doesn’t take up much space and, at the same time, is part of the headset.

This versatile type of furniture is mainly placed in the living room. Representing a compact workplace, it easily places a laptop on its surface, and there is still room for all kinds of folders and books. After work, all these accessories are removed, and the lid is closed, turning the secretary into an ordinary cabinet or.


But no matter how convenient and capacious the secretary is, it is not intended for long-term use. You can’t put a desktop computer on it, and it’s not too comfortable for your feet to constantly rest against the drawers. However, it is great as an alternative to a mini-home office.
The secretary can be placed not only in living rooms, but also in the library, office and even in the bedroom. The main thing is to find a place for a compact workplace, where it does not interfere and does not take up unnecessary space. square meters. A corner secretarial chest of drawers fits this description perfectly, allowing you to store various things in a large number of drawers, and when the lid is open, it serves as a desk.


A compact workplace is necessary not only for adults, but also for children. Sometimes a secretary cabinet for a schoolchild is placed in the nursery; in this case, it replaces a desk and places portable computer equipment and other study supplies. Perhaps the best option would be to use a large desk for work and study, and a secretary for a laptop or computer, but each parent chooses furniture based on the dimensions of the children's room, so there are no need for advice here.


Often, along with the secretary, they also look for a bureau. Both types of furniture represent a compact workplace, only a secretary is more of a cabinet with a retractable or hinged lid, and a bureau is a type of table with an add-on. The latter stands steadily on four legs and has small dimensions that fit perfectly into almost any interior. Meanwhile, the presence of a work surface and shelves for papers allows you to use it for short-term work, for example, while sitting at it you can pay bills or write a shopping list for the store.


Both the secretary and the bureau are types of multifunctional furniture, but the first one performs more functions, but the second one is more compact. There is probably no need to have both of these pieces of furniture in your apartment at once, so it’s up to you to choose which is more necessary or which is better.
When a child reaches the age of plush toys and wooden rocking chairs, his growing up is not a reason to send old favorites “into exile.” But it’s worth thinking about refurbishment of the nursery. For example, a horse can be easily turned into a compact, fun secretary for a teenager. A little ingenuity, a few boards and screws, a reliable tool and love for your rapidly growing child - that's what you need for this.
For the internal structure, medium density MDF is mainly used. This gives two advantages at once: firstly, MDF with a thickness of 16 and 19 mm is sufficiently durable and works well in bending even at large sizes. Secondly, its surfaces are easy to paint. Sanding before applying paint, as a rule, is not required; only the edges, due to their high absorbency, require at least two treatments - “sandpaper” No. 100 and No. 180.
You will need a variety of screws: 4.0 x 45 mm; 4.0 x 20 mm; 3.5 x 50 mm; 3.5 x 25 mm; 3.5 x 16 mm.

You will need
cordless drill wood drill bits 3.5 and 6 mm Forstner drills 30 and 35 mm jigsaw miter box hammer chisel pencil and ruler tape carpentry and assembly glue* lighter MDF screws 19 and 16 mm plywood 27 and 18 mm lumber rubber cord rollers with guides belt for pens.


When gluing, high precision is required due to the lack of fixing screws. Simple adhesive tape will help you.


Some pieces of furniture
Some pieces of furniture seem to have come straight out of a science fiction or spy movie: in fact, they are not at all what they seem. This cannot be said to be a modern invention - furniture with additional secret functions has been made since ancient times. Various hiding places and secret drawers are often found inside antique furniture that has survived to this day. Tables, dressing tables, chests of drawers and cabinets created by ancient masters usually had a dual purpose: they were not only used, but also money, documents and jewelry were safely hidden in them from prying eyes and intruders, which was vital in those turbulent times.

In France, in the 18th century, they even began to produce a new type of furniture - secretaries. The name itself suggests that these interior items were intended to keep the owner’s secrets. As a rule, these were miniature bureaus with many visible and hidden shelves and drawers and a folding tabletop used as a desk.
The boxes were often equipped with secret locks and secret locking mechanisms. Among antique dealers and collectors of antiques, there are many legends about untold riches accidentally discovered after pressing some inconspicuous stud inside an antique secretary. Or how an antique secretary, having changed many owners, fell into the hands of an experienced specialist who was able to figure out the location of the hiding place, searched for a long time for a way to open it, and, of course, eventually discovered a secret drawer full of ancient treasures.


But even today, the romance of secrets and mysteries has not gone away - people still like to create unexpected and original places to store valuables. And for a number of reasons, the easiest way to do this is in furniture and other interior items. Some hiding places cannot be created without the help of a good furniture maker; in some cases, furniture is already sold with secret niches for storage, but there are also ways to reliably hide something inside the most ordinary furniture.
The simplest example is if you need to securely hide an envelope or flat package, simply tape it to the bottom of the drawer on the bottom side. In most cases, even if someone goes through all the drawers of your desk, they will hardly think to look under them. For greater confidence, use the lowest drawer so that inspecting its bottom is also physically inconvenient.
The same principle applies to hiding places under the seats of chairs, however, in our opinion, this is less reliable: chairs are often lifted to be rearranged, and they can also accidentally fall. Therefore, there is a very high probability of quickly discovering such a cache, and it is better to use this original storage method for something not very valuable.


It is also quite common to store valuables in a piano. By its design, this musical instrument has a lot of free space inside, which can be perfectly used to place anything: from household supplies to important documents. Of course, provided that there is no professional musician living in your family who will not allow you to treat the instrument so frivolously.
Hiding places are often installed under furniture - in the empty space between the legs, which is covered by a decorative facade. Someone builds a convenient drawer there. Or you can simply find a flat box of suitable size, put valuables in it and put it away under the closet. You can also make the simplest double bottom inside a drawer yourself.


Naturally, not all ready-made furniture can be used to store valuables - most often it is simply intended for the convenient placement of ordinary household items. For example, in an ottoman in the hallway it is very convenient to neatly lay out shoes, and in ottomans or banquettes in the bedroom or living room - those things that are often used in these rooms.


The same applies to storage under the bed - you won’t get a full-fledged hiding place from this place, but it is very convenient to remove items that are not needed at the moment.
Among the ready-made furniture intended for secret storage of valuables, special shelves and tabletops should be noted. From their appearance it is impossible to guess that there is a hiding place inside.


Wall mirrors and specially designed paintings can also make excellent hiding places that are almost impossible to discover. Also, real safes are sometimes disguised as paintings.


Another way to create a hiding place at home is to purchase a secret drawer or safe disguised as an outlet.

It is very popular to place caches made from books on bookshelves. This does not require any special skills or expensive materials - the main thing is to choose the spines of the books in such a way that they look harmonious among the other publications on the shelf and do not attract attention to themselves.

You can try creating your own simple secret storage spaces inside or under countertops.


Other, more complex projects are made to order from a good craftsman. This applies to secret drawers or special secret niches for storing various furniture inside.
In the age of high technology, people quickly forgot that just two decades ago letters were written by hand and sent by mail. Today, progress has gone so far that there is no longer a need for paper correspondence, but still, in offices and bedrooms, many people need functional and beautiful furniture for working, for example, on a laptop.
This article was written to remind you of such pieces of furniture as a bureau and a secretary, and also to tell you about the origins of their occurrence and the features that distinguish one item from another.
The design of the bureau was created at the turn of the 17th and 17th centuries, in France, and was nothing more than a large casket on high legs with a hinged inclined lid above the tabletop, which was complemented by compartments or drawers for writing instruments. Such an item was often installed in bedrooms and served as a desk and jewelry box. The bureau took up little space and was comfortable to sit at; these qualities prompted furniture makers to develop the very idea of this item; as a result, a certain cabinetmaker J. Aubin, a courtier of Louis XV, modified the design of the table and decorated it with a cylindrical lifting lid, for which it received the name “ King's Bureau", and today it is a symbol of its era, one of the main attributes of an interior in a classical style.
A similar item to a bureau is considered to be a secretary - a tall bookcase equipped with a pull-out shelf or folding board for written work. Even at the very beginning of its existence, the secretary was an element of the furnishings of purely luxurious, aristocratic interiors
 1
1
These days, interior design is no longer bound by any technological framework, fashion trends or other restrictions. Everyone is free to dispose of their personal living space at their own discretion and according to personal preferences. For some, the layout is important, taking into account the location of all technical innovations, while others need the spirit of tradition, a unique atmosphere and aesthetics in each item.

Such an object can be furniture with history, some kind of cult object that will transform the decor of a bedroom, living room or office. The secretary today is again becoming a popular piece of furniture, because it is not only very effective, but can serve as a chest of drawers, a desk and bookcase at the same time, which is especially important in the space of a small room.
First of all, a secretary cabinet will be appropriate in a classic elegant interior with the same high-quality furniture, expensive fabrics and natural materials.
 1
1
It is also good to use this item in the neoclassical interior of a living room, a French-style bedroom (light wood or painted furniture), and an Art Deco office.
 2
2
Note that the choice of room for the location of the secretary in the house is not important; it can be installed in the dining room, hallway and even children's room in order to conveniently store all the essentials in one place.
As was said, the bureau is an extraordinary object, very characteristic and catchy. It is simply impossible not to notice it in the setting, thanks to its unusual appearance, which, by the way, can vary somewhat and contain features of other pieces of furniture familiar to us.
It can be presented in the form of a familiar, but compact table, with a convenient design of compartments for accessories, built on the surface of the table top, which, in turn, can be retractable or folding.
A more modern minimalist model looks like a regular desk, but with a hidden drawer system and a lifting top.
The bureau table is undoubtedly an excellent purchase for modern, practical interiors, and is especially useful in small children's rooms, cozy bedrooms or built-in home offices.

A traditional bureau will also not take up extra space, but will look much more distinctive than a table.
This item should be equipped with a hinged lid, inclined or cylindrical, hiding two or three tiers of mini-compartments for office supplies and personal items.
Models of traditional bureaus today are made from practical, high-quality MDF material, and the straight lines of the silhouette make it possible to use similar furniture in modern styles: contemporary, boho and even loft.

A bureau made according to a classic model, always made of solid wood, with figured legs, decorative fittings, often with artistic painting or carvings on the facade. Such a thing should be used when decorating interiors in vintage, retro, classic, and also boho styles, if the owner of the house likes such an item.
 1
1
The combination of the design of several objects in one testifies to the endless desire of human thought for functionality and comfort in everything. The hybrid was no exception furniture industry- a chest of drawers where you can store personal belongings and, if necessary, use the folding tabletop for work.
 2
2
The design of a bureau-chest of drawers can be completely varied, from classic to ultra-modern, which allows you to use the item in any interior style, in any area of the room convenient for you.
However, the most unusual models of bureau-chest (varnished figured, or in the constructivist style with clear forms) will organically fit into equally bright interior styles: pop art, boho classic, empire and art deco.

The most amazing version of the bureau, in our opinion, is combined with a console. It can be used even where the area is very modest: in a bright but narrow corridor; small bedroom, kitchen-living room, compact hallway.
The design of the console office is light and compact, often having only two support legs and fastenings to the wall. A narrow, long tabletop is sometimes complemented by a pull-out shelf and lined rows of compartments for accessories.
Vintage, shabby chic, classic style - this is the environment in which such an item looks appropriate for a setting with a touch of time.
 1
1
Furniture that retains the breath of old times gives our apartments a special flavor. In this section we will mainly talk about the secretary, but not about the one that we all know as an integral part of a modern furniture wall, but about how our ancestors imagined this piece of furniture many years ago. A home craftsman with some carpentry experience is quite capable of making such a desk along with an extension.
The table shape, tabletop area and extension are small in size. Therefore, the secretary will not take up much space in the room and can be placed somewhere near the wall, and maybe in front of the window.
In our design we will be dealing with shaped parts, small drawers, etc. To make them we will need pieces of plywood board or thick plywood.
The secretary shown in Fig. 20 should be considered only as one of the options. Your own taste and the material you have will tell you a variety of variations of this model. First, let's determine the main dimensions of our future structure. Table height – 75–78 cm (top edge height), extension height – at least 40 cm, tabletop width – 120–140 cm, depth – 60–80 cm. When manufacturing various parts, you must first draw up an accurate sketch of them. For curly sidewalls and corners, it is necessary to make templates in advance and transfer the shapes with a soft pencil to the material.
Rice. 20. Secretary
Now some instructions for making a secretary. The table consists of two sidewalls, which are also the supporting legs of the table top, a frame of drawers and a thick rail that strengthens the structure and is placed in the lower rear third of the table. We connect the frame and tabletop to the sidewalls using dowels in the same way as the crossbars, which act as special legs. We connect the back support strip to the sidewalls using cuts and, after gluing, also with screws. In accordance with the specified width of the drawers, we insert shutter strips between the slats. To the extension, consisting of sidewalls, top board and back wall, we add various drawers on both sides. Since our design uses different materials, it is recommended to paint the secretary, preferably in two brown tones that go well together.
The picture below shows how without special tool you can make the specified shapes for the secretary from the available material. First, use a hacksaw to make the marked cuts before starting to carve. Then, using a chisel, we hollow out part of the material (on both sides), and then make oblique cuts. We finish the grooves and roundings with a rasp.
It seems that the screen in the middle of the room has finally gone out of fashion. However, screens can be used in our daily lives. They allow you to partition or close something.
Our first recommendation concerns a screen that can be used to create a comfortable workplace. Two workstations in a narrow children's room, equipped with a side to the window, give two children the opportunity to study without distraction. The partition can be made from old material you have. If we build new partition, it is recommended to make a frame from slats (2 cm thick and 6–7 cm wide), interconnected by overlapping ends. If construction is proposed large sizes, it is necessary to provide transverse rigid fastening, especially if we (as indicated in Fig. 21) also want to equip small shelves on the partitions.

Rice. 21. Screen
We carefully sheathe the frame on both sides with TDVP. We make small shelves from pieces of boards 12–15 cm wide, nailed together at right angles. The shelves should be positioned in such a way that they are supported by transverse connections, which are secured with screws screwed into the other side of the partition. Since the shelves are not opposite each other, you can hang a tear-off calendar or attach a writing board on the screw heads on the other side.
At certain intervals we screw in small hooks. We attach lamps to the top of our structure to provide the necessary lighting. In order for the partition to have a strong support, support bars are used as legs (as can be seen from the figure).
Another option for using a screen is shown in the figure below. The screen can be used by placing it in front of the crib to protect from light and noise. It is also useful in the garden to temporarily fence off, for example, a swimming pool. To do this, we build frames approximately 180 cm high, which are upholstered on one side with any padded material. The upholstery can be mats, straw matting, awnings, burlap (which, by the way, can be painted in a very original way) or even cardboard, which can be covered with wallpaper. The frames form a screen using plug hinges.
To use the screen outdoors, we attach two long pegs at the bottom of each frame that stick into the ground. By using tent pegs (as indicated in the right picture below), the screen is installed so firmly that no wind will blow it away.
As we noted earlier, when furnishing apartments, one often has to deal with the fact that the furniture available for sale does not quite correspond to the size of the premises. Often a section of the wall remains unoccupied, although it could be rationally filled with some piece of furniture. One solution to this problem is a homemade cabinet with shelves. This locker is extremely useful thing. It can be used, for example, to decorate a youth room, a corner of the room or as a TV stand. Its appearance should, of course, be in harmony with all the other furniture in the room.
It is advisable to use parts of a well-preserved old cabinet as a material. If you plan to paint the cabinet in advance, this greatly simplifies its manufacture, since nails and screws are used to connect the parts; however, you should always recess their heads. The holes must be filled with wood putty and the surface must be sanded after setting. sandpaper. If we want to do without nails and screws, the individual parts can be connected using wooden dowels.
The dimensions of the locker are determined by specific conditions. For our example, they are as follows: width – 90 cm, height – 75 cm and depth – 40 cm. The frame of the cabinet consists of two side walls, a shelf (bottom shelf), a lid, a back wall and a base. To connect the polyc to the side walls, it is best to use a closed tenon joint. To do this, the floor must be between the walls, the lid must be on the side walls (see Fig. 22 bottom left). The back wall fits into a recess that is located inside, on the side walls. We use TDVP or plywood boards as the material for this.
The easiest way to create a convenient place to store your own things is to create it yourself. This approach eliminates multiple adjustments and approvals. It allows you to personally control all important work operations. The availability of a variety of components in the relevant market segment simplifies the task. This article talks about what a high-quality DIY dressing room is. Drawings and diagrams, photos and Additional materials will help you implement the most complex ideas without errors and extra costs. Even if you decide to give the order to specialists for execution, this information will be useful at all stages of the project from formulating the task to accepting the assembled structure.
Read in the article
The storage of clothes and shoes, accessories and jewelry must be thought out taking into account individual capabilities and needs. There is no point in thinking about a young couple planning frequent moves. A set of cabinets may be sufficient. Difficulties arise when allocating a separate room is simply impossible.
To find a suitable cabinet, after compiling a list of personal requirements, you can find a specialized store on the Internet. This article discusses in detail the creative process of implementation unique projects using serial components.

Below are the basic rules and important nuances that must be taken into account for a quality organization:
For your information! The cost is assessed taking into account the initial investment, the expected service life, the cost of installing furniture components, construction and finishing work.

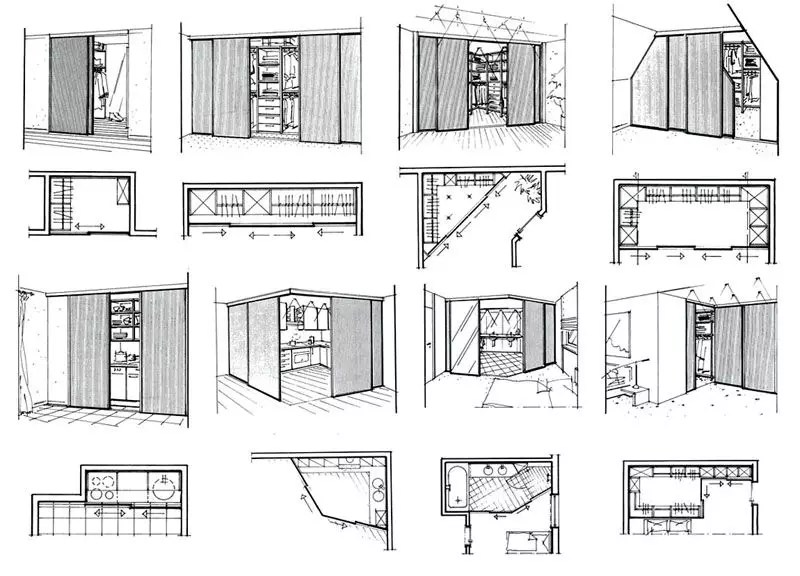
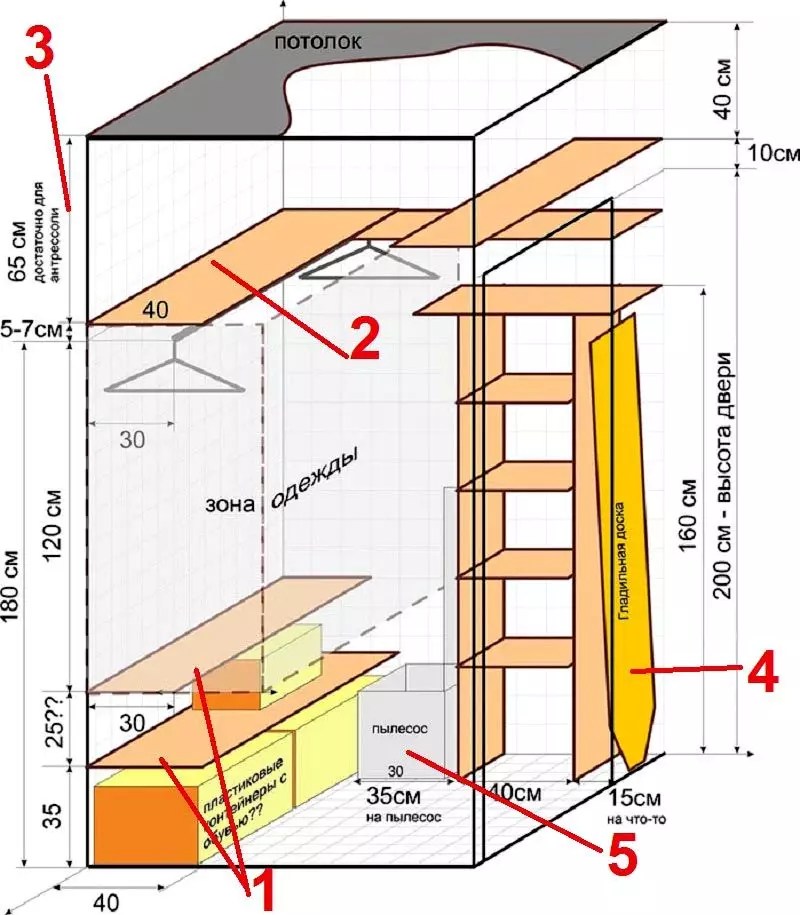
This figure shows the dimensions of the dressing room, parameters individual elements. The author of the project was able to organize storage spaces in the corners. He installed hanger guides on different heights to ensure comfortable placement of long raincoats and short jackets. Even without a thorough study of the market, it is clear that such a structure can be assembled from standard boxes and other inexpensive standard components.
However, there is not enough data for a full-fledged project:

The project should be considered in its entirety so as not to miss truly important nuances. Once a photo of a suitable do-it-yourself dressing room has been found, drawings and diagrams can be entrusted to professionals to prepare. They know the range of components well. They have specialized software to create volumetric layouts, which are convenient for carefully studying objects from different angles. Of course, the corresponding services are provided free of charge only when purchasing components from the appropriate store.
A well-prepared project should have the following components:
Related article:
At a certain point, all this no longer fits into a traditional wardrobe. A logical question arises: isn’t it necessary? Layout with dimensions, types of wardrobes, lighting features and many other nuances are in this material.
For preparation, a preliminary study of well-established engineering solutions will be useful. Please note that the dressing room in can be supplemented with a structure similar in purpose in,. It is permissible to use various combinations, create unique modifications taking into account architectural features a specific property.

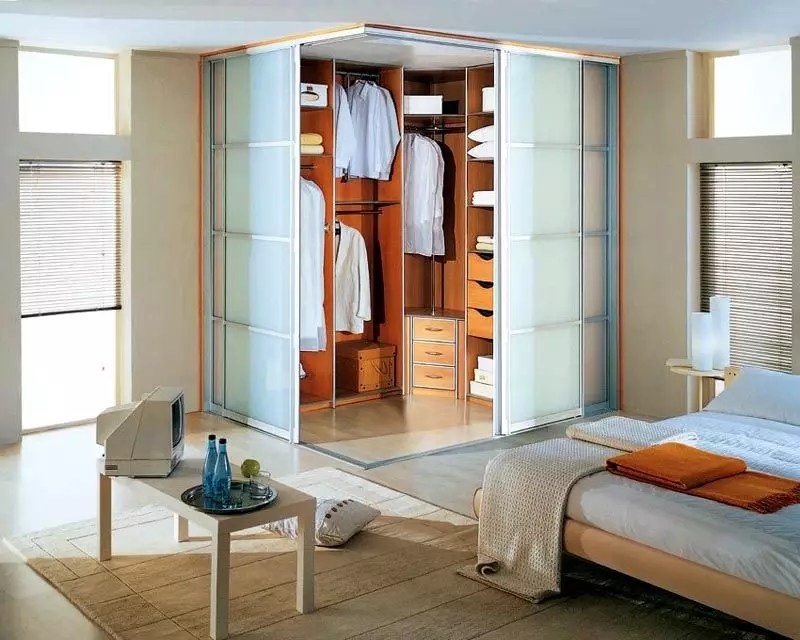
It should be noted that at the entrance to a residential property, attention should be paid to increased attention appearance of the interior. The sliding door system has the necessary functionality and aesthetic characteristics. To avoid loading wet things into a closed volume, it is recommended to install it nearby. To remove moisture, use carefully so as not to dry out genuine leather shoes.


The latest project is suitable for equipping relatively small hallway. By removing the partition, the passage and free space are increased. It will be useful for trying on. To simplify this mandatory procedure, the door is often installed with overhead lighting.

Such solutions are used when equipping niches, for installing several functional parts between columns. If necessary, the facade is covered with sliding doors.

The same solution is used in wide aisles. To create the impression of greater volume, use light colors for decoration. In rooms without windows, they are especially carefully designed.
DIY built-in wardrobe parts can be perfectly combined with architectural elements. With accurate calculation and high-quality installation, it will visually level the flat surfaces of the room. Typical furniture, with right angles on the contrary, highlights the slightest irregularities.
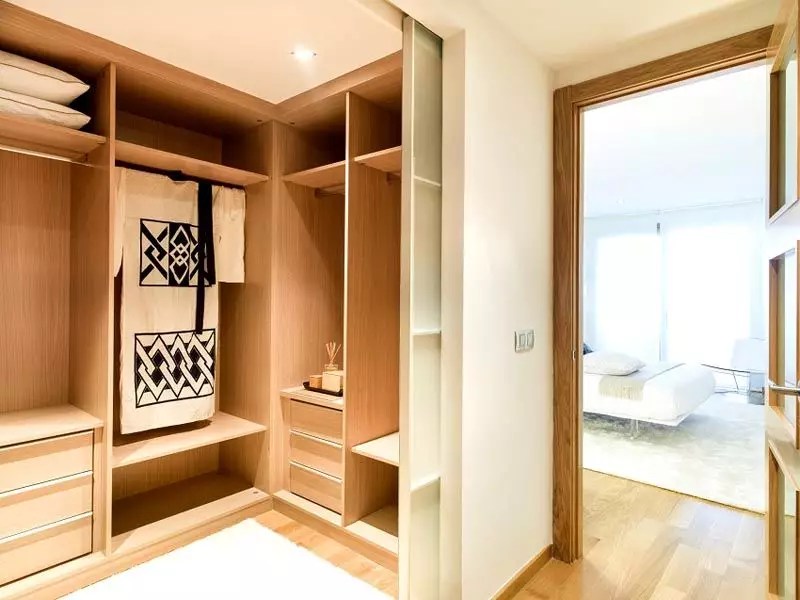
The picture shows an example with a protruding column that had to be covered with panels. In the standard version, the recess is used for its intended purpose. Since access to the far part is difficult, rarely used items are placed there
Please note that there are no wide gaps. Unlike standard cabinets, here architectural parts are used as separate walls. A do-it-yourself dressing room can be precisely built into a room of complex shape. During operation, displacement is excluded. It is permissible to use significant loads (with the correct calculation of supports and shelves).
For objectivity, it is necessary to note the disadvantages of built-in structures:


Using such a layout, you can study the design from different points, check the width of the passages, and make sure there are no obstacles when open doors.

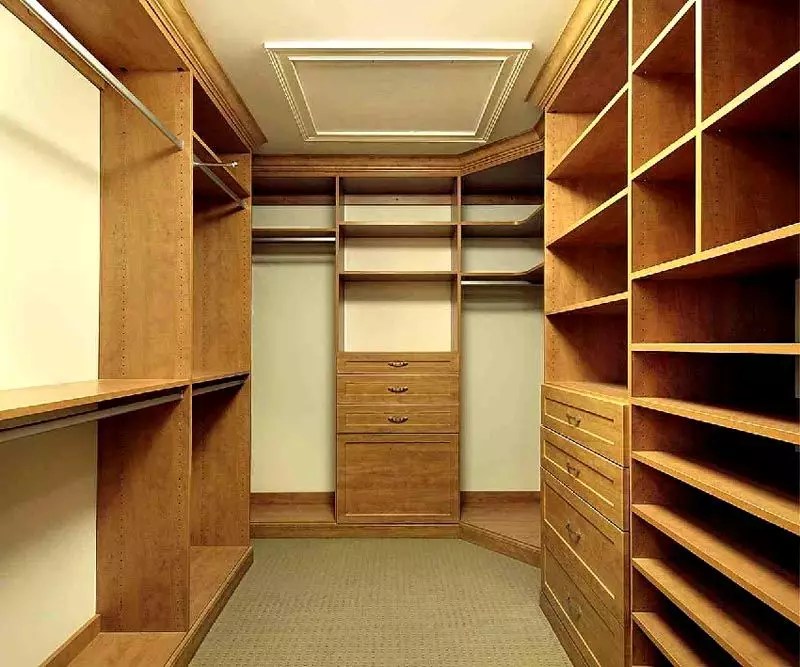
Such solutions are quite suitable for a private room. This option offers the following advantages:
For your information! Such parts, unlike built-in furniture, can be moved around the room and transferred to other places without unnecessary difficulties.
This project does not provide for construction or special finishing work at all.
Below are comments that will be useful when clarifying the design parameters for a small dressing room:

There is no need to make the floor in the dressing room with your own hands if there is supposed to be a full-fledged fitting area. Sharp heels will quickly damage something that is not strong enough flooring. It is better to choose an option that is more resistant to mechanical stress. Avoid choosing too bright colors decorative finishing to minimize distortion external influence. This approach will simplify the formation of a harmonious image during the selection of individual components of the outfit. The suitable surface should not be slippery. In some situations, installation of the system will be useful.

In the same way, taking into account functionality, convenience and future use, other components of the do-it-yourself dressing room project are chosen.
The supporting parts of the structure are made from different materials, with various types finishing. This table shows the distinctive parameters of popular options:
| Material/Finish | Advantages | Flaws |
| Powder coated steel | High strength, variety of colors. | High dead weight, formation of rust streaks due to improper installation/operation in conditions of high humidity. |
| Nickel plated steel | Impeccable appearance. | Poor or complete non-compliance with classical design trends, high price. |
| Aluminum | Lightweight, resistant to corrosion processes. | Lower load capacity compared to steel. |
| Chipboard and fibreboard with veneer | Excellent aesthetic characteristics at a reasonable cost. | Some manufacturers use outdated technologies. Their products contain ingredients that are unsafe for health and worsen the indoor atmosphere. |
| Chipboard and fibreboard with lamination | Low price, magnificent appearance, resistance to changes in humidity and temperature. | “Cons” – as in the previous paragraph. The variety and high quality of designs is not provided in all products. |
| Natural wood | Unique aesthetic parameters. | Products made from natural wood are damaged by changes in temperature and humidity. They are more expensive than artificial analogues. |
| Polymers | Lightness, variety of colors and shapes, resistance to high humidity. | Limited strength. |
| Glass | Durability, ease of removal of dirt, impeccable appearance. | Good visibility of dust and minor defects. Fragility. |
The definition with suitable details is determined by a complex of factors and a specific purpose. So, to ensure transparency, glass and plastic parts are installed in prominent places. Inside there are lattice structures.
It's easiest if there's enough space. The use of a standard canvas with a swing system does not need to be considered in detail. Below are other engineering solutions with comments about the advantages, features and disadvantages.

| Product | Depth/Width, cm | Notes |
| Built in furniture | 45-90/- | A structure that is too deep is not necessary so as not to complicate access to distant areas. |
| 30-40/- | Separate places should be allocated for storing children's and adult shoes, boots with long tops. | |
| Hangers | 50-70/- | If the depth is shallow, unfold the hangers parallel to the door and install retractable structures. |
| Shelves for linen | 40-65/80-100 | Dimensions can be specified taking into account the parameters of the kits. |


Hooks, rods, and shelves are inserted into such surfaces. If necessary, you can quickly change the location, remove unnecessary ones and add the necessary functional elements in the dressing room with your own hands.

They are rigidly attached to the wall with a fixed width distance. However, the shelves can be installed at different levels as needed. Any user can quickly perform the corresponding transformation without the use of additional fasteners.
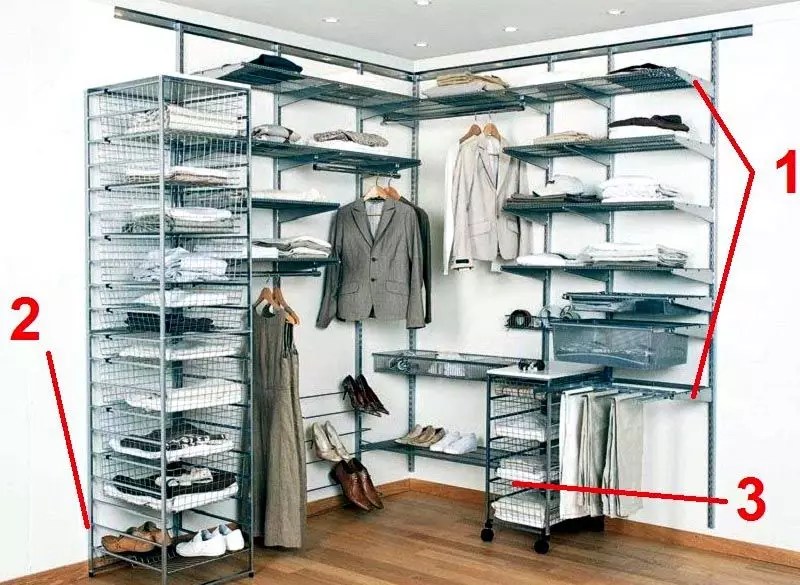
Cantilever mounts (1) provide versatility and easy access. Floor-supported structures (2) are highly durable. They are designed for storing heavy items. Mobile modules (3) are equipped with wheels.


To increase efficiency, install with an electric fan in the duct.
| Photo | Brand/Model | Overall dimensions, cm | price, rub. | Notes |
 | PAX/GS 450 | 53.5×117×40 | 7200-8650 | The walk-in closet kit includes racks, rails, shelves, crossbars, fasteners and end caps. |
 | -/Miolla | 88×160×45 | 2480-4500 | Inexpensive collapsible design with a cover made of non-woven material. It is not difficult to assemble it with your own hands in a few minutes. |
 | -/Orlando 1 | 210×250×50 | 18200-21300 | The manufacturer included a pantograph in this wardrobe room set. This furniture microlift makes it easier to lift and lower heavy and large items. |
 | Elfa/ Comfort 1 | - | 64200-67800 | A kit for equipping a dressing room with your own hands. |
 | Tatkraft/Saturn | 84-121.5×42.5×113-198 | 2280-3650 | Universal stand on wheels. |
 | Amethyst/ GR128S.300CP | 6.2×30 | 70-120 | Clothes hanger 128 retractable L300 mm GR128S.300CP |
By individual design For the project, dressing rooms are made to order by domestic and foreign specialized companies. This process is no different from making ordinary furniture.
The project implementation consists of the following stages:
At each stage, you can seek help from professionals.