Installation of such facing building material as siding is quite simple. However, many are frightened by the very thought that, when doing this work on their own, you will inevitably stumble upon an obstacle in the form of an opening called a window. Indeed, in residential buildings there are windows, but this does not mean that the installation facing material will be difficult.
In fact, installing siding around a window is as simple as the entire process. Let's see what the assembly of this product is like.
First of all, you need to prepare everything Building tools, which may be needed during the hour of work. Do not underestimate the significance of this moment, because it is precisely this that determines the convenience and ease of all subsequent manipulations.
So, installation of such facing building material as siding requires the use of the following working tools:
On the following photos you can see which tools are commonly used for the specified jobs.
Installing siding around the area where the window is located also requires the use of special components.
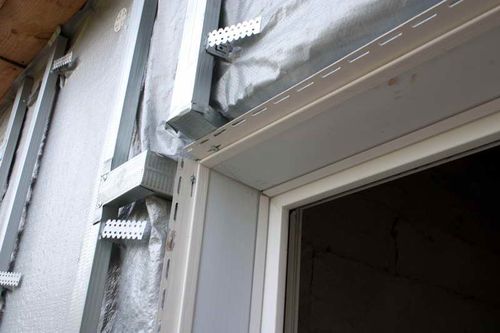
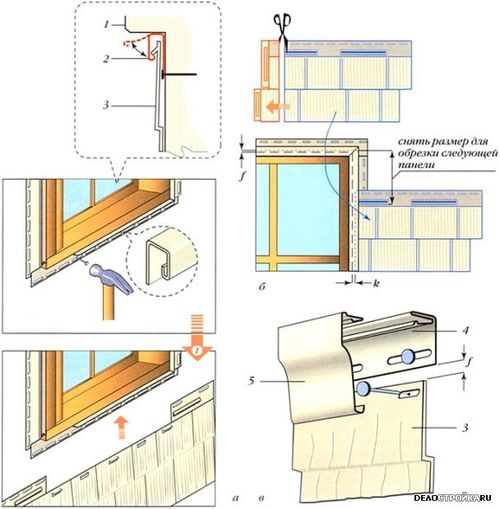
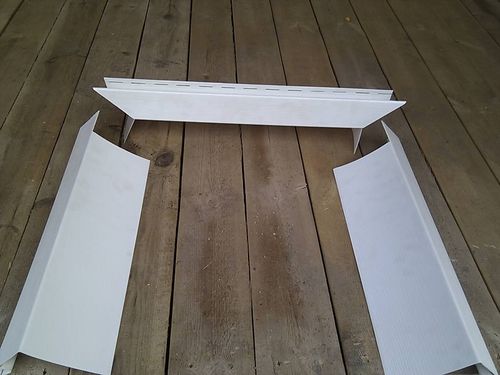
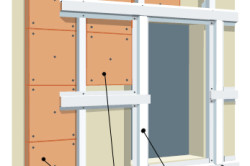
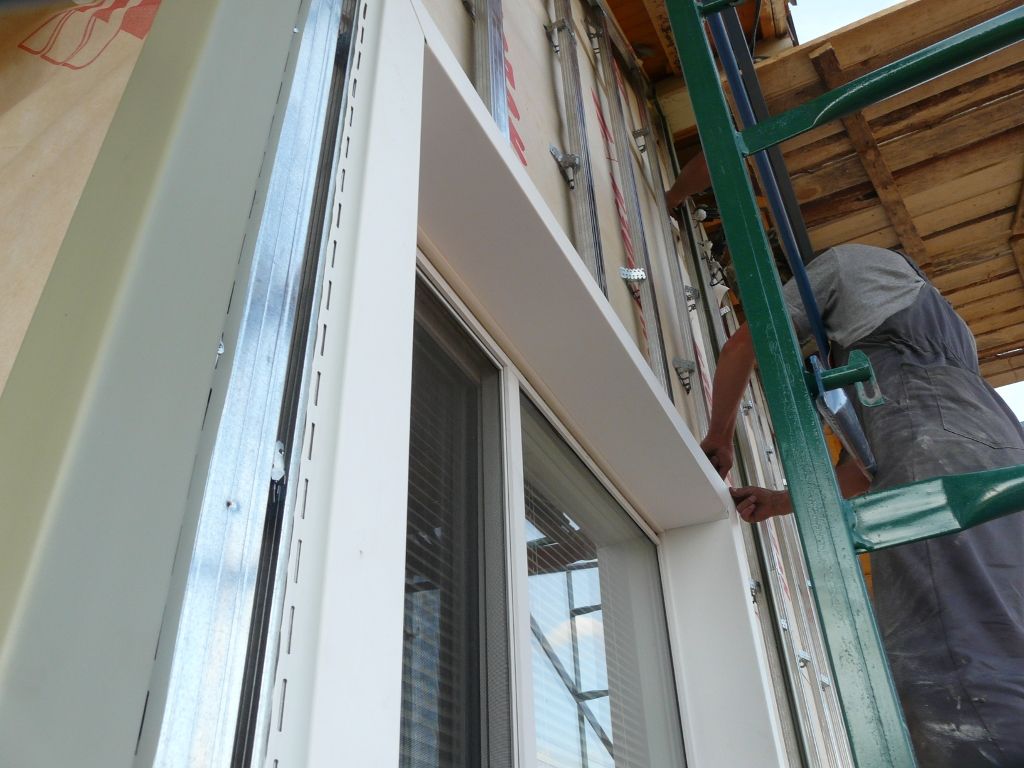
Finishing the wall with siding around the opening in which the window is located is the process of assembling load-bearing profiles made of galvanized metal, as well as installing components for cladding work. These elements are special slats that are attached along the entire perimeter of the opening in which the window is located. All specified details are shown in these photos.
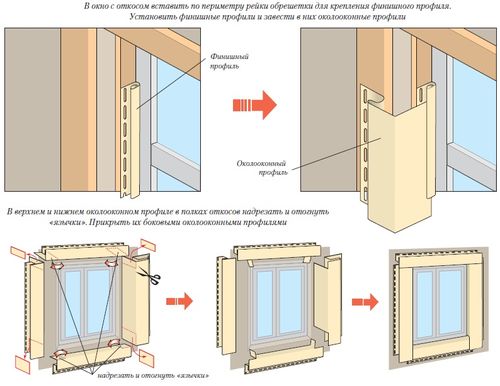
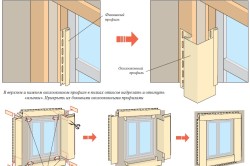
In the case where the siding will be installed on the slopes around the window, it is necessary to use double-sided corner profiles.
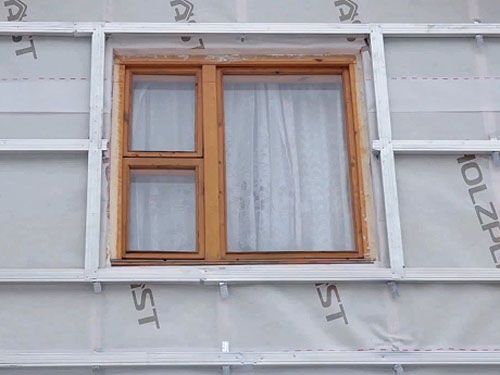
Before the siding is attached to the facade of the building, the sheathing must be assembled. You can see what the frame looks like in these photos.
First, preparation is carried out before attaching the frame. The window is getting ready for facing works by removing platbands and other elements protruding above the plane of the walls of the building.
Once it is accurately determined that the surface of the structure on which the siding is to be installed is dry, you can begin to work.
If there are uneven surfaces on the wall, they must be covered with plaster. And in the case where the window has rather large slopes, installation is required corner profile. However, it is more profitable to level the slopes with plaster, and then apply a special primer. What it looks like is shown in the available photos.
Before you begin to attach the siding, you need to apply markings to the sheathing. To do this you need the following tools:
![]()
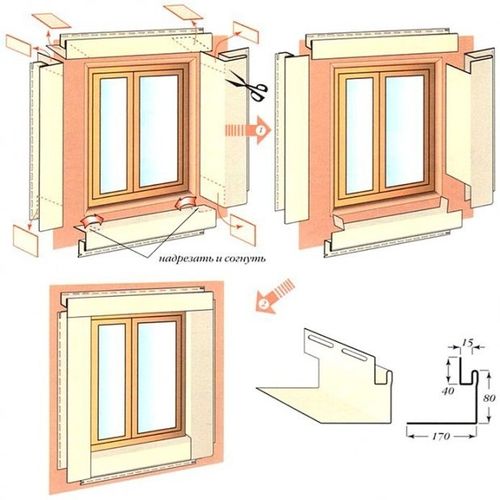
Installation of building materials around the opening in which the window without slopes is located is carried out in this way:
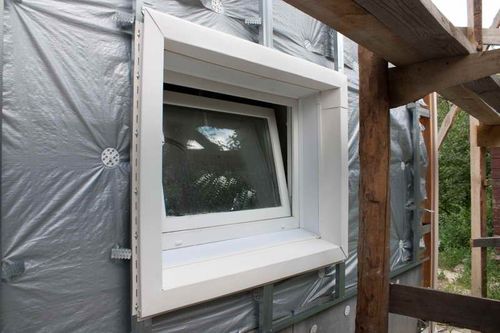
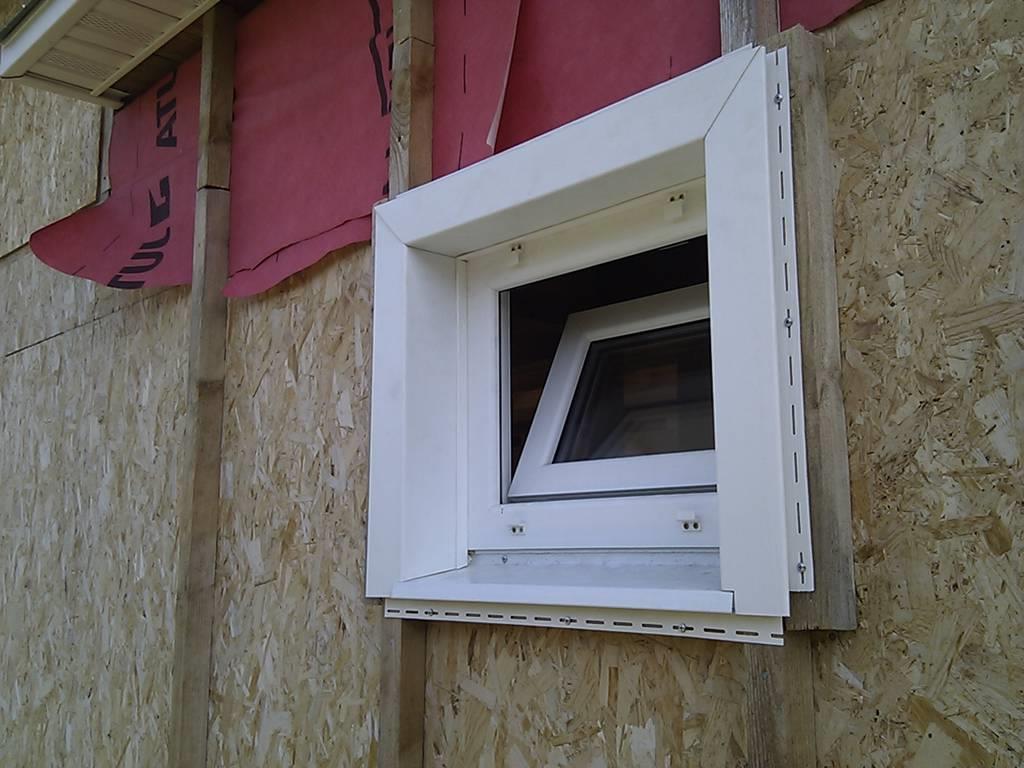
First you need to determine the distance under the window. On all sides of the opening where the window is located, it is necessary to leave a margin that does not exceed six millimeters. After this, the required gap is cut using metal scissors. Next, the supporting profile is fixed. A sheet of building material will be inserted into it. These manipulations will help add aesthetics to the appearance of the house, as shown in the available photos.
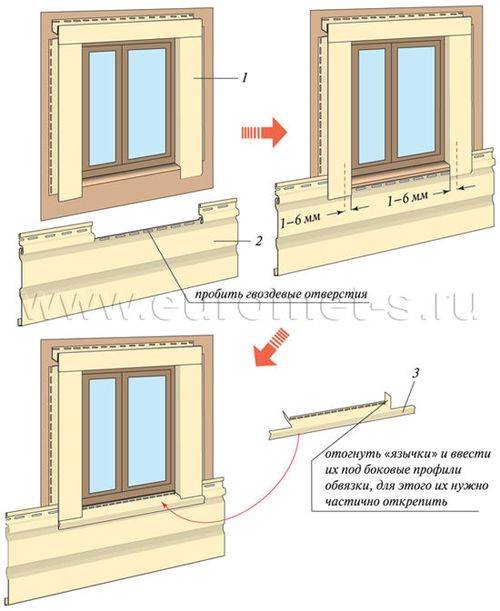
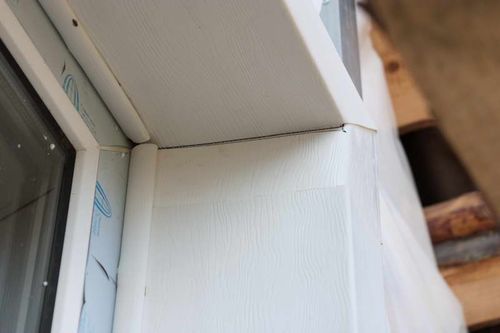
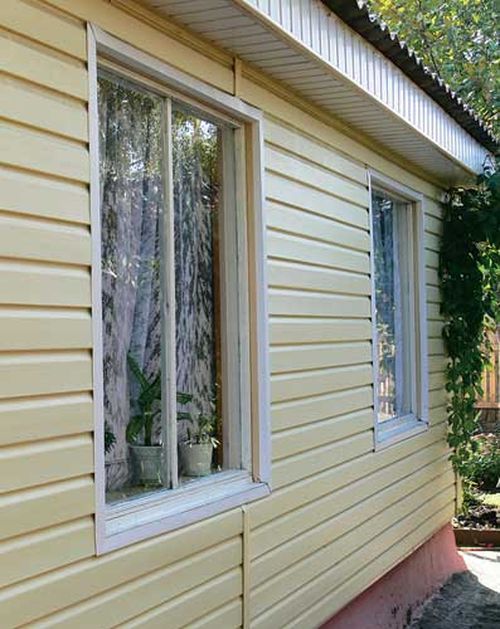
After completing all the steps described above, a panel is attached under the window, the width of which corresponds to the width of the opening in which the window is located. It should turn out as shown in the photo.
In the same way, siding is installed around the entire opening.
More detailed information on how siding is installed around the opening in which the window is located can be found in this video.
Many people, when installing siding, are faced with the problem of installing it around windows. Installing siding around a window is a challenge. There are many nuances in this work that will definitely need to be taken into account during its implementation. We definitely need to talk about this in more detail so that everyone knows how to install the siding itself around the window.
To finish a window with siding, it is necessary to properly install the sheathing around window opening, only in this case the end result will look neat and pleasing to the eye.
Of course, in this case, you can turn to a professional team of workers who work in this area. However, installation can be done by your own with my own hands. To do this, you need to follow the recommendations that will be presented below. Only in this case, installation of modern siding around the window will be possible without unnecessary problems.
Of course, before you begin work on covering windows with siding, you need to acquire all the most necessary tools and materials. To work you will need:
These tools and materials should be sufficient to install regular siding around the window. Fortunately, currently all this can be purchased in specialized stores that sell tools and building materials. If you can’t find something, you can always borrow from neighbors or friends.
So, all problems with the tool are solved, now you can move directly to around the window.
To begin with, the surface for installation must be carefully prepared. To do this, all platbands are removed from the windows, as well as other elements that may interfere with future work. It is necessary to check whether the surface on which installation will be carried out is dry. If there is constant air humidity here, then you need to plaster this place and then carefully prime it. In addition, all those elements that have rotted must be removed so that there are no problems with the further operation of already finished windows.
In order to install siding, you must first mark the future sheathing. To do this you will need a number of tools. Here you cannot do without a square, with the help of which all structural elements are aligned at an angle of 90 degrees. You will need chalk, with which, after taking measurements, you can draw straight lines. In order to level the frame, you should use a level. In this case, the water level is useful in order to measure the correct location of the lower and upper supporting profiles.
All horizontal and vertical structural elements must be positioned strictly vertically and strictly horizontally. During the work related to the installation of the sheathing, these nuances must be taken into account so that the work is done truly efficiently. Now you can move on to attaching the sheathing itself. Of course, in this case, all horizontal and vertical elements must be fastened using self-tapping screws and a screwdriver. Everybody is here structural elements are made of galvanized steel, so it is worth using special metal screws that have an enlarged head. In this case, you simply cannot do without a screwdriver.
To better connect all the parts of the sheathing, you can use special brackets that will help make the structure more durable, rigid and reliable. After the sheathing around the window is installed, you can proceed to installing the siding itself around the window. This is done quite easily. However, the sequence described in the instructions must be followed.
So, now we come to the most interesting part, namely the installation of siding around the window. In this case, we will consider installation around windows that do not have slopes. Although in the case of slopes the technology is not much different.
First you need to take measurements. First, the distance under the window is measured. Here you need to take a small margin of approximately 6 mm. This measure is necessary to ensure truly high-quality work. In addition, when cutting a strip of the required length, it is worth stocking up on approximately 6 centimeters of strip length.
After this, take metal scissors and use them to cut out required clearance. It will not be possible to cut it out right away, since the strips of siding are often very long. That is why an initially short strip is cut off, which will have a length with a margin of 6 centimeters. This will make it much easier to use metal scissors.
Also, do not forget about installing the supporting profile. This must be done before the start of work related to the installation of all other structural parts. The supporting profile will allow you to install all subsequent parts into it. This will provide a more beautiful and attractive look to the entire structure. This is precisely why people often use siding in their work. The supporting profile is attached using self-tapping screws for the metal sheathing.
After this, a panel is installed, which will have a length equal to the width of the window together with the frame. Clarity and evenness are very important here. Before fixing it, it must first be leveled using the appropriate tool. After this, this panel must also be secured using self-tapping screws and a screwdriver.
Here it is necessary to leave a sufficiently large temperature gap to ensure adequate compensation during subsequent operation of the material in hot weather.
In hot weather, siding has one very negative property - it expands. If you do not provide a gap of 1 mm when installing it, you may end up with a not very pleasant sight. There is a high probability that it will rear up over time.
This can be observed especially clearly in hot, dry weather. When installing it, temperature compensation is very important, which is achieved through small allowances. Moreover, this applies not only to its installation around the window, but also to the installation as a whole.
You should not install siding panels in very cold weather.
Frost has a detrimental effect on the condition of all structural elements. If you install the siding itself around the window in severe frost, then it may simply begin to collapse during the installation process. Therefore, installation must be carried out in optimal temperature conditions so that compensation gaps can be correctly set.
Once the bottom panel is installed, you can begin installing the top panel. It is installed in exactly the same way. Moreover, do not forget about both sides, both right and left.
As you can see, all the work associated with installing siding around the window is quite simple. A person who does not have extensive construction experience will cope with this task without any problems. The most important thing here is to do everything in strict accordance with the instructions.
In this case, the work will be done as quickly and efficiently as possible. It will definitely help not only beginners in such an extraordinary task, but also real professionals who deal finishing works not the first year. You should always remember the simple truth - “live forever, learn forever.” It allows you to move through life with your head held high and overcome even the most difficult obstacles.
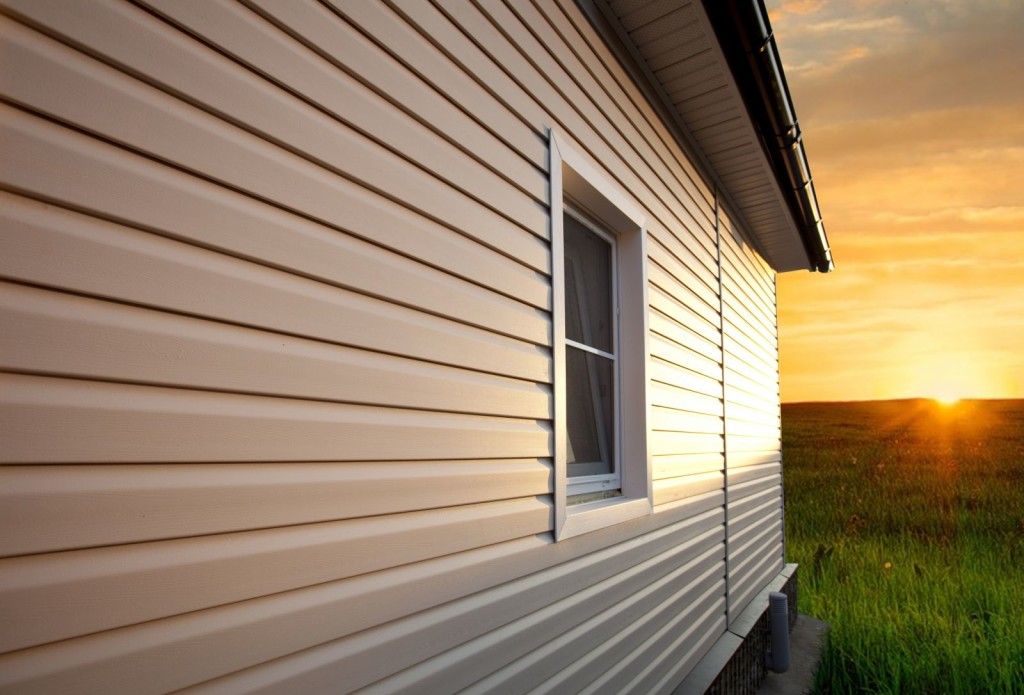
Siding is a modern facing material, increasingly used in the decoration of houses, balconies, modern industrial buildings. Its popularity is growing due to its ease of use, low weight design and low price. In appearance, this is a ribbed covering, where each subsequent protrusion seems to hang over the previous one, forming a corrugated surface, which increases the protection of the sheathed room from external influences, and is also interesting element decor.
There are many types of siding, but for domestic needs they are most often used on steel base, or vinyl. It is not difficult to guess that steel requires more maintenance, has more weight and a higher price. Therefore, the most popular is vinyl; it is not only not inferior in quality to its analogues, but also has a number of advantages. In addition to weight, price, and ease of use, one can note its resistance to:
Therefore, siding is used not only for interior decoration of a house, but for cladding its exterior. Lots of photos and videos design solutions proof of that.
Mounting hardware
Very often you can find houses or balconies covered with siding - this is easy to do, the cost of work is minimal, this is the decisive point when choosing a facing material. Sheathing the outside of a house with your own hands is quite simple and does not require any special skills. The only difficulty is the window and doorways. Therefore, if you decide to decorate your window with siding yourself, read these instructions.
First, you need to prepare everything necessary tools and accessories for work. A very important point is the choice of accessories:
- To fasten the facing material, be sure to select original spare parts offered by the manufacturer. This will ensure quality and reliability for many years.
- It is better to calculate the number of fasteners in advance, because... When purchasing more, you may not find the desired shade of the strip or manufacturer. Calculate required quantity Just:
- We measure around the perimeter of the window opening. If you intend to install ebbs or a window sill, then the distance under the window is not taken into account.
- Add up the resulting values.
- We add about 10% of the margin for trimming or other inaccuracies.
- Choose original fasteners. Although their price is not so low, it will provide high-quality cladding. If you are trying to save on this expense item, make a drawing; from this photo it will be easier to determine which fasteners can be replaced with cheaper analogues, and which ones can be discarded altogether.
Finishing the window opening
In order to sheathe windows with siding and refine the cut points you will need:
- H-profile
- J-profile
- Corners for decorating panel joints (external and internal)
- Chamfer
- Low tides
- Finish and window trim
Depending on the individual architecture of the buildings, windows may differ in their structure, and of course the siding will also differ. But there is general points, which you should familiarize yourself with in advance:
- It is better to choose galvanized fastening screws; they are not subject to rust, so they will last longer.
- Screws must be screwed in at right angles; tilting will reduce the fastening force, and this design will last less time.
- The fastening elements must not be screwed in completely, leaving about one millimeter of gap. Over time, the material will naturally expand, so fastening it too tightly can lead to deformation of the panel.
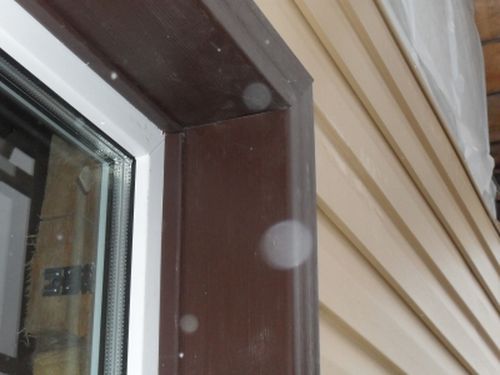
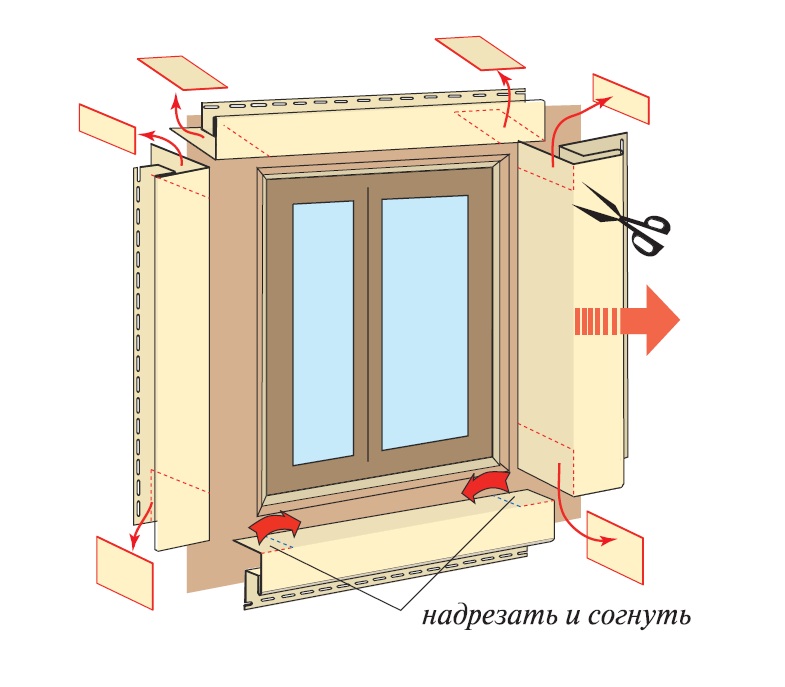
- Corners are cut at 45 degrees
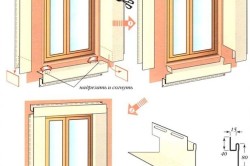
- The adjacent part of the fittings, at the point of joining with the slope on one side of the joining strip, is cut at an angle, and on the other is wrapped. This ensures fastening without gaps.
- A finishing strip is installed under the window, which will add reliability to the structure.
- And perhaps the most important point when facing the outside with siding, this is a tight joining of elements, which will ensure the tightness of the structure and protection from external factors such as rain, snow and wind.
Depending on the structure of the window opening, the exterior siding finish will differ. And since there are several standards for windows, the principles of cladding are different for each building:
- A window according to European standards means the slopes of the window opening are less than 19 centimeters. In this case, the window strip has standard size up to twenty-two centimeters. Attaching it with your own hands is a very simple process, and is carried out using a finishing profile into which the bar is inserted. If desired, you can replace the finishing profile with a chamfer and a J-profile, this will significantly reduce costs.
- According to Russian standards, windows have slopes of more than 19 centimeters. In this case, a J-profile is placed near the frame, along the perimeter of the window outer corner, and insert siding panels into the grooves of the fittings.
- Window without slope. In this case, we install a platband, or you can use a narrower J-profile, and insert a panel of facing material into it.
- Arched window. In this case, a flexible J-profile is used, or a regular one is used, slightly cutting it at the bend around the window.
As you can see, sheathing a window opening from the outside is not so difficult; it is enough to have all the necessary materials on hand and first read the instructions, and perhaps look at photographs for installing siding.
If the facade is the face of the house, then the windows are undoubtedly its eyes. Therefore, when repairing the facade, it is necessary to select the appropriate “makeup” for the windows. Today we’ll talk about such an aspect of façade finishing as design window slope siding.
Scheme of work
Our story will be incomplete if we do not pay attention to the material that we have chosen for decoration.
Reference: Siding is a decorative and finishing material in the form of elongated rectangular panels. Initially they were used in this role wooden boards, which were used to cover the outside of buildings. Practically in the West they called siding what we called lining, but these planks were nailed to the wall of the building overlapping, like fish scales (see what it looks like in any movie about the Wild West). However, now siding and lining are different concepts.
It turns out very nice with slopes
IN modern construction The following types of siding are used:
Note: Most often, vinyl siding is produced in the form of imitation wooden lining, but can imitate any other material - granite, marble, brick or woodwork and even a log house.
Siding is one of the most popular modern materials used for façade finishing. We will definitely tell you how to decorate the facade with siding in another article, and today we will dwell in more detail on the finishing of window slopes.
Let's start with the selection necessary materials and tools. In addition to siding panels, we will need:
In addition, prepare the following set of tools:
Important! When cutting siding, use only a fine-tooth tool. This is the only way you can achieve a neat smooth cut. If you plan to do a large amount of work with siding (for example, covering an entire house), it is better to “splurge” on a jigsaw.
To determine the amount of materials needed, you will need to know the height and width of the window. In addition, several types of window siding elements are produced depending on the configuration of the opening:
The first step in finishing the slope with siding is the installation of sheathing, which will be the basis for installation decorative elements. It is almost always used as lathing metallic profile. If for some reason you decide to use for sheathing wooden slats, ensure the wood’s resistance to moisture and pests by treating it with appropriate compounds.
The sheathing elements must be mounted strictly vertically (plumb) and horizontally (checking the level). We check the perpendicularity of the elements to each other with a square. Dowels are used to install the sheathing.
Work process
Further work depends on the depth of the slope
Why is the determining figure exactly 20 cm? The siding must cover the slope with a margin (overlap). The industry produces a J-shaped strip 22 cm wide, which is guaranteed to cover any slope less than 20 cm deep.
So, if we need to finish a shallow slope, we mount a j-shaped strip along the entire perimeter of the slope with a “loop” towards the window. If the slope is shallow, then the j-bar can be cut to the desired size
From the outside, we cover the edge of the J-shaped strip with the finishing profile.
If the depth of the slope exceeds 20 cm, then we can’t get by with “little loss” - we’ll have to work with a hacksaw or jigsaw. We install a j-shaped profile along the inner edge of the slope (towards the window).
Slice regular panels siding into sections of equal (important!) length, so that this section is enough to cover the deepest part of the slope with an overlap of two centimeters.
We insert the segments end-to-end into the j-profile. When all the sections are installed, we cover them from the outside with the finishing profile.
Tip: For very small slopes and slope-free openings, you can use a single element - the platband.
To finish curved (arched and vaulted) openings with siding, special flexible starting and finishing profiles are used. However, such materials are expensive; you can save money by using conventional profiles, cutting them in increments depending on the curvature, and bending them.
Advice: If you do not have experience in this type of work, it is better to invest in a flexible profile. Damage to material in inexperienced hands will be more expensive.
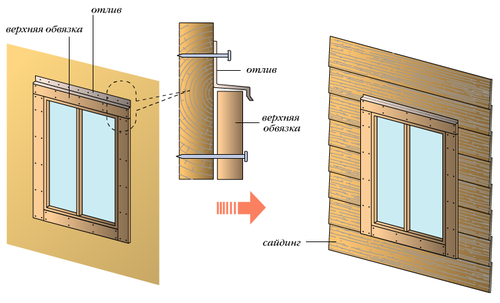
The installation of the ebb and visor completes the work.
You can see more clearly all the work associated with finishing window slopes with siding from the outside in the presented video. We will definitely touch on some issues not covered in this article (for example, insulating a window opening) in other publications.
Exterior finishing work on a loggia or balcony is a rather complex process. Finishing materials Today we offer quite a large assortment. Today we’ll look at how glazing and finishing balconies are done using siding.
Note that there are several types of siding:
Each type of siding has its own advantages, which determine the scope of its application. For cladding balconies with your own hands, the most popular is the use of PVC panels. Let's look at the process of finishing a balcony window from the outside and how it happens interior lining loggias with this material.
This method allows you to carefully finish the windows of balconies and loggias after glazing with your own hands. Due to its ease and simplicity installation process, PVC profile is in great demand for this type of work.
Among the many advantages of plastic siding, the following advantages stand out:
To sheathe window slopes from the outside, you will need the following elements:
When purchasing siding and consumable accessories, you need to ensure that all elements are the same shade. Sometimes, on the contrary, they purchase additional elements of a contrasting color so that the windows and interior decoration visually different.
Due to the fact that each house is individual, there are also windows different shapes. Location relative load-bearing wall may also be different. There are four main locations and types of openings:
Advice! It is quite natural that the finishing of windows with siding located differently will be slightly different. You will also need a different number of profiles.
Let's look at all the do-it-yourself cladding options in more detail.
This option is the simplest in terms of DIY finishing. Such windows can be sheathed in two ways:
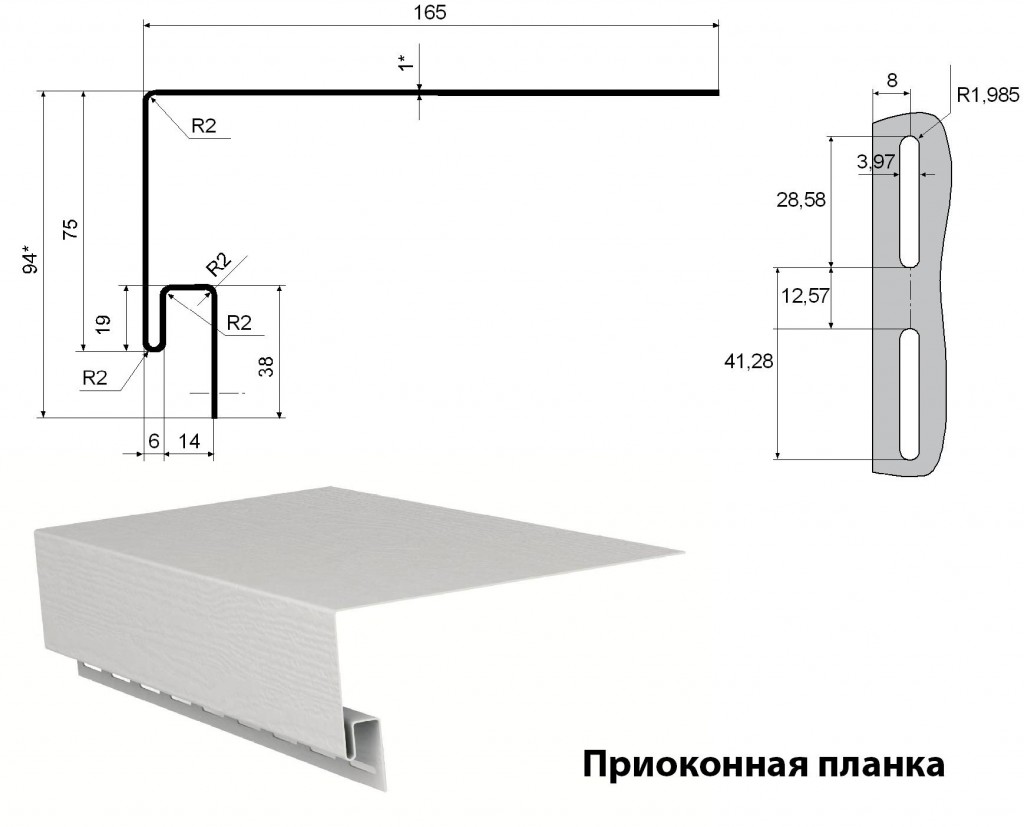
This window arrangement is considered a European standard. Its finishing plastic siding also does not raise questions. For such slopes, a near-window strip is used, which is installed using the following technology: 
Our country has a more severe climate, so in many houses the wall thickness reaches 50 cm. In turn, the width of the slope outside is more than 19 cm - standard width window strip. Such windows are sheathed as follows: 
Sometimes it is necessary to veneer arched windows. Moreover, such openings can be either provided for by the construction project or converted from ordinary windows with your own hands. The technology for finishing such openings is as follows:
Advice! In order for the finishing of windows with siding to be high-quality, neat and last for many years, it is necessary to maintain a technological gap. In this case, such a gap should be anywhere at the junction of two siding elements.
To make the interior decoration of the balcony look complete and neat, you should correctly install the trim around the window. This process has certain nuances that must be observed:
 Using a similar technology, sheathing is installed around balcony door. Here the lining is made a little easier, since there is no need to line the door from below.
Advice! If necessary, you can perform simultaneous insulation of the balcony. To do this, between the cladding ( plastic panels) and insulation is laid on the wall. The most commonly used foam, penofol or pressed mineral wool- a modern analogue of glass wool.
Having studied the technology of performing the work, you can come to the conclusion that finishing the windows with your own PVC hands siding is quite possible without the involvement of hired workers. In addition, glazing and finishing of balconies with ennobled windows will complement appearance and emphasize the originality of the cladding of the loggia.