The sliding wardrobe ranks among the leaders in domestic market among furniture of various configurations. Thanks to it, free space is used sparingly, it fits perfectly even in small room. Despite the fact that sliding wardrobes are compact in size, they are quite spacious. In addition, they are multifunctional and have a long service life if assembled correctly.
To make it easier to navigate the question, instructions are always included with the elements. The wardrobe assembly diagram includes information about the stages of work, the name and quantity of parts and elements. When buying a cabinet, you also need to check the quality of each component part: strips, fasteners. You need to make sure that there are no various types defects - swelling, cracks, chips. When transporting a furniture set, it is recommended to take precautions; for example, poorly secured furniture may fall and break.
In order for furniture to serve its owner for as long as possible, it must be properly assembled. Any assembly of a wardrobe (instructions and diagrams will help us with this) will not be complete without the use of some tools. Here are the main ones:

First of all, you need to decide where the purchased furniture will be located. Before assembling the coupe, it is important to take into account all the nuances and details of placement. When planning to install furniture in the corner of the room, keep in mind that it is measured from the corner total length. To determine this value, take the size of the mezzanine. Next, they carry out which will display the boundaries of the future cabinet. In order for the line to be even, you need to make several marks and then connect them.
For a long service life of furniture, high-quality assembly of wardrobe doors is required. Instructions for this work are required. Next, you need to decide where the bar will be located, separating the compartments for things with horizontal shelves and the place where the hangers with clothes will be placed. To determine these areas, you need to measure the perimeter of the future cabinet ceiling and measure the necessary distance from the outer boundaries of the structure. The height of the shelves, the size of the edge of the structure and the vertical stand are marked on two vertical lines.

Modern furniture manufacturers assume that an action plan is needed for such a difficult task as assembling a wardrobe. Instructions are included with each piece of furniture. Only after all the step-by-step steps have been read with understanding can you begin to install the fastenings for the wardrobe.
Fasteners are applied to the pre-drawn lines and locations for future holes are marked where dowels will subsequently need to be driven in.

Since the closet is assembled independently, without the involvement of professionals, it is necessary that the assembly diagram of the sliding wardrobe is always present before your eyes in order to avoid possible mistakes.
The vertical stand is fixed with screws to the fastenings. Before installing the mezzanine, you need to draw a line with a pencil in the place where it will be located. Holes are drilled along this line, self-tapping screws and dowels are driven into them, and then the mount is mounted on them. Any assembly of a wardrobe, the instructions for which describe the entire process in great detail, involves the installation of mezzanines. It is fastened and fixed with self-tapping screws. Next, you can begin installing the side panel. To do this, you need to measure the distance from floor to ceiling as accurately as possible. The sidewall is adjusted to the size of the main structure and securely fastened. Marks are made on it and the vertical stand, and 2 fasteners are mounted in the marked places. After this, the shelves are installed and secured with self-tapping screws.
Since not everyone can assemble a wardrobe correctly, this process must be approached with all seriousness and responsibility. Where the hangers will be located or where the hangers will be, you need to hang the pipe. The hangers with clothes will be held on it. The pipe is cut to a certain size and installed on fastenings that were made in advance. The next step is marking. The mounting points on the wall surface are marked with a pencil. A hole is drilled in each false panel into which a dowel is driven. Then the panels are fastened with self-tapping screws in the marked places.

When the main structure of the cabinet is secured, you can begin such a direct process as assembling the wardrobe doors, the installation instructions for which are described step by step. It is necessary to adjust the length of the guides to the appropriate size. The planks are attached to the false panels on the floor and ceiling using self-tapping screws. Each cabinet model has the principle of a sliding door system, but furniture from different manufacturers has its own individual characteristics. It is advisable to choose a system that does not require the installation of special equipment. You can order doors at furniture factory, then there will be no need to additionally cut the material and adjust the sheets to size. How to assemble wardrobe doors yourself? Algorithm of actions:

Before choosing a wardrobe, you need to decide on its model. Some prefer the built-in look, others prefer the full-size one. The first model is a structure that is built into free space. The only drawback of this type is the inability to move. The second type is a wardrobe made according to individual order. And the wardrobe is assembled (instructions must be included) either by the buyers themselves or by specialists.
In conclusion, we can conclude that if there is a niche in the room, then this is the right place would be better suited for arrangement After all, in addition to saving space, it will also save your money.
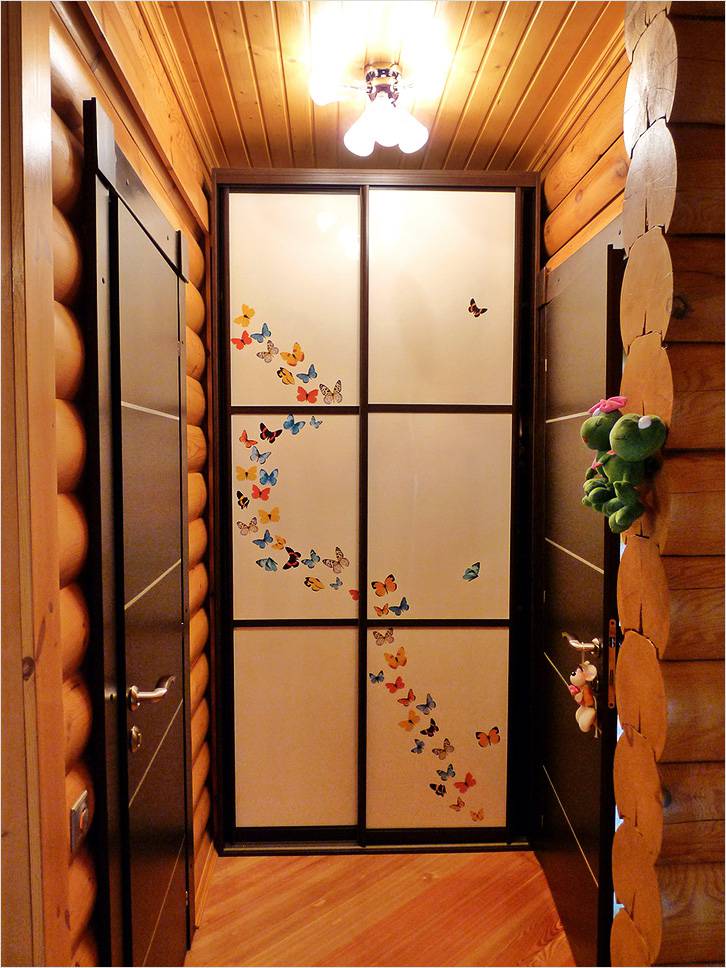
Many of us are faced with the need to buy a wardrobe. The wardrobe model has become very popular. His door design extremely convenient and saves free space in the room. They are even used as partitions. There are two ways to solve this issue:
 The second option, of course, will cost less than the first. But this process will require certain skills and abilities. It is very important to correctly measure all design parameters, think over the dimensions of all compartments and shelves, the height and width of the product. If you are ready to take on this job, then you need to figure out how to do it.
Preparatory stage

To do everything correctly, you must follow the instructions. Let's  Let's look at the whole procedure in more detail.

Be careful when working on doors. The ease of use of the door also depends on the quality of the profile. It is sold unassembled and consists of the following parts:
The sealant must be applied evenly and carefully over the entire length. The profile frames are attached at the top and bottom to the mirror, which is in a horizontal position. Next, the side frames are put on the mirror in a vertical position. The frames are connected to each other with self-tapping screws into prepared holes.
Door installation begins with fastening. We measure the attachment points at the bottom and top of the cabinet. The guides are attached with self-tapping screws with press washers, also in prepared holes. First install the top part, combining it with the side frames, then the bottom one. Use a level to avoid warping. Install a stopper to secure the door. We insert the door into the upper one and then lower it into the lower guide. The height and angle of the door can be adjusted using the lower rollers. Your closet is ready.
At each stage, pay attention to the assembly diagram for this model. To clarify all the difficult points, watch the video instructions. If you doubt your construction skills and design abilities, turn to the professionals.
Today, anyone can make a sliding wardrobe with their own hands by ordering everything necessary materials V specialized companies. This piece of furniture is one of the most popular, as it has a number of advantages. If you also want to install this convenient storage for various things in your apartment, you need to read to the end of this article and you will learn how to assemble a sliding wardrobe yourself.

Purchasing or ordering a ready-made cabinet is much easier than assembling it yourself, but in fact there is nothing complicated about it. Self-assembly according to drawings has a number of advantages, such as:
At self-assembly cabinet according to drawings or photos, do not forget that this work also has some disadvantages, namely:
If all the listed difficulties do not deter you, and you are determined, let’s take a closer look at how to assemble a wardrobe yourself?

Decide where you will install the future cabinet and take measurements. To do this you will need a certain set of accessories:
First you need to measure the distance between the two walls where the cabinet will be installed. Measurements should be taken from below and from above for greater accuracy. You should also determine the distance from the floor to the ceiling on the left and right by finding out the height of the furniture. This must be done on both sides, since the walls are not always quite even. It is necessary to approximately determine the depth of the cabinet. You should draw a rectangle on paper and write down the dimensions of the future furniture. Exact dimensions will be needed later.

Visit several furniture stores, taking with you a sheet with measurements. Look at different models of cabinets and decide which one you want to make yourself. You can also see photos on our website. You can find out the specifics of the materials, fittings and components used from sellers in stores. If you don’t have enough time for this, invite a designer to your home. For a fee, they will advise you on materials and create a sketch of future furniture.

To create a detailed drawing you will need school drawing skill or some computer program for furniture design. Not everyone has the necessary software, so you can always choose the first option.

On a sheet of A3 paper, you should make a drawing of the future cabinet, clearly drawing all the details and indicating their dimensions. Please note that you should make a retreat of approximately 1 cm from the walls, at least 3 cm from the ceiling and at least 10 cm from the floor. This is required so that the cabinet is in assembled form fit into the provided niche. It is necessary to step back from the floor so that the cabinet stands on special legs with height adjustment. After drawing all the shelves and drawers on paper, all parts should be distributed in a table, indicating all dimensions.

Having in hand detailed drawing future furniture, contact a company whose specialists will cut out the parts you need from chipboard, mirror or glass for you. You can also purchase all spare parts, fittings and materials that may be required.
From additional materials To assemble a wardrobe with your own hands according to a photo or drawing, you will need the following:
IN Lately The popularity of the top-hung door system has increased, but it is better to choose the familiar aluminum mechanism, which has become traditional.

From all the fittings and parts that you receive, you will need to make a sliding wardrobe using the photo yourself. It is unlikely that everything will be done in a day, since the process is quite labor-intensive. For assembly you will need the following set of tools:

Assembly always begins with installing the bottom. On the lower part facing the floor, you need to install the legs in two rows of 3 pieces. They should be securely fastened with screws. The nearest row of legs should be placed along the axis of movement of the door leaves. Turn the structure over and push it into the prepared niche where you plan to install the cabinet. With help building level and adjustable legs, align the structure in a horizontal plane. After this, the base should be pulled out for subsequent assembly.

The side walls should be attached to the cabinet ceiling using confirmations. The design should be U-shaped, which must be placed on a pre-prepared base and secured from below with confirmations. It is necessary to assemble the cabinet in the position in which it will stand in your niche.

Need to take back closet future wardrobe and attach it to the overall structure with screws. To increase the rigidity of the frame, you can use Euroscrews to secure several shelves and nail the back wall to them. The resulting frame can be carefully inserted into the niche.

Using store-bought corner pieces, secure the shelves. To do this, you need to attach the corners and install cut-out shelves on them, as well as install pull-out drawers.
Sliding doors should be installed at the very end. You need to align the outer edge of the aluminum rails and attach them from the bottom and top to the base of the furniture. You need to insert the doors one at a time: first start top part into the guide installed on top, and then place the lower roller on the bottom guide.
So, your closet should now be completely ready, and all you have to do is fill it with useful things.
Furnishing the home is the final step that combines all renovation and design stages. IN modern furniture several must be combined the most important qualities: operational functionality, appearance as such, compliance with the overall design idea.
Coupe systems or their elements are present in almost every home. The convenience and functionality of this furniture are undeniable, and for such designer styles, like minimalism, urban, hi-tech and completely irreplaceable. The article provides comprehensive recommendations for making your own wardrobe.
Having considered the pros and cons of this class of furniture, we will get a complete understanding of the modern concept of a wardrobe with a compartment door opening system.
| Advantages | |
| Ergonomics | Standard designs require “blind” areas for opening. In coupe systems, doors move in one plane along guides when opening and closing. Significantly saved space. |
| Capacity | The ability to arbitrarily configure the internal space (filling), which determines the capacity. The only requirement is ergonomic feasibility. |
| Versatility | Fits into any interior. Various ways design and finishing allow you to install a wardrobe in the bedroom, kitchen, living room, etc. |
| Functionality | Inside, unlike conventional cabinets, you can store large items, household appliances. Embed various devices- ironing board, workbench, tabletop, etc. |
| Ideal solution for narrow spaces | For narrow aisles and corridors, a sliding wardrobe is often the only solution. Only it can be placed in such places and used comfortably. |
| Zoning | Double functional purpose. Using such furniture, you can easily zone a room, that is, it can also serve as a partition. |
| Variety of designs | No restrictions on internal content. A large number of materials for the manufacture of facades, which allows you to realize any design idea. |
| Using a mirror | You can install a mirror on the facade. This will improve the functionality of the room and visually expand the space. |
| Reliability during operation | Doors that move along guides will last much longer than doors that open on hinges. |
There are significantly fewer disadvantages, but they are there:
| Flaws | |
| Failure of the sliding system | This only happens if you purchase a low-quality sliding system. |
| Need for additional lighting | If the dimensions are large, additional lighting will be required; it significantly increases operational comfort. |
| The need to clean the guides | Over time, the lower guides become clogged, which can interfere with the movement of the roller. Therefore, sometimes you have to clean the grooves of the guides. |
| The mirror gets dirty quickly | If a mirror is used in the decoration, then it will have to be washed frequently to remove stains and hand marks. |
| No possibility of rearrangement | When designing, dimensions are related to the specific location of the cabinet. Not suitable for those who like frequent rearrangements. |
There are several varieties, they have structural and external differences:
Let's consider each of them separately.
When constructing such a cabinet, there is no top, back wall and base. Only partitions are manufactured. The entire structure is screwed directly to the ceiling, walls and floor. Metal corners are used for fixation.
This is a stationary structure, and it is an invariable part of the created interior.

Has sidewalls, top, bottom, back And sliding doors. This is a complete separate piece of furniture. It can be moved and is not tied to any design elements.

An excellent solution for small apartments where every meter is valuable. Repeats the shape of the corner and allows you to rationally use the space of the room.

This is a type of corner, but the facade does not follow the shape of the corner, but is made diagonal. The increased capacity of this design determines its frequent use as a dressing room.
Furniture with sliding door systems is made from a variety of materials. The table shows the main ones:
|
Material |
|
|
|
The most common and frequently used. Chipboard, having a low price, is quite durable. A huge selection of textures, colors, patterns allows you to produce a façade for any design solutions. There is one, but significant, drawback - it is difficult to finely process. For this reason, mostly simple structures are made from chipboard or laminated chipboard. |
|
|
Eco-friendly material, easy to process. The variety of facade coatings is no less than that of chipboard. Practical and affordable material. |
|
|
Expensive option, but natural wood will last a long time. A magnificent decoration in any interior. |
The classification according to design differences is as follows:
Built-in . There is no need for top, bottom or sides. Their function is performed by the walls, floor and ceiling of the niche. For manufacturing, you can use plasterboard, which will reduce total costs on the product.
Corpus . The main difference from a regular cabinet is the method of opening the doors. If necessary, you can move it. Transportation (moving) without disassembly is possible. The downside is the increased consumption of materials, since the side, bottom and top walls, and the rear part are made.
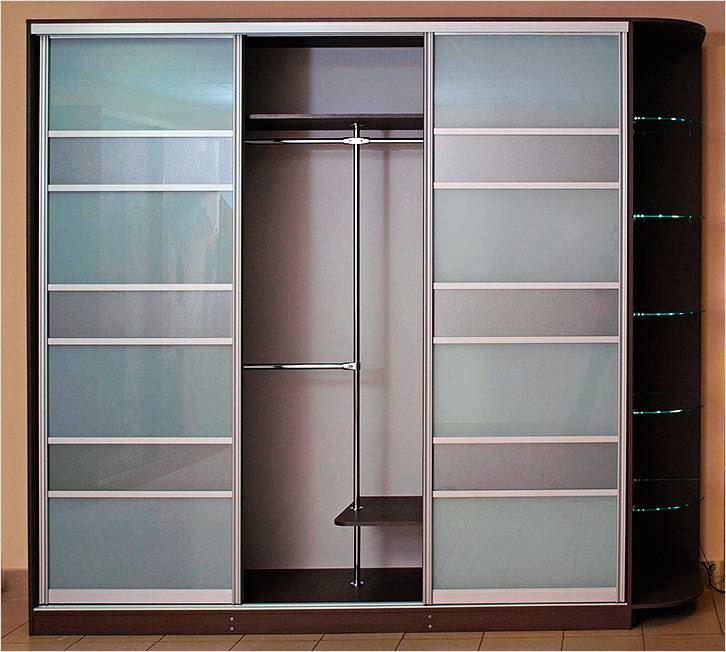
Now let's take a closer look at the organization of the internal volume of the cabinet.

When designing, ergonomic and operational specifics should be taken into account.
Let's look at the main structural elements wardrobe
The choice of door size depends on factors:
The optimal width, worked out in practice, is from 600 to 900 mm. This size provides the most comfortable conditions use.

Sliding systems are classified according to two main criteria:
To manufacture the profile of the moving system, aluminum or steel is used. The material of the sliding system is selected, as a rule, the same as that used for the door frame. Steel structures cheaper, but in most cases preference is given to aluminum.
Structurally, two types of systems are produced - bottom-mounted and top-hung. In the lower-support type, the door with rollers moves along a rail. In the top-hung system, its rollers move along the upper guides.

The height is arbitrary. The only limitation may be the ceilings or the small stature of the owners of the apartment/house. Structures are made from ceiling to floor, as well as smaller heights.
The standard length of the wall material used is 270 cm. Standard apartment has a ceiling height of 260–270 cm. Almost identical dimensions make it possible not to cut or build up structural elements.
For ceilings higher than 270 mm (if you want to have a floor-to-ceiling closet) there are two solutions. First, the sheets of material are joined to the required length. Secondly, the mezzanine is assembled. Sheets can be joined using high-precision equipment from companies specializing in such services.

The depth of the shelves determines the everyday usability of the cabinet. The optimal and recommended figure is 60–70 cm. Usually in the closet there is a rod for hangers, the width of which is about 48 cm. A depth of 60 cm will completely eliminate contact inner surface doors and clothes hung on hangers. Most furniture accessories (boxes, trays, etc.) have a width of 50 cm. The shelves should not be made deeper, since it will be inconvenient to get “under the wall” when placing things.
The dimensions of the premises do not always allow the installation of furniture with the maximum recommended shelf depth. But there are also restrictions on the minimum depth. The best option the depth may be 40 cm. Considering that 10 cm goes under the sliding door mechanism, you can purchase small hangers 30 cm wide. Alternatively, install a hanging rod(s) perpendicular to the doors and the rear wall, in this case, the width of the hangers placed is not limited .
This solution is much better than completely abandoning the installation of a cabinet, especially since even such a “narrow” design for small apartments- the ideal solution.
When designing, the length of the cabinet is selected in accordance with the location of its further installation.
![]()
The height between shelves is 250–350 mm. The selection rule is simple: greater shelf depth - longer distance between them, less depth means less distance. This dependence is associated with ease of access to stacks of linen located deep in the shelf (near the back wall).
When designing a mezzanine, you should take into account the size of the things intended to be stored on it. If these are suitcases, then the height of the mezzanine should be equal to the height of the suitcase, plus a small margin.
The mounting height of the hanger bar is determined by the length of the clothing placed on it. Maximum height will be equal to the longest thing. Average length of typical wardrobe items:
These calculations are approximate, since the length of clothing depends on height, style and other parameters.
The diagrams show various options furniture assembly projects and technologies:


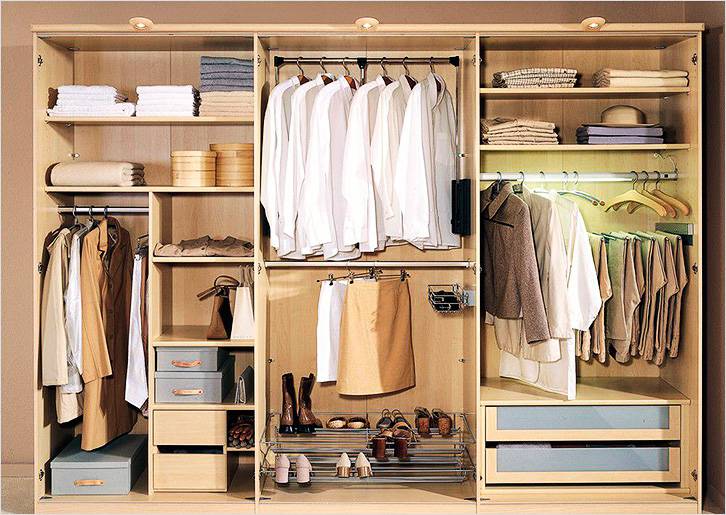
When designing the filling of a sliding wardrobe, first of all, zoning is done internal space. The figure shows a universal diagram of the breakdown into storage areas for various things:
![]()
Buying ready product, you will have to agree with the filling configuration proposed by the manufacturer. Self-production will allow maximum consideration of dimensions, functionality, location of various zones and much more, which will ultimately ensure maximum operational comfort.
Below is a table with examples of frequently used elements of internal filling and zoning of a sliding wardrobe with their help.
| Zoning | |
|
|
Shelves are one of the main filling elements. They can be stationary and retractable, solid and ventilated, half and full depth, etc. |
|
|
Drawers are the second most important element of the cabinet. |
|
|
Hanging rod - necessary for clothes on hangers. The material used varies, most often metal. |
|
|
Convenient storage baskets. All things are clearly visible in them, which creates a certain convenience. |
|
|
This device is called a trouser. Pants are always ironed and ready to wear. |
|
|
A bar (hanger) for storing ties is convenient to choose, does not wrinkle, and proper suspension prevents them from changing shape. |
|
|
Convenient placement of belts, as an alternative - storage on a shelf in rolls. |
|
|
Compact and convenient storage underwear. |
|
|
Placing bed linen, towels, and some clothes in piles on shelves. |
|
|
A significant part of the internal volume is allocated for storing blouses, light blazers, and short sundresses. A pipe with hangers is installed in the opening. You can make several such sections - for short and long things. |
|
|
Department for accessories - bracelets, watches, glasses, etc. It is recommended to store these items in drawers. Inside, the space can be divided into separate cells. |
|
|
Shelves for storing shoes. In the upper (mezzanine) part you can place shoes in boxes. |
|
|
Hooks, hangers, carabiners, rings and other accessories for bags. |
| Travel suitcases | Place rarely used (once a year during vacation) suitcases on the far (top) shelves or mezzanine. |
|
|
One of the options for bed linen. Shelf width up to 80 cm, height up to 60 cm. |
Characteristics of the main filling elements:
The interior content, thought out to the smallest detail, will be in sharp dissonance with poorly chosen facades. It is the facades that give the entire cabinet a special finished look. Let's consider several options for their implementation.

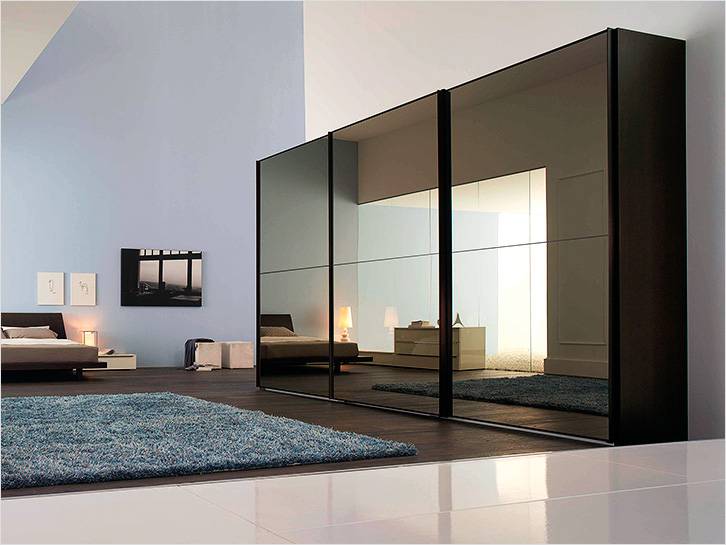
A mirror visually enlarges the space and makes the room brighter. Can be whole or divided into several parts. The large weight of the mirror determines the need to select high-quality and reliable rollers. Such a facade creates additional maintenance troubles - the mirror quickly gets dirty. It will have to be wiped and washed regularly, especially if the family has small children.
For facade mirrors it is used various finishes- sandblasting patterns and drawings, spraying of various shades (silver, emerald, gold, etc.) for glass, printing color images and much more. For safety reasons, a mirror with inside covered with shockproof (armor) film. If the mirror breaks, the pieces will not fly away.

Glass is no less popular than mirror; facades are equipped with unbreakable ones. Mainly used frosted glass with an image. Vertical and horizontal stripes that divide the canvas into separate squares look original.

These materials are laminated with film. The facades look massive and heavy. To install them you will need reliable roller systems. One of the advantages is a huge selection of colors, shades and patterns, texture - from matte to bright glossy.
On MDF and Chipboard facades You can apply photo printing.
These are the main types of facades used in the manufacture of sliding wardrobes. You can combine them with each other. This article contains photographs with a considerable number of original ideas for the production of facades.
After cutting all the elements, the edge tape is glued to the ends of the slab. Sequence of operations performed:
| Instructions for gluing the edge to the end of the workpieces | |
|
|
If you don’t have an assistant, you can use a simple trick. You will need a small box and a quick-release clamp. The clamp presses the board to the box, ensuring the stability of the workpiece and the convenience of gluing the edge tape. |
|
|
One side of the edge tape has an adhesive surface. Warm up to high temperature it is easy to glue to the workpiece. |
|
|
Cut the edge to the required length. Leave a margin of 1 cm at the edges. After gluing, you can cut it with ordinary scissors. |
|
|
For gluing position temperature sensor set the iron to “2”. |
|
|
For safety reasons, wear left hand two gloves. There should be no pellets on the palm. |
|
|
Use the iron to move along the edge tape, and hold it with your left hand (flat). |
|
|
We carry out the iron in opposite direction, at the same time, with a gloved hand, firmly press (smooth) the edge tape. |
|
|
Use your hand to smooth the edge a few more times. |
|
|
Using a special roller. Iron on the edge tape and then roll it with a roller. Very comfortably. |
|
|
Once the tape has cooled down, carefully cut off the remainder from the end with a sharp knife. |
|
|
We get a cut like this. |
|
|
We repeat the procedure for all ends of the workpiece. We measure the tape with a margin of 1 centimeter, from each edge. |
|
|
Glue it with an iron and smooth it out. |
|
|
Cut off the cooled edge. The edge on the adjacent edge has already been glued; we make the cut very carefully. |
|
|
We cut off the longitudinal remains of the protruding edge on all sides. |
|
|
Result. Gluing edge tape the ends of the remaining blanks. |
|
|
All cuts are sanded with a special whetstone. The inside of it is filled with foam rubber, the outside is filled with fine-grained abrasive. |
|
|
Grinding of cuts is done only with longitudinal movements. |
The processing of the main elements is carried out similarly.
According to the project, the details are cut out. This operation is best done in a workshop using a special formatting machine. After cutting and gluing the edges, we assemble the cabinet:
| Frame assembly instructions | |
|
|
To work you will need to collect additional device, consisting of a metal strip and two pieces of board connected at an angle. It turns out a corner with a metal guide. You will also need two quick-release clamps. Using this device it is very convenient to connect workpieces at right angles. |
|
|
We check with a square - it should be 90˚. |
|
|
Set aside 70 mm from the top edge. |
|
|
In the example, a 16 mm slab is used, therefore, it is necessary to retreat 9 mm from the edge. Why not 8 mm? Because the plate protrudes 1 mm beyond the edge, forming a small side. The middle of the end of the adjacent plate is at a distance of 9 mm. |
|
|
Drilling mark. |
|
|
A similar mark is placed below. |
|
|
Using a drill, we make holes for the fasteners. |
|
|
A special drill replaces three at once. It allows you to make the main hole, the collar and chamfer in one operation. |
|
|
Drilling. |
|
|
We tighten the confirmation with a screwdriver. |
|
|
Having secured the sidewall, we mark the installation locations for the shelves according to the design. |
|
|
Next, using a square, place marks on both sides under the holes for attaching the shelves. |
|
|
Markings along which holes for confirmations will be drilled. |
|
|
The device assembled at the beginning of work is convenient to use for fastening shelves. Using a tape measure, measure 1/2 the thickness of the slab. The thickness of the plate is 16 mm, so we retreat 8 mm from the mark. |
|
|
At this level we install the shelf using quick-release clamps. |
|
|
Here you can clearly see that the mark is in the middle of the end of the workpiece. Everything is ready for drilling. |
|
|
Let's drill. |
|
|
We tighten the confirmations. |
|
|
We install the remaining shelves in the same way. |
|
|
We install the cross member. And we fasten each shelf with confirmations. |
|
|
Having fixed the cross member quick clamp, we twist it with confirmations from above and below, then we secure each shelf. |
|
|
This is how the lower part of the wardrobe is assembled. We clamp the strip from the slab with a clamp and secure it at the end with a confirmat. |
|
|
We drill shallow holes from below for installing furniture legs. |
|
|
We tighten the metal sleeve with external and internal threads. |
|
|
Using a hexagon, tighten (recess) to the required position. |
|
|
We screw the leg with the plastic support into the sleeve. Thanks to this, the furniture can be moved and leveled. |
|
|
Two parts support leg assembly. |
|
|
After assembling the cabinet, a fiberboard sheet is attached to its back side with ordinary nails. |
|
|
We start fixing the fiberboard from the top. By tilting the cabinet from side to side, we achieve a 90˚ angle between the side panel and the top bar. We nail the sides and bottom of the fiberboard sheet. |
|
|
During assembly, no such plastic furniture corners were used. Why? The use of confirmat is much more practical, since it is screwed into the slab a few centimeters and reliably connects the structure, giving it additional rigidity. |
|
|
We close the confirmation hats with a decorative cap. |
Using the same operating sequence, you can assemble a wardrobe of any configuration.
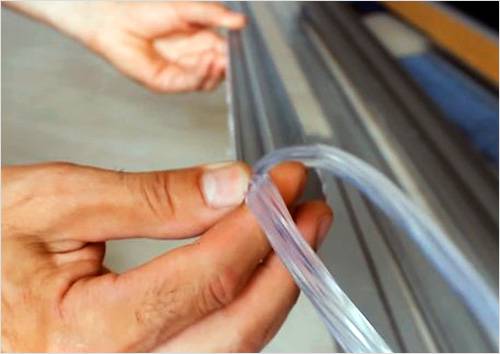
The door consists of a frame, metal guides and a roller system. You should order it from a company that professionally deals with such systems. Specialized software will calculate all elements based on given dimensions and issue a complete specification for assembly. Mirrors or slabs from other materials are cut to the size of the doors for mounting in frames.
| Elements for sliding system | |
|
|
|
|
|
|
|
|
|
|
|
|
|
|
Vertical posts/handles for the side parts of the door. |
|
|
Sealing rubber for the mirror. |
|
|
Self-adhesive brush to soften the impact of doors when opening/closing. |
|
|
|
|
|
|
|
|
Brackets for fixing doors in extreme positions. |
The main parts for assembling the doors are made of aluminum. All metal components must be coated protective film, protecting them from scratches during transportation.
Let's consider step by step assembly door leaf. In our example there will be two mirror doors.
| Door assembly instructions | ||
|
|
The door is located in a horizontal position and provides free access from all sides. | |
|
|
In the upper part of the vertical post, which also serves as the door handle, we drill two mounting holes. | |
|
|
The lower one has a diameter of 6.5 mm. | |
|
|
Top hole- 10 mm. The upper door profile and the roller will be attached through it. | |
|
|
The lower part of the same vertical profile. The upper hole is 10 mm, the lower one is 6.5 mm. The distance from the edge of the first hole is 7 mm, the second is 43 mm. The lower roller will be attached closer to the edge. The second hole is for the screw connecting to the profile. | |
| Profile installation | We fix the rubber seal on top with a profile, carefully inserting it. | |
|
|
We perform the procedure sequentially on all faces. We do not cut off the rubber seal at the corner, but lay it continuously around the entire perimeter. | |
|
|
This screw does not tighten completely. Later the upper rollers will be installed into it. | |
|
|
Install the upper rollers and tighten the screw until it stops. | |
|
|
Rubber seal installed at the bottom of the door. | |
| The screw with the top roller is also tightened | At the top we attach the second pair of rollers. | |
|
|
Install the lower roller. We press the spring on the roller and carefully insert it into the hole, securing it with a screw. | |
|
|
The screw is tightened with a hexagon. | Ready wardrobeWardrobe with first door installed. |
|
|
We assemble and install the second door in the same sequence. | |
Additionally, we install auxiliary elements - a pipe for hangers, etc.
 In the end it should look like this
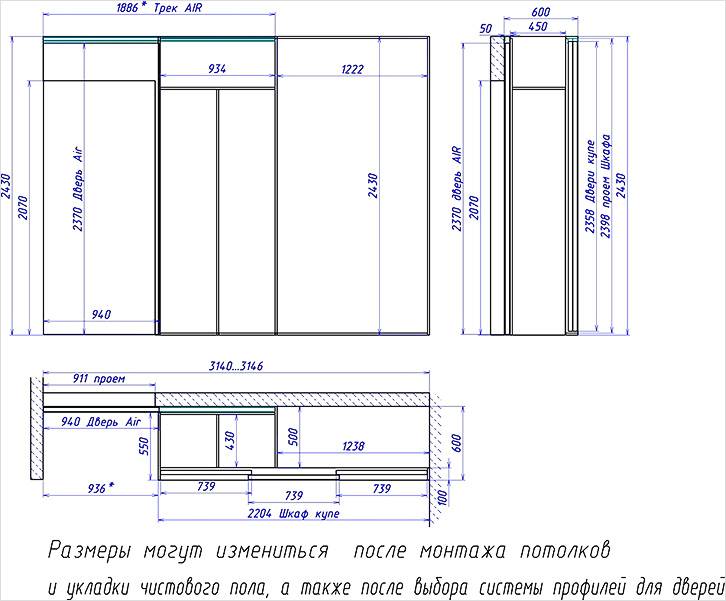
We invite you to familiarize yourself with the diagrams and drawings. They will help you create your own project.


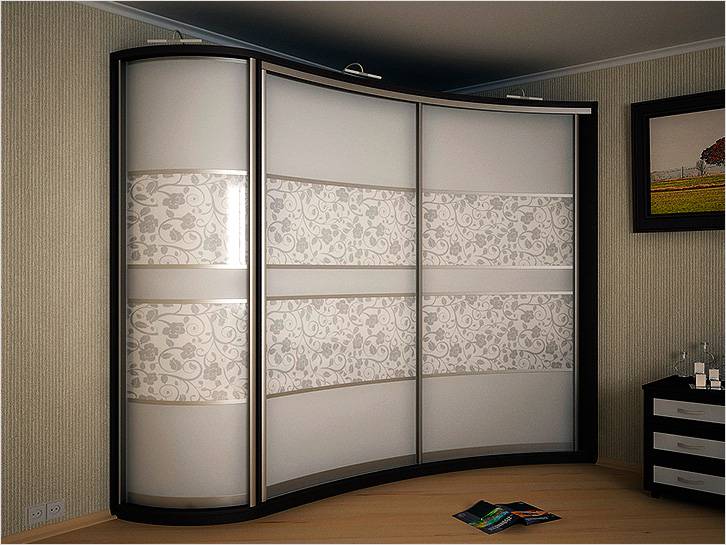


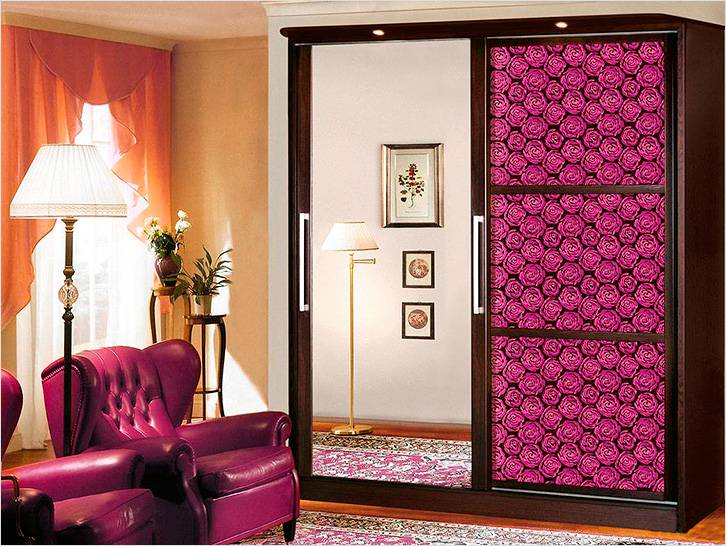


The sliding wardrobe in the domestic market has gained a leading position among cabinets of any design. This type of furniture has become a godsend for modern interior. It allows you to rationally use the free space in the room. The popularity of furniture is explained by a number of advantages: firstly, it is impeccable versatility, secondly, having a compact size, the cabinet has excellent capacity, thirdly, it has a long service life and high quality execution. When making furniture, only environmentally friendly materials are used. natural materials and reliable fittings. Interesting design solutions allow you to create attractive furniture, emphasizing its individual style. Such positive characteristics make this cabinet ideal for a modern interior. It will fit even into a small room. This article will tell you how to properly assemble a wardrobe.
Before assembling the wardrobe, you need to prepare the tools for assembly. For this you will need:
These tools will become real helpers in your work.
To make it easier and faster to navigate the question of how to assemble a wardrobe, an assembly diagram is included in the package of the purchased product. You should check for its presence. When purchasing, you need to pay attention to the quality of each element, strip and parts, make sure there are no cracks, swelling or other defects. When transporting the set, precautions must be taken: the furniture must be firmly secured in transport, and a flat road should be chosen for transportation.
Before assembling the wardrobe, it is important to understand the assembly algorithm. If it is planned that the furniture will take up space in the corner of the room, then the total length of the set is measured from it. To do this, you need to measure the length of the mezzanine. Next, a vertical line is drawn that will display the boundaries of the future structure. To get a straight line, you need to make several marks.
After this, you should measure a vertical line. At its level, a bar will be placed in the same position, separating the compartment for things with horizontal shelves from the compartment where the hangers are located. To do this, you need to measure the perimeter of the ceiling and measure the distance from the right or left border of the cabinet. Next, the height of the shelves, the edge of the future structure and the vertical stand are measured on two vertical lines.
The kit always includes instructions on how to assemble the wardrobe. After reading it carefully, you can carry out the second stage of work - installation
fastenings

Fasteners are attached to the drawn lines, and marks are made using a pencil for future holes where dowels are driven. The fastenings are secured to the wall with self-tapping screws.
Since the main task is correct assembly furniture, you should know that if profiles are used to frame the edges of some elements, it is more rational to use them at the next stage.
Since you have to assemble the wardrobe yourself, you should be very careful at every stage. The vertical stand is fixed with screws to the fastenings. In order to install the mezzanine, you need to draw a horizontal line with a pencil where it will be located. A hole is drilled on this line to secure the parts. After that, self-tapping screws and dowels are driven in there, the fasteners are mounted on the wall, and a mezzanine is installed on them, which is fixed with self-tapping screws.

WITH maximum accuracy The distance from the floor surface to the ceiling is measured. The side wall is adjusted to the size of the main structure and securely fixed with fasteners.
Then marks are made on the side wall and vertical stand of the cabinet. In these places, two fasteners are mounted, after which you can install the shelves, securing them with self-tapping screws.
Where there will be hangers, you should hang the tube for them, having previously secured them with appropriate fasteners. The tube is cut to required sizes, is inserted and also secured.
After this, marks are made with a pencil at the mounting points on the wall surface. A hole is drilled in each false panel into which dowels are driven. Then they can be attached to the marked places with self-tapping screws.
Before assembling the wardrobe doors, it is necessary to determine the length of the guides and adjust them to the appropriate size. They are attached to false panels on the ceiling and floor using self-tapping screws. After assembling the frame, work begins on installing the door. Each model has its own sliding system which has its own individual characteristics. For a cabinet, it is better to choose a system that does not require special equipment. When ordering the manufacture of a door from a specialized furniture company, you do not need to cut the sheets, attach them to the guides and adjust them according to the dimensions of the rails.

So, before assembling the wardrobe doors, you need to:
After all stages of the work have been completed, you can call your family and friends to evaluate the result.

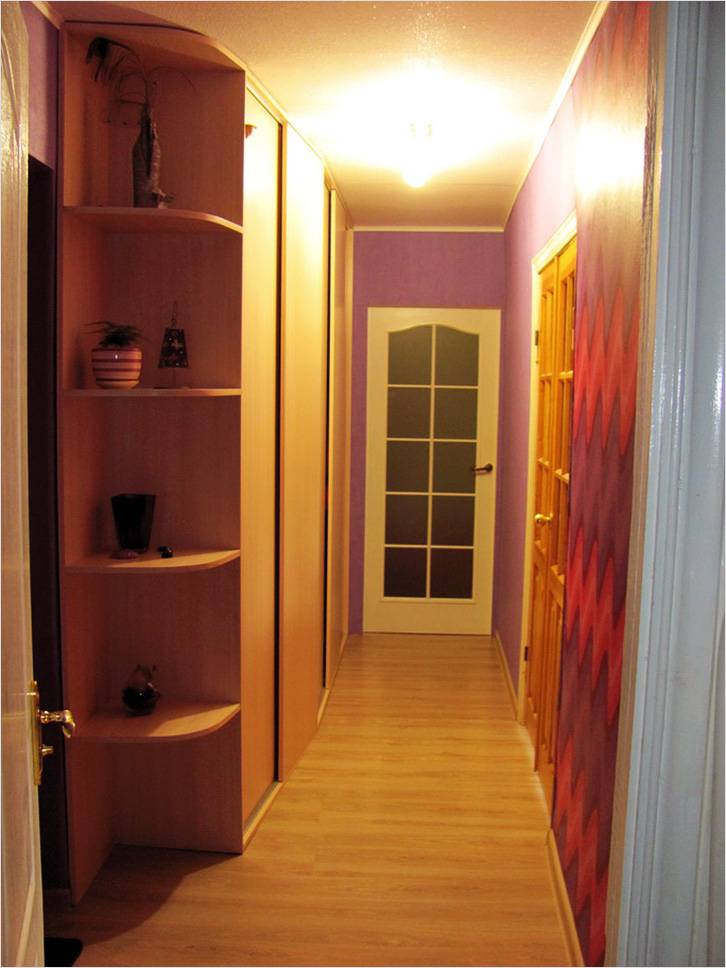
For people who do not have sufficient experience in making furniture with their own hands, the idea of assembling furniture may seem utopian. Many apartment owners place the structure in a niche in order to save space. It's pretty rational decision, especially in small spaces.
Before assembling a built-in wardrobe, you need to choose its type, since a niche is usually filled with two types of wardrobes: built-in and full-size. The first type is a built-in structure, the second type is a regular custom-made cabinet. If there is a niche in the room, it is better to use it for a wardrobe. This solution significantly saves room space and financial costs for installation work.
Before assembling the wardrobe, you should put the niche in order: remove switches, sockets, and cover the walls with wallpaper or paint; if desired, you can use plastic panels. After this, the material for the door is selected: mirror, decorative plastic or glass. Because the standard height ceilings are more than three meters, it is more convenient to place mezzanines on the upper part of the niche. The most commonly used doors are hinged or sliding doors. Sometimes they choose an accordion door.
A built-in wardrobe can be installed fully or partially; it has no surfaces, but is equipped with the necessary fittings: shelves, holders, racks, baskets, etc. These elements can be easily attached to the walls of the room and the wardrobe can be fully used. The only drawback is that it cannot be moved.
When installing the door, be aware that the floor surface may be uneven. For this reason, you may need to adjust the wheels that move the doors. The wheels should not be adjusted very often as they may become unusable.

You can also put a cabinet wardrobe in a niche, which contains all the elements of the standard model: ceiling, floor, back wall and side panels.