 From dried leaves, flowers and herbs you can create unique paintings - both exquisitely complex and completely simple, which even small children can make. There are several techniques for making paintings, and perhaps you yourself will come up with something new. |
Collect and dry beautiful plants and enjoy creativity with your children, develop imagination, neatness and a sense of beauty.
Collect leaves, flowers and herbs for future paintings it is possible from spring to autumn.
Dry They are better in old heavy reference books or magazines. Thick plant stems do not dry well, so it is recommended to cut them in half lengthwise. Leave the plant in the book for 10-14 days.
Glue take it thick enough so that drops do not form.
If according to your intention colorful but transparent petals
must be superimposed on a dark background and retain their original color, then first you need stick them on thin white paper
, cut along the contour, and then include it in the composition.
So, on a fine autumn day you went out to the park or forest and collected a large collection of beautiful bright leaves and plants.
Applications can be made as from freshly picked leaves and dried. If you want to preserve the leaves, two drying methods can be recommended.
The first, well-known, method - putting leaves between the pages of an old unnecessary book. It is better to lay each leaf on both sides with a paper napkin.
The second method is express drying of leaves using an iron. Just remember that the leaves are not sterile, so it’s better to iron them on a surface that you don’t mind throwing away later, for example, on large sheets paper. You also need to place a sheet of newsprint or a paper napkin on top of the sheet before ironing. And now more details.
 Powder drying
This method of drying flowers and leaves is not quick or easy. It will require bulk substances with hygroscopic properties: sifted river sand, semolina or corn grits, salt or crushed chalk.
Powder drying also has its advantage: it completely preserves the shape and vibrant color of plants or inflorescences.
Heat the sand in a frying pan so that no moisture remains and let it cool. Pour 2 cm of sand into cardboard box and place flowers on it.
Gently sprinkle sand on top until the plants are completely covered.
After two to three weeks, you need to make holes in the bottom of the box so that the sand can spill out.
Shake the dried flowers slightly to remove any remaining sand.
Such flowers can be used for three-dimensional paintings or making floral arrangements.
There are also plants that wither faster than they can dry (hydrangea, bulbous plants, heather, chicory). They need air drying with stems immersed in water.
Cut the lower part of the stem at an angle of 45 degrees and place it in a vessel with water to a height of 7.5 cm.

Hot drying, that is, iron drying perfect option when to dry the leaves for the herbarium for tomorrow. Also, hot drying can preserve the original color of cornflowers.
Wipe the leaves with a damp cloth or cotton pad to remove dirt and dust. There is no need to wet or rub too much so as not to damage the fragile surface.
Line your ironing board with clean paper and place the leaves on it.
If you use newspapers, be careful, as printing ink can print on both the leaves and the surface of the ironing board.
Cover the top with another sheet of paper.
Switch the iron to minimum temperature and check that there is no water in it. If your iron is not too high power, then you can set the temperature closer to average, but not the maximum, because too hot an iron will ruin the leaves.
Iron the leaves several times, then remove the paper and turn them over to the other side. Cover with paper again and iron.
Repeat the procedure until the leaves are completely dry.
Leaves and flowers that you want to use not for herbariums and paintings, but to create garlands or other crafts, need to be dried without a press.
To dry, place the plants on paper and straighten them carefully.
Tie the flowers in bunches and hang them with the inflorescences down. The room should have good air circulation and relative dryness
 Drying plants and leaves under pressure
Drying leaves under a press is the most famous and simplest method.
Leaves and flowers are simply transferred with sheets of paper or paper towels on both sides and placed under a press, or in books and magazines.
The paper must be changed every day to remove absorbed moisture.
Flowers and leaves will be ready to use after a week.
If the workpieces have become too brittle, dip them in a solution of water and PVA glue (4 parts water to 1 part glue), and then dry.
Leaves dried and processed in this way are ideal exhibits for a herbarium.
Some plants can be dried horizontally on a wire rack (for example, ivy). Some are best not turned upside down (physalis).

Single large flowers whose petals are rich in liquid, such as roses or tulips, can be dried in the oven at low temperature.
Watch the process carefully: the flowers should not turn brown.
Before you start work, cover the table with oilcloth so as not to stain it with glue. Prepare the base - a sheet of cardboard, collected or dried leaves, scissors, glue (preferably PVA), tweezers.
First you need come up with a future picture . Then arrange it on a separate sheet of paper. And only then start gluing the individual leaf parts to the base. It is best to apply the glue in droplets along the edges. If you apply glue to the entire surface of the sheet, it may warp when drying the application.
Need a finished picture put under a press for one or two days. Don't forget to do it for her frame!
Try to start by coming up with pictures that do not require cutting out any details from the leaves, but are created by overlaying the leaves. You can come up with a lot of such pictures: butterflies, mushrooms, chickens and other birds... The missing elements can be drawn in with a felt-tip pen or made from other natural materials.
Having mastered simple pictures, children can begin to come up with multi-tiered images. In this technique, leaves are glued on top of each other in layers. The application will turn out bright and cheerful if the leaves are different in color.

In this type of appliqué, excess parts of the leaf are cut off so that the result is exactly what the little artist intended.

Using this technique, a picture is created by gluing many leaves of the same or similar shape and size (or, for example, maple seeds). This way you can make the scales of a fish, the tail of a cockerel or a firebird.

It is used to create individual images or entire paintings with a symmetrical structure, as well as to obtain two completely identical images (for example, reflection in water). To do this, you need to select similar leaves to get an image with its “reflection” or symmetrical in itself (“Butterfly”, “Dragonfly”, “Landscape with a lake”, “Boat on the river”).

A type of symmetrical appliqué. Its difference is that it allows you to get not one or two, but many identical images - ornaments. You get a whole “round dance” of trees, flowers, mushrooms, butterflies, etc.


You just want to catch the bright colors of autumn and hold on to them longer. Leaves are simply a miracle of shades that are worth decorating your apartment as part of color therapy. 🙂 But how often, having brought home some beautiful leaf, we notice that it quickly loses color and shape, and it is useless to use it in decoration.
Today the most successful ways, get water, soda, books :))

The easiest way to preserve leaves longer is to pick them directly from the branches. Not to say that on the branches autumn leaves hold very tightly, but still this is a great chance to keep the bouquet in original form. Before placing the arrangement in a vase, trim the branches with a sharp knife and lightly split them. You can add a few tablespoons of glycerin or a teaspoon of sugar and an aspirin tablet to the water. Periodically sprinkling the leaves with water from a spray bottle will help the bouquet retain its fresh charm.


A skeleton in decoration is a somewhat strange combination, unless we are talking about leaves and flowers. This technique allows you to make things so delicate that you can’t believe they are of natural origin.
You need to prepare a soda solution (about 3 tablespoons per 1 liter of water) and carefully place the leaves in the solution. Boil them over low heat for an hour to two, until the leaves darken, periodically adding baking soda. Then we lay the leaves on paper and hit them with the bristles of a toothbrush. The pulp of the leaf crumbles and a cute skeleton remains. 😉 Then the sheet needs to be dried, you can paint it or leave the resulting natural shades.
Some florists prefer the dry skeletonization method: you can peel the pulp from the leaf without first soaking it. In this case, it is better to use a natural bristle brush, and the stiffer the bristles, the better.
To prevent the sheet from being too brittle after cleaning, you can spray it with hairspray.


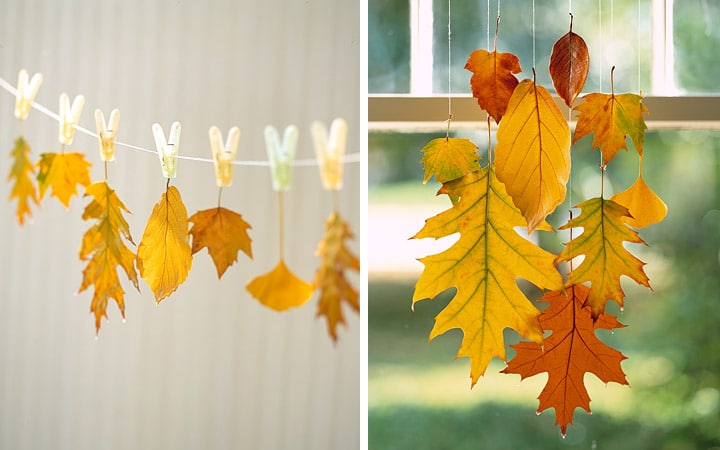
Simple and stylish garlands greatly decorate the veranda and the house, but only if the leaves remain in their original form, without losing their shape and color. Special floral sprays or acrylic lacquer, which is also sold in spray - in construction stores.
Leaves sprinkled with this varnish look shiny and fresh, are protected from damage and do not fade. The varnish is intended for wooden furniture, plastic, glass, but it will also protect leaves perfectly :)
You can also use a special floral varnish for the leaves to make the flowers shine. Another remedy is the usual one. vegetable oil, which can be applied to the leaves with a silicone brush.


For that type of decor where smooth and clear lines are needed, the leaves can be dried using the old proven method. Place them between the pages of the book, and then move them to a new page every day. The moisture from the leaves will be completely absorbed in about a week; to strengthen it, you should dip them in a solution of water and PVA glue 4:1 and dry well. And then you can use the leaves in their original form, or paint them.
Pictures made from leaves sandwiched between two glasses look very stylish, and this decor lasts for a very long time, the colors do not fade.
From leaves preserved in this way, you can make a panel that looks like it was painted with oil paint.
Updated: April 20, 2019 by: Olga Fomina
Autumn crafts - we have no doubt that mothers of schoolchildren are very familiar with these words. And I also know that feeling when a child, coming home from school, says that dried leaves or a craft made from them should be brought... tomorrow. How to quickly dry leaves so they are ready as soon as possible? The most convenient and accessible way for everyone is with an iron.
Yes, yes, we will iron the leaves as if they were some kind of shirt. But, as with fabric, you need to carefully set the temperature so as not to spoil it. If the iron is too hot, the sheet will lose color.
Step 1. Wipe the leaves with a damp cloth - you will be surprised how much dirt accumulates on them. Especially those taken from trees growing near roads. There is no need to wet the leaves; we also do not recommend rubbing them too hard.
Step 2. Place on ironing board Blank sheet paper, place the leaves on it and cover them with another sheet of paper. You can also use newspapers (they are often recommended in tips on how to quickly dry leaves), but letters and photographs from newspapers can be imprinted on the leaves (tested).
Step 3. We make sure that there is no water in the iron (we will dry the leaves, not steam them) and set the minimum temperature. If the iron doesn't seem hot enough, increase the temperature a little, but don't overdo it. It is better to iron the leaves longer with a not very hot iron than to ruin them in one fell swoop at the maximum temperature.
Step 4. We stroke the leaves. After ironing once, remove the top sheet of paper and check the result. Turn the leaves over, cover with paper again and iron. We do this several times until the leaves become dry and brittle.
As you can see, drying leaves with an iron is not that difficult. The main thing is not to make it too hot.
And at the end we offer you examples of crafts made from autumn leaves, found on the Internet:


DIY wax autumn leaves step by step with photos


The beauty of autumn leaves can be enjoyed not only in autumn. Some drying methods may cause leaves to lose or change color. However, there are numerous ways that help maintain color and shape for a long time. After reading this article, you will learn how to dry autumn leaves so that they delight you in the cold season, when the trees outside are bare and unsightly.
Select bright leaves. Collect freshly fallen, bright and sufficient soft leaves. The leaves may be slightly dry, but not to the point where they break or curl at the sides. Choose whole leaves. Avoid torn or slightly damaged leaves.
Cover the leaves with adhesive on both sides. For decoupage, a white adhesive is used, which becomes invisible when dried. You can purchase the adhesive at a store that sells art and craft supplies. Use a sponge brush to apply the adhesive. Place the leaves on a sheet of newspaper to dry.
Wait until the adhesive is completely dry. It should not stick to your fingers. It should also become completely transparent on the leaves.
Repeat on the other side. Turn the leaves over to the other side and apply adhesive to them. When the second side is dry, the leaves are ready to use. This method allows the color and shape of the leaves to be preserved for a long period of time.
Take fresh leaves. Collect freshly fallen bright leaves. Coating with paraffin wax will give the leaves a beautiful shine. Dry each sheet by wiping it with a paper towel before moving on to the next step.
Melt paraffin wax into disposable tableware. 450 g of paraffin wax should be melted in a disposable container, heating it over low heat.
Remove the melted wax from the stove. Be very careful as the melted wax is very hot. Place it carefully on your desktop. Be careful not to tip the wax container over. This is especially important to consider if you have animals or children in the house.
Dip each leaf into the melted wax. Hold the leaf by the stem and dip it in wax several times. Make sure that both sides of the sheet are completely covered with wax. Do not put your fingers close to the hot wax to avoid getting burned. Repeat the above steps with the remaining leaves.
Lay the leaves out to dry. Place each wax-coated sheet on wax paper and leave until the wax hardens. Let the leaves dry for several hours in a draft-free room. After the leaves are dry, they should be special effort removed from paper. Thanks to this method, the shape and color of the leaves are preserved for a very long time.
Select fresh leaves or a small sprig with leaves. If you want to dry a whole twig with autumn leaves, give preference to this method. Select a branch with leaves that are firmly attached to it.
Cut off the end of each branch. Hammer the end of each branch to reveal fresh wood. This should be done so that the branch absorbs glycerin better. Otherwise it will not reach the leaves.
Dilute the glycerin solution. It can be purchased at the store. To prepare the solution, mix 530 ml of liquid vegetable glycerin with 2 liters of water in a large container.
Place the branches with leaves in the solution for three to five days. The twigs and leaves will need to absorb the glycerin for three to five days. Place the container with the solution and twigs in a dark place.
Remove the twigs and leaves from the solution. The color of the leaves will become brighter. In addition, they will become more elastic. You can use the whole twig or individual leaves to make various fakes.
Place fresh leaves between two paper towels. This good way dry leaves for fakes. However, be prepared for the leaf color to become duller. Place fresh leaves on a double layer of paper towel. Cover them with a single layer of towel.
Dry the leaves in microwave oven. Place the leaves in the microwave and heat them for 30 seconds. After this, continue heating for 5 seconds.
Leave the leaves overnight. Place the leaves in a dark, draft-free place and leave them for at least overnight and up to 2 days. If you notice that the leaves are starting to fade, they urgently need to be treated.
Spray the leaves with acrylic spray. The leaves need to be processed on both sides. Wait for the leaves to dry. After this, they can be used to make fakes.
Place the leaves between two sheets of paper. Unfortunately, you will not be able to preserve the color of the leaves using this method. Place the leaves between two sheets of construction paper.
Place a heavy book on the paper. To prevent stains from remaining on the book and work surface, place paper napkins or toilet paper between a sheet of paper and a book. They will absorb moisture from the leaves.
You can also dry the leaves directly in a book, but in this case you should only use an old book, which you won’t mind, as stains may remain. Place the leaves between the pages of the book. For best results, place each sheet at least 20 pages apart.
Check the condition of the leaves after a week. They must be dry. If they are still not dry, continue drying for several days.
Choose fresh leaves. Use moist, bright and freshly fallen leaves. After the procedure, the leaves will become shiny.
Dry the leaves. Place dry leaves between two paper towels. Place the leaves in a single layer, leaving some space between them. Iron each side with paper towels. Iron each side for 3-5 minutes.


