Handmade items fill the home with special warmth and comfort. In addition, they turn out to be exclusive. We offer an overview of lamps that will completely change the atmosphere in the room, turning into the envy of friends and relatives. Moreover, they are made from everyday items that are usually thrown away.


Cardboard bags for juices or other drinks are a fairly common thing in most homes. Most often it is thrown away. But Malayan designer Edward Chu spent a lot of time cutting them into hundreds of strips and making amazing lamps from them without a drop of glue, a simple origami principle.

Yaroslav Olenev proposed making lamps from disposable plastic spoons and became the winner in the Ecology and Design category from the Future Now magazine.


No less original application I also found Natalie Simpson for ordinary wooden hangers. But they look amazing in the form of a chandelier.
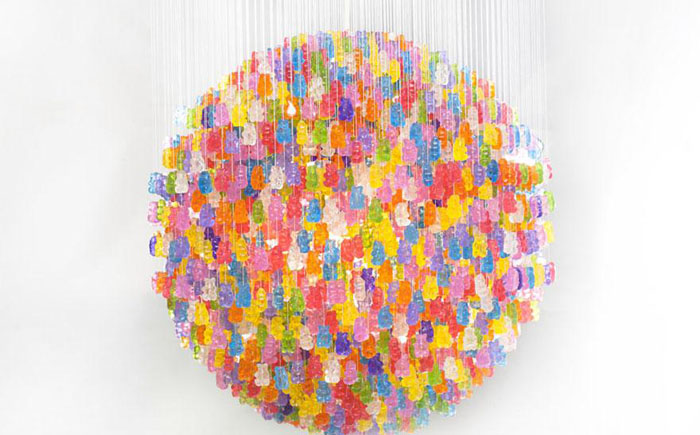

Kevin Champeny must be given his due; not everyone has the strength and patience to string 14 thousand bears to get a chandelier.

Tira Hilden and Pio Diaz have their own vision of the problem of housing lighting. Their lamps make the room look like a forest. All the walls come to life and turn into trees.

A talented welder, Matt Ludwig also turned out to be an excellent designer. For the restaurant "JJ's Red Hots" he made an incredible original chandelier from the old one drum set.

Texas artists Joe O'Connell and Blessing Hancock used parts from old bicycles to create stunning lamps and hang them in a tunnel under the highway.

It will probably be difficult to find a more original chandelier than one made from a pumpkin by a Polish artist. He carves stunning patterns into the peel that never repeat.

Lampshades made from felt hats from Jeeves & Wooster look original and stylish.

One day, Heather Jennings saw an amazing Rhododendron chandelier in a store, but it cost more than $800. Then the designer decided that she could do no worse with her own hands. For this she needed paper cupcake liners.

A chandelier made from ordinary metal tetrahedral graters will look incredibly beautiful.

Vases and candy bowls made from openwork napkins are still fresh in my memory. Now it's time to knit chandeliers.

A strange option is proposed by Fansua Lego, he believes that the most The best way storing cutlery is a chandelier.

A large cloud is cut out of wood, but the rest and the switch are made of cardboard.

Several globes can make a wonderful cascading chandelier, a great way to illuminate a flight of stairs.
You always want to decorate your home, and when you have the funds for this, then you can buy designer items. But any exclusive thing is first made by the hands of a master, and then can only be made by hand.
Well, if one person has already done it, then we can repeat it. So, I suggest not spending money on goods in the store, but making a chandelier with your own hands and thereby creating a unique flavor in your home.
I have several friends who, horrified by the price tags in the store for lighting fixtures, created a chandelier themselves. And it turned out beautifully. A friend created a lamp for the nursery from threads, and an acquaintance created as many as two lighting fixtures from wooden planks. And you won’t immediately realize that it’s handmade; it looks quite original and interesting.
But masterpieces can be created from absolutely anything, even from trash.
Have you seen how in famous TV shows they create lamps from broken saucers or spoons and forks, or even from graters?
It’s absurd, but even if you can make something digestible out of this, then, using your imagination and choosing nicer materials, you can do everything yourself.

I found a few ideas that I also liked, but I’ll express my opinion a little later.
Still, many people are given the ability to see beauty in their surroundings. Just think what craftsmen make from wire, paper, or even a sewer pipe.
Paper also makes masterpieces, such as circles of white paper or butterflies. And everything is done simply.
Many identical paper blanks are made and sewn together.

And then attached to the frame.

Here are the results of this technology for making a paper chandelier in the photo, borrowed from Facebook. But here the blanks are not sewn together, but glued together. I think that sewn ones look neater.

Well, if you have a tea set lying around, then you can also build a beautiful lamp for your dacha.

The main thing here is to carefully cut out the bottom of the cups so that they do not crack or burst.
But with the help of wooden boards you can make a very modern and beautiful chandelier. After all, the texture of the wood is very noble and looks interesting in different color combinations.

You can simply coat the block with oil, which will give it a shade of honey with beautiful natural veins, or you can paint it in wenge color. The main thing is to varnish it to make caring for the chandelier more convenient.
We will need:
We take our bars, cover them with oil and varnish and let them dry.

We assemble the blanks and fasten them with bolts.

We secure the cartridges and hide the cord.


Paste on front side frosted glass and hang it by screwing in the light bulbs in advance.
The light is diffused and soft.
Not everyone knows where to get frosted glass, so this version of the chandelier can be made lighter.

For example, by attaching ceiling lamps to the frame. As in the photo.
Well, for a snack there is also the option of a chandelier, which, by the way, is also made by hand!

So don't say it's not possible and beautiful thing It cannot be done at home. I assure you otherwise.
Plastic bottle and disposable tableware can also transform into a wonderful chandelier. The main thing is to show a little imagination. But the designers have already done a lot for us, so I’m presenting an option for a master class in making it from plastic.
We will need:
We will make the frame of the chandelier from a bottle, cutting off its base to create a hole at the bottom.
Now we are making a lot of blanks, for this we cut off the stem of the spoon, we will use only its base.
And using the glue gun we begin to glue the base of the spoons to the bottle.

You need to start from the bottom. Each subsequent layer removes all the sloppiness of the bottom one.
Once you've collected layer by layer, then it's the cartridge's turn.
We only insert an energy-saving light bulb into it so that the plastic does not melt.
And we hang it from the ceiling.
Can be used for chandelier only plastic bottom from containers, fastening them together, as shown in the photo.

And it’s better when all the bottles are the same color and transparent.
Can you imagine using plastic plates to create beauty? The only negative is that such a chandelier will not provide enough light and it will be difficult for it to illuminate a fifteen square room.

This is an option for non-main lighting or for use in small rooms.
But it is also possible to decorate and illuminate a children's room with a homemade chandelier made from natural material- from threads or rope. Well, I’m still for environmental friendliness.
We will need:
First, inflate a balloon of the required size and tie it.
After this, we make a small hole in the bottle with glue with a knife, thread it into the needle and pierce the bottle with glue with it and bring it out into the hole. This way our thread will be completely wet with glue.

And we begin to wind the adhesive thread around the ball until it becomes as tight as you would like.

Now you need to dry the glue, so hang the ball and leave it for twelve hours.
After drying, you need to take a needle and pierce the ball. It will either begin to deflate or burst.
We take the cartridge and trace its dimensions on the lampshade with a marker, cut out a hole with scissors. And at the bottom we also make a hole for further connection of the lamp.


But you can wrap the cartridge with wire or hem it with thread.

By the way, you can use the same technology to create square lamps and lampshades.

You will need all the same materials, but instead of thread we use a tourniquet.
To make a chandelier, both cardboard and water hose, but everywhere you need time and imagination.
Here are some cardboard ideas.


I really liked many of the options, but I still prefer clear glass in the chandelier. Took it off, washed it and got a lot of light. But you need to work with glass skillfully, so I didn’t write here the process of making a complex version of a lighting device.
A wooden options add color to interiors rustic style or .
In this article we propose step-by-step master classes How to make table lamps with your own hands from improvised materials that you always have in the house. It would seem at first glance ordinary and unnecessary things, but from them you can make original and designer lamps for the desktop.
The most popular and simple materials at hand are: glass bottles and cans, cardboard and paper, plastic vessels, water pipes and cement. We will show and tell you how to make lamps from this in this article.
With simple and elegant table lamp made of copper, you can decorate any corner of your home by making it yourself. She'll fit in perfectly modern interior from loft style to rustic. Prostate and laconicism are the main trump cards of this table lamp.


M materials:
To get started, take a tape measure, a marker, a pipe cutter, a rag, copper pipes and acetone.


TIP: Our parts have: 3 cuts of 15 cm, 1 cut of 20 cm, 1 cut of 45 cm, 1 cut of 25 cm. We used 12 tubes. When designing your light fixture, please note that the copper elbow size will be added.
Insert the parts together and glue with super glue. In order to avoid problems in the future, it is better to glue each part and place it next to each other.

Even though the glue works instantly, you may want to wait a few minutes before proceeding to ensure that the pieces are glued together perfectly.

Tip: It will be more convenient to apply glue if you use a brush. If you want the cover to be at the very top, install it first. This way the first part will be ready, and the cable will go in a different direction.
Tools:
Materials:
 Install the electrical system
Finally, place the lamp in a corner or place you like and see how it will become a wonderful addition to your interior, lighting up the space!

When I first saw the Robert Delta table lamp, it was love at first sight! The shape is amazing, it comes in a variety of bright colors, just the way I like it. I was recently wondering since the accessories were surprisingly durable, why not use them for a lamp?

Here are all the materials used:
Tools:


Then use small pieces of art tape to attach them together and wait for the glue to dry completely.
TIP: Use super glue, it dries instantly (we used Aleene). Apply glue lightly, and wipe off excess.

Then start working on the base of the lamp.
The level at the bottom of the lamp needs to be made a little bigger, so cut some 1×4s to raise it a little. It will also add extra weight, giving it more stability. Use screws to attach 1×4 to existing metal base. (We swapped the existing rod with one from another lamp to get it to the correct height).

Next, drill a hole for the cord and insert plastic sleeve from an old lamp. The lamp should be disassembled, and the cord and wire should be pulled through the threaded rod of the hole in the new base. Inside the lamp, glue it in the center.


At the top (shape 5), mark the center and drill a hole for the center rod. Then glue it in place.


Once you've finished removing dust, apply paint! To cover the top of the threaded rod, use the top of an old lamp - it just slides over the rod. Then return it back to the nest!
That's it, your handmade table lamp is ready.


This lamp is perfect for a home desk, both for students and schoolchildren. Boys will especially appreciate it; it looks more like a transformer and a robot from the future. You can paint or decorate the jar itself with paper, thread, or make it more embossed. How correct.


Plastic bottles can always be found around the household, so decorating an old table lamp is not difficult. Usually, when restoring old lamps, the bases are left and plastic is used for the lampshade. The lampshade mount is usually used as an old one. When working with plastic bottles, remember that cutting them is easier paper knife or construction knife. Glue is used for rubber or special glue for plastic.


Wood in the interior is always a classic - it is always fashionable and relevant. By decorating a table lamp with a cut of wood or an old piece of driftwood with your own hands, you will get a designer item that simply has no price.


The basis for a table lamp can be, in principle, any item you don’t need: these are children’s toys, Sewing machines, unnecessary socks and so on. Experiment and create beauty!


It would seem, why waste time if specialized stores offer a wide variety of style options: from classics and hi-tech to minimalism and Provence. However, a DIY table lamp allows you to create a unique decorative lighting fixture that matches the interior of your home.
We would like to immediately emphasize that this is not only financial savings. IN in this case You are guaranteed to get a unique, inimitable device. Even if you use the lampshades described below, it will still become unique, just like its creator.
The main thing is to use your imagination and see what is available at home. The materials used are:
This option can be called universal and economically acceptable, since it is not difficult to make, it looks presentable and is suitable for rooms with different decorations.
To make your own lamp, you need to take:

The work is quick and uncomplicated, the main thing is to do all the work carefully to ensure reliable connections and safe electrical connection. First of all, marking is done copper pipes using a tape measure and marker.
Using a pipe cutter or hacksaw, you need to cut the tube into pieces the right size. The markings are wiped off with acetone. Sequentially glue the parts together.
To be sure, press and hold for a few minutes. To avoid problems with electric wire, it is advisable to immediately pull it inside the structure, and then attach the lamp socket and plug.
Decorator's advice. An easy-to-use lamp is obtained if you use elements of the following sizes: 20 cm - 1, 25 cm - 1, 15 cm - 3, 45 cm - 1 and elbows corresponding to the size of the tube.

The material for the lamp mast is wooden beam size 20 x 25 mm, length 1 m. Sawn into 4 pieces of different lengths: 500, 250, 150, 100 mm. The ends are rounded, special cuts are made - recesses, and holes are drilled.
In this case, cuts are made on elements of 500 mm and 100 mm on one side, and on others - on both sides. In each strip, holes are made in the middle according to the diameter of the used electric cable. The foundation is being prepared. To do this, take a board of any arbitrary size so that the structure is stable.
A rectangle is drilled in the center according to the size of the strips used. The planks are connected to each other using a washer and a screw. Then they are attached to the base using a long wood screw.
This will ensure the reliability of the design. An interesting option could be old books connected to each other and mounted on a base. A hole is made in the center through which the rod is passed. After this, the lampshade with the cartridge is attached.
A single-core wire is connected to it (cross-section 0.75 mm² of each core). It is advisable that it be insulated, which does not have factory markings. To prevent it from hanging, it is passed through the holes in the slats. The switch can be of two options: installed directly on the wire or mounted on the base. A plug is installed at the free end.

The fabric should not be too dense and allow light to pass through. Therefore, you can use flax. When choosing a pattern, it is important to take into account the wishes of the child. Cut the fabric and connect all the parts except the bottom. Fill with sealant.
The fabric is impregnated with any composition that makes it dense (starch, gelatin). The improvised lampshade should dry well. A small hole is made at the bottom for the cord to exit. The seal is removed. A prepared LED cord is laid inside the structure. Can be used New Year's garland. The bottom is sewn up: the lamp is ready.
This is the easiest option. The selected vessel becomes a lampshade. WITH flower pots There will be no problems: they have a hole in the bottom. You can make a hole in a vase using a drill, but you need to do all the work very carefully.
The surface is wetted, and the drill is set to minimum speed. Then a lamp socket is installed inside the vessel, a wire is supplied, and secured to the bottom with a washer. The lamp is screwed in. To create a night light, it is advisable to choose a low-power option.
The above-described base of lamps can be decorated with various lampshades. Thanks to this, they become an addition to a certain interior. The various directions that are taken as a basis are described below. Think about your preferences, hobbies, favorite activities and create something unique.
In the style of plastic spoons, ordinary utilitarian objects give an interesting opportunity to create an exclusive lampshade. To do this, take a plastic vessel of the required size, a large number of plastic spoons. It is impossible to indicate the exact quantity, it all depends on the size of the lampshade.
Handles are cut off from spoons. After that they use a gun to create decorative items and special glue are connected in series with each other.

In order for the design to have correct form, the basis is plastic containers for water or drinks. After the entire structure has acquired the required shape, the glue has dried, and a cartridge with wires is attached to the upper part.
For the lampshade, choose small branches of bizarre shapes. The bark is removed, impregnated with bactericidal and fire-fighting agents, and combined in any form.
Important advice. The only precaution: the branches should not touch the lamp to prevent a fire.
An acceptable option for eco-styles. Thus, it is not difficult to make a table lamp with your own hands from scrap materials.
To do this, the hangers are disassembled into individual elements, which are securely connected to each other and attached to the electric cartridge. This option does not require additional decoration: wood emphasizes the eco-style well.

This is a rather labor-intensive option, but the result is a fun and, most importantly, safe lamp for a child’s room. Any old table lamp with a large soft lampshade can become the basis. To do this, you need to remove the decorative material.
Turn the metal base upside down. Buy a large number of small multi-colored toy bears, string them on strong threads of various lengths and tie them to the upper, wide part of the base. The result is a “living”, cheerful design.
For music lovers interesting option may be the use of small drums as lampshades. They create a luminous flux in two directions: up and down, so they do not irritate the eyes. But more importantly, the uniqueness of the lamp is guaranteed.
You will have to work hard with this material, but if you want, anything is possible. Bicycle parts are connected to each other and as a result form a chandelier that scatters fantastic designs on the walls and ceiling.

Hats are also used for these purposes; they can easily replace old lampshades and give the room an elegant charm. Depending on your wishes, it is easy to make male and female versions.
In the past, interiors were decorated with knitted napkins. Using this method, you can create a lamp. The only difference is the need to impregnate the material with PVA glue, which is diluted in a 1:1 ratio.
In order to give the product its shape, inflate a ball of the required size or take a 5-liter plastic bottle. Ready product impregnated with the composition and placed on the matrix. During the drying process, the knitted element takes on the selected shape. All that remains is to replace the boring lampshade.
Decorator's advice. You can create several options for lampshades and change them from time to time depending on the time of year, holidays, changes in decorative details, textiles or style direction interior decoration.
If you make an effort and carefully process all the details, homemade table lamps become unique decorative lighting fixtures that reflect inner essence owners and make the house more attractive and comfortable.
Purchasing interior items in a store that fit perfectly into the design of your room is a great success. This kind of shopping requires a lot of time, money and love for shopping. It turns out that the problem can be solved much simpler. For example, a DIY table lamp can be very interesting. You only need a little imagination and available materials, and you can make a beautiful piece of furniture that will make your apartment much brighter and more beautiful. Table lamp helps distribute lighting, highlight individual areas of the room, hiding its shortcomings, and, conversely, highlighting its advantages.
Beautiful table lamp unique design- This unusual element interior With your own hands you can make a truly spectacular thing, which has no analogues.
This is the embodiment of the proverb “The new is the well-forgotten old.” The easiest way to get new thing without special costs time and money is to transform an old lamp.
IN lighting fixture 3 parts can be distinguished:
To make an old, time-worn column look new, you will need:
How to make a table lamp so that it looks like a completely new thing?
Important! Instead of a base, you can use a beautiful glass bottle, a clay pot or a vase.

The lampshade is the most visible part of the lamp. If it is made of textiles, then it can easily be transformed with a bright bow attached to the bottom of the diffuser. It will be even more beautiful if you attach a beautiful brooch or button in the center of the bow.
Important! The color of the ribbon must be chosen so that it harmonizes with the shade of the textile used.
How to make a table lamp with your own hands at home when the old one is completely worn out? If the textiles are worn out and clearly require replacement, then two options are possible:
Important! Textiles for the lampshade should be selected so that it harmonizes with the shades of the curtains and upholstered furniture. The paper structure, made from the same wallpaper with which the room is covered, looks interesting. You can, on the contrary, play on contrasts. Especially if we're talking about about the nursery or teenage room. For the lampshade, use brightly colored fabric with designs that match your child's hobbies or with images of your favorite cartoon characters. It is quite possible that the lamp will turn out to be the brightest color accent in the room.
Replace the lampshade with a new one:
Important! If the lampshade is draped, then make stitches at the top and bottom so that you can insert elastic bands into them. A lace, slightly corrugated fabric will look great in a romantic bedroom. The room will immediately be transformed, becoming more sophisticated and elegant.
You can use it as a base for a lampshade. balloon or an inflatable ball. Moreover, the ball can be used in a round or oblong shape, as desired:
Important! Don't forget to leave a hole for the light diffuser to fit onto the lamp column.
Jute is one of the popular and favorite materials used for decoration. The secret of its success is strength, aesthetics and environmental safety.
Important! With the proper skill, jute twine can be used to make beautiful panels, vases, flowerpots, decorative figurines. However, it takes a lot of patience for our handmade product to turn out truly luxurious.
The essence of the work is that, using thin tweezers or a knitting needle, you attach a well-glued string to a base with a printed pattern.
Important! A filigree pattern of curves and spirals creates lace of marvelous beauty and grace. The work is not easy, painstaking, but the result will be truly magnificent.


.jpg)


