You can say about garlic the same way as about onions - it “causes seven ailments.” But garlic not only helps to avoid many diseases and cure existing ones, but is also a vegetable that improves the taste of a dish and increases appetite.
Garlic can be stored well at home. But if there is a lot of it, for example, you have your own garden with a garlic bed, but there is nowhere to store it (although there may be other reasons), then the garlic can be dried. It's not like that labor-intensive process as it seems at first glance. Dry garlic also takes up little space and is very convenient to use.
The following varieties of garlic are suitable for drying: Kirovogradsky, Starobelsky White, Southern Violet, Bronitsky, Ukrainian White, Kalininsky, Rostovsky, Creole and others.
If you are harvesting your own garlic, do not water it for several days before digging it up, since the soil must be completely dry. For the same reason, they do not dig immediately after rain.
The garlic must be ripe. This is evidenced by the leaves themselves, which turn yellow and fall to the ground.
If you dig up garlic that is not yet fully ripe, its bulbs will be loose and loose. They will be poorly stored and dry.
But overripe garlic is also not very good, since when it is dug up, the scales are easily separated from the heads, as are the cloves themselves. This makes further processing difficult. After all, the cloves can become stained with soil, and it is not recommended to wash garlic that is going to be dried. Such garlic will take a very long time to dry and may simply become moldy and spoiled.
Only healthy, clean, undamaged and fully formed garlic is suitable for drying.
Garlic is dried by taking it into pieces, cutting it into slices, or making powder out of it.
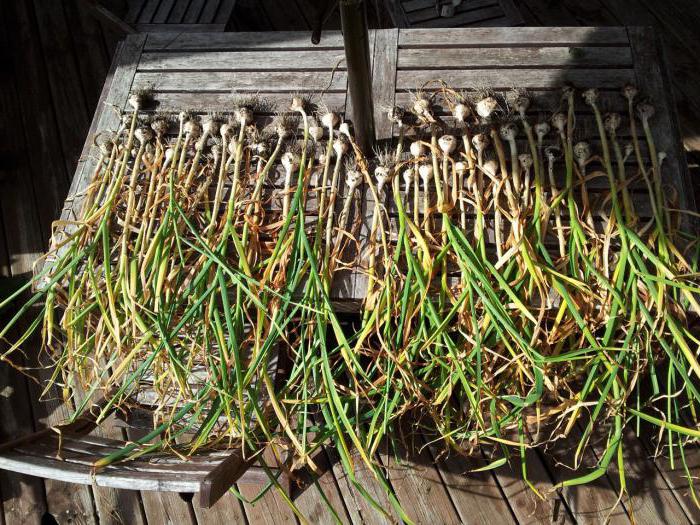
Immediately after digging, the garlic needs to be dried. Primary drying is carried out directly in the field. To do this, it is pulled out of the ground and left to lie there for several days. During this time, the tops and roots will dry out and the garlic will ripen. The scales will also dry out and press tightly against the bulb. In rainy or cold weather, drying is carried out in warm room at a temperature of about 30°C for six to eight days.
When the tops dry, they are cut off, leaving a small stump. But most often, garlic and tops are braided into braids and hung by them in a dry, cool room.
Garlic is peeled from the upper hard scales without destroying the bulb itself.
Then the garlic is cut into pieces 5 mm thick.
Place on sieves or baking sheets lined with parchment and dry in an oven or oven at a temperature of about 50°C. To avoid steaming or uneven drying, the garlic should be stirred periodically.
Garlic can also be dried in the sun, spread out in a thin layer. But this method is inconvenient because you need to make sure that moisture from rain or dew does not get on the garlic.
Garlic is considered dried when the slices no longer bend and break easily.
The crushed garlic is well cooled by placing it on a cloth or on the same sieves.
The garlic is then winnowed by hand to separate the slices from the flakes.
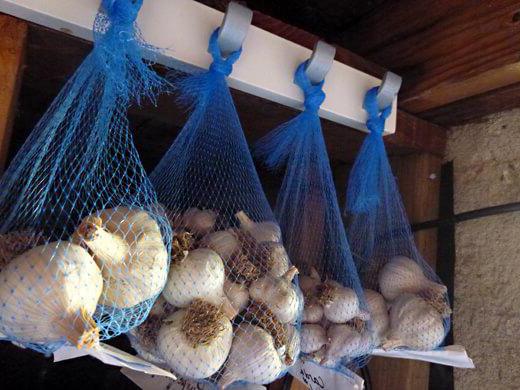
Ready garlic is packaged in boxes, paper bags, hermetically sealed glass jars and stored in a dry, dark, cool room for about a year.
Festive video recipe:
Garlic heads are disassembled into cloves and completely peeled. The root collar of the cloves is cut off. Check that the cloves are free of damage and brown spots.
Some people advise grating the garlic, but this method releases a lot of juice, which makes drying the garlic almost impossible. You can chop the garlic using a food processor, but the slices should not be very wet. Therefore, the best cutting method is still manual. That is, armed with a sharp knife, the cloves are cut into thin slices and immediately laid out on a baking sheet covered with parchment.
This garlic is dried in an oven or electric dryer at a temperature of 50-60°C.
The chopped garlic is periodically stirred with a spatula and ventilated, occasionally opening the door. This must be done so that the raw materials do not steam and dry evenly. Drying continues for several hours.
Method 2. Garlic is disassembled into cloves, peeled and the root collar is cut off. The cloves are cut in half. They are laid out in one layer on a baking sheet lined with parchment, cut side up. Dry in an oven or oven in the same way as in the previous case.
Drying time depends on the quality of the garlic, degree of grinding, drying temperature and choice of drying unit.
Ready dried garlic breaks easily.
It is cooled in air and packaged in paper bags or hermetically sealed glass jars.
Well-dried and cooled garlic slices are ground in a coffee grinder or blender until powdered. Then sift through a sieve so that the resulting powder is homogeneous. You can chop the garlic to coarse crumbs, then the prepared topping will taste good in the dish.
If the garlic cloves do not chop well, it means they are not dried enough. You need to additionally dry them in the oven, cool again and grind.
Store garlic powder in glass, well-closed jars. Shelf life is about a year.
To prepare the harvested garlic crop for the whole year, you need to know a few secrets of drying it. There are several methods for drying garlic after digging, each of which prepares the vegetable for further use. Before you think about how to dry garlic after digging, you need to know the features of preparing the vegetable for this procedure.
If the summer resident initially planned to use the harvested crop for drying, he needs to plant garden the right variety vegetable. For this it is better to use winter or French pink variety. These varieties do not lose their taste after drying.
It is necessary to prepare the crop for drying from the moment it is harvested. Before removing vegetables from the garden, you need to make sure that the soil is thoroughly dry. Also, a couple of days before harvesting, watering should not be done. After removing garlic from the soil, it cannot be washed; it is better if its cleaning involves removing the top layer of husk. Otherwise, drying the vegetable will be problematic, moreover, it may rot.
To dry at home, you should prepare a cool room with low humidity. Do not cut off the root, foliage or stem of dug up garlic.
A lot of techniques have been invented that tell how to dry garlic after harvesting. Many summer residents prefer to dry the dug garlic whole in order to prolong its freshness and gain a lot of possibilities for its use. However, some of them advise drying this vegetable by immediately chopping it. This method of preparation will reduce the amount of time spent preparing the product for use in dishes.

This method is also suitable for drying greenhouse vegetable, which ripens before the onset of heat. In order to dry garlic in a peeled state, you need to wait until it is ripe, remove it from the ground and clean it of the upper dirty layers. To do this, it is recommended to follow these tips:

If desired, the prepared raw materials can be turned into powder. To do this, the slices are placed in a coffee grinder and ground. This spice can be stored for 1 year.

Drying garlic with whole heads at home is done when the vegetable is fully ripe. Storage is carried out in a room with good ventilation, where the temperature does not exceed 10 degrees Celsius. Then you need to follow the instructions:

You can use stockings to store such vegetables. They should be hung in the shade.
You can also chop this vegetable for storage. To do this, the cloves are cut into pieces of 2 millimeters. The knife must be constantly moistened with water to prevent the darkening of the slices. Then the slices are dried a little and stored in an airtight container.

This method helps the roots and tops dry out, while the vegetable itself begins to ripen and does not lose its structure and taste. Dry vegetables in bundles at home according to the following instructions:

The finished bundles are hung in a cool, dry room. Storage of braids dried at a temperature of 30 degrees can last an average of 9 months.

For drying, whole heads, not damaged by disease, are selected. Drying garlic in a crushed state is required according to the following instructions:

In order for the homemade powder to acquire a uniform structure, it should be passed through a sieve.

Many summer residents wonder whether it is possible to dry the harvested garlic crop in the sun? The answer to this question is not clear-cut. The fact is that when dried in the sun, the shelf life of vegetables is greatly reduced. Therefore, only those who are engaged in drying vegetables are allowed to dry vegetables this way. industrial cultivation garlic, because such drying significantly saves time. If you plan to eat the product yourself after harvesting, drying the garlic requires a longer method.
Drying in the shade is considered best. If a summer resident decides to dry a vegetable for planting next season, it needs to be dried in the sun after collection for 3 days. Drying is carried out during the day; at night, the garlic is removed to a dry room.
The described methods allow you to preserve the harvested crop for a long period in a dried form. It is worth considering that such preparation at home helps preserve everything. beneficial features product. You can store the prepared product in sealed jars or in a well-ventilated place, for example, in wicker baskets, stockings, or bundles.

Dried vegetables should be regularly inspected for the appearance of rot or mold. Almost all varieties of garlic can be dried and stored for the winter. The silver-white variety or Creole is best suited for harvesting. The vegetable crop perfectly retains its, beneficial properties and taste. The plant consists of 40% dry matter. Therefore, there should be no problems with how to dry garlic, but you still need to follow certain rules.
There are two types of garlic varieties, depending on the time of planting:
Winter crops include Parus, Dubovsky, Alkor, Yubileiny Gribovsky and others. All of them are planted in winter, that is, in the fall, but with the expectation that before the onset of winter the cloves can take root in the ground. Depending on the region, the landing period falls in September or October.
Spring varieties include Gulliver, Aleysky, Sochinsky 56 and others; they are planted in the spring.
You need to know how to store garlic depending on the type of variety:
Should never be planted vegetable crop after onions and potatoes. Garlic will grow best where cucumbers, pumpkins and zucchini were previously planted. The plant loves soil that has been amenable to abundant application of organic fertilizers.

Even knowing all the rules on how to dry garlic, you still need to collect it on time.
At the time of ripening, spring or autumn plant varieties have a yellowed aerial part, which, as a rule, lies on the ground. Harvesting occurs approximately in the second half of the last month of summer.
Winter varieties may not shoot or, conversely, shoot arrows. The degree of maturation can be determined by the following characteristics:
Typically, the harvest period occurs at the end of July. Harvesting is recommended in dry and warm weather.

If you miss the most favorable time for harvesting, then no rules on how to dry garlic will help. Especially if young roots have already begun to emerge at the bottom of the bulb. Overripe garlic can also be determined by the fact that the onion cloves begin to fall apart and the scales burst.
It is best to dig garlic with a pitchfork; in this case, the risk of damaging the bulbs is minimized. After this, the plants are laid out directly on the garden bed to dry. It is necessary to remove the soil from the plant, but do not tear off the foliage.
If the weather is warm and dry outside, then there is no need to hide the garlic anywhere; let it dry right in the beds. Naturally, if the weather is rainy, the plants are hidden under a canopy. If it rains only at night, then during the day the bushes can be taken out into the sun and hidden under a canopy at night. About 5 days are allotted for preliminary drying.
Now you need to clean the garlic from soil and dirt and leave it to dry for another 2-3 weeks. The room where the garlic will be dried should be well ventilated. The readiness of a plant for further storage can be determined by the uniform color of the dried leaves. The main thing is not to cut off the stems and roots until the garlic is completely dry. During the drying period, garlic gains additional nutrients and increases in weight. Do not knock the heads against each other to avoid damaging them. Under no circumstances should garlic be washed, even if it had to be removed in rainy weather.

These simple rules How to dry garlic after digging allows you to prepare the crop for the next winter as well as possible.
After the garlic has dried, it must be prepared for further storage:
Depending on the type, it is necessary to store in different conditions. How to properly dry garlic of autumn varieties - at a temperature of 16 to 20 degrees. Winter varieties must be stored in cool rooms, at a temperature of 2 to 4 degrees. You should also know that winter garlic does not store well and is more susceptible to disease and quickly loses moisture. The humidity in the storage area should be 50-80%.
How to properly dry garlic after digging? If all the rules are followed, you can proceed to the immediate preparation of the harvest for winter storage. So, what are the different ways?
Braids are the most common method that has existed since ancient times. In this case, the leaves are removed, leaving only the false stem. All plants are woven together with twine so that the “structure” for storage is strong. At the bottom you need to form a loop that will allow you to hang the garlic in the basement or cabinet. Using the same principle, garlic can be woven into so-called brooms.
The storage location should be dark, not very damp and always cool.
You can store garlic in nets or wicker baskets.
There is also a storage method - in sterilized jars. For this method, only those crops that have been prepared according to all the rules for drying garlic after harvesting are suitable. The bulbs do not need to be peeled. Glass jars wash and sterilize well. The plant heads are placed in jars and sprinkled with coarse salt. The main feature of this method is that salt prevents the garlic from getting sick. Instead of cans you can use wooden boxes with low sides.
Our ancestors stored garlic in linen bags. Depending on the humidity of the room in which the plant will be stored, it is prepared. If the humidity is low, then the garlic is simply mixed with dry husks. At high humidity, vegetables are pre-rinsed in concentrate table salt and dried thoroughly. Only after the bulbs are dry, the garlic is placed in cloth bags. Salt prevents the plant from getting sick and prevents pests from spoiling the harvest.
Under no circumstances should garlic be stored with other vegetables.
People often complain that even if all the rules for drying garlic after digging are followed, despite proper further storage, problems arise with the harvest.
However, if mold appears, then this already indicates that the bulbs were not dried well or the crop was frozen. Mold quickly “spreads” if indoors high humidity and very warm. In this case, we can recommend drying the garlic in direct sunlight, naturally, having first cleaned it of mold.
If, on the contrary, the garlic dries out too much, then it can be dipped in melted paraffin. A thin protective layer is formed on the bulb, which will not allow moisture to evaporate. In addition, paraffin will protect the plant from pathogens.
Even a beginner in gardening will be able to grow garlic. It is much more difficult to determine the time of harvest and conduct preparatory work for storage.
Grow garlic on garden plot is not difficult, and even novice gardeners can cope with this task. But not everyone can keep their harvest as juicy. In this article you can learn how to dry garlic after digging, and when it is necessary to harvest.
Storing in braids
Its safety greatly depends on the time of harvesting. The garlic should be fully ripe, but not overripe. There are reliable ways to determine the ripeness of garlic.
Garlic can be spring or winter, and the ripening time for these types of garlic differs.
It is not recommended to delay harvesting garlic. A sign that the garlic is overripe is cracked scales. If the garlic bulbs easily fall apart into cloves, this may also indicate that the garlic is overripe. This type of garlic stores very poorly and should be used first.

Sun drying
Unripe garlic will also not store well. During storage it becomes soft and crumbly. It also responds well to various bacteria and fungi.
An important point when harvesting garlic is the choice of weather. It should be dry and preferably out of the sun. Watering garlic before digging is also not recommended.
Performing these simple steps of digging up and initially drying the garlic will help to ensure maximum preservation of the garlic in the winter and until it is planted in the soil or for other purposes.

Drying garlic
As a rule, garlic is not dug up in rainy weather. High humidity can promote the development of fungi and rapid rotting of garlic. In addition, dry soil is separated much easier than wet soil.
However, the weather is not always favorable to gardeners, and the time for garlic to ripen may coincide with the rainy season. In this case, there is nothing left to do but dry the garlic after digging it up in rainy weather.
After digging up the garlic and carefully separating the bulbs from the dirt, you should use dryers with the ability to change the temperature. The starting temperature for drying should be 25 degrees Celsius and gradually increase to 40 degrees.
Once completely dry, garlic bulbs should be sorted and inspected for damage in the same way as garlic dug up in sunny weather.

Garlic in a fabric bag
After the garlic heads are finally dried and prepared for storage, it is necessary to provide all the conditions for this. In unsuitable conditions, garlic cannot be stored for a long time and will very quickly lose all its qualities.
The main conditions for storing garlic are air temperature and humidity level. And here they may differ in the types of garlic.
Knowing how to dry garlic after harvesting in rainy weather and sunny conditions, it is necessary to ensure the humidity level. The optimal humidity level for storing garlic is 50-80%. Higher humidity can trigger the emergence and spread of dangerous diseases. Garlic that has 3 layers of protective scales is best stored.

Bunches of garlic
There are many known methods for preserving garlic. Some of them have been used since ancient times, while other methods use modern technologies.

Garlic in a wicker basket

Garlic in salt
To receive good harvest garlic annually, you should know and adhere to some planting and care rules. Using them when growing, you can get surprisingly large and healthy yields.
To summarize, it should be recalled that digging and drying garlic is a very important task. Garlic that is not dried enough will not be stored for long, but will become susceptible to dangerous diseases. You can learn how to dry garlic after harvesting in the video below.


