Swedish wall for a child it is both entertainment, a hobby, and The best way development. It can be made of wood, plastic or other materials. But instead of going around stores looking for what you need, you can make a wall bars yourself. This is not so difficult, even for a novice craftsman, and anyone can find the materials and tools at hand.
By making a wall bars with your own hands, you will get an indispensable item for your home. By the way, it will be useful not only as a sports equipment, but will also become a truly multifunctional equipment. The wall bars can be used not only by children, but also by adults, because it can withstand weights of up to 100 kilograms. You can also dry clothes on its slats in bad weather or if you don’t have a balcony.
And finally, main function- sports. The wall bars for children will be best help in healthy growth and development. With daily use, the baby will grow strong and strong. It is especially recommended to equip a boy’s room with such a device, but active girls will also enjoy using the wall.

Think about how you see the wall bars in the room, calculate its dimensions, taking into account the size of the room itself. Please note that you will also need space during its operation. You may have to rearrange the furniture, and remove some things from the room altogether. It is best to plan the wall bars in the corner.
Not only the width, but also the height of the wall is important. Take this into account if you are going to make fastenings not on the main wall, but on the ceiling and floor. The calculations here will require very accurate ones. If you are a novice master, it is better to get by with mounting it to the wall - here, in principle, the height can be any.

A do-it-yourself wall bars for children can be made from various materials. But the most durable, reliable and safest will be natural wood.
The Swedish wall will be based on wooden beams, the length of which is equal to the expected height of the structure. Focus on the height of the ceilings. And their thickness should be at least 4 cm. You will also need cuttings of a smaller diameter (2.8-3 cm), in the amount of 10-15 pieces - depending on the length of the wall that you imagine. Processing wood yourself is a labor-intensive process, and not everyone can handle it. Therefore, it is more convenient to take ready-made cuttings from shovels or other tools and work with them.
In addition, you will need special wood screws, a saw and drill, a hammer and screwdrivers, a set of wood drills, Grinder, tape measure and pencil for marking.
Please note that the base of the wall bars must be perfectly processed, safe and durable. Check both each detail separately and the entire structure for strength - the health and life of your child depends on it!

The Swedish wall for children, the drawing of which you see above, will be optimal and easy to make at home. Here detailed instructions to work.
This sports equipment can work real miracles. After regular training with it, your child will become stronger and more resilient, his agility will increase and correct posture will form. Activity on the wall bars helps strengthen blood vessels and even improve immunity.

Other advantages include the possibility of physical exercise even in cases where it is simply not available. For example, you don’t have a playground in your yard, or it’s cold outside and you can’t go out for a walk. A wall bar for a child will not take up much space, but it will become great view activity and distract the baby from the TV or computer. And it will be much easier for schoolchildren to do their homework with breaks in the form of exciting sports exercises.
The whole design can help not only in the development of the baby, but also in the design of the nursery. Let the child use his imagination: together you can paint the wall bars, cover it with stickers, apply any decor that will turn the structure into unique element interior
The Swedish wall for children, photos and drawings of which you see in the article, is only the basis for your creativity. You can attach not only a ladder to it, but also a swing, a horizontal bar for practicing, or a rope for climbing. Think for yourself what type of creativity your child is more inclined towards, and build on this when working on the apparatus.
Helpful advice for parents: the wall bars should not be a daily “must” for a child. If you don’t force your baby to study, but give him freedom, he will be much more willing to climb the wall. In addition, you can always connect a game element to this activity.
The health of our children is at risk today. Most guys prefer physical activity computer games. Sedentary image life leads to the fact that most of them begin to have problems with posture. Experts recommend teaching your child to exercise from early childhood. Of course, not all parents can afford to equip a full-fledged gym in their apartment. A Swedish wall for children, which can be installed even in a small room, will help you get out of this situation. Considering that children love outdoor games and love to climb and tumble on various bars, the wall bars will turn children's pranks into a full-fledged set of physical exercises.
You can buy a wall bar, but it is much cheaper to build it yourself. Your children will be delighted with this simulator. And constant exercise on it will have a beneficial effect on the formation of a child’s back.
It is very easy to make a wall bars with your own hands. To do this, you will need several long pieces of plastic pipes, tees and a soldering iron for soldering such pipes. Who previously soldered heating using plastic pipes, it won’t be difficult to make such a wall bars. Those who don’t know how, but have a desire to have such a wall bars, can borrow a soldering iron and watch a five-minute training video on YouTube on how to solder such pipes. There is nothing complicated, everything is simple. After training, start making a wall bars with your own hands
First of all, you need to draw a rough sketch.

To make your own wall bars for children look more attractive, you can spray paint them.
To secure the simulator to the wall, take 10x200 dowels and sleeves made from pipes. Attach each node separately to the wall.


Caring for the younger generation includes the physical side of education. Regular sports exercise strengthens children's bodies, develops strength and endurance, and helps them burn off excess energy. The area of a children's room is not suitable for installing large sports complexes, and their price is too high. An elegant solution to the problem would be a hand-made wall bars. It takes up little space, is easy to make yourself, and requires little investment in materials and time.
Sports equipment can be made from two types: wood or metal. Each has its own advantages. The wooden wall bars are made from natural materials, easily and organically fits into the design of the premises, production takes little time. A metal product is much stronger and will withstand the weight of even several children or adults. But it requires skills to work with welding machine, which is not available to everyone.

Sports walls come in wood and metal
Regardless of the material chosen, at the initial stage of construction it is necessary to prepare drawings of the future projectile. This will help you calculate correct parameters, because the height standard apartment does not exceed 2.7 m. In addition, in the drawing it is necessary to take into account the distance between the two posts in order to correctly measure the crossbars. Take into account the dimensions of the future sports equipment in order to fit it into the existing interior. The drawings will help determine the correct connection between the wall and the crossbar, adjust the dimensions, and outline the fastenings.
The dimensions of the wall should be such that it does not touch the floor in case of laying a carpet or carpeting. It should also not touch the ceiling from above, so that the hanging bar can be easily removed. The height should be safe for children.

Drawings of a wooden sports wall for home training
To make a do-it-yourself wall bars, you will need the following materials:

The wall bars are simply ideal for home workouts.
The board is sawn in half, measuring the required length of the stand. The ends of the beams are rounded using a jigsaw, sawing off the excess. Initially sanded with a plane, then processed sandpaper or grinder. Measure the distance for future crossbars (about 30 cm), mark the locations of the holes using a thin drill.
Preparation of the crossbars begins with determining their length. Usually it is 60 cm, so the cuttings are cut in half. If they were not sanded at the factory, you will have to carry out this process yourself. Any roughness or chipping of wood products can turn into a thorn in your hands in the future. The bars and crossbars are treated with stain, then varnished or painted, depending on the desired appearance.

Drawing of a sports staircase with a suspended beam made of wood
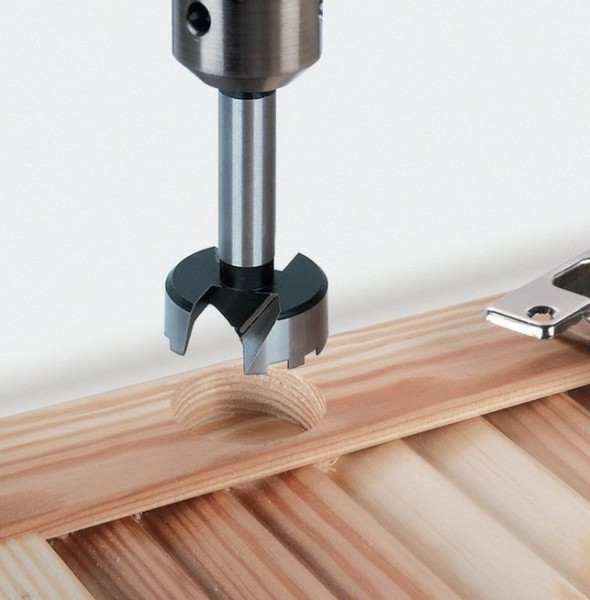
After drying, holes are made in the bars. To do this, use a pen as an attachment for a drill required diameter, or a crown. The hole should be made blind so that it remains possible to further strengthen the steps with screws and glue. Also Smooth surface racks, without traces of recesses, has more aesthetic appearance. Then the structure is put together: the ends of the crossbars are treated with glue, inserted into one rack, then the second is secured on top. Additional fastenings are provided with self-tapping screws, connecting the rack and the step with them.

Drawings of a wall bars with attachments
Fastening to the wall is carried out using metal corners. To do this, mark holes on required height, focusing on construction level. Select dowels of the required sizes and parameters, and fix the ladder to the wall.
Removable horizontal bars are made in several versions: solid sidewalls are cut out; assembled from two planks, connecting them at an angle; welded from metal pipes, bending the ends into hooks. . If it is possible to make blanks for milling machine, or the manufacturer has the skills figure cutting jigsaw, then cutting out the necessary spare parts from thick plywood (more than 18 mm) will not be difficult. You will need to make two identical sidewalls of a triangular or smooth “L” shape with cut out hooks with which the horizontal bar is hooked to the crossbar.
The distance between the hooks should be taken into account; it should correspond to the gap between the crossbars. The sides are fastened at the back using a strip of plywood, the size of which is slightly smaller than the length of the crossbars. This is necessary for firmly inserting the crossbars into the grooves, without interference from the side posts.
At the end of the protruding part of the sidewalls, holes are prepared and a crossbar is inserted, strengthening it with self-tapping screws. It should be noted that this design is designed primarily for the weight of a child: for an adult, it is more reasonable to make a removable horizontal bar from metal.

Wide-grip attachments
Do-it-yourself metal wall bars are not so easy to make. Preparatory work it will require less if the materials are purchased in a store. Purchased pipes do not need to be cleaned old paint and rust. For production take:
The racks are cut to a given height of the projectile, approximately 2.5 m, the remains of the pipes are used for remote parts, welding them to the top of the racks at an angle of 90?. The crossbars are connected to the uprights by welding, making sure that the metal is set thoroughly and not as a top layer.

The metal sports wall can be supplemented with hanging bars, barbell supports and abdominal benches
Then it is necessary to make reinforcements so that when hanging on the horizontal bar, the outrigger part does not bend down. To do this, measure the length between the end point of the upper extension and the stand so that the reinforcement forms the third side of the triangle. Pipes are cut off the right size, not forgetting about processing allowances. Weld reinforcements onto both posts of the wall bars. Along the entire length of the racks on the back side, pipe pieces with nuts are welded, with the help of which the equipment will be mounted on the wall. The surface is primed and covered with paint and varnish.
A do-it-yourself wall bars are quite easy to make. Her an undeniable advantage is accessibility and low price. It helps save space in the apartment, providing children and adults with equipment to maintain physical fitness.
The Swedish wall can be made more diverse by additionally equipping it with a rope or rings. It is a good alternative to bulky sports equipment and is suitable for working the muscles of the whole body.
Caring for the younger generation includes the physical side of education. Regular sports exercise strengthens children's bodies, develops strength and endurance, and helps them burn off excess energy. The area of a children's room is not suitable for installing large sports complexes, and their price is too high. An elegant solution to the problem would be a hand-made wall bars. It takes up little space, is easy to make yourself, and requires little investment in materials and time.
Sports equipment can be made from two types: wood or metal. Each has its own advantages. The wooden wall bars are made from natural materials, fit easily and organically into the design of the premises, and production takes little time. A metal product is much stronger and will withstand the weight of even several children or adults. But it requires skills in working with a welding machine, which is not available to everyone.
Sports walls come in wood and metal
Regardless of the material chosen, at the initial stage of construction it is necessary to prepare drawings of the future projectile. This will help calculate the correct parameters, because the height of a standard apartment does not exceed 2.7 m. In addition, the drawing must take into account the distance between the two posts in order to correctly measure the crossbars. Take into account the dimensions of the future sports equipment in order to fit it into the existing interior. The drawings will help determine the correct connection between the wall and the crossbar, adjust the dimensions, and outline the fastenings.
The dimensions of the wall should be such that it does not touch the floor in case of carpet or carpeting. It should also not touch the ceiling from above, so that the hanging bar can be easily removed. The height should be safe for children.

Drawings of a wooden sports wall for home training
To make a do-it-yourself wall bars, you will need the following materials:

The wall bars are simply ideal for home workouts.
The board is sawn in half, measuring the required length of the stand. The ends of the beams are rounded using a jigsaw, sawing off the excess. Initially sanded with a plane, then treated with sandpaper or a sanding machine. Measure the distance for future crossbars (about 30 cm), mark the locations of the holes using a thin drill.
Preparation of the crossbars begins with determining their length. Usually it is 60 cm, so the cuttings are cut in half. If they were not sanded at the factory, you will have to carry out this process yourself. Any roughness or chipping of wood products can turn into a thorn in your hands in the future. The bars and crossbars are treated with stain, then varnished or painted, depending on the desired appearance.

Drawing of a sports staircase with a suspended beam made of wood
After drying, holes are made in the bars. To do this, either a pen of the required diameter or a crown is used as a drill attachment. The hole should be made blind so that it remains possible to further strengthen the steps with screws and glue. Also, the smooth surface of the rack, without traces of indentations, has a more aesthetic appearance. Then the structure is put together: the ends of the crossbars are treated with glue, inserted into one rack, then the second is secured on top. Additional fastenings are provided with self-tapping screws, connecting the rack and the step with them.

Fastening to the wall is carried out using metal corners. To do this, mark holes at the required height, guided by the building level. Select dowels of the required sizes and parameters, and fix the ladder to the wall.
Removable horizontal bars are made in several versions: solid sidewalls are cut out; assembled from two planks, connecting them at an angle; welded from metal pipes, bending the ends into hooks. . If it is possible to make blanks on a milling machine, or the manufacturer has the skills of figure cutting with a jigsaw, then cutting out the necessary spare parts from thick plywood (more than 18 mm) will not be difficult. You will need to make two identical sidewalls of a triangular or smooth “L” shape with cut out hooks with which the horizontal bar is hooked to the crossbar.
The distance between the hooks should be taken into account; it should correspond to the gap between the crossbars. The sides are fastened at the back using a strip of plywood, the size of which is slightly smaller than the length of the crossbars. This is necessary for firmly inserting the crossbars into the grooves, without interference from the side posts.
At the end of the protruding part of the sidewalls, holes are prepared and a crossbar is inserted, strengthening it with self-tapping screws. It should be noted that this design is designed primarily for the weight of a child: for an adult, it is more reasonable to make a removable horizontal bar from metal.

Wide-grip attachments
Do-it-yourself metal wall bars are not so easy to make. It will require less preparatory work if the materials are purchased in a store. Purchased pipes do not need to be cleaned of old paint and rust. For production take:
The racks are cut to a given height of the projectile, approximately 2.5 m, the remains of the pipes are used for remote parts, welding them to the top of the racks at an angle of 90˚. The crossbars are connected to the uprights by welding, making sure that the metal is set thoroughly and not as a top layer.

The metal sports wall can be supplemented with hanging bars, barbell supports and abdominal benches
Then it is necessary to make reinforcements so that when hanging on the horizontal bar, the outrigger part does not bend down. To do this, measure the length between the end point of the upper extension and the stand so that the reinforcement forms the third side of the triangle. Cut the pipes to the required size, not forgetting about processing allowances. Weld reinforcements onto both posts of the wall bars. Along the entire length of the racks on the back side, pipe pieces with nuts are welded, with the help of which the equipment will be mounted on the wall. The surface is primed and covered with paint and varnish.
A do-it-yourself wall bars are quite easy to make. Its undeniable advantage is its availability and low price. It helps save space in the apartment, providing children and adults with equipment to maintain physical fitness.
The Swedish wall can be made more diverse by additionally equipping it with a rope or rings. It is a good alternative to bulky sports equipment and is suitable for working the muscles of the whole body.
Children are our everything. For them we are ready to create best conditions accommodation. Special attention addresses the comprehensive development of the child. After all, parents want their children to receive everything they need at every stage of their lives. Physical education also plays an important role, which is the key to a child’s development. That is why most children are sent to sports clubs, dances and other clubs. However, it is possible not to send children to such institutions. It is enough to make a children's sports corner in your room or home. This is a kind of sports section that will be located at home. You will always know how and what your child is doing.
Still, the question arises: how to do sports section for the child at home? This is exactly what we will look at in our article. To make things easier, corresponding photos and drawings will be shown. If you have children, this information will be very relevant.
Children's sports corners for the home are quite popular and have been used for many years. They are comfortable and practical. The child will be glad that he will have his own corner in the apartment or house where he can play sports. And it doesn’t matter what the weather is like outside, because the house will always be warm and cozy. Just give children space, and their imagination will develop as it pleases. On average, a sports corner at home for children will occupy 2 m2 or more.

Let's look at the factors that speak in favor of making it in your home or apartment:
As you can see, the presence of this corner in the room will only benefit both children and parents. The only negative is that the corner takes up space and can be dangerous for children. But, this is how to submit it. After all, the room still has a corner for children’s games. As for falls from the structure, it is enough to simply place mats on the floor to protect those playing.

I would like to note that parents can buy a ready-made corner and install it in a suitable place, or they can make a children’s sports corner with their own hands. It will be cheaper, but you will need to have manufacturing instructions, drawings, materials, tools and free time. And some skills in working with wood are also welcome. However, before moving on to the instructions, you should consider the requirements for a children's sports corner.
Everything that concerns children should be safe and not harm their health. And here there are several points that are taken into account when creating children's corner. Let's start with the fact that all structural elements must be reliable, strong and durable. All parts are connected to each other securely so that when playing sports the child does not fall and injure himself. In addition, the wall or other elements must be fixed to the floor or wall.

The second point concerns the finishing of products. All paints and varnishes or other compounds that will be used in the future for processing wood or metal should not emit toxic substances. Children will constantly be in contact with the elements, so their safety must be appropriate. Well, as we mentioned above, it is important to take care of mats and soft surfaces.
If we conclude, it is not difficult to make such a sports corner. It is only important to choose appropriate place and follow the instructions. Let’s say right away that to accommodate all the elements of the corner you will need at least 2 m2 and an additional 1 m2 of free space around for games and unhindered movement.

But the next question arises: what is included in the sports corner? To create a functional corner in the apartment, you cannot do without:
Below is shown what a full-fledged complex for children should look like.

Thanks to this set of sports elements, you can make a complete structure so that your child develops and leads an active lifestyle. Now let's look at how to create a corner with your own hands.
It is the main element, without which not a single sports corner in the apartment can do. The Swedish wall takes up little space, is functional and easy to create with your own hands.
Here's what you'll need to create a wall bars:

With this set you can create a Swedish wall. But, you also need a product layout. DIY children's sports corner drawings.

Now let's start with the DIY manufacturing process:

That's all, the staircase is ready. To complete it, all that remains is to create a horizontal bar for it.
While the varnish is drying on the ladder, you can create a horizontal bar. You can buy it and install it on the wall, or create it yourself. We will make the horizontal bar a stationary part of the stairs.

Here's what you'll need for the job:


The Swedish wall is ready. We will install it later.
Note! Making the rings is a little more difficult. It is much easier to buy them and install them in the right place. However, below is a video on how to make them yourself.
The last thing we will do for the home sports corner is a rope ladder. This is a useful detail, as it helps develop the child’s coordination and strengthens his spine and shoulder girdle. That's why we recommend doing it.

Now let's consider necessary tools and materials:

Basically, you need wooden sticks and strong rope. You can make them out of them beautiful staircase.

Now that you have made a sports corner with your own hands, you can install it. As stated at the beginning of the article, it will be installed on spacers. To bring this to life, these same spacers are screwed into the upper and lower parts of the wall bars, and the structure is installed in in the right place and the spacers are screwed in to the limit. This way the sports corner will be absolutely motionless.
Note! Spacer quality better time Check from time to time by tightening the nuts. This also applies to the bolts in the sidewalls that hold the horizontal bar to the wall.
If you need to perform installation in a different way, you can do this:
That's all, all that remains is to buy the mats and install them in their places. Then you can minimize all injuries to the child. Children's sports corner for apartment photo.

A children's room with a sports corner is every child's dream. We looked at the benefits of having a sports corner. And if you work with your head, hands and brains, you will get a durable, reliable and functional product for children to play with. When working, you only need to remember that this is a sports corner for children. Therefore, its creation is a responsible matter. But as a result, you will receive a lot of joy and appreciation from your child.


