And probes are always included with the device. Sometimes it's pretty quality probes, which faithfully serve their master for years. And sometimes, not even a week has passed since the date of purchase of the device, when one of the probes becomes unusable, for example, the wire from the tip or from the plug breaks, or the insulation breaks, cracks, exposing a thin core.
In such a situation, a person certainly comes to the idea of buying new probes, and preferably better ones, more reliable, maximally satisfying the needs and requirements, individual requirements depending on his type of occupation, where a multimeter is used regularly or from time to time.
Of course, in such cases, someone decides to repair the probes themselves, and there is a lot of material on the Internet on this topic. You can generally make improved plugs yourself, select the best wires in good, flexible insulation, develop probes to suit your needs, and you’re done. But what if a person simply doesn’t have time to do this, but needs to use a multimeter, needs new probes quickly, and it’s impossible to make a mistake in choosing.
This article is precisely intended to help the consumer somewhat orient himself in the designated topic. What types of probes are there for multimeters? What are their features? Let's look at the nuances, advantages and disadvantages various probes, as well as their purpose depending on the design.

The cheapest, most universal probes are quite simple. They, of course, are not particularly reliable or durable. The wire insulation is made of PVC, the plugs are plastic, as are the tip holders. The electrodes of the tips are made of steel; a thin wire is soldered to them inside the holder. If you accidentally pull the tip, it may come off, so you need to use these probes with caution.

The plugs of different models of simple probes differ in the length of the central electrode, as well as the size of the protruding plastic part of the plug body.
Each device has its own plug mounting depth. For example, the simplest 830 multimeter comes with probes with a short electrode with a diameter of 4 mm, and the multifunctional 266FT comes with an extended banana-type electrode, which also has a diameter of 4 mm.

Is on modern market probes with plug plugs, differing in the shape of the holder, but these are minor variations. If the wire is made of PVC, and the holders are plastic and without flexible sealed inputs, then this is not the best the best option for probes. PVC insulation cracks easily when bent, especially near the plug.
If the probe wire has good flexibility, is made of a material close in flexibility to silicone, and the inputs of the holders and plugs are sealed and also allow flexibility, these are the most reliable probes. The flexible sealed input of the holder will prevent the wire from being pulled out of it even with an accidental tug.
The surface near the base of the holder, closer to the electrode, should not be slippery so that the probe can be comfortably and firmly held in the fingers when carrying out measuring work with a multimeter. It is better if the holder has a rubberized surface with small protrusions where the fingers grip it.

Sealed holder entries can also be made of plastic, but such an entry must allow flexibility, that is, have characteristic recesses. It is good if the electrodes and plugs are covered with protective caps, this will avoid puncture injuries, as well as contamination of the plugs, especially if the work is carried out in a dusty environment, as is the case in manufacturing plants.

Branded probes are always more thoughtful, since they are designed taking into account operating experience and the sad consequences of defects. For this reason, high-quality branded probes are often necessarily equipped with sealed flexible inputs of holders and plugs, and the tips and plugs themselves are protected in the form of caps and plugs. The probe wire is flexible enough and does not crack or break due to accidental kinks.

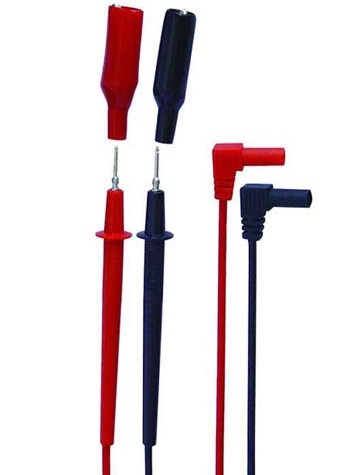
To carry out measurements when working with, on boards or separately, or even for the purpose of piercing the insulation of the wire that needs to be measured, probes with electrodes in the form of sharp needles are intended. Such tips are usually made from of stainless steel or made of brass.
The needles must have protective caps, obviously to prevent accidental wounds, as well as to avoid damage to the needles themselves, so as not to bend, so as not to get into the wrong place, etc.

If your work involves SMD installation, then probes with needle-shaped tips are what you need. With such a needle, you can optionally scrape off the solder mask from the board and take measurements directly on the board. Despite the fact that the needle looks thin, such a probe will certainly withstand a typical 600 volts for a long time, or a current of 10 amperes for a short time.

Especially for measuring the parameters of SMD components, there are also special probes - pliers. With these pliers you will accurately measure the required characteristics and will not miss a component, whether on the board or on the table.
The length of the wire of this probe is not long, and why is there a long wire here? The device is always located nearby when working with SMD.

When special care is required when taking measurements, and it is important not to touch anything unnecessary with the electrode of the probe tip, probes with tips with holes at the ends come to the rescue. With these probes, measurements will be safe for nearby components if we're talking about about the printed circuit board, as well as for adjacent conductors, if we are talking about measurements in the process. An accidental short circuit during measurements will definitely not happen.
In some cases, crocodiles are more comfortable view probe tip than sharp electrodes. There are such solutions on the market today.
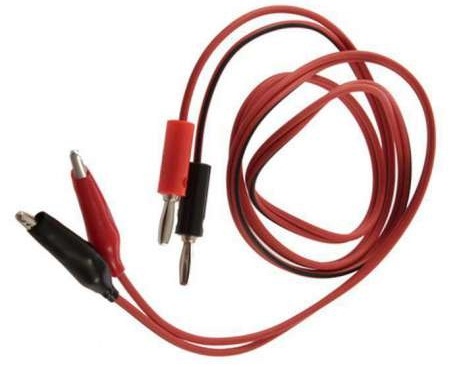
Probe leads can be short or long.

Crocodiles can have different size, so there are probes to solve any problems related to measurements using a multimeter. One thing is constant here - the crocodile is necessarily equipped with a reliable dielectric shell.
There are crocodiles in the form of connecting tips, as an addition to standard probes. It often happens that the multimeter comes with probes equipped with fastening crocodiles that can be disconnected if desired.

Speaking about connecting tips, one cannot fail to mention kits in which probes, in addition to connecting wires, contain several types of tips. The tips simply screw in like attachments.

This is very convenient when different tips are needed when taking measurements, for example, a tip in the form of a terminal is screwed to ground, and the crocodile is alternately connected to different points of the chain being measured.

Electronics engineers working with lead-out components will especially appreciate probes in the form of hooks and clamps, which are indispensable when taking measurements on, and simply for conveniently holding lead-out electronic components for the purpose of taking measurements.

These hooks are also found in typical probe kits, along with alligators and needles.
We hope that this short article has given the reader some general idea about what kinds of probes for multimeters there are, and what opportunities are offered by their various types to make work easier, as well as the tips that come in sets.
Andrey Povny
Measurements with a multimeter are made using probes. Not all multimeter probes included in the kits have good quality, so it would be preferable to make them yourself. It doesn’t take much time, but then it makes it possible not to be distracted by replacing them. It is also possible to equip the probes with crocodile clips, which will free your hands while taking measurements. Sometimes it is useful to have both measuring collapsible thin probes and a model with alligator clips; each of them will be indispensable in certain situations.
Alligator probes are very convenient to use if you need to fix a conductor for accurate measurements with a multimeter. To carry out the work you will need the following tools and components:

Wires use stranded copper because copper has good conductivity and flexibility. Silicone shells are soft, flexible, and will not break or crack over time. You can find an option specifically designed for black and red multimeters.
To make homemade probes, you need to connect the wires with plugs and clamps. If you know how to solder and have everyone necessary tools the procedure will take no more than half an hour.
 It is advisable to select the same color for the plug, wire and clamp, so that one probe is, for example, completely red, and the second completely black. In this case, the multimeter will be convenient to use and it will be easy to observe polarity when taking measurements.
First, you need to insert the wires into “bananas”, through which they will be connected to the multimeter. The connection with the plug is not particularly difficult.
A bolt is unscrewed from the banana, after which a wire can be inserted inside, the end of which has been stripped in advance. Then you need to tighten the bolt, thereby securely fixing the wire inside. The same operation is performed with the other wire. At this point, the “bananas” can be considered connected.
On at this stage strip and tin the free ends of the wires that will go to the alligator clips. Next, take a crocodile clip for a wire that matches the color. The insulation is removed from it and the bolt is unscrewed.
Clamping the wire with bolts is not the most reliable solution for multimeter probes. It will be better to solder it in this place, having first made a small soldering pad out of tin. The second “crocodile” also joins.

Now you can start soldering the crocodile. To do this, a wire is inserted inside, bringing the tinned end to the prepared area.
The wire must first be covered with crocodile insulation so that it can then be pulled over the connection.
Solder is taken and the wire is soldered to the crocodile. The soldering must be strong so that the wire does not fly off at the slightest tension. When the wire is soldered, you need to clamp it with the lower edges of the crocodile body; this can be done using pliers.
After this, strong clamps are formed, which will guarantee the long-term serviceability of the homemade probe. Next, the insulation is put on the crocodile. This is necessary for its reliable and safe operation, as well as for its aesthetic appearance.
You can also make thin probes for a multimeter. The cheapest and easiest option is to make them from the body of handles. Everything here is very similar, only instead of clamps you will need the following parts:
As a tip, either buy special thin probes for a dt multimeter, or use thin sewing or medical needles. It is better to use special probe needles, purchasing them on the radio market or in an online store.
Everything else you need is the same as in the previous version of making probes for a multimeter. The plugs are connected in the same way as described above, and securing the tips of future probes has several features.
To begin with, one hole is made in the top caps of the pens. This is necessary for the wire to go inside. It is desirable that their diameter matches the diameter of the wire. Next, the lower part of the handle is disassembled and a needle is inserted into it.
The needle must be soldered to the wire, which is previously inserted into the cap. The solder should not be made too thick, but it must be soldered securely. The soldering process was also discussed above.
When everything is ready, silicone is poured into the lower part of the handle and until it hardens, the needle sticks out according to the level. She should not be disturbed for several hours.
You can do it this way. First, stick the needles out 4-5 cm, then put on the cap. Thus, the tips for the probes will independently take the desired position. When the silicone has hardened, the structure is strong and comfortable.
To check the device for functionality, you need to measure the resistance of the probes. To do this, you need to connect the multimeter to the network and set the switch to measure resistance.
If the multimeter does not have automatic range adjustment, you need to switch to measuring the lowest limit.
Insert the leads of the probes into the sockets of the device, and then connect the probes to each other. The resistance figure should be 0, or as close to zero as possible. If the multimeter is automatic, then a couple of seconds after the circuit is closed, the device itself will set to 0.
If you know the sequence of the process, then all the work will not be difficult. You need to have minimal soldering skills, and then everything will be done quickly, and the device will last for many years.
Every owner of a Chinese multimeter DT830 and similar models must have encountered some inconveniences during operation that are not visible at first glance.
For example, the battery constantly drains due to the fact that they forgot to turn the switch to the off position. Or lack of backlighting, impractical wires and much more.
All this can be easily modified and the functionality of your cheap multimeter can be increased to the level of individual professional foreign models. Let's consider in order what is missing and what can be added to the operation of any multimeter without special capital costs.
Replacing multimeter wires and probes
First of all, what 99% of users of cheap Chinese multimeters encounter is the failure of low-quality measurement probes.
 Firstly, the tips of the probes may break. When touching an oxidized or slightly rusty surface for measurement, the surface must be lightly cleaned to ensure reliable contact. The most convenient way to do this is, of course, using the probe itself. But as soon as you start scraping, at that moment the tip may break off.
Secondly, the cross-section of the wires included in the kit also does not stand up to criticism. Not only are they flimsy, but this will also affect the error of the multimeter. Especially when the resistance of the probes themselves plays a significant role during measurements.
Most often, a wire break occurs at the connection points at the plug-in contact and directly at the soldering of the sharp tip of the probe. 
When this happens, you will be surprised how thin the wiring inside is really.  Meanwhile, the multimeter must be designed to measure current loads up to 10A! It is not clear how this can be done using such a wire.
Here are real data on current consumption measurements for flashlights, made using standard probes included in the kit and using homemade probes with a cross section of 1.5 mm2. As you can see, the difference in error is more than significant. 
The plug-in contacts in the multimeter connectors also become loose over time and worsen the overall resistance of the circuit during measurements.
In general, the unequivocal verdict of all owners of DT830 multimeters and other models is that the probes need to be modified or changed immediately after purchasing the tool. 
If you are the lucky owner lathe or you have a familiar turner, then you can make the probe handles yourself from some insulating material, for example pieces of unnecessary plastic.
The tips of the probes are made from a sharpened drill. The drill itself is a hardened metal and can be used to easily scrape off any carbon deposits or rust without the risk of damaging the probe. 
When replacing plug-in contacts, it is best to use the following plugs used in audio equipment for speaker sockets. 
If you really are on a collective farm or there are no other options at hand, then as a last resort you can use ordinary contacts from a collapsible plug.
They also fit perfectly into the connector on the multimeter.  At the same time, do not forget to insulate the ends that will stick out outside the multimeter, in the places where the wires are soldered to the plug, with a heat pipe.
When it is not possible to make probes yourself, the body can be left the same, replacing only the wires.
In this case, three options are possible:

After replacement, such wires will very easily be collected into a bundle without getting tangled.
Secondly, they are designed to withstand a huge number of bends and will break no sooner than the multimeter itself fails.
Thirdly, the measurement error due to their larger cross-section compared to the original ones will be minimal. That is, there are continuous advantages everywhere.
If you make long wires up to 1.5 m, taking into account all the connections, the resistance on them can reach several ohms!Important note: when replacing wires, you should not try to make them much longer than those that came with the kit. Remember that the length of the wire, as well as its cross-section, affects the overall resistance of the circuit.
Those who do not want to do homemade products can order ready-made, high-quality silicone probes with many tips on AliExpress. 
To ensure that new probes with wire take up minimal space, you can twist them into a spiral. For this new wire it is wound around the tube, wrapped in electrical tape to secure it, and the whole thing is heated with a hair dryer for a couple of minutes. As a result, you get this result. 
In a cheap version, this trick will not work. And when used for heating construction hair dryer insulation may even float.
Refinement of the multimeter mount
Another inconvenience when taking measurements with a multimeter is the lack of a third hand. You constantly have to hold a multimeter in one hand and use the other to work with two probes at the same time.  If measurements take place at your desk, then there is no problem. Put the tool down, free your hands and work.
What should you do if you measure the voltage in a panel or in a distribution box under the ceiling?
The problem can be solved simply and inexpensively. In order to be able to mount the multimeter on a metal surface, on back side device using hot glue or double-sided tape, glue ordinary flat magnets. 
And your device will be no different from expensive foreign analogues. 
Another option for inexpensive modernization of a multimeter in terms of its convenient placement and installation on a surface for measurements is manufacturing homemade stand. To do this, you only need 2 paper clips and hot glue. 
And if you don’t have any surface nearby where you can place the tool, what should you do in this case? Then you can use an ordinary wide elastic band, for example from suspenders. 
You make a ring out of an elastic band, pass it through the body and that’s it. Thus, the multimeter can be conveniently mounted directly on your hand, like a watch.
Firstly, now the multimeter will never fall out of your hands again, and secondly, the readings will always be before your eyes. 
Caps for probes
The spikes at the ends of the probes are quite sharp, which can hurt you. Some models come with protective caps, some do not.  They also get lost quite often. But in addition to the danger of pricking your finger, they also protect the contacts from breaking when the multimeter is in a bag mixed with another tool.
In order not to buy spare ones every time, you can make them yourself. Take an ordinary cap from a gel pen and lubricate the tip of the dipstick with any oil. This is done so that the cap does not stick to the surface during the manufacturing process.
Then fill inner surface hot glue the cap and place it on the sharp tip.  Wait until the hot glue hardens and calmly remove the resulting result.
Multimeter backlight
A function that the multimeter lacks in poorly lit areas is display backlighting. Solving this problem is not difficult, just apply:

Make a hole in the side of the housing for the switch. Glue the reflector under the indication display and solder two wires to the crown contacts.  They supply power to the switch and then to the LEDs. The structure is ready.
The final result of a homemade modification of the multimeter backlight will look like this: 
The backlit battery will drain much faster, so be sure to turn off the switch when natural light will be quite enough.
Replacing the crown in a multimeter with a lithium-ion battery from a phone
IN last years It has become very popular to remake a multimeter by replacing the power supply from the original crown with a lithium ion battery from cell phones and smartphones. For these purposes, in addition to the battery itself, you will need charging and discharging boards. They are bought on Aliexpress or other online stores. 
The overdischarge protection board for such batteries is initially built into the battery in its upper part. It is needed to prevent the battery from being discharged beyond its nominal value. acceptable standards(about 3 Volts and below). 
The charging board does not allow the battery to be recharged above 4.2 Volts (link to aliexpress).  In addition, you will need a board that increases the voltage from 4V to the required 9V (link to aliexpress).
The battery itself fits compactly on the back cover and does not interfere with its closure. 
First, the output voltage on the boost module must be set to 9 Volts. Connect it with wires to a multimeter that has not yet been converted and use a screwdriver to unscrew the required value. 
You will have to make a hole in the case for a micro or mini USB charging connector.

The boosting module itself is located in the place where the crown should be. 
Be sure to ensure that the wiring from the module to the battery is of the required length. In the future, this will allow you to easily remove the cover and, having halved the body, carry out an internal inspection of the multimeter if necessary.
After placing all the parts inside, all that remains is to solder the wiring according to the diagram and fill everything with hot glue so that nothing moves when moving the device. 
It is advisable to fill not only the body with hot glue, but also the contacts with the wires in order to extend their service life. 
A significant drawback of such a multimeter on a lithium-ion battery is its operation, or rather not operation, at subzero temperatures.
Once your multimeter sits in the trunk of a car or in a bag in the winter for a long time, you will immediately remember the battery.
And you might think, was such a change useful? Ultimately, of course, you decide, based on the operating conditions of the device.
Refinement of the on/off button on the multimeter
It is advisable to further improve the last option for refining the multimeter with the transition to lithium-ion batteries by placing a shutdown button in the power supply circuit of the converter to the battery. 
First, the converter itself consumes a small amount of current, even in standby mode when the multimeter is not working.
Secondly, thanks to this switch, you won’t have to click the multimeter itself again to turn it off. Many devices fail prematurely because of this reason.
Some paths are erased ahead of time, others begin to shorten each other. So a button to turn off the entire device at once will be very useful.
Another tip from experienced users of Chinese multimeters is that in order for the switch to serve for a long time and properly, immediately after purchase, disassemble and lubricate the sliding areas of the switch balls. 
And on the board it is recommended to coat the tracks with technical Vaseline. Since new devices do not have lubrication, the switch wears out quickly. 
You can make a button like an internal one, if you find it free place, and in the external. To do this, you will have to drill only two micro holes for the power wiring. 
Flashlight in multimeter
Another innovation for the multimeter - additional option flashlight. Often you have to use the device to look for damage in switchboards and distribution cabinets in basements, or short circuits in wiring in rooms where there is no light.
An ordinary white LED and a button specifically for turning it on are added to the circuit. It is very easy to check how much luminous flux from a given LED is enough. You don't even have to disassemble it to do this.
Place the anode leg of the diode in connector E, and the cathode leg in connector C (the anode leg is longer than the cathode). All this is done in the connectors for the transistor measurement mode on the P-N-P block. 
The LED will glow in any position of the switch and will go out only when you turn off the multimeter yourself. To mount all this inside, you need to find the necessary pins on the circuit board and solder two wires to the emitter (connector E) and collector (connector C). A button is soldered into the wire gap and mounted through a hole in the multimeter body. 
You secure everything with hot glue and you get a portable flashlight-multimeter.
Probes are an integral part of all multimeters, which comes complete with measuring instrument regardless of its model. Good probes For many years they have been faithfully performing their task. But it also happens that a few days after purchasing a multimeter, one or even both contacts fail due to a broken wire, broken tip or cracked insulation. To protect yourself from such a nuisance, you need to purchase high-quality and reliable multimeter probes, with good send off and durable tips. Many people prefer to make them themselves. In this material we will talk about the varieties and features of these elements, and also figure out how to make homemade probes for a multimeter.
These products are the simplest and cheapest. They are included with most inexpensive multimeter models. The cables of these elements are equipped with PVC insulation, and the plugs and lug holders are made of plastic. Attached to a steel electrode from inside the holder thin wire. Such tips can easily come off if not handled carefully. It is clear that there is no need to talk about durability and high reliability here.

Different models of universal contacts have unequal lengths of the central electrode of the plug and the protruding part of its body. They also differ in the mounting depth of the plug.
The multimeter may have a probe made of various materials. High-quality and reliable contacts can be distinguished by the following characteristics:
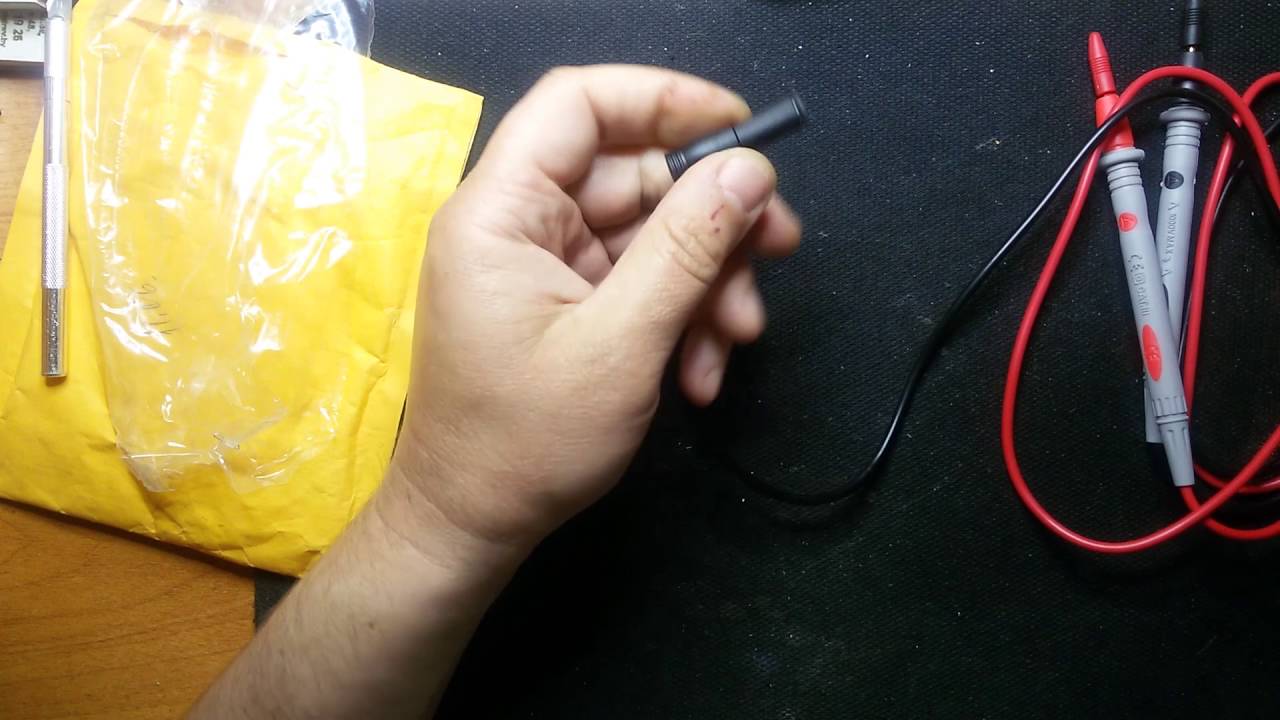
The video shows an example of such products:
Silicone probes have all of the above properties. These parameters are responsible for the high popularity of such products.
Often the holder inputs are made of plastic, but in this case they must have special recesses, otherwise the element will not have the required flexibility. On almost all branded models, plugs and electrodes are equipped with caps that protect the elements from contamination and minimize the possibility of puncture injuries.

These products were developed taking into account the experience of using earlier models, and therefore are distinguished by their thoughtfulness and ease of use. The wire of such contacts has sufficiently high strength and flexibility, is resistant to accidental jerks and does not crack when bent.
When working with SMD elements, it is periodically necessary to carry out measurements, which can only be done using devices connected to the tester. thin probes. These products are equipped with sharp brass or stainless steel needle-shaped tips. They are necessarily protected with caps, which minimize the risk of electrode fracture or accidental injury to the technician.
For SMD installation specialists, such elements are most convenient to use. Sharp probes can not only pierce the wire insulation, but also scrape off the desired area solder mask on the surface of the board with further measurement work. Although the thickness of this needle is very small, the element can easily withstand a voltage of 600 V for a long time.
For measuring work when installing SMD components, multimeter probes are also provided. They allow you to measure the required parameters of a part both on the desktop and directly on the board.

During the measurement, the component is clamped with pliers, which guarantees the quality of the contact. These products have a fairly short cable, but a long one is not needed to work with SMD.
If the measurement process requires maximum care to prevent the electrode from touching other parts, then it is best to use probes with holes at the ends.
With their help, you can make measurements as printed circuit boards, and during electrical installation work without fear of accidentally causing a short circuit.
This version of the tip is also available on the modern market and is in considerable demand. In some cases, it turns out to be preferable to sharp electrodes. The size of the “crocodile” may vary, but in any case it must have a reliable shell made of dielectric material.
Connecting tips can be made in the form of “crocodiles”, serving as additional element For standard probe. Often, the kit for the multimeter includes tips in the form of clip-on “crocodiles”, which, if necessary, can be either detached or attached.

It is also necessary to mention the kits, which include several different tips. When starting work, the master himself selects the one he needs and screws it in like an attachment. This feature allows in some cases to significantly simplify the measurement process. So, for example, a crocodile can be connected in turn to different sections of the electrical circuit being tested, while the other tip is attached to ground as a terminal.
Technicians who work with terminal components prefer terminals designed in the form of clips and hooks. With the help of such elements it is convenient to produce measuring work on printed circuit boards, and also hold lead components in place during measurements. These tips, as well as needles and crocodiles, can be included in the delivery package.
As we said above, many people prefer not to buy new ones when factory probes break down, but to make them themselves. Let's consider two popular options for making homemade products.
To make them you will need dismountable fountain pens (without refills) and dart tips for darts.

The operating procedure is as follows:
For additional fixation, the dart tip can be glued.
The entire device is clearly shown in the video:
Now let's figure out how to make thin probes for a multimeter with your own hands. To do this, we will need collet pencils using replaceable leads, and sewing needles of suitable thickness.
The production of thin probes is carried out as follows:

It is advisable to apply colored heat shrink to the resulting products. When working with a hair dryer, you need to be careful, as the flow of hot air can cause deformation of the plastic.
Pen and pencil caps can be used as protective elements.
The video shows an example of making needle probes for checking small parts:
From this article you learned what tester probes are needed for, what types of these products there are and what are the features of their use. Well, for those who like to assemble on their own electrical devices and products, you will probably be interested in information on how to make multimeter probes with your own hands.


