The question of how to hang a shelf on a plasterboard wall has several possible correct answers. It all depends on what load the structure will place on the gypsum plasterboard sheathing, and what materials we will have at our disposal.
I will tell you how you can hang lightweight shelves with minimal labor, and also describe the technology for installing heavier structures.
Once the paneling and finishing are complete, we may be wondering how to attach a shelf to a drywall wall. The problem is that drywall is a rather fragile material, and therefore it will crumble under load. This means that when hanging shelves we will have to use the most various devices, which will allow us to compensate for this lack of drywall.

The choice of fastening method directly depends on two parameters:
We will build on them when planning our work.

For decorative shelves, stands for small photographs or keys in the corridor, you can use adhesive installation. This method is the easiest to implement:

The described method requires virtually no labor costs, but its reliability is low.
If we are dealing with a structure whose mass is small, but does not allow the use of the adhesive method, we can simply fasten the shelf with self-tapping screws. The choice of fasteners depends on where we will carry out the work:


The length of the self-tapping screw must be sufficient to completely pass through the plasterboard and penetrate into wooden beam or steel profile. For single-layer sheathing, it is advisable to use elements from 25–35 mm.
The instructions for performing the work are extremely simple:


If tightened too tightly, the reliability of the fastening may decrease due to the integrity of the cardboard layer. And it is also undesirable to unscrew the screws and re-tighten them back: the thread destroys the plaster, and when re-attached it will hold much worse.
Now let's figure out how to hang a heavy shelf. Here, ordinary self-tapping screws are not enough - it is advisable to either use special dowels or solve the problem in other ways.
Let's start with a description of special fasteners - fortunately, they are present on the market in a fairly wide range:
| Illustration | Name and operating principle | |
 |
6–12 | Butterfly.
A lightweight, two-blade dowel that fits into a pre-drilled hole. When the locking screw is tightened, the blades open and are pressed against the skin from the inside. |
 |
20–30 | Driva
Plastic or metal dowel with deep carving. Installed by screwing it into drywall along a starting hole with a diameter of 5–6 mm. Fixation is ensured by spiral blades, which, when the locking screw is screwed in, expand inside the plaster layer. |
 |
15–16 | Fischer Pd
It is made of plastic, consists of a sleeve with a massive end. When tightening the fastener, the end stop is pressed into the sleeve, opening it and pushing it apart into the drywall. |
 |
Up to 50 | Molly
Probably the most popular type of fastener. It is installed in a hole with a diameter of 8–10 mm, while the teeth on the neck are stuck into the drywall. When the locking screw is tightened, the inside of the dowel opens, pressing tightly against the gypsum board and distributing the load from the hung shelf over a sufficiently large area. |
Perhaps the described mounts have one significant drawback - a rather high price. But if we consider that to hang a shelf we need only a few of these dowels, then this drawback can be considered insignificant.

However, sometimes you have to decide how to screw a shelf to drywall if the load on it is high, and it’s not possible to use a special dowel. This situation arises, for example, when there is a minimum gap between the sheathing and the wall, which does not allow the installation of a spacer sleeve.

Here you can do it like this:
Here the rigidity of the entire system comes to the fore, so I recommend working with dowels 8–12 mm or more, even if a thinner product is sufficient for reliable fixation. The thing is that a thick dowel will not bend under the weight of the shelf, and the load on the edge of the hole in the gypsum board will be minimal.


When implementing this method with your own hands, it is worth keeping in mind that both when drilling a nest with a hammer drill and when hanging a shelf, the hole in the gypsum board will increase slightly. So it’s worth installing fasteners in advance - then at the finishing stage we will be able to mask any defects that have arisen.
And finally, a universal answer to the question of how to fix a shelf on drywall . If you want the suspended structure to hold tightly, it is better to provide for its installation in advance:

Tip: be sure to place marks at the level of installation of the mortgage on the adjacent walls, floor and ceiling. This will make your job of finding it easier!


A shelf in the interior of a room performs 2 functions - aesthetic and practical. This - comfortable stands for books, various useful items and souvenirs, plus a means to create a unique, original interior in the room. The topic of today's article: fastenings for shelves on the wall - their main types. At the same time, we will try to figure out when traditional types of fastenings are appropriate, and when you can resort to something unusual. When purchasing this piece of furniture, the kit often includes fittings and materials for fixing. If you built the shelf yourself, you will have to think about the issue of fastening.
Immediately before your eyes there is a comic picture by the Danish artist H. Bidstrup, where a home craftsman is trying to nail something to the wall with a nail. But it's not that simple. Questions arise: where exactly to pin this item, what fastening to choose, will it withstand the weight of the structure and the things placed on it?
The easiest installation option is using corners. So, given: an ordinary wooden horizontal shelf without any decoration.
For installation you will need:

The procedure is as follows:
Now all that remains is to admire the result and arrange books or decorative items.
The use of practical brackets and metal corners It is appropriate when the fastenings fit into the interior of the room. If these details do not fit in with the interior, you have to resort to tricks using different types secret fastenings.
There are 3 types of hidden fastenings of shelves to the wall:
What to give preference to?
Important! The only difficulty here is to take all the measurements correctly. Extra holes will certainly spoil the whole plan.
Important! The more massive the product, the more metal pins will be needed.
The described types of installation are used for the simplest structures, be it a “glazed box” or a horizontal board. However, designers create unusual designs with complex shapes: in the form of animals, plants, geometric shapes or tel. Here you can use the same traditional methods of attaching shelves to the wall or non-standard solutions:
Important! Of course, such a shelf is not for heavy books. But how decorative item It looks decent in an interior with small souvenirs. The belts are secured to screws with plastic dowels.
With all the diversity existing methods interior design and modern design, almost impossible to imagine modern premises, which would not use shelves.
Decorative and easy to store various small items, massive for books - shelves can not only be an additional useful surface, but they can also act as decorative decoration any room or office.
There are two main ways to attach shelves:
The traditional method of fastening using various types brackets, metal or wooden racks are popular only when fasteners carefully selected in color, texture and material also add their own “zest” to the artistic image of the room.
But often, the presence of additional decorative and technological elements is not always consistent with general plan designer and target orientation of the designs. In this case, it would be better to use the second fastening method.
The development of modern design craft and the construction industry makes it possible not only to quickly cope with the task of hanging shelves, but also to successfully use the fastening of shelves to the wall without visible fasteners, thereby creating the illusion of floating in space.
Let's look at the main stages correct fastening shelves to the wall, while hiding all fastening elements:
With thickness brick partition from 250 mm and concrete partitions with a thickness of 100 mm or more can be safely used for hanging shelves without additional load-bearing structures.

Scheme of invisible shelf fastening.
1 – bracket for fastening the shelf; 2 – mounting holes; 3 – steel axle; 4 – suspension; 5 – shelf.
With thinner bricks, cinder block and plasterboard walls up to 100 mm, it is possible to use invisible fastening of shelves to the wall, but such shelves are suitable only for decorative purposes.
Since they simply will not withstand additional loads.
Then you need to determine the thickness of the shelf itself.
It can be determined by placing a load of expected weight on it. The absence of visual deflection and deflection to the touch indicates sufficient thickness boards.

An exception may be cases when the choice of a thicker board is dictated by general concept interior
However, it is also necessary to take into account the fastening features, due to which the thickness of the board, as a rule, cannot be less than 30 mm. The thickness of the shelf must be selected depending on the load, for example, for books - boards with a thickness of 45 to 60 mm are suitable.

The board must be dry and processed in accordance with its purpose.
After this, the types of fastening the shelves to the wall are selected, depending on its purpose and the thickness of the board.
There is a huge amount fastening materials, which can be masterfully hidden from prying eyes, let's consider some of them:

Fastening technology using hinges:
For accurate hanging, you need to accurately measure the distance between the centers of the loops.
This distance will determine the markings on the wall for the mounting holes. To ensure that the shelf hangs evenly and does not warp, it is better to use a building level, which will ensure an accurate horizontal line for the shelf.
After the holes in the wall are drilled in accordance with the markings, they are filled with a plug into which screws are screwed.
The screw should be screwed in deep enough, but the distance between its head and the wall should allow the shelf hinges to be put on.
The shelves come complete with special fasteners designed for invisible installation. A shelf installed in this way will be securely fastened. This will create a visual impression that it is literally hanging in the air.
Let's consider step by step execution this installation.
It starts with purchasing a modern shelf in a furniture supermarket or online store.

Step 1. Measure the distance between the centers of the mounting holes directly on the product.

Step 2. After this, mark the location of the shelf on the wall. With help building level draw a horizontal axis on which we mark the position of the mounting holes, taking into account the center-to-center distance between them.


Step 4. Next operation There will be a hole drilled for attaching the brackets. They must be made strictly perpendicular to the wall, this will ensure that the shelf angle is 90 degrees relative to the wall. To simplify drilling, it is advisable to use a square.


Step 6. Then we attach the brackets to the wall using self-tapping screws.

Step 7. Now we carry out the direct installation of the shelf. To do this, we put it on the steel axles of the brackets, alternately tapping it with a rubber hammer on the left and right sides in the front part. The shelf will be evenly installed on the fastening elements, eliminating distortions.

Step 8. The final stage will be to check the play and reliability of the fastening. After this, we remove the remaining debris and install a flowerpot with an orchid. The installation process is complete.
Installation technology for fastening metal rods:
As a rule, reinforcing pins or threaded rods with a diameter of at least 10-12 mm are used.
First of all, we take our shelf and measure its length and width.

Then, using a ruler and a building level, we mark this length on the wall (not the entire distance, but a little shorter), at the location of the future location of the shelf.

We mark three board thicknesses on each side of the shelf and drill holes equal to the diameter of the pins; we make such holes in the shelf itself (you can use a template, since the holes in the wall and in the shelf must match exactly).

Then judge from the subsequent filling of the shelf, if there will be light souvenirs there, then these two pins will be enough, but if there will be heavier things, you can make more fastenings (even every 5 cm)
.
We take the required number of long rods (their length should be approximately 1/3 of the width of the shelf, but keep in mind that there should be at least 10-15 cm of pin in the wall).
Insert the rods into the wall half their length, check with a level so that they are exactly perpendicular to the wall; the durability of the entire structure and the safety of the objects standing on it depend on this. Then fix the rods with synthetic glue or resin and wait until the glue dries.

After this, we place the shelf on the rods (you can additionally glue the pins to the shelf by pouring glue into the holes).
One of the mounting options can be considered preliminary installation of a block into the wall square section(usually used for narrow shelves).
Fastening installation technology:
To do this, a square block is attached to the wall, the side of which is equal to the thickness of the board for the future shelf.

It is attached using dowels, nails or plastic anchors with self-tapping screws. Then, round wooden pins (pins) are driven into the block into holes pre-drilled according to the template, which are lubricated with glue, after which the wide part of the shelf is put on them.

In order to place the board on pins or dowels, use a mallet with a rubber striker, which is gently struck on the outer edge of the board. 

By varying the height, texture, color and thickness of the shelves, you can achieve an original and unique design and create a feeling of orderliness and completeness in the design of the room.
Without limiting your imagination and using all the advantages of modern construction market, you should remember about safety, carefully make and check all fasteners.
In this case, the shelves, like any other element of the functional decor of the room, will serve for a long time, remaining a reliable, useful and beautiful element of the interior.
Selected for you:
Very often the question arises about arranging shelves in the presence of plasterboard walls or partitions. This material is quite susceptible to destruction, and therefore unnecessary impacts on it are undesirable, especially if we're talking about about large external loads. When securing heavy objects to drywall, many factors must be taken into account, since neglecting knowledge about this material can lead to its destruction. Even when drilling holes, the wall can be severely damaged, cracks may appear along its entire length, and even worse, it may not be able to withstand the load at all.
First of all, such a factor is the maximum ability of the panel to withstand the load. It is personal for each element; you can find out about this when purchasing or look at the packaging.
The second factor is, of course, the method of fastening. Considering the capabilities of the plasterboard sheet, the characteristics of the load it can withstand are described for the entire area of the structure. Accordingly, if the fastening is carried out with one screw, the structure is unlikely to withstand. Therefore, when fastening heavy objects, it is worth using several profiles.
What is this article about?
Let's begin to consider the impact of loads on plasterboard materials from fastening lightweight shelves that do not have a big impact on the structure of the drywall.
To attach such shelves, it is enough to use screws. How does the mounting itself take place? plasterboard wall. We will analyze it step by step, and then we will understand the principles of such fastening, its pros and cons. This fastening is also suitable for attaching hooks to drywall, for example, for towels in the bathroom, the main thing is not to hang heavy jackets on them.
First of all, you should select the screws. In particular, it is advisable to carry out fastenings using dowels, thus the structure will be much better and more durable. The store will help you choose the right screws or dowels, telling you about all their properties, what load they can withstand, etc. Why will this method be much better and more durable? During installation into the wall, the dowel opens up, placing emphasis on the walls of the hole, which prevents it from being easily removed from the structure.
The mounting method is quite simple.
Find a profile in the wall and install dowels in it. Thus, you can be confident in the quality of the structure and its durability.

Now it would be worth noting the pros and cons of such fastening. Let's start unconventionally, with the bad:
And now a little about the good stuff:
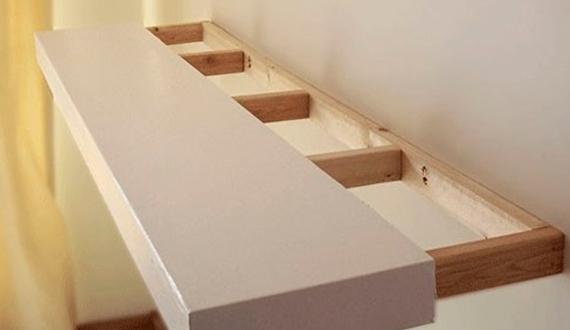
How to hang a shelf on a plasterboard wall with a large impact on the surface, namely with a large weight of the shelf. Accordingly, the method for a light shelf will not work here, since under the influence of a large mass the plasterboard will simply crumble and crack, which can lead to complete destruction of the wall structure, as well as to the fall of the shelf. And from this it follows that there is a special way to hang shelves on drywall, and let’s look at it.
To secure such shelves, a special design will be required; firstly, it will be necessary to mount the structure strictly in the profile of the plasterboard sheet, and secondly, the use of special fasteners.
Please note that the mount is mounted strictly on a horizontal profile.
Just like with the previous fastening, we will consider the pros and cons. First of all, let's talk about the advantages:
Not a single design is without its drawbacks; there are few of them here, but they still exist.
One of the most popular fastening methods is the anchor bolt method. This method is known to almost everyone who works with drywall, but it is used extremely rarely. This design consists of fastening directly into the wall through plasterboard sheathing with anchor bolts.
This fastening method is used only if the distance between the wall and the plasterboard is small!
This mount is the highest quality and strongest.

Among the features of this method are:
But there are also some disadvantages, and not a single design can do without them:
Naturally, many controversial issues arise here. But first you need to decide on the weight and size of the shelf, its design and method of operation. And only after that make a conclusion about which method is right for you.
But if there is no uncertainty about how the shelf will be used, undoubtedly, the choice should be the most reliable anchor method.
The hidden shelf is a decorative accent that creates the illusion. The shelf seems to “float” on the wall. By adding such furniture to the interior of your living room, bathroom, kitchen, bedroom, you can solve the problems of storing books, necessary accessories or souvenirs. Similar furniture often required to decorate children's rooms with many tiny cars, dolls or other toys. “Floating” shelves are cheap, beautiful, keep everything safe on them, and it takes little time to make such furniture.
The discreet fastening that supports the shelf has wide range varieties:
If the time has come to modernize the interior, shelves with hidden fastenings in the Provence style are the ideal decor. She creates exclusively her own, unique home comfort. And at the same time it seems to be floating in the air! Its artsy and simple at the same time appearance Will decorate the bathroom and any nook that needs storage space.
This shelf model installs as a floating shelf and is reinforced for added strength, making it a great storage option for collectibles, photos, keepsakes and glassware. The design is inexpensive and requires very few materials.
Tools:
Consumables:
Advice. You should avoid last-minute shopping trips; it is better to prepare materials in advance.

Attention! The walls of the room are painted before attaching the shelves. Instead of boards, you can use MDF.
These shelves are made from 2-8 drawers, not necessarily matching in color, shape or size.
Decorative handles or accessories can be added if desired. Another idea is to attach a decorative "sticky note" to inside drawers, which became full-fledged regiments.

And, voila, the furniture is ready! This DIY shelf is an economical idea for creating storage space for small items.


