Dismantle household climate control equipment as responsible as installing it. Especially if you plan to use it further, for example, when moving to another place of residence. Let's consider the basic rules on how to dismantle an air conditioner yourself without losing its effective performance.
Disassembly, as well as installation of the air conditioner, is strongly recommended to be trusted professional installers. This largely guarantees a high-quality installation procedure, without the appearance of unpleasant consequences in both cases. But if there is no money for an expensive service, with certain skills, it is possible to disassemble it yourself.
The main point when dismantling a split system is careful, consistent adherence to the basic rules that will preserve the functioning of the equipment. Will be useful here in many ways special tools that will help you disassemble with the least effort, better quality. These include:
A set of these tools is a must because not many standard mounting tools are useful. Using the latter, it is likely to cause irreparable damage to the system, after which it will have to be replaced.
There are certain rules and conditions that must be observed in order to protect health and equipment from breakdowns and malfunctions. Let's list them:
When dismantling the outdoor module, the primary task is to “pack” the freon. It is necessary to carry out this procedure efficiently so as not to subsequently waste time and money on refilling the air conditioner. You should pay attention to the accuracy and precision of pumping the refrigerant.

It is possible to reproduce using a pressure manifold or without it. This device will be able to indicate when a vacuum has been reached in the cooling circuit. It is in this case that the second valve should be closed to “pack” the freon inside the condenser.
The difficult task of transferring refrigerant can become more difficult during the cold season, when the air conditioner cannot be turned on. The compressor oil thickens and its smooth operation is impossible. If the equipment is equipped with a “winter kit” that allows the equipment to operate for cooling even at sub-zero temperatures, the problem is easily solved by starting heating devices located in the compressor crankcase and drainage. After 10 minutes of warming up, you can start the climate system for cooling and pump freon, following the recommendations described above.

If there is no winter heating system, you can use a pressure gauge station to collect the refrigerant. It is connected according to the same principle as the collector. Freon is transported there for transportation.
After “packing” the coolant, you can begin to remove the outdoor module from its mountings. How to dismantle an air conditioner with your own hands:

The indoor unit of the air conditioner is removed from its mountings only after dismantling the outdoor unit. Here you also need to be careful, especially with the clamps of the evaporator and the equipment itself. If these elements are damaged, the subsequently newly installed unit will vibrate during operation, which will lead to its failure.
How to dismantle the air conditioner yourself:

Here are some unpleasant consequences of careless dismantling of the split system:
The video will tell you how to properly dismantle the split system
When changing residence, they often carry an air conditioner with them; after all, the equipment is expensive. To do this without loss, it is strongly recommended to contact professional installers who will do everything correctly and with high quality. If you plan to disassemble the air conditioner on your own, you must strictly follow the dismantling rules, and do everything as carefully, clearly, and harmoniously as possible.
 Air conditioning
There are situations in which it is necessary to know how to dismantle the air conditioner. The reasons may be different - the old split system does not work or you are expecting a move, but you are reluctant to buy a new one. Be that as it may, everyone wants to save money, especially in the face of new expenses. Dismantling air conditioners can cost from $70 depending on the power, location, type of device, and in some cases it is also necessary to charge the system with refrigerant after installation.
Dismantling the air conditioner will cost the owner a certain amount
Whether a qualified specialist or an amateur who wants to dismantle the air conditioner himself, a person must know how this device works in order to avoid unpleasant consequences. It would seem that disconnecting the tubes and unscrewing a few hardware is a trivial matter, but practice shows that everything is somewhat more complicated.
The operating principle of an air conditioner is not difficult to understand. IN in this case We will talk about split systems, since that is what people usually deal with. Freon flows from the evaporator to the compressor, where due to more high pressure it heats up.
Then the condenser is blown with relatively cold air, due to which the refrigerant cools and turns into a liquid aggregate state, which is accompanied by an exothermic reaction. Due to this, the air passing through the condenser is heated. The heated refrigerant from the condenser moves to the expansion valve, where it partially transforms into a gaseous state at reduced pressure. The liquid and gaseous refrigerant then enters the evaporator, which receives air from the room. There, the substance finally turns into a gaseous state, due to which it absorbs heat from the room, after which it is sent to the compressor for a second cycle.
That is, it becomes clear that air conditioning requires a rather complex organization from the device, especially from the pump. It must be absolutely sealed, and the use of additional seals is not allowed due to regular temperature and pressure surges. Therefore, tightness is achieved only through the precision of all parts. This is where the problem usually arises for those who decide to dismantle the air conditioner with their own hands. If you make a mistake when removing the system, you can damage the pump, which will lead to a decrease in the efficiency of the device, and then to complete breakdown. It usually breaks if dust and other aerosols that harm the wall, or oxygen, enter the pump. Therefore, dismantling the air conditioner requires extreme caution.

If the air conditioner is damaged during removal, it will no longer work correctly.
To dismantle the air conditioner with your own hands, you still need to spend money, because a person will definitely need a number of tools, without which the task cannot be completed. These include:
In some cases, it is necessary to acquire safety equipment. Moreover, it is always necessary for two people to participate in dismantling - one person is unlikely to be able to do everything correctly and safely. It is under no circumstances worth risking your life and health.

Open-end wrenches will come in handy when removing the device
Dismantling a split system with your own hands is somewhat more difficult than a similar process with monoblock air conditioners like window or mobile. In such cases, you just need to shut off the refrigerant supply channels, turn on the device and wait until the substance leaves it, so as not to harm the surrounding room. Then the air conditioner is turned off from the network, the drain is disconnected, carefully removed from the mounts and the pipes are disconnected so that you can finally remove the device - absolutely nothing complicated.
To properly dismantle it yourself, you need to follow certain rules. The instructions are simple, but any mistake can lead to serious consequences, including complete breakdown of the system.
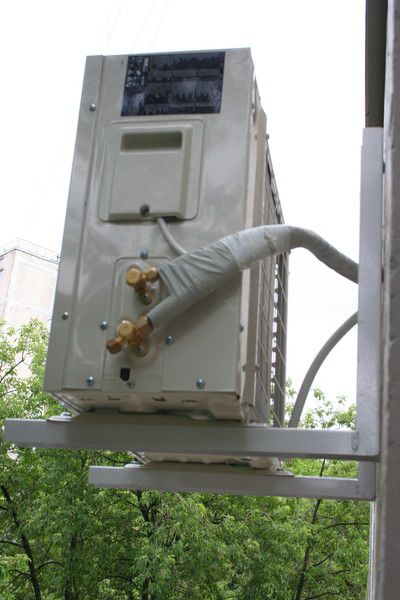
People thinking about how to remove a split system should understand that the first step is to dismantle the outdoor unit of the air conditioning system. Initially, you need to at least briefly familiarize yourself with the architecture of the device. There are two fittings on the outdoor unit, with caps screwed on top of them. Visually, the difference between these pipes is clearly visible: the tube connected to the first one is thicker - this is the supply, or steam, pipeline; the second pipe refers to the outlet or liquid pipe. Under the caps there are nuts that regulate the supply or removal of refrigerant. Near the supply fitting there is a nipple, thanks to which freon is released from the air conditioner.
According to the instructions showing how to properly dismantle the split system, removal of the outdoor unit is carried out through the following steps:
If the air conditioner is dismantled temporarily in order to take it for repairs, there is no need to remove the brackets; there will always be time to disassemble it.

Dismantling the outdoor unit can be quite a difficult undertaking.
At first glance, dismantling the indoor unit of an air conditioner may seem like a trivial matter that does not require special skills or effort. However, this is not entirely true due to the fact that different models have their own characteristics. But there are some rules that anyone who wants to know how to remove an air conditioner from a wall needs to know. Disassembly is carried out according to the following algorithm:
This completes the dismantling of the split system. However, there is one more recommendation: when transporting the outdoor unit, you need to make sure that it stands exactly the same as on the fortifications. It should not be placed on its side or turned over.
Modern air conditioners are mainly split systems of one of several varieties, from wall-mounted to ducted indoor units. For the high energy efficiency, cooling capacity and noise insulation of split systems (compared to window models), the consumer pays for the complexity of installing and removing such devices.

Split air conditioner removed due to:


In the latter case, dismantling is carried out when the room has turned, for example, into a warehouse and is crowded, and the specifics of the room are such that it does not require any cooling at all.
You will need the following tools:


If the air conditioner is on the ground floor, you can easily reach the outdoor unit from a stepladder or lightweight “transformer”. Dismantling an air conditioner on the second floor may require a three-section sliding stairs. For the third or more high floors truck crane for rent. Lifting above the 5th floor may require a special outdoor lift used by builders, or the services of industrial climbers. Dismantling the outdoor unit, if freon preservation is required, is not performed in parts. The compressor and refrigeration circuit must not be disconnected. To remove the outdoor unit without disassembling, you need the help of a partner: a powerful split system weighs about 20 kg.

It is necessary to remove unnecessary people from the territory or work site and ensure the safety of passers-by by placing identification signs. If work is carried out on load-bearing wall high-rise building, the place is cordoned off with red and white tape. The fact is that if a spare part or tool accidentally falls from the 15th floor, then this object can kill a passerby or break a car window.
At the work site, remove furniture and personal belongings, pets, etc. from the room. If the air conditioner is dismantled in winter, take measures to avoid freezing yourself and not causing inconvenience to other people.

If you use safety equipment, work out a plan for its use. It will protect you from unpleasant and even catastrophic consequences. Place your tools in an accessible place - this will make your work quicker.

Saving freon will help reduce the cost of reinstalling the air conditioner in a new location, where it will subsequently continue to operate. Proper pumping of freon - without losses, as indicated in the operating instructions. Freon destroys the ozone layer earth's atmosphere and is itself a greenhouse gas. And refilling an air conditioner for 2019 with new freon when you have lost the old one will cost several thousand rubles.

Be sure to pump freon into the outdoor unit. This is done as follows.


Run the air conditioner in ventilation mode (without compressor). Flow warm air will blow out any remaining water condensation. Disconnect devices.
If it is impossible to pull the tubes out of the wall, then use side cutters to cut through the copper tubes at a distance of 20 cm from the fittings, flatten and bend the resulting ends.

Removing electrical and piping is carried out according to the following scheme.


After this, the indoor unit can be easily moved and removed. The external unit is even easier to disassemble, but in the same sequence.


To remove the indoor unit do the following.


The indoor unit has been removed. To remove the outdoor unit, do the following.


This completes the dismantling of the split air conditioner. Pack the outdoor and indoor units (and all fasteners).
If dismantling (reinstallation) of a simple split system is relatively simple, then more complex devices, for example, ducted air conditioners, are much more difficult to move. They have a large set of components and weight, and require special approaches when being integrated into the interior of premises. Electrical line de-energized and disconnected before removing the hydraulics, and not after it. Before installing the air conditioner in a new location, it is necessary to blow out and evacuate the freon circuits of both units. Hard-walled communications are simply cut off.

If the hole is wide enough to pull them out, then start with the parts that are easiest to pull out. Then the rest are removed.
You cannot store a disassembled split air conditioner for a year or more. Over time, the freon will all disappear. Air with moisture will get inside through the drying valve gaskets and oxidize the pipelines. In this case, the entire circuit must be replaced. Often, no repairman has parts for an old air conditioner, since the entire line of compatible models has long been discontinued, and the owner is forced to buy a new split system.

Dismantling a duct split system begins with dismantling the air ducts. The work begins where the duct grilles communicate with the air in the cooled rooms. Having removed the channels, they begin to remove indoor and outdoor equipment modules. Run the air conditioner after pumping freon into the outdoor unit - the valves holding it must be closed and insulated using plugs. When the system is purged, the power cable is disconnected.
Greetings to all guests and readers of the Air Conditioner website. In this article we will talk about how to remove an air conditioner. It often happens that the internal unit of a split system prevents repairs in the room. In what cases will it be necessary to remove the air conditioner, and is it possible to do without dismantling? We will also consider these questions in the article.
To remove any indoor unit, you must first “snap off” the lower clips. Most blocks have two clips at the bottom, which are indicated by various arrows or serifs. There are three main types of these clips. The first two can be difficult to determine (requires experience or knowledge of a specific model). So, what are their differences:


In this case, you need to press the clips up to release the internal block;


Often in such cases there are additional holes (as in the photo). In this situation, the clip must be pulled down from the block. To do this, you will need a device (something like a screw head);


Here you first need to carefully remove the cover, and then everything becomes clear. Using the LG air conditioner as an example, first unscrew two screws. Afterwards, unhook from the sides front part cover, then pull it all out towards you.
In any case, it is better to contact a specialist, especially if you do not know how the clips of your air conditioner work. Incorrect actions can break the fasteners and the unit will not fit tightly to the wall.
Depending on the scale of the repair and how tightly the indoor unit fits against the wall, there are several options for solving the problem.
1 case. Let's say we plan to re-glue the wallpaper, and the gap between the wall and the block allows us to do this neatly. Then there will be no point in dismantling the block (extra money down the drain). Here you can “snap” the internal unit from the plate and, without disconnecting the communications, hang wallpaper.
Case 2. If plastering and leveling of walls is carried out during repairs, then dismantling of the indoor unit will be required. It is important that, after finishing repair work The length of the communications was enough to install the unit back. During the repair process, you can (grind and putty). Read more about removing only the indoor unit.
Case 3. There are situations when the indoor unit has to be removed along with the route. This may be due to the following reasons:
In these situations, it is necessary to dismantle the air conditioner. Read the article on how to dismantle a split system.
Knowledge of how to remove an air conditioner from a wall with your own hands may be needed in several cases:
To begin with, when changing the location, you should deal with disconnecting the air conditioner from the wall completely, that is, both units. In this case, it is important not only to carry out high-quality dismantling, but also to follow the rules for transporting split system modules.
First of all, they provide for the availability of the necessary tools. To remove the air conditioner yourself you will need:
Instead of a pipe cutter, you cannot use wire cutters and similar tools, as they will spoil the quality of the copper pipeline.

First, the external module is dismantled - the compressor-condensing unit or KKB.
Step 1. Divorceable or wrench On the end side of the KKB, open the valve plugs.
Step 2. Close the liquid valve of the external unit. Use a hex wrench.
Step 3. To ensure that all the freon passes to the external module, start the air conditioner in cooling mode for 30-40 seconds. As soon as the compressor starts working only on suction, a pressure gauge station is connected to the valve from the gas pipeline and wait until the readings are reset to zero. Immediately close the freon return valve.
Step 4. The system is completely de-energized. Before proceeding to the next stage of removing the air conditioner from the wall, use an indicator screwdriver to check the absence of current by inserting it into the phase terminal.
Step 5. Now the freon line is cut with a pipe cutter, since it is a non-removable structural element. The remaining ends must be insulated from moisture and debris. You can use electrical tape for this.
Cut off the connecting tubes at a distance of 15-20 cm from the fittings. If the dismantling of the capacitor module is carried out for the purpose of repair and restoration work, then there is no need to cut the copper tubes.
Step 6. Carefully disconnect the drainage pipeline and interconnection wires. ends electrical wires It is also advisable to wrap the drainage tube with protective material.
Step 7. Now we begin to dismantle the device itself. How to properly remove the external air conditioner unit from the brackets? To remove it from the nuts and bolts, use an open-end or socket wrench. Since the KKB usually has considerable weight, it is advisable to take a second person as an assistant.
Step 8. The brackets are removed from the surface of the building or balcony by unscrewing the shut-off valves with a socket head.
After the air conditioner has already been removed from the wall, they begin to pack it. To do this, you will need a multilayer cardboard box, polystyrene foam and soft packaging film in a roll.
The KKB can only be transported in a vertical position to avoid water hammer during subsequent work. Before installing the unit in a new location, you should let it stand for 2-3 hours.
If transportation is planned for winter time, you need to remove the air conditioner from the wall so that all the freon does not leak out. For this, a pressure gauge station must be used. But most experts advise draining the refrigerant and then completely recharging the circuit.

The most serious malfunction of a split system can be a breakdown of the compressor. It occurs when:
In this case, you will also have to remove the air conditioner control unit yourself and disassemble it. Some climate control systems do without complete dismantling, but it is problematic for a non-specialist to do this, since in this option access to many elements is severely limited.
The outdoor module has been dismantled, how now to remove the air conditioning compressor? In fact, there is nothing supernatural here:
It is worth considering that before removing the air conditioning compressor, it is necessary to check the degree of oil deterioration. If it has bad smell and changes color when tested for oxidation, then replacement + flushing of the KKB will be required. If the properties are normal and the oil oxidation test is negative, a simple replacement will be sufficient.
Everything is clear about how to remove the air conditioner compressor and the outdoor unit itself from the wall with your own hands. All that remains is to figure out how to dismantle the internal module. This process also takes place in several stages:
When removing the air conditioner indoor unit from the wall, extreme care must be taken not to damage the mounting latches that hold the unit to the mounting plate.
Be sure to caulk the ends of the copper freon tubes in the same way as for the external unit.
Pack the indoor unit in a thick cardboard boxes, covering it with foam and wrapping it in soft bubble wrap. The evaporation unit can be transported in any position, unlike the KKB.
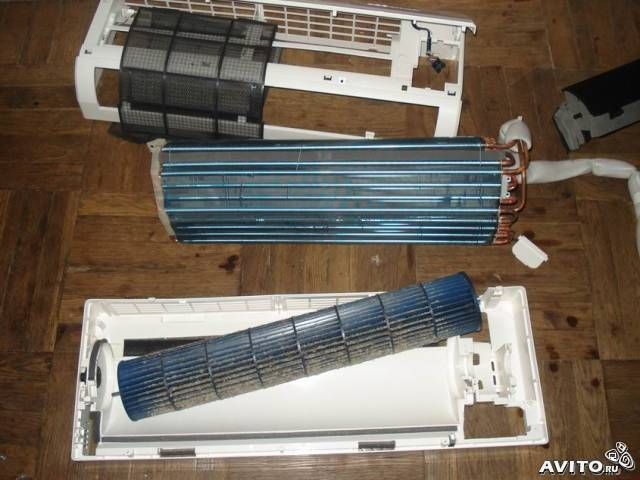
If any element of the indoor unit of the air conditioner needs to be replaced or cleaned, it may also require its removal from the wall or partial disassembly into its components. It looks like this:

All elements are washed with water and a cleaning agent. You can use a steam generator for more thorough cleaning. When the parts have dried, they are fixed in reverse order to place.
If you need to dismantle the control board, first remove the protective cover from electronic unit, disconnect all wires (connectors of indicator panel sensors, air damper drive). Then unscrew the board from the fastening elements using a screwdriver or simply disconnect it from the latches.
When the indoor unit is not dismantled, but disassembled, there is no need to cut the freon line.
Monoblock systems can be dismantled in almost the same way. The only difference is slightly different fundamental electrical diagram and pipes with working fluid.
You should not remove the air conditioner yourself in the following cases:
In these situations, it is better to contact professional installers.
Before you take action on your own, you can watch a video on how to remove the air conditioner yourself:


