If you are looking for budget decision for building a fence, then you will be interested in this article. We invite you to consider original solution, which has been implemented by a large number of summer residents - a fence made of bottles. Let's talk about using plastic bottles. We will look at the pros and cons of this structure, as well as what types of fencing from plastic bottles you can build with your own hands. And of course, we suggest you consider the instructions for making a fence.
Like any other structure, a fence made of plastic bottles has a number of positive and negative aspects. Fencing made from plastic bottles also has similar features. So, let's consider positive sides such a solution:
But do not forget about the disadvantages that this fence also has:
There are several ideas on how to make a fence from plastic bottles for your dacha. Let's look at the most common options, and then we offer you instructions for making them.

This means low fences that separate paths, beds and other areas. So, a plastic bottle is half buried in the ground. Only its lower part will be visible. A similar border can also be used as a regular decoration. Its production is very simple. Fill it with earth or sand small fraction, screw the lid on and dig it into the ground.

Another original solution in which the bottles are fixed on a wire. So, the wire is threaded through its “body”. In this case, you can make the fence relatively high. If the fence on the wire is high, then a dressing unit must be organized.
It's quite unusual way making a fence from plastic bottles. It is used very rarely. The reason is that it takes a lot of effort to make it. So, you need to use only two-liter containers. They should cut out the middle part and cut vertically. That is, you should end up with a rectangle. These elements are connected to each other with a stapler. The result is a continuous web of large quantity elements of plastic bottles.

Already based on the name, it is clear that such a fence resembles a rack in appearance. To implement it you need to do wooden frame. Mounted first wooden poles supports along the entire perimeter of the territory. To form a rack, transverse bars are attached to them. Before using bottles, they should be washed thoroughly and then filled with sand. These containers are displayed on the manufactured rack.
It is better to fasten the bottles using small screws. They are screwed to the slats from below and above with screws. That is, the height of the rack should be equal to the height of one bottle. Thus, the fence rises up to the required height. There may be several such racks.
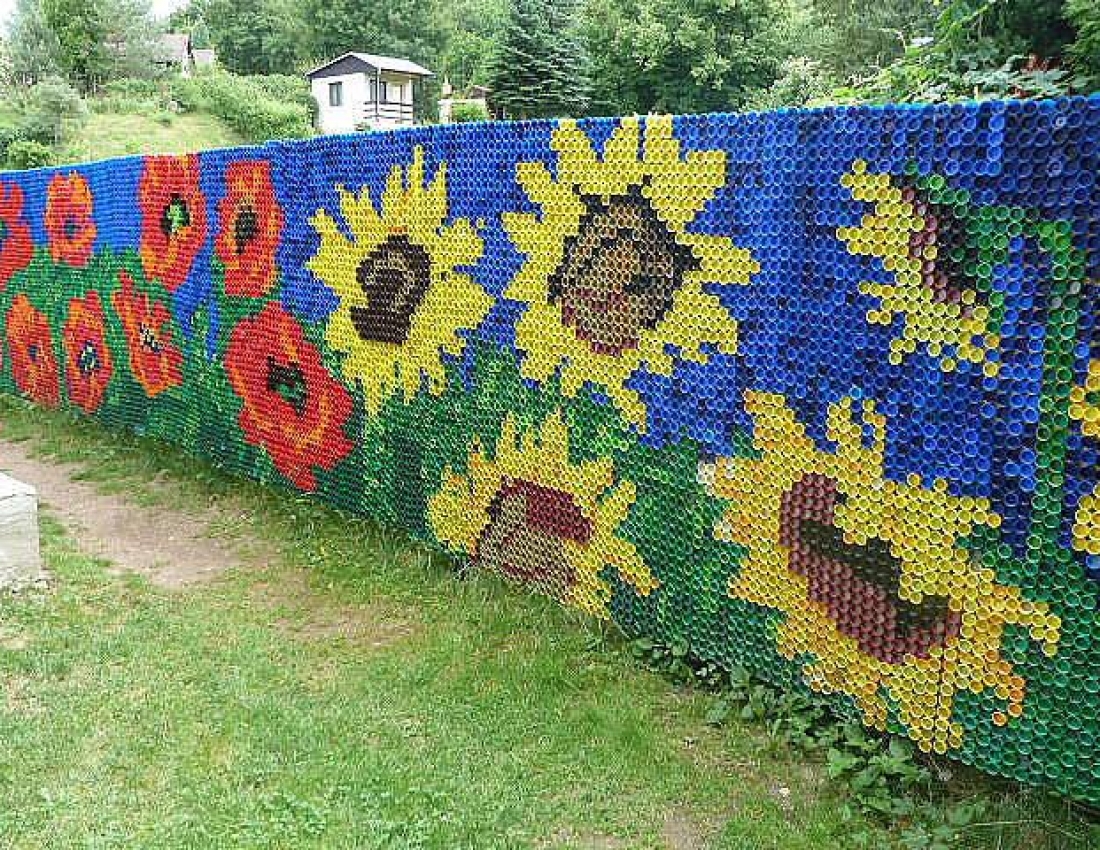
Another very bold and original solution is to use plastic bottle caps. Of course, making such a fence will not be easy. This will take a lot of time. But the end result can be very beautiful picture. Any design can be painted on such a fence. This can be done by using multi-colored lids.
Important! If you have such an idea, then you should understand that its implementation will require a couple of tens of thousands plastic caps.
But you can also make a small fence from plastic covers. For example, you can protect flower bed. In short, there may be plenty of ideas.

Now let's look at the principle of making a fence from plastic bottles and wire. To work, you will need a set of the following materials and tools:
So, the essence of the work comes down to several sequential actions. First of all, the bottles are washed and thoroughly dried. After this, you need to carefully and evenly cut off the bottom. We will use 5 containers in one column. As a result, the height of the fence will be about one meter. But keep in mind that the lowest bottle must have a bottom, and all subsequent four bottles must have a cut bottom.

After that, place a bottle with a bottom on the bottom, and insert everything without a bottom on top of it. Make sure that the topography of the containers completely coincides and is positioned sequentially. Due to this, visually everything will look beautiful.

After this, you need to take all the cut bottoms and drill holes in the center of them according to the diameter of the wire. Holes are also drilled in bottles at three levels. That is, a wire will be stretched across the columns of plastic containers in three places. Due to this, sufficient rigidity will be ensured to the product. After this, in a certain sequence, string a bottle with bottoms onto a wire, as shown in the figure:

Having formed the required number of sections, the entire structure of the future fence made of plastic bottles should be moved outside. Dig metal or wooden support posts into the ground around the perimeter. At the height of the tensioned wire in the columns of bottles, drill holes in the support columns buried in the ground. The wire will be attached to these holes.

As you can see, making such a fence is not particularly difficult. However, it takes a lot of effort. The end result will delight you, because this is how you can outline your territory.

Above we looked at a relatively simple fence design made from plastic bottles. Now we invite you to consider the technology for making a more powerful fence. To do this, you need to decide on the choice of building material that will combine all the bottles into one fence design. For example, it could be a mortar based on clay and sand or a regular concrete mortar. There are no rules here.

There are several nuances that you should pay attention to. Bottle bottoms should be placed outside. Due to this, the fence will acquire a certain decorative character. After complete drying concrete mortar, the protruding bottoms can be painted in any desired color, which will completely hide the unpleasant and cold gray color.

Important! When making a permanent fence using a combination of plastic bottles and solution, remember that the height of such a structure can reach up to one and a half meters. Moreover, such a height can be built in one go. When the solution sets and hardens, you can raise the fence even higher.
As seen, this method It's also not entirely complicated. It is quite possible to cope with all the work independently. With all this, you will be able to create a very durable and reliable fence, which will be decorated with plastic bottles.
So, here we have looked at all the features of how a fence is made from plastic bottles. In fact, there are a lot of ideas. In this article we have described the most common ones. You can choose the technology that is most suitable for you personally. And if desired, you can modify it. To do this you need to use your imagination.
We hope that this article has awakened in you the desire to create and create fences from plastic bottles at your dacha. If you already have own experience in this matter, then share it by leaving comments at the end of this article. Moreover, we recommend that you watch the prepared video material, which describes other features of the manufacture of such a structure.
Using plastic bottles in the country to create various elements decor today has reached the level of art. If we also take into account their incredibly high practicality and low cost, then we get perfect material for building a fence. Such structures will be discussed in this article.
Why did PET bottles receive such an unusual use for them?
Let's look at their features:


This type of fencing is used to separate different areas of your site.
Its installation instructions are very simple:
Tip: you can use alternating products of different shapes and combinations of different fillers.
This way you can achieve greater aesthetics and variety.

This design is most often used for fencing flower beds and beds with tall plants. Its installation requires a little more diligence, but is also no different great complexity and consists of stringing empty bottles onto a wire.
Advice: if you want to make this type of fence more stable, it is recommended to fasten the containers together in several rows.

A very interesting option is to use the walls of large PET containers. From them you can build not only a fence, but also a canopy or even walls.
It looks like this:

Such a fence can now be safely installed on the street side of the site. First of all, we bury the pillars, install the transverse strips, but then you can go in two ways:
Fence made of lids

“Beauty requires sacrifice” - this phrase is ideal for the design in question. When creating it, only bottle caps are used, which may require from ten to fifteen thousand. Then you need to think over a suitable ornament and, in accordance with it, fasten the products with wire.

This method is also different high level labor intensity and use additional materials. But at the end you will get a solid wall made of stone and plastic. In this case, containers filled with sand play the role of bricks and are fixed with cement mortar.
We looked at how to use plastic bottles in the country when arranging fences. There are several methods, and they all differ in their complexity, installation method and final result. But in any case, you will get a cheap and unique design.

Be original and economical!

The amount of garbage that each person “produces” is growing every year. The problem is becoming global, as flying plastic bags and plastic bottles lying everywhere have become an eyesore for everyone. I’m grieving, it turns out that you can help, and even for your own benefit. In any case, this applies to plastic bottles. You will be surprised how varied and, importantly, useful crafts from plastic bottles can be made in literally a matter of minutes. Well, or a watch... Depends on the scale.
PET (polyethylene terephthalate) is a thermoplastic from which bottles are made. It will be useful to know its physical properties:
Plastic bottles are very convenient to use, but are harmful to the environment, since the polyethylene from which they are made takes more than 200 years to decompose. This same property allows the use of almost waste raw materials as construction material. Craftsmen Even houses are already being built from plastic bottles, as well as sheds, dachas, greenhouses, greenhouses, fences. Worked out various technologies- the approach is quite serious.
The main idea is to pour into bottles bulk material, screw them on with lids and use them as bricks. Fill the bottles with sand and soil. Sand is preferable because there is too much plant debris in the soil that can rot. It must be sifted, dried, filled into bottles, compacted well, and topped up. The result is a kind of brick.

To build a house from plastic bottles, you will need a solution that fills the gaps between the “bricks”. There are options here too. This can be a regular mortar, which is used when laying brick walls, you can make clay mortar. To keep the “bricks” in the wall until the mortar sets, they are tied with twine on the side of the lids. Later, these “grids” will come in handy when you plaster the walls. They turn out uneven, so you can’t do without leveling.
You can build a greenhouse or greenhouse from plastic bottles. In this case, only transparent plastic is used, since it is necessary for sufficient light to pass through. For the construction of a shed, on the contrary, it makes sense to choose darker plastic - it will be less visible what’s inside.

The second requirement for bottles as a building material is an even shape. This one, you know, without recesses. Otherwise, folding the walls so that they retain heat will not work - it will “siphon” into the curly cutouts. Remove labels from bottles and dry. You also need to prepare pins or rods - bottles are strung on them. Their diameter is small so that the neck passes freely. Now you can start building a greenhouse/shed from plastic bottles.
To build a greenhouse or shed, pillars are dug in the corners. Frames are assembled from timber according to the size of the walls. These frames will be the base for the bottle walls. We assemble them (the frames) on the ground and, ready-made, attach them to the dug-in pillars. When you make the frames, don't forget the doorway and windows.

We build a frame, cut off the bottom of the bottles, and string them onto a pin. From such “columns” we assemble walls, roof
The construction process begins with cutting the bottom. We string the cut bottles onto pins, pointing the necks in one direction. We insert the bottles with force so that they become very tight. Having collected a number required height, attach it to the frame. You can fasten it with clamps, strips cut from metal, nails... In any way available to you. We press the second row against the first so that there is a slight deformation. We fasten it in this position. So, row by row, we assemble all the walls, then the roof.

Using the same technology you can make a gazebo. But here there is no need for tightness, so you can collect shaped and colored containers. This will make it even more interesting (example in the photo).
Bottles will also need to be smooth, transparent or yellow. The central part is cut out of them, resulting in a square-shaped piece of plastic. The pieces are sewn together into long strips. In the strip, the pieces are placed so that they curl in one direction. Then the strips are sewn into canvases. To make the canvas even, the strips are positioned so that they curl in different sides. As a result, they equalize each other. The finished canvases are nailed to the frame. This completes the construction of the greenhouse for plastic bottles.
This type of “cladding” for greenhouses withstands winters well; it does not need to be removed. Due to the firmware (many small holes), there is no absolute tightness, which allows you to regulate humidity. You won’t be able to heat such a greenhouse, but it will delay autumn for you and speed up the arrival of spring.
You can sew plastic for a greenhouse by hand, but it is not easy. It will be easier for those who have non-capricious Sewing machines. Old Podolsk machines cope with this task. There may be problems with others.
You can make a fence from plastic bottles different ways. If you need a serious monolithic fence, you can use bottles as bricks. The technology is the same as when building a house. To avoid plaster (after all, there is a high risk that it will collapse) - select the color of the plastic to obtain the required Rusinka. But in this case you will have to look for “building materials” of the same diameter or from different sizes lay out patterns. In general, the process is creative, no matter how you look at it.

You can also make filling for the fence from plastic bottles. Make a frame, say, from wood, and come up with a beautiful filling from shaped containers and their parts.
Not only can you make a house and a fence from plastic bottles, they are also used as a basis for upholstered furniture. The idea is to use plastic containers rather than wood for the frame. With the lids screwed tightly on, they have a high bearing capacity, and assembled into blocks, they are quite capable of withstanding loads of up to 100 kg or more.

A bed made of plastic bottles... you need a good mattress, and the base is not too difficult to make
Although the furniture is made differently, the general algorithm of actions is the same:
The trick is to ensure that the bottles fit very tightly against each other and do not move. The slightest play can lead to destruction of the structure. Therefore, assemble the blocks slowly, carefully securing them. You can stack bottles in layers, securing each layer in several places. For inner layers It is better to use double-sided tape - the fixation will be more reliable.
The easiest way is to make an ottoman or banquette from plastic bottles. We proceed in the order described above. You need to find bottles of the same height. It’s better if they are the same shape - it’s easier to assemble. From plastic containers With the lids tightly screwed on, we assemble the base in the form of a cylinder. It is advisable that the radius of the base be greater than the height of the bottles - this way the bench will not tip over.

Next, you need to cut out two circles from fiberboard, which will be slightly larger than the resulting radius of the base - this is the “bottom” and the base of the seat. We secure them with tape. We take furniture foam rubber and, according to the obtained dimensions, cut out the necessary parts. We sew a cover from furniture fabric, colors that suit the interior.

Such a banquette can be not only round. It is quite possible to make it square. And so that this furniture is not too light, it can be made heavier by pouring water. But water is not very reliable. It's better to pour sand. Both heavier and more reliable.
If you need furniture higher than one bottle, proceed as when creating walls for a house. Find “material” of the same shape and height. Leave the first bottle intact, screw the cap tightly (you can add sand to prevent it from turning over). The bottom of the other is cut off and one is placed on top of the other. The bottle goes a certain distance and does not move further, no matter how much effort you make. If the resulting height is enough, great; if not, put on the next one. This is how you assemble rows of the required height, then fasten them into blocks.
There is another way. It is more reliable in the sense that the bottles are not held by compressed air, but due to mechanical stop. And they have double walls, which is also important. Disadvantage - more work, more raw materials are needed. The whole process is illustrated step by step.

From such modules we assemble blocks of the required configuration, fastening them with tape. Don't skimp on scotch tape. You can first fasten two bottles together, then assemble larger blocks from the double ones.
As you understand, with this technology there are a lot of bottle tops left (half of the third bottle). They can be used to make other crafts from plastic bottles: flowers, more practical things for the household.
The most common crafts made from plastic bottles are garden figurines and flowers. About garden figurines read There are others interesting ideas, but there are a lot of collected interesting animals and insects. And we’ll tell you about flowers made from plastic bottles below - these are probably the crafts made from plastic bottles that bring the most pleasure. The process is simple, there are a lot of possibilities, the result is amazing.
You've probably noticed that the bottom of a PET bottle looks like a flower. All you have to do is find the bottle beautiful color, cut off the bottom of it. Now you have a nice flower. In the middle you can add petals cut from the central part, a core from plastic strips cut into noodles, or glue beads inside, but more on that in a little more detail.

To work, you will need a marker, a lighter or a candle (it’s more convenient with a candle). If available, take pliers, tweezers or pliers to hold the workpiece while processing. You will also need acrylic paints, glue and beads may be needed. The entire manufacturing process comes down to a few steps:

There are a lot of options here. Just start doing it. It may not work out perfectly right away, but you will understand what and how you can fix it. Check out some more pictures from step by step photos process of making flowers from plastic bottles.
For beginner crafters, you can try making flowers from plastic bottles simple shapes for garden decoration. In this case, you can also use milk containers. To avoid painting plastic, look for colored ones. And it doesn’t matter so much whether they are transparent or not. They can be combined to produce flowers of different shapes.

To create such flowers, use the part near the neck. It is cut to form petals. Next - warm it up a little, giving the desired bend to the petals, a little paint, the core from a melted piece with a thread (a bottle of a smaller diameter, a pharmacy bottle will do). So it turned out to be a buttercup.
Another option is to cut from the neck into strips of equal width - 1-1.5 cm, bend them (warm up a little at the base). Make a middle whisk from the side of a milk bottle or paint clear plastic with acrylic paint.

The middle is any bright. Here is a piece of cork, but you can cut it into thin noodles, roll it up and then heat it. You will get a shaggy core.
It's all about the form... Despite the imperfections, they decorate the site
The topic is actually inexhaustible. A variety of flowers are made from plastic bottles. From simple and uncomplicated to very realistic. It's not so much a matter of skill as different tastes and desires.
PET containers turned out to be so good material that they make a lot of useful things. In this section we have collected useful crafts made from plastic bottles that can be used around the house.
If you cut off the bottom of a bottle with a capacity of 2–3 liters, you get a bowl or a bowl, and so that its edges are even, they can be melted on a heated iron. But so that you don’t have to clean the sole later, use a special silicone pad. If you don't have one, you can do this through a sheet of baking parchment.

Container for food. The plastic is food grade...
From the same bottle we cut off the threaded part. There should be 1-2 cm of plastic left around the thread (we melt the edges using a well-known technology). Now it won’t be difficult to seal any package hermetically: we pass it through the cut neck, wrap it outward, and screw on the lid.

From the bottom of the bottles attached to the bar, it turns out great shelf for newspapers (photo on the right). You can also store umbrellas.
From plastic cut into strips you can weave different shapes containers. Bottles need an even shape, with thick walls. They are cut into strips of a certain thickness. You need to cut in a spiral - the result is quite long strips. If their length is not enough, they are sewn perfectly.

You can even make a lampshade, but under one condition: you will use similar crafts from plastic bottles in lamps - only they hardly heat up. Plastic is incompatible with other lamps. We will describe three ways to make a lampshade from a plastic bottle.
First. You need a large capacity bottle. We draw it into strips of equal width. At the beginning and at the end of each strip, we make holes with a heated soldering iron or a nail heated on fire. We insert scissors into this hole and cut. The result is smooth stripes.

When the strips are cut, we also make a hole in the bottom, pass a thick fishing line through the neck, bring it out through the hole in the bottom, with reverse side we attach the decor. Maybe a button, maybe a pebble suitable color. Now, by pulling the fishing line, we get interesting shape shade. You can put a low power light bulb in it.
Another lampshade was made using a similar technology. But then they cut part of the bottle with the neck into strips, wrapped the strips and secured them to the neck. To give the desired shape, the bend can be slightly warmed over the flame of a candle or lighter. We attach the resulting “flowers” to the base. So we get an unusual design.

They also make lampshades from the bottoms. You need to find a sufficient number of identical bottles, cut off the bottom of them, and glue them together using universal glue (choose transparent). The main thing is that it glues the plastic and hardens quickly.
Making a vase from a plastic bottle - what could be easier... Just cut off the neck and you're done. But there is a technique that allows you to get patterned walls. You will need a soldering iron with the thinnest tip possible. Its power should not be too high. Then everything is simple: use a heated tip to burn out the patterns.

Magically! To make the drawing appear brighter, take acrylic paint and paint the resulting beauty. The paint can be in a regular can, but it’s faster and more convenient to work with a spray can.

These are the options...
Crafts from plastic bottles is such a broad topic that it is impossible to talk about everything. What’s nice is that if you know a few tricks, you can easily find out how and what to do just by looking at photographs. So here we have collected a few ideas that we found interesting.


You can even make a boat...

And this is just decoration...


04.07.2017
Country cottage area - perfect place to realize bold design ideas. Even the fence here can be unusual, for example, made with your own hands from plastic bottles. As befits a fence, it will highlight private territory and will show uninvited guests that there is an owner here. If plastic containers were not thrown away, from time to time every family could build fences from them - attractive, functional and reliable. The purposes of their construction are different - as a full-fledged fence summer cottage, and the framing of a flower bed.
The advantages of fences made from bottles are:
Among the shortcomings of the bottle fence, experts discovered the following:
The types of fencing made from plastic bottles are represented by the most different designs. This can be either a low border highlighting a flowerbed or a permanent fence.
Read also:
DIY gate locks - enhanced protection private property


Experts advise not to string the lids randomly. Having thought through any pattern in advance, you can get not only a cheap, but also quite aesthetic structure.
Today, several types of structures have been invented that can be assembled from plastic bottles. These are frame fences, low decorative fences and permanent buildings. You can use any part of PET - the lid, bottom or middle part. In this case, the owner receives two benefits at once - getting rid of garbage and building an attractive fence.
To create a full-fledged fence, in addition to plastic bottles, you will need some auxiliary materials:
Short decorative fencing cope well with the task of fencing flower beds with vegetation.

Also, low fences made of plastic bottles are assembled for the purpose of marking and marking the territory. To create a mini-fence, PET is cut or inserted whole into the ground. The elements are placed one after another. The combination of colors allows you to create fancy designs. You can make a low fence from bottles cut into ribbons.
A light, simple fence is more of a decoration than a serious obstacle to hooligans. Its design requires a wire frame or wooden supports. A good option To create a frame PET fence, a chain-link mesh will be used.

When purchasing a mesh, choose a material with a cell size that matches the thickness of the cylinders. Fill the cells with bottles like a mosaic, creating ornaments and designs.
These are fences made of plastic bottles filled with cement or a clay-sand mixture. The process of creating structures is labor-intensive. Traditionally, it begins with marking the area and digging in pillars, maintaining a distance of 1 - 1.5 m. You can pour a foundation along the perimeter or do without it, having first cleared and leveled the ground surface.
The container is filled with cement or clay-sand mortar, then placed in rows like brick storage. Between levels they do cement pouring. The bottles are laid out with their bottoms facing out. Subsequently, they can be easily turned into flowers by dyeing.
Let's look at how to make a fence with your own hands from plastic bottles on poles and cross slats. PET in in this case Let's take one shape and color. Using screws, screw the plugs to the slats, and lubricate the threads on the neck with reliable glue, for example, “Moment”. Before the start of the so-called construction, we recommend stocking up on bottles at the rate of 5 PET per picket fence.

Make a fence from plastic bottles with your own hands according to our instructions:
If the frame is wooden, first the caps are screwed onto it, and then the bottles are screwed into them. Screws are used to secure the covers. The next block is placed on the bottoms of the cylinders. Another row of corks is laid on top, the elements of which are screwed both to the block and to the bottom of the bottle above.

About half of the polymer waste comes from plastic bottles. Considering their practicality (they completely decompose in nature in 70-80 years) and low cost, this is an ideal material to build a fence. A fence made from plastic bottles, made by yourself, will be an ideal addition to the landscape of your summer cottage. Minimal time costs and availability of raw materials make the polymer in demand. You and your neighbors will admire the result - spectacular and unusual decor building structures.
A fence made from PET containers does not carry a functional load. It acts as decoration or demarcation elements. land area. The cheapness of raw materials does not affect its positive qualities:
A self-made plastic fence has several significant disadvantages:

Weigh all the advantages and disadvantages of a fence made of polymer material, and you will decide on its functional necessity for a particular landscape.
The plastic type of fence is made from many elements - from lids to bottoms. The owners choose the parts of the bottle suitable for making a fence at their own discretion. Creative work, meanwhile, will solve problems with waste disposal and decorative design possessions. The following fences can be easily made from bottles:
You will have to work with big amount containers, so it’s easier to assemble or purchase it over the winter. 
To make a fence with your own hands from plastic containers, required:
A PET fence will solve the issue of recycling several hundred, and possibly thousands of pieces of waste.
There are many variations on how to make a fence from plastic bottles. Let's look at the most popular options for PET fences:
Helps to focus attention on certain objects, to delimit your area into several functional zones. Visual separation serves not so much a practical as a decorative purpose. Building a fence does not require much effort from the master:
To achieve the same type of construction, it is recommended to use polymer containers of identical sizes and shapes. 
The design is a sequence of connecting plastic bottles and units for fixing the container. The connecting element is steel wire. Height finished design the builder regulates independently. The distance between bottles varies from 2 to 2.5 m.
By stringing PET, it is easy to create a low border or a building the height of a person. To make the “seams” stronger, tie knots after threading the wire into the container.
A costly process in terms of time and raw materials, which is carried out in several technological steps:
The plastic fencing option has different purposes. You can use it to build not only a fence, but also a gazebo, curtains, and decorate the building. 
Represents monolithic structure, which will protect the territory from prying eyes. On preparatory stage you need to stock up on polymer bottles, wash them and compact them with sand. The actions are performed sequentially:
You can replace glue with screws. In this case, the used water container should be filled halfway. 
It is distinguished by reliability and durability. Execution algorithm construction work identical to the design of the rack:
A lot of effort and time is spent on the fence, but the result obtained - a reliable and durable fence more than compensates for it.
The unique design will not leave indifferent lovers of bright and enchanting decor. The fence can be made of randomly located covers, or selected according to the color scheme, following the contours of the pattern. A hedge will add completeness to the exterior and effectively decorate the garden space.
IN single design the covers are connected on a chain-link mesh, selecting the cell diameter to match the section of the cap. To determine the sequence and color range elements, it is recommended to use embroidery patterns. 
The monumental fence is characterized by a high degree of strength and durability. Before you begin technological work, it is necessary to prepare building material. Bottles are cleaned of dirt and dust.
The sequence of actions is simple even with minimal construction skills:
If desired, decorate the supporting supports for the fence with material that was not used. Plastic sheet will be relevant both for the fence and for making a gazebo. 
A fence made from plastic bottles with your own hands is an opportunity to achieve a unique fence and make your landscape fantasies come true. Depending on the type of fencing, it will perform a protective function, creating a separate comfort zone.


