Dinner table - an essential attribute of any dining room or kitchens, center of attraction for everyone families and in weekdays, and especially in holidays, when behind him are going relatives and friends. Therefore, the table must be comfortable, high quality and beautiful.
Large in stores today choice, but it’s much more pleasant to make a dining table with your own hands. Moreover, this is significant saving for the family budget.


 Materials that are used for the manufacture of dining tables, enough:
Each of them has their own pros, and so are the disadvantages.
 So you've decided do dining table on kitchen with your own hands. First of all, you need to decide dimensions future product so that it fits harmoniously into the interior.
You can take it ready-made drawing dining table, if indicated in it dimensions meet your requirements.
For example, consider manufacturing dining table made of wood.
This one is simple rectangular the table will have four legs Great look like in classic interior, and in Selecting the appropriate method finishing, you can make the dining table in or in

 Before assembling the table, prepare materials:
Note: The boards for the table top need polishing.
 necessary for making a dining table:
 Step 1. Making a table top. Boards trim first in width and then in length. Process surface plane. Sand the wood thoroughly until the table top is smooth. The edges must be well finished. If you do this, the boards will tight adjacent to each other.
Make identical marks on the edges of the boards, retreat 10–15 cm. Then drill out holes and apply into them carpentry glue. Plaster the edges. After which the choppers must be driven into the holes. Connect boards.


Excess glue must be removed emery paper. Level the joints between the boards with a plane, sand tabletop surface and edges.
Note: If you go over the countertop with a metal sponge, the wood will become more textured.


Step 3. Pairs of legs connected by short crossbars are fastened together long cross members.


Step 4. Drill into the long cross members holes. When the glue dries, install table top.

For more strength the structure can be strengthened with additional transverse bars or boards.

How to properly make a table from a metal profile:
 Definitely more before assembly need to antiseptic impregnation.
When the work is done and the table is ready, you need to take care of it finishing. First of all, choose color your product. It can be absolutely anyone. Best fit oak or walnut, these colors are considered classics.
Give the wood the desired shade and even imitate valuable wood species can be used with decorative stains.
For protection from moisture and giving presentable appearance need to cover the table several layers varnish Each layer must be dried thoroughly.
If desired, the tabletop can be decorate. For example, interesting and uncomplicated even for a beginner, it is applicable both for decorating a new product and for restoration dining table with your own hands.
How dining tables are made from wood, see video:
The dining table is important element kitchen interior. The design and dimensions of the kitchen table should allow the entire family to be seated at it, but at the same time not interfere with free movement. Available for sale big choice kitchen tables of various shapes, from domestic and foreign manufacturers. But if you have some carpentry skills, then it might make sense to make a table with your own hands, with your own design that will fit perfectly into the general interior kitchens.
In our article we will tell you how to make kitchen tables of different models, what tools and materials to use for this. Also at the end of the article, you can see unusual models of kitchen tables.
Despite the variety of table models and production methods, the set of tools used for making tools, with minor exceptions, remains the same:

Depending on the complexity of the table design, additional tools are included in the set.
The following materials can be used to make a kitchen table:
Often in the production of kitchen tables, a combination of two or more of the above materials is used. 
Kitchen table fittings include the following fastening and decorative elements:

Certain table models may include additional fittings not included in the list.
On the purchased laminated chipboard sheets, mark the parts of the table:
When making markings, take into account the fact that the table posts should be located 15-20 centimeters from the edge of the tabletop. 

At the second stage, you will need to trim the racks and crossbars of the table with a special tape:

Please note that gluing the trim tape is only required in visible places on the table parts.
A simple kitchen table made of chipboard is ready! 
You can also watch how to make a table from chipboard in the video:
The “book” table consists of the following parts:
A table of this design can be made from laminated chipboard, or from glued and edged timber. Also, metal parts are used to make the base.
Let's look at the process of making a table from laminated veneer lumber.

In order to make a tabletop from bars glued together, you need to have at least two racks with clamps on which you will form the tabletops. Stands and tabletops for a table made of laminated veneer lumber are made in the following way:
 Bars clamped with clamps
 Retractable legs for the “book” table are made in the shape of frames, where the lower crossbar is located 15-20 centimeters from the floor. To make a frame, you will need four bars with a cross section of 50x25 millimeters. The connection of the bars can be made using long screws, tenons and glue or confirmats.
 Table-book
 To highlight the beauty of the wood, cover the finished table with a clear varnish, if desired, pre-treating its surface with stain. To achieve a polished effect, you will need to apply several layers of varnish. 
How to make a “book” table, watch the video:
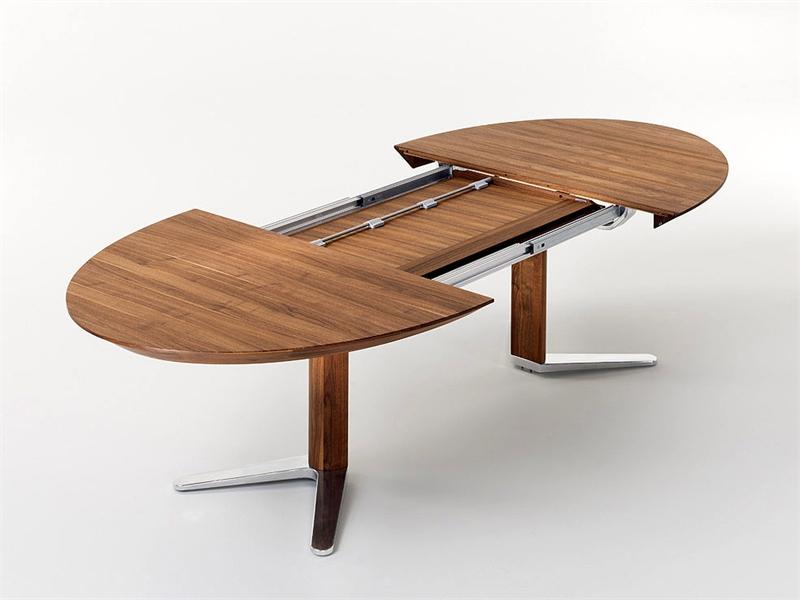
The sliding table has the function of increasing the surface of the tabletop by installing additional elements. This type of table is popular in small apartments, where the area of the home does not allow installing an ordinary large table.
In production extendable table from the following parts:
It is best to make an extendable table from a combination of chipboard and bars.
 Accessories for extendable table
The base for the sliding table is made of four narrow crossbars connected to each other by corner fastenings for the legs and a tray. To lighten the overall weight of the table, instead of laminated chipboard, you can use plywood 5 millimeters thick for the pallet. Also, instead of a pallet, manufacturers often use metal or wooden crossbars, which strengthen the structure and serve as storage for the middle tabletop.
The legs for the sliding table are made from four bars with a cross-section of approximately 50x50 millimeters, slightly beveled towards the bottom. A hole is made at the top of each leg for a mounting screw. The hole should be located on the inside. Don't forget to sand the legs with a plane and sandpaper.

Instructions for assembling the sliding table are also in the video:
If you have a very small kitchen and there is no way to install a regular kitchen table, then the solution to the problem can be the manufacture of a folding wall-mounted table. Its advantage is that when folded it takes up only 15-20 centimeters of kitchen space, and when disassembled it can easily accommodate two or three people for lunch.
The folding table consists of three parts:
You can make a table from plywood, bars, hinges and screws.
 Wall Table Parts
 If you have a tabletop, but you don’t want to make parts for a folding table by hand, then purchase folding brackets from the store. Bracket models are specially designed for wall mounting and are very inexpensive, ranging from 170 to 700 rubles.
 Wall bracket for table
 You can see another version of the kitchen table in the video:
To help you choose a kitchen table, we present you with photographs of the original models:


Now that you know everything about making tables, it won’t be difficult for you to make your own table for the kitchen!
Perhaps the main attribute of a room for eating - a dining room or kitchen - is the kitchen dining table. Choosing any furniture for small kitchen In a typical city apartment, you have to make a compromise between the free space in the room and the spaciousness and comfort of the furniture; this fully applies to the choice of table. It is not easy to find a small kitchen table with the desired shape of the tabletop in stores; custom-made ones promise considerable additional costs. There is a decent way out of the situation - making a table with your own hands.
For a room with an area of 6-8 sq.m., probably the most suitable tabletop size will be in the range from 800x500 mm to 1200x600 mm, with a standard height of 750 mm from the floor. The elongated shape of the tabletop - oval or rectangular - allows you to place the table along the wall, saving free space.
When making a kitchen table, it would be the right decision to use a factory-made material intended for the same purpose, namely a post-forming countertop made of chipboard. These countertops are covered with wear-resistant decorated plastic, used in the furniture industry in the manufacture kitchen sets, supplied in the form of sheets approximately 3 m long, 600 mm wide, 26 mm or 36 mm thick (standard). Postforming countertops have a low price. Their front overhang (end) has an aesthetic semicircular shape and is also covered with plastic. Standard fittings are available for them: end and connecting strips, edges for processing ends, couplers, etc.
There is no need to purchase a whole piece of kitchen countertop just for one third of its length. The required piece can always be found (purchased for a proportional fee) in furniture workshops, where they accumulate in large quantities as remnants from the production of kitchen sets. There, in the furniture workshop, you can immediately ask to cut the part on a format cutting machine to obtain a rectangular workpiece with the required dimensions.

Postforming type tabletop.
However, chipboard countertops have one feature - they have only one or two plastic-covered overhangs along the length of the canvas. For the table, we need to have all the ends processed (on all sides). For this reason, it will not be possible to directly (without processing the ends) use ready-made kitchen countertops. Moreover, you will have to cut off the front factory overhang. The open ends of the chipboard must be treated taking into account protection from water ingress, not forgetting the aesthetic appeal of the treatment. There are two main ways: apply (glue) a special edge tape or use PVC-based furniture edging. We will take the second path, as it is the most practical from an operational point of view and forgiving some minor mistakes of the master. We will use furniture edging with sides (girths), this will not only make the tabletop more solid appearance, but will also give additional protection. A piece of edging of the required length can be purchased at the store. furniture fittings. A T-shaped (with a central tenon) PVC edging with girths is required for chipboard with a thickness of 25 mm or 32 mm. When purchasing a 25-mm edge, you must first make sure that it can be put on a 26-mm end without any problems. The use of a 32nd edge is also quite acceptable and gives the tabletop a visually thicker edge.

T-edge with girths (sides) in section.
Another important point- legs (supports). Today there is a wide selection of both piece supports and ready-made bases for tables. The most common solution is a round leg with a height of 710 mm and a diameter of 60 mm. Legs of this type are collapsible, adjustable in height, have a low price, are easy to install, and come in several external coating options (shiny, matte, painted in various colors). If you need to transport or compactly store the table, it can be easily disassembled. Legs are also sold in specialized furniture stores. As a rule, the manufacturer packs them in packs of 4 pieces, unassembled. When purchasing a whole pack, the kit must include a hex key.


Set for making a table: a piece of kitchen worktop, four legs, edging.
What tools are needed for this have already been described in detail; we will not repeat ourselves; we will briefly list the main stages and dwell on some of the nuances.
Step 1. Apply markings. On the front (working) surface of the tabletop we apply markings with a pencil according to the design of the future table. All roundings must be made with a radius of at least 60 mm, in order to avoid changes in the color of the edging in places of sharp bends (depending on the edging manufacturer).


Applying markings for rounding corners on front surface rectangular blank.
Step 2. Give shape. According to the markings, leaving a small reserve of 2-3 mm, we cut off the excess. The jigsaw file must have the opposite (reversible) direction of the teeth (see article about), in order to avoid chipping the plastic coating, even though the edge with its girths can partially hide small chips in the cut. Use a belt sander to ensure that the contours of the table top exactly match the markings.


Cutting corners with a jigsaw and final finishing with a belt sander.
Step 3. Mill the groove. Depending on whether the edging is used exactly along the width of the tabletop (25 mm) or larger (32 mm), the groove is milled exactly in the center of the end, or with an offset. The exact milling parameters are calculated after measuring the geometry of the edge used with a caliper. In the absence of a “native” cutter with which you can make the required groove width in one pass, you can perform multi-pass milling using a cutter with a smaller tooth height.


Measuring the edge with a caliper: the internal width and thickness of the tenon.


Milling a groove for a 32 mm edge in a tabletop 26 mm thick (the groove is offset downward relative to the center of the end).
Step 4. Stuff the edging. Before filling the edging, the end of the tabletop must be coated silicone sealant. It will not be superfluous to put the sealant in the groove, and also apply it to the upper edge (girth) of the edge, directly adjacent to the working surface of the tabletop. This will ensure maximum protection against water penetration. The edging is stuffed with a rubber mallet, starting from the place where the joining seam will be least noticeable. After completing the stuffing, accurately join the ends of the edging using a sharp knife. The last operation will be to remove from the surfaces of the tabletop any excess sealant that was squeezed out during packing. The tabletop is ready.

Applying sealant to the chipboard end. It is enough to apply only to the upper half, which is above the groove.


Edge padding. When securing the tabletop using struts (as in the photo), you need to take care of the spacers under the tabletop to prevent damage to the lower, protruding edge of the edge.

Step 5. Attach the legs. To attach the legs (more precisely, their cast holders), on the underside of the tabletop we apply pencil markings in the form of two perpendicular lines at the location where each holder is attached. Usually, good option is to install the legs at a distance of about 100 mm from the edge of the tabletop (see photo). The holders can be secured with self-tapping screws 20-25 mm long with a countersunk head. All that remains is to put the legs on the holders, securing them with a hex key, and the dining table for the kitchen is completely ready to use.

Markings for attaching leg holders.


The table is ready.

Table option with an oval tabletop.
The design of a kitchen table made from a postforming table top is simple, unpretentious, accessible for self-production, and reliable. However, it must be remembered that if handled carelessly - a strong blow to the leg in the side direction - there is a possibility of breaking the holder, made of a relatively brittle alloy. With careful handling and proper care, the table will last for many years.
The kitchen table is the same age as the kitchen itself. Probably even older than her: in parking lots and settlements primitive people large flat stones were found near the hearths, which served as cutting, distributing and dining tables; they contained remains of food and food. In this article we will look at how to make a kitchen table with your own hands completely at home. This will not only allow you to save a certain amount (in general, not ruinous), but will also provide an opportunity to acquire initial skills carpentry work, which may turn out to be much more significant in the future. The most common types are used in kitchen tables furniture joints, but its design forgives rather serious flaws in operation. There are also great-looking types of kitchen tables, for the manufacture of which it is enough to be able to saw off a piece of board and tighten a screw.

A table in the kitchen also provides considerable opportunities for creative self-expression: much less skill is needed here than imagination, and failure will not ruin the entire interior. The samples of original kitchen tables in the photo below are quite accessible for making with your own hands, but first you need to get a feel for the design and material on basic level This is what we will try to help the reader with.

There are at least 15 different ways to make a kitchen table, including artistic forging and casting from homemade artificial marble. However, firstly, we will limit ourselves to kitchen tables made of wood, as a material that allows us to obtain the desired result with at the lowest cost labor, money and time.
Secondly, we will deal with tables with rectangular or rounded corners. A round table requires 1.6-2.2 times more usable area than rectangular for the same number of eaters. Moreover, the first meaning refers to the case when the hostess is deprived of a free approach to him and must be served over the shoulder of the person sitting. This already falls into the category of parodies of the rules good manners. Like, how should you tilt the plate when finishing the soup: towards you or away from you? Answer: depending on what you want to pour on yourself or the tablecloth. Besides, round table in a small kitchen, a stronger rectangular one of the same capacity is wedged into the so-called. functionality triangle, see below.
The height of the kitchen table is normal, 700-780 mm, counting from the floor to the top surface of the tabletop. For people of average height, the optimal table height is 750-760 mm. But with the dimensions of the kitchen table in plan, the situation is more complicated.
The essence is in the same triangle of functionality: refrigerator-sink-stove. Ideally, it should be rectangular isosceles with legs of 1.2-1.6 m. However, the ergonomics of the kitchen is spoiled much more than a slight deviation from these proportions by wedging the dining area into the hypotenuse. Simply: the hostess bent over the sink or stove and pressed her seductive forms against her husband’s cheek just when he brought the spoon to his mouth. Therefore, it is advisable to make the table in the kitchen, especially of economical layouts, smaller, as long as it is comfortable for the eaters.
Minimum permissible sizes family kitchen table in plan is considered to be 600x900 mm. For single people, let's say a table is 450x750 mm, like in railway cars. In this case, in a “micro-kitchen” or kitchen area of a small-sized one-room apartment, it is also permissible to make it a wall-mounted folding one, see below. But optimal sizes kitchen table tops are considered (650-800) x (1100-1400) mm, depending on the available usable area and the build of the users.
Traditional kitchen table - on the base, pos. 1 in Fig. The underframe is the supporting frame of their boards placed on edge - the tsar. The drawers can be tightly fastened to the table legs, and the tabletop can be placed loosely on them; those. its fastenings only prevent horizontal displacement. This kitchen-sized table is simpler in design and stronger, but it is more difficult to bring in/take out, especially if the passage to the kitchen is narrow. The second option is that the drawers are tightly fastened to the tabletop, and the legs are detachable. In this case, the tabletop needs to be durable and not made of anything suitable for use. case, the material, and the design is more complicated. But there are no problems with bringing in/out. Both of these options for a classic kitchen table will be discussed in more detail below.

The table on the base can also be artistically designed, pos. 2. Making an artistic kitchen table is not as difficult as it might seem. The basis of its design - turned shaped legs - can be easily obtained from commercially available railing balusters (see below). For a novice craftsman who knows how to use a jigsaw, a figured sawed-off drawer does not pose a problem. What remains is a molding - a shaped chamfer on the lower edges of the drawers. You can rent a manual one for it. milling machine with a cutter of the profile you like, with it the work itself on setting the molding takes less than an hour plus 10-15 minutes of training on some kind of cutting.
No less common in kitchens are tables of beam construction, pos. 3. Even in their simplest design (see 2 options below) they are more attractive than tables with a base. However, to complete them in a high-end design (item 4) requires well-equipped carpentry and solid manufacturing skills. Beam tables require more material, but they undeniable advantage– they can be made completely collapsible without tools (also see below).
Tables with a load-bearing tabletop without an underframe (item 5) are also very often found in kitchens. In factory version this is perhaps the most cheap look kitchen tables good quality. A set of legs for such a table + a postforming tabletop (see below) will cost about 2,500 rubles, and assembly will take at most half an evening. But when completely self-production With such a table, a beginner will encounter some significant nuances, see below.
Tables-books, they are also tables-pedestals, pos. 6, initially created a sensation due to its compactness when folded and the ability to be used in a half-fold version, but then there was a period of some disappointment. Firstly, no matter how you sit at such a table, your legs feel uncomfortable. Secondly, in the first samples, the rotary support lock was the simplest, consisting of a pair of 50x20 bars, attached with a gap equal to the thickness of the support to the underside of the tabletop. The outer faces of the bars were often removed with a wedge so that the support would not cling to them when unfolding the table. However, if you accidentally pry the tabletop with your knee, the lock is immediately released. Therefore, such tables could not do without a hodgepodge of cutlets and mashed potatoes on the trousers and the floor, and a reliable and easy-to-use mechanical lock turned out to be very complex and expensive. Nevertheless, both amateur craftsmen and serious manufacturers are improving this, in principle, very promising design, which will be the subject of a special section in this publication.
Wall-mounted folding tables (item 7) are rarely found in very tiny kitchenettes. Most often - among busy bachelors who are accustomed to doing everything while standing, even sleeping on the carpet in front of their bosses, because... have all the disadvantages of book-tables with virtually no room for improvement. Serving tables (item 8) are used much more often on the farm, but this is a separate class of furniture with its own specific qualities and manufacturing technology, so here we will limit ourselves to just mentioning them.
The kitchen table, firstly, is made from wood species or materials that are little or not subject to shrinkage when dried: oak, hornbeam, wenge, laminated chipboard, MDF. Ordinary industrial wood in a kitchen atmosphere with its fluctuations in temperature, humidity and organic vapors in the air begins to warp and crack after 5-7 years, even if impregnated and varnished. On the other hand, the dimensions of the kitchen table are small. This leads to some features of its manufacture, which ultimately make it possible to simplify the work.
This is the main detail of any table. For a homemade table in the kitchen best option– buy a ready-made postforming countertop; they are available in a wide range of colors, textures and sizes. Postforming is a profiled laminated chipboard with rounded edges, finished to look like wood or other material. The advantages of postforming in relation to a kitchen table are as follows:

Postforming is good technologically for simplicity and speed of work. But countertops made from boards, the so-called, look much more solid. solid wood or furniture panels. Joining boards into an array is quite delicate and painstaking work; for this purpose, special devices are used - clamps. If you want to try your hand at making furniture from solid wood, we offer a selection of videos:
In the last video, the material is junk, but you can achieve the look - cool oligarchs will salivate.
Traditionally wooden furniture going on the dowels. The dowel connection is invisible and cheap; Just in case, let us remind you what it is and how it is done, see fig. To connect wooden parts, wooden dowels are used, which dry out along with the connected parts; The laminated chipboard, which practically does not dry out, is connected with plastic dowels. Corner plastic dowels are rarely used, because... often break. Connections with wooden dowels are usually glued.

It is often difficult for novice craftsmen to achieve accurate markings for the dowel connection. Tricks, such as marking with bitten nails (item 4 in the figure), do not always help, and it is impossible to remake an incorrectly marked dowel connection; both parts go to waste. Therefore, it is better for beginners to assemble their first products using Euro-furniture screws - confirmed ones. This is more expensive, but does not require special skills, because... the confirmation hole in both parts, compressed with a clamp, is drilled in one go, see fig.

Parts made of laminated chipboard or dense thin-layer wood, connected with confirmats, last for many years. All the designs described below can be assembled both on dowels and on confirmations. However, in the latter case, the following rules must be observed:
In practice, it is not difficult for even a perfect “teapot” to fulfill these conditions:

And a little more about dowels. It is best to place a detachable (freely applied) tabletop of a classic kitchen table on them. Incl. and for such purposes, plastic dowels with a round head or dowels with a head and different types of corrugation on the long recessed and short protruding parts are produced, see fig. on right. Thick tabletops are attached first, approx. from 20 mm; the second ones are thinner.
Classic tables on the underframe along with the legs (item 1 in the figure) are traditionally connected (assembled) using tongue-and-groove joints, which is quite complex and labor-intensive. Modern instrument– a drill with a twist drill for wood and a screwdriver – in combination with legs, the section of the heads of which is not less than 60x60 mm (for balusters the heads are usually from 100x100 mm), allows for a kitchen table with plan dimensions of up to approx. 750x1500 mm can be made by connecting with wood screws at an angle, pos. 3. In any case, the outer sides of the drawers should be 1.5 cm away from the outer surfaces of the heads of the legs, this is necessary for overall strength. The minimum permissible height of the kitchen table drawers is 120 mm; thickness – 30 mm.

It is highly advisable to reinforce the connection with oblique screws with diagonal ties in the corners (item 4, above) from the same board as the drawers. If the tabletop is not intended to be removed unless absolutely necessary, then the labor-intensive installation of it on dowels can be abandoned. Then, at the corners of the finished supporting frame, scraps of the same board - crackers - are cut into the drawers and the tabletop is attached to them from the bottom with self-tapping screws, pos. 4 below.
Tabletop classic table with detachable legs should be at least 24 mm thick (chipboard, plywood) or 30 mm thick (solid wood). Countertops made from other materials, e.g. artificial stone, suitable for tables on the base along with the legs, are not applicable here. Due to the large difference in thermal expansion modules between them and wood, the table will soon become loose.
Next, the drawers are attached to the tabletop with long confirmations right through the end, on the left in the figure, with sizing with wood glue or PVA. It is difficult to achieve accurate assembly using ordinary wood screws, because... they are without a neck to keep the joint from moving.

The next point is that jibs in the corners (also in the figure) are required, wooden mortise ones or ready-made steel overhead ones. The legs are attached at the corners in the usual ways, on the right in Fig.
A drawer is a classic structural module of a classic kitchen table. The guides for the table drawer are the same as for the drawers of the bedside table, chest of drawers, and closet. Since a large weight load is not expected in this case, and the smooth movement of the drawer and the ability to fully extend it are not of great importance, you can use inexpensive roller guides on which the keyboard boards of computer desks run.

The structure of a furniture box is shown on the left in Fig. It is not necessary to assemble its tray the old fashioned way on a box tenon (on the right in the figure); you can use self-tapping screws into the ends of the boards. The thickness of the boards for the drawer sides is 12-20 mm. The plywood bottom is often fastened with a furniture stapler, but this is not entirely reliable. It is better to attach it with self-tapping screws through the cranial bars along the contour of the bottom. The front of the drawer can overlap the front side of the table or fit flush into it, it doesn’t matter.
To install the drawer in the table, an opening is cut out in the longitudinal front drawer according to the cross-sectional dimensions of the drawer tray, plus allowances on the sides for the guides (indicated in the specifications for them), plus another 3 mm along the contour. Then the side support boards are installed to secure the guides. They are attached to the longitudinal frames from the inside using backing bars. There is no need to fasten it to the tabletop; it will become loose. Next, the box is assembled, attached to it and to the supporting boards, respectively. the guide parts push the drawer into place, that's all.

A completely simple, but good-looking kitchen table with a classic look can be made on a supporting frame made of boards, see fig. on right. Its length, if the drawer section is at least 120x20 mm, can be increased to 1100 mm. Tabletop – any weight up to 15 kg. The angle of inclination of the legs from the vertical is 15-20 degrees, this is one fundamental point in this design. The second is transverse ties made of 50x15 timber, they give the entire structure the necessary rigidity. So, although this table looks classic, in fact it is already a beam table.
Drawings of a pair of kitchen tables with a beam structure are given in Fig. Above - completely collapsible without tools. The tabletop is structurally any, placed on dowels, although the style of this table (rustic) is fully consistent only with a tabletop made of solid wood. A variant of its fastening from the underside without dowels on cranial bars is shown in the inset in the center on the right.

In this product, a beginner may find the bottom bandage (longitudinal tie) with a beveled through groove for the wedge to be a stumbling block. In fact, everything is very simple: the bottom bandage is assembled with glue from 3 layers of 10 mm plywood or boards. How to make beamed kitchen tables of this type, you can watch the following video:
Factory-made kitchen tables without bases are usually produced with postforming countertops, pos. 1 in Fig. Those who want to make something similar on their own for a wooden tabletop will encounter the following tricks.

First, a table stand is still needed, because wooden beam from 50x50, pos. 2. The fact is that mechanical stress in boards always flows to the corners, where they are distributed very unevenly. But the wood under all 3 fastening points of the leg frame must be tensioned approximately equally, otherwise the fastening will loosen on its own. Timber piping expands the fan of stress in a given place to an acceptable value, but it is impossible to replace continuous piping with corner pads; they will be of no use.
The second is the material of the countertop. The standard threaded sockets for mounting the leg clips (item 3) are designed for laminated chipboard or dense, fine-grained wood. If the tabletop is made of pine, etc. layered rather soft wood, then the nests can, having torn the layers, crawl back out already during the installation of the clips. And the probability that this will happen when someone accidentally pushes the table is close to 100%
And the third is the leg clips themselves. In cheap sets of parts for tables without tabletops from “alternative” manufacturers, they are most often made of silumin, pos. 4. And silumin, as you know, is very, very fragile. In general, if you like such tables, it will be easier to buy a ready-made one with a guarantee. Most likely, and cheaper than assembling a kit for self-assembly at retail.

The disadvantages of the table-book of the original design (see figure on the right) have already been mentioned above. In Fig. Below is a drawing of the design of a table-book (conventionally, only one rotary support is shown without the wings of the tabletop), which eliminates them in an amateurish, but effective manner. Simply, the width of the rotary support is reduced by more than half compared to the wing span of the tabletop (350 and 720 mm, respectively). Now the support rotates 90 degrees, so you can sit comfortably as you wish. The support, located in the working position along the longitudinal axis of the tabletop, holds it even better than an oblique one, and in order to lift the tabletop until the upper support bar comes out of the simplest clamp (see above), you need to raise your knees so that it will be very uncomfortable for yourself. Overall stability is ensured by the legs of the cabinet section, which must be made as long as possible, but not less than 600 mm. Otherwise, the swivel supports must be brought down in height to the floor level.

A fundamentally similar solution was used in the wall-mounted folding table (items 1 and 2 in the next figure), but here the bevel of the hanging corner of the support contributes to operational reliability. Which is quite applicable in the previous one. case: there are no contraindications for performing that support in the form of a trapezoid converging downward.

A proprietary solution to the problems of a book-table is removable legs stored in the cabinet. Installing them is not much more troublesome than catching the latch on the tabletop with a rotating support. Such a table-book is, of course, more expensive, but its operational reliability is complete: there is no latch, because it's simply not needed.
The next step in the evolution of the book-table is a design with a larger cabinet and one leg on each wing of the table top. There are half as many legs, which means the whole table is cheaper. Its stability has only increased due to the expansion of the cabinet, it is generally comfortable to sit, and there is more space in the cabinet (which is always in short supply in the kitchen).
Consumers liked such kitchen tables so much that they were already given the nickname - Cheburashka table. Probably, remembering from the cartoon: “Here, we built, built, and finally built it.” A folding kitchen table as it should be.
If your kitchen is combined with a living room or you plan to combine them, then you don’t need to think about a kitchen table; it’s better to replace it with a column. You can not only drink at the bar counter, you can also eat there. The point of such a replacement is that at least half of the dining area goes beyond the kitchen, and the rest is used sporadically and does not wedge itself into the functional triangle. Result? See fig. It’s more convenient to work and dine in a 5-measure kitchenette with a bar counter, which separates the apartment’s zones, than in 8-9. meter kitchen Brezhnevka Don't believe it? Let's do the math.

The kitchen table does not stand on its own. To plant the eaters, you need to add 400 mm along the contour, and another 300-350 for the approach. As a result, a 900x600 mm table requires approx. 2.5 sq. m of “living space”, and the table is 1200x700 mm and all 3.5 sq. m. Shove such a thick piece into the kitchen regular sizes without crushing the soft-boiled functional triangle is very, very difficult. Here, even if two people sit at the counter from the kitchen side, the functional triangle is not disturbed, and the hostess is within easy reach of everything.
One of the famous culinary experts once said: “The kitchen is conservative, like the digestive tract.” Here, of course, he bent and overdid it. Something like a stove, refrigerator, food processor and the microwave is not found in our stomachs, although the kitchen is really conservative. But even in the most conservative sphere, at some point there comes a time that requires fundamental changes.
Arranging a summer house is a constant process. Either you build something or improve it. Moreover, furniture is constantly needed and tables are most in demand in the country. And put it in the garden, and near the house, and also in . We will tell you how to make a table for a summer house with your own hands in this article using the example of ready-made projects.
The material for this table was disassembled pallets. Naturally, you can use new boards. There is only one condition - they must be dry. You can buy dry ones (this costs more) or buy regular ones, put them somewhere in ventilated stacks and keep them for at least 4 months, or better yet, six months. In general, any furniture, including, is made from dry wood.
We are assembling a table for the street - to put it in a gazebo, so we will not glue the boards of the tabletop, but will fasten them from below, using planks. It's very simple country table and very cheap.
Having disassembled the pallets, we get boards with individual colors and patterns. Having worked a little magic, rearranging them several dozen times in different ways, we achieve the required result. It turns out to be quite a nice tabletop.
Take the side parts of the pallet. We use them for the table frame. We first sand them with coarse sandpaper, then fine sand them to the required smoothness (grain 120 and 220).

We take the planks that remained unused and use them to fasten the tabletop. We place them in the place where the joints of the boards are located. We use two screws to fasten each board with a joint, and one for a solid one.
From the treated sidewalls and two boards (also sanded) we assemble the table frame. We fasten its parts with self-tapping screws at the end (two for each joint). The frame can be glued or also “planted” on self-tapping screws. Only they are long. For each, we pre-drill holes with a drill whose diameter is slightly smaller than the diameter of the screws.

We turn the assembled tabletop over and sand it. The procedure is the same - first use sandpaper with coarse grains, then with fine grains.
Next is installing the legs. We select four boards of the same size, check their length, and adjust if necessary. Then - sanding again. This is easier than sanding the legs that are already screwed on. We screw the sanded boards to the frame. These will be the legs. For each there are two self-tapping screws, fixed diagonally (look at the photo). For greater stability, we install jumpers at the bottom. You can leave about 10 cm from the floor to the lintels. We connect everything with self-tapping screws, so that the boards do not crack, we pre-drill holes.


After removing the dust, varnish again. In theory, the varnish should lie flat, but it depends on the wood, so another sanding/painting cycle may be needed. As a result, we get this homemade country table.

If you don’t like mismatched boards and traces of old nails, you can make the same design into boards. This table can be rectangular, or square. All sizes are arbitrary - please see the space available.
This DIY garden table is assembled from leftover boards different breeds and sizes. Pine boards 25 mm thick and 50 mm wide were used for the tabletop frame, and 15*50 mm leftovers for the legs. We make the frame according to the dimensions you need. This table will stand on the veranda, which is small in width. So let's make it narrow - 60 cm, and length 140 cm. The height of the legs is 80 cm (everyone in the family is tall).

Immediately cut two long boards of 140 cm each. To make the tabletop width 60 cm, subtract twice the thickness of the board used - this is 5 cm. Short bars should be 60 cm - 5 cm = 55 cm. Fold the frame, following right angles, twist with self-tapping screws. We check whether the bars are folded correctly - we measure the diagonals, they should be the same.
We cut the boards into four 80 cm boards and attach them from the inside to the assembled frame. You can use 4 screws for each leg.

At approximately the middle of the height of the legs we attach the crossbars. This is a frame for a shelf. The shelf can be used for its intended purpose, and it also increases the rigidity of the structure. We fasten strictly at right angles, checking with a large square.

We put the frame on the floor and check whether it wobbles or not. If everything is done correctly, it should stand rigidly. Next, take sandpaper or a sander and sand.
Let's start assembling the tabletop. From finishing works There were boards of different types of wood left, some painted with stain. We alternate boards of different colors.

We fasten the tabletop boards with finishing nails, carefully finishing them off with a hammer. You can secure it to the shelf with regular nails or self-tapping screws. Then we smooth it out with a sander. The last stage is painting. Very unlucky with the choice of varnish. We bought it too dark and didn’t like the look. I'll have to sand it again and paint it a different color.

This design features L-shaped legs. They are assembled from boards of the same thickness. In this case 20 mm. In order for them to hold well, 5 self-tapping screws are needed. We pre-drill holes with a drill with a diameter 1-2 mm smaller than the diameter of the screws. Then, using a drill of a larger diameter, we drill recesses for the caps. The diameter can be matched to furniture plugs of a suitable color or made from a wooden rod. Another option is to use wood putty, to which you add wood dust that remains after sanding. After drying and sanding, the marks will be difficult to find.

When assembling the legs, you must ensure that the angle is exactly 90°. You can choose timber as a pattern. First, coat the joint of the two parts of the leg with wood glue, then install the screws in next sequence: first the two extreme ones, then the middle one, and only then the other two. After the glue has dried, we sand the legs, varnish them and dry them.

It's time to make the tabletop. We assemble it from boards of the same thickness. We select the size as needed. You can use fragments of different widths. It is only important that everything looks organic, and that the sides of the boards are smooth and fit together without gaps.
Coat the sides of the boards selected for the tabletop with glue and lay them on flat surface(some kind of table) and tighten it with clamps. In this case, we got by with one, but preferably at least three. We tighten it so that there are no gaps in the resulting shield. Leave it for a day. Having removed the clamps, we get an almost finished tabletop. It still needs to be trimmed - to align the edges, and then sand it. You can trim with a jigsaw or a regular handsaw. It's difficult to get a straight line using an angle grinder, but you can try. After sanding we get a beautiful tabletop.

Using the same technique, you can make an oval or round tabletop. You just need to draw the appropriate line and trim the glued boards along it.
To make the table look more attractive, we will make a frame. We take a thin strip, sand it with sandpaper and fasten it around the perimeter of the tabletop. You can also use finishing nails. Only we also first coat the planks with wood glue, and then with nails.

After the glue has dried, we sand the joint again with sandpaper.

Now you can attach the table legs. We assemble a table frame from four boards (there is no photo, but you can do it as in the previous paragraph). We attach it to the back side of the tabletop with glue, then install furniture confirmations through the tabletop. A preliminary hole with an extension for the cap is drilled for the confirmations. The holes for fasteners are masked in the same way as on the legs.
We attach the legs to the fixed frame. We place them inside the frame. You can attach it with regular self-tapping screws. That's it, we made a table for the garden with our own hands.

For this table we used 38*89 mm boards (we unraveled them ourselves), but you can take standard sizes. A difference of millimeters will not greatly affect the results. In the photo below you can see what should happen.

To connect the parts, 16 cm long studs with washers and nuts (24 pieces) were used. All other connections are made with nails 80 mm long.

The parts are installed in place, a through hole is drilled with a drill. A stud is installed in it, washers are put on both sides and the nuts are tightened. Everything is tightened with a wrench. Why is this option convenient? For the winter you can disassemble it and take it to a barn or garage.

We cut the boards according to the drawing required size. Everything is needed in double quantities - for two seats. We sand the boards, pay special attention to the ends.
The short sections that we use to fasten the three boards of the seat along the edges are cut at an angle of 45°. First, we assemble the structure that is attached to the seat from below. We take a board about 160 cm long, and attach two short boards sawn at an angle to the end of it. You need to attach it so that this board is in the middle.

Then we attach the legs to the resulting structure (you can use nails). Then we add more boards cut at an angle and tighten everything with studs and bolts.
We attach the seat boards to the resulting structure. Since this is an outdoor table, there is no need to knock them together closely. Leave a gap between two adjacent ones of at least 5 mm. We nail it to the supports (which have been sawn down), two for each board.

We fasten the finished seats using four boards 160 cm long. We fasten each leg with hairpins (if you walk, you can put two hairpins, installing them diagonally or one above the other).

The table is assembled according to a different principle. Please note that for the tabletop, the transverse boards along the edges are cut at 52°. We attach them at such a distance that the legs fit in. 2 nails for each board. You can use finishing ones, with small heads, or you can drive them deep and then mask the holes with putty.

Now we need to assemble the cross legs. We take two boards, cross them so that the distance between their ends is 64.5 cm. We outline the intersection with a pencil. At this point you will need to remove the wood to half the thickness of the board.

We make the same notch on the second board. If you fold them, they turn out to be in the same plane. We connect with four nails.

We make the second leg for the table in the same way. We are not assembling the table yet.
Now you need to attach the legs to the structure on which the benches are installed. We place them at an equal distance from the benches and fasten them with pins.


Now we install the tabletop. We also fasten it with pins. The last stage is painting. Here everyone does as he pleases.
According to this drawing, you can make separate benches and a table for a summer house or garden. The design is reliable and simple to implement.


