How to make a country table
Arranging a summer house is a constant process. Either you build something or improve it. Moreover, furniture is constantly needed and tables are most in demand in the country. And put it in the garden, and near the house, and also in the gazebo. We will tell you how to make a table for a summer house with your own hands in this article using the example of ready-made projects.
The material for this table was disassembled pallets. Naturally, you can use new boards. There is only one condition - they must be dry. You can buy dry ones (this costs more) or buy regular ones, put them somewhere in ventilated stacks and keep them for at least 4 months, or better yet, six months. In general, any furniture, including garden benches. made from dry wood.
We are assembling a table for the street - to put it in a gazebo, so we will not glue the boards of the tabletop, but will fasten them from below, using planks. This is a very simple country table and very cheap.
Having disassembled the pallets, we get boards with individual colors and patterns. Having worked a little magic, rearranging them several dozen times in different ways, we achieve the required result. It turns out to be quite a nice tabletop.
We assemble a tabletop from boards
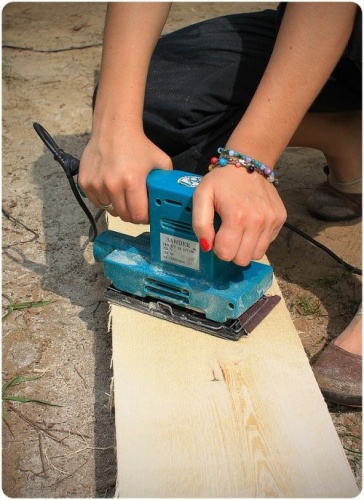
Take the side parts of the pallet. We use them for the table frame. We first sand them with coarse sandpaper, then fine sand them to the required smoothness (grain 120 and 220).

The side slats will go to the sides of the table
We take the planks that remained unused and use them to fasten the tabletop. We place them in the place where the joints of the boards are located. We use two screws to fasten each board with a joint, and one for a solid one.
From the treated sidewalls and two boards (also sanded) we assemble the table frame. We fasten its parts with self-tapping screws at the end (two for each joint). The frame can be glued or also “planted” on self-tapping screws. Only they are long. For each, we pre-drill holes with a drill whose diameter is slightly smaller than the diameter of the screws.

The tabletop is almost ready
We turn the assembled tabletop over and sand it. The order is the same - first sandpaper with large grains, then with small grains.
Next is installing the legs. We select four boards of the same size, check their length, and adjust if necessary. Then - sanding again. This is easier than sanding the legs that are already screwed on. We screw the sanded boards to the frame. These will be the legs. For each there are two self-tapping screws, fixed diagonally (look at the photo). For greater stability, we install jumpers at the bottom. You can leave about 10 cm from the floor to the lintels. We connect everything with self-tapping screws, so that the boards do not crack, we pre-drill holes.


The DIY garden table is almost ready. All that remains is to coat it with varnish
After removing the dust, varnish again. In theory, the varnish should lie flat, but it depends on the wood, so another sanding/painting cycle may be needed. As a result, we get this homemade country table.

DIY garden table ready for use
If you don’t like mismatched boards and traces of old nails, you can make the same design into boards. This table can be rectangular, or square. All sizes are arbitrary - please see the space available.
This DIY garden table is assembled from leftover boards different breeds and sizes. Pine boards 25 mm thick and 50 mm wide were used for the tabletop frame, and 15*50 mm leftovers for the legs. We make the frame according to the dimensions you need. This table will stand on the veranda, which is small in width. So let's make it narrow - 60 cm, and length 140 cm. The height of the legs is 80 cm (everyone in the family is tall).

Assembling the frame, attaching the legs to it
Immediately cut two long boards of 140 cm each. To make the tabletop width 60 cm, subtract twice the thickness of the board used - this is 5 cm. Short bars should be 60 cm - 5 cm = 55 cm. Fold the frame, following right angles, twist with self-tapping screws. We check whether the bars are folded correctly - we measure the diagonals, they should be the same.
We cut the boards into four 80 cm boards and attach them from the inside to the assembled frame. You can use 4 screws for each leg.

Making jumpers for the shelf
At approximately the middle of the height of the legs we attach the crossbars. This is a frame for a shelf. The shelf can be used for its intended purpose, and it also increases the rigidity of the structure. We fasten strictly at right angles, checking with a large square.

We put the frame on the floor and check whether it wobbles or not. If everything is done correctly, it should stand rigidly. Next, take sandpaper or a sander and sand.
Let's start assembling the tabletop. From finishing works There were boards of different types of wood left, some painted with stain. We alternate boards of different colors.

We fasten the tabletop boards with finishing nails, carefully finishing them off with a hammer. You can secure it to the shelf with regular nails or self-tapping screws. Then we smooth it out with a sander. The last stage is painting. Very unlucky with the choice of varnish. Bought too dark appearance didn't like it. I'll have to sand it again and paint it a different color.

Homemade table for the cottage is ready
This design features L-shaped legs. They are assembled from boards of the same thickness. IN in this case 20 mm. In order for them to hold well, 5 self-tapping screws are needed. We pre-drill holes with a drill with a diameter 1-2 mm smaller than the diameter of the screws. Then, using a drill of a larger diameter, we drill recesses for the caps. Diameter can be matched to furniture plugs suitable color or make them from a wooden rod. Another option is to use wood putty, to which you add wood dust that remains after sanding. After drying and sanding, the marks will be difficult to find.

Legs with markings for fasteners
When assembling the legs, you must ensure that the angle is exactly 90°. You can choose timber as a pattern. First, coat the joint of the two parts of the leg with wood glue, then install the screws in next sequence: first the two extreme ones, then the middle one, and only then the other two. After the glue has dried, we sand the legs, varnish them and dry them.

Table legs are ready
It's time to make the tabletop. We assemble it from boards of the same thickness. We select the size as needed. You can use fragments of different widths. It is only important that everything looks organic, and that the sides of the boards are smooth and fit together without gaps.
We coat the sides of the boards selected for the tabletop with glue, lay them on a flat surface (some kind of table) and tighten them with clamps. In this case, we got by with one, but preferably at least three. We tighten it so that there are no gaps in the resulting shield. Leave it for a day. Having removed the clamps, we get an almost finished tabletop. It still needs to be trimmed - align the edges, and then sand it. You can trim with a jigsaw or regular hand saw. It's difficult to get a straight line using an angle grinder, but you can try. After sanding we get a beautiful tabletop.

Gluing a tabletop from boards
Using the same technique, you can make an oval or round tabletop. You just need to draw the appropriate line and trim the glued boards along it.
To make the table look more attractive, we will make a frame. We take a thin strip, sand it with sandpaper and fasten it around the perimeter of the tabletop. You can also use finishing nails. Only we also first coat the planks with wood glue, and then with nails.

We fasten the bar around the perimeter
After the glue has dried, we sand the joint again with sandpaper.

This is what the finished tabletop looks like
Now you can attach the table legs. We assemble a table frame from four boards (there is no photo, but you can do it as in the previous paragraph). We attach it to the back side of the tabletop with glue, then install furniture confirmations through the tabletop. A preliminary hole with an extension for the cap is drilled for the confirmations. The holes for fasteners are masked in the same way as on the legs.
We attach the legs to the fixed frame. We place them inside the frame. You can attach it with regular self-tapping screws. That's it, we made a table for the garden with our own hands.

The board table is ready
For this table we used 38*89 mm boards (we unraveled them ourselves), but you can take standard sizes. A difference of millimeters will not greatly affect the results. In the photo below you can see what should happen.

To connect the parts, 16 cm long studs with washers and nuts (24 pieces) were used. All other connections are made with nails 80 mm long.

We connect the table parts together with studs, washers and nuts.
The parts are installed in place, a through hole is drilled with a drill. A stud is installed in it, washers are put on both sides and the nuts are tightened. Everything is catching up wrench. Why is this option convenient? For the winter you can disassemble it and take it to a barn or garage.

Drawing of a bench with dimensions
We cut the boards according to the drawing required size. Everything is needed in double quantity - for two seats. We sand the boards, Special attention pay attention to the ends.
The short sections that we use to fasten the three boards of the seat along the edges are cut at an angle of 45°. First, we assemble the structure that is attached to the seat from below. We take a board about 160 cm long, and attach two short boards sawn at an angle to the end of it. You need to attach it so that this board is in the middle.

Bottom seat support assembly
Then we attach the legs to the resulting structure (you can use nails). Then we add more boards cut at an angle and tighten everything with studs and bolts.
We attach the seat boards to the resulting structure. Since this is an outdoor table, there is no need to knock them together closely. Leave a gap between two adjacent ones of at least 5 mm. We nail it to the supports (which have been sawn down), two for each board.

Fastening the seats together
We fasten the finished seats using four boards 160 cm long. We fasten each leg with hairpins (if you walk, you can put two hairpins, installing them diagonally or one above the other).

We connect the legs to the boards using pins
The table is assembled according to a different principle. Please note that for the tabletop, the transverse boards along the edges are cut at 52°. We attach them at such a distance that the legs fit in. 2 nails for each board. You can use finishing ones, with small heads, or you can drive them deep and then mask the holes with putty.

How to make an outdoor table out of wood
Now we need to assemble the cross legs. We take two boards, cross them so that the distance between their ends is 64.5 cm. We outline the intersection with a pencil. At this point you will need to remove the wood to half the thickness of the board.

This will have to be cut out
We make the same notch on the second board. If you fold them, they turn out to be in the same plane. We connect with four nails.

How to make X-shaped legs for a garden table
We make the second leg for the table in the same way. We are not assembling the table yet.
Now you need to attach the legs to the structure on which the benches are installed. We place them at an equal distance from the benches and fasten them with pins.


Table leg fastening unit
Now we install the tabletop. We also fasten it with pins. The last stage is painting. Here everyone does as he pleases.
Outdoor table for a summer residence with benches
According to this drawing, you can make separate benches and a table for a summer house or garden. The design is reliable and simple to implement.

Separate benches and a table for the garden according to the same drawing

You can make the appearance more decorative by slightly changing the design of the seats and tabletops

Another option with separate benches

Painted white

Stable country table

Simple table with X-shaped legs

Garden table made of wood

Homemade wooden table with a crossbar at the bottom
http://stroychik.ru
What could be better summer holiday at your own dacha? Indeed, the popularity of this type of recreation not only does not decrease from year to year, but also attracts everyone with its accessibility. more people. Dacha for many of personal plot with beds and greenhouses has become a full-fledged place of recreation, a full-fledged culture is being formed in society country holiday. And, you must agree, what would a vacation be without comfortable and comfortable furniture? The dacha has already ceased to be a place where all the junk from the apartment is taken, and the arrangement of the dacha requires a full functional furniture, created specifically for the dacha.

Choosing furniture for your dacha, of course, will not be difficult, given the variety of furniture that manufacturers offer. But besides the trivial purchase of your favorite country interior items, there is another way out - self-production country furniture.
This approach to arranging country house will not only allow you to save money, but will also bring a lot of positive emotions. If you like to do something “with your own hands,” then making furniture yourself will help you realize your creative inclinations, enjoy working with wood, and the result of the work done will be a useful and necessary thing for the household. You can rightfully be proud of the result of the work done, because there is nothing better than seeing something you personally created. If you are already excited about the idea of making your own country furniture and have firmly decided to try yourself in this matter, then, for sure, you are now tormented by many technical questions. But first things first. Let’s try to conditionally divide all the questions that concern you into 2 large groups: “what to do?” and “how to do it?”

The answer to the first question is actually the most important. This is the area of strategic planning. You should not take on work that you cannot complete, otherwise instead of enjoying the work and excellent result you'll turn out to be another one headache. If you do not have special skills and special tool, you should not take on very difficult work.
An indispensable attribute of a country house is a large wooden table with a set of chairs attached to it. Big comfortable table, for which all family and friends could gather will never be superfluous - this, one might say, is the basis of a set of country furniture. It is its creation that can be done first.

Now it's time to answer our second question. And first of all, you should decide on the choice of material for the future table. Naturally, a person comes to the dacha to take a break from the bustle of the city, to spend a little time in nature, so in our table you will refuse everyone artificial materials, which will be used in modern furniture. Our table will be comfortable, beautiful and environmentally friendly, and the most environmentally friendly material- this is, of course, a tree. It is from wood that it is best to make a table for a summer house with your own hands, because in addition to being environmentally friendly, wood is also very convenient for processing. After choosing the material, you should focus on creating the table design. To create a table you can use ready-made design solutions or spend a few hours creating your own original design project. As an option, you can use a simple table design shown in the diagram.


After choosing a table model, you should calculate in detail the need for materials to create the table: the number of boards, timber, fasteners and paint. It is, of course, better to purchase the required materials with a small supply. Before you start, you need to have everything necessary tool, preferably electric. Your tool list should look something like this:

The assembly order will look something like this. First of all, the tabletop boards are cut and prepared. They can be installed closely or left a distance of 3-4 mm, which is somewhat simpler. We fasten the treated boards to two bars with self-tapping screws or special furniture bolts, while the heads of the screws must be recessed into the wood. To make cross-shaped racks, we cut the ends of the boards at the desired angle, joining the boards is done in half of the board. To select the joining grooves, we make cuts limiting the groove, and select the excess wood with a chisel or a router with a barrel cutter. We securely fasten the assembled supports to the tabletop, after which we measure the required length of the longitudinal stiffener. It is advisable to attach the finished and processed stiffener to furniture screws, which will allow it to be adjusted in the future if necessary. Ready product It is advisable to cover it with a natural water- or oil-based stain.
In order to organize a place in the country for outdoor recreation, it is not necessary to buy an expensive wooden furniture or spoil the area with inexpensive plastic fittings. So, you can make a table for a summer house with your own hands, having detailed drawing and a minimum of skills. Even so, this process will take a little time and will bring a lot of pleasure, both during the assembly of such a structure and in subsequent operation.
The drawing of a table for a summer house with your own hands is presented below.
Drawing of a table for a summer cottage made of wood


In order to independently master drawing of a table for a summer cottage made of wood, you will need the following tools:
We list the main materials for a DIY table:
Our garden table has an approximate width of 1.4 m. This optimal width so that 4-6 people can sit behind it. The height of the product will ultimately be about 0.7 m. In order to make assembling a table for a summer house as simple as possible, you can use the following patterns.

First, the main parts are prepared. So, it is necessary to cut the timber and boards into the following components:
The basis for the future table is two rigid frames made in the form of a trapezoid. Such a frame is assembled from two legs 0.8 m long and two horizontal bars (0.65 m and 1.4 m, respectively).
The legs themselves in lateral section have the shape of a parallelogram with acute angle– 60 degrees. The ends of horizontal bars are cut at 45 degrees. To rigidly fasten legs with bars, it is better to use furniture bolts with a length equal to twice the width of the bar, plus the thickness of the washer and nut.
After the two base frames are assembled, they must be installed vertically at a distance of a meter from each other for the subsequent installation of the tabletop of our garden table. As such, four boards 15 cm wide are used. They are fastened with wood screws, leaving a gap of 2 cm between the boards. This way, moisture will not accumulate on the surface of the table, even if most of the time it will stand in the open air.
In order to maintain equal gaps, you can use pre-prepared wedge templates, which are temporarily installed between the boards of the countertop.
Fastening the seat boards is done in the same way (see previous paragraph).
In order to DIY garden table served for a long time, after assembly it should be coated with special wood paint. The most common option is regular Oil paint. But you can also find other compositions that are more suitable in terms of environmental and aesthetic properties. The color is chosen from personal preferences, funds and the environment where the table will be installed.
Do garden table You can do IR yourself using scrap materials, which many will find absolutely useless. We offer you unusual ideas for the dacha, which relate to the creation of various garden furniture and tables, among others. Look at the photos of garden tables and choose for yourself best option. When implementing any idea for a summer house, you can use your imagination and make the changes you need.
A wooden garden table represents the aesthetics of the natural landscape of the dacha and the ease of manufacture. Photos and photos will help you make a garden table with your own hands. detailed instructions. Before you start making a garden table with your own hands, prepare everything necessary materials and tools. Be sure to look at the photo on how to make a garden table with your own hands: they show the production process.
It's very stylish and original table, which can be used both in the garden and in country interior. The costs are minimal, because it is based on a pallet of bricks.
You will need:
The procedure for making furniture and detailed instructions on how to make a garden table with your own hands.


Sand the tray well: first with coarse-grained sandpaper, then with fine-grained sandpaper. You can also use a grinder with a grinding wheel.
Attach swivel wheels to the bottom of the pallet. To do this, use ordinary screws, onto which put washers removed from the screws for metal tiles (since there are large holes on the bases of the wheels). You can directly fasten the wheels with screws for metal tiles, but then you will need a special attachment for a screwdriver.
Cover the table with an antiseptic wood stain, preferably containing wax. In this case, the table can be tinted to resemble walnut, rosewood, oak, pine, larch, or use a transparent antiseptic to only highlight the structure of the wood without changing its color.
Please note: not all pallets are the same! They are different sizes and with different intervals between the slats. Choose a pallet that suits you best.
If you have an old round garden table, don't rush to throw it away! Of course, it has absolutely no view and is broken, but for your garden it is a real find. In its new guise it will decorate not only a relaxation corner in the garden, but also a country house.

Garden tables made of wood will go with many styles, as their decor is universal.
Look at the photo of garden tables with similar design options:


You will need:


Fill cracks and gouges and sand the table with fine-grit sandpaper, then prime everything except the tabletop. Paint the table with white paint (except the tabletop).
Wrap up tiles in a piece of drape or other dense soft fabric and break it with a hammer. Apply an even layer of tile adhesive on top of the tabletop and cover the surface of the tabletop with tile fragments. Trim the edges with a trowel. When your mosaic has dried a little, wipe the surface with a sponge soaked in water to remove any traces of glue from the surface.
After the glue has completely dried, treat the seams between the pieces of tile with white grout.
Paint the sides of the table top with white paint, and then decorate them, as well as the legs of the table, with gold and copper glass outlines.
 Typically, garden furniture is made of plastic, wood, rattan, presented in soft natural colors.
However, if a bright multi-colored “character” appears in the garden, especially one made of colored glass, then all attention is immediately drawn to it.
And it was made from an old broken flower stand, a lid from metal barrel and regular round glass.
However, all these elements can be replaced with scraps of colored plastic.
So, let's look in more detail at how to make a plastic one. dining table with your own hands.
You will need:


On a piece of paper, draw a circular pattern in the Moroccan style. Then increase the pattern to the right size using a photocopier. Place the pattern under the glass and outline it with a copper outline. Dry the circuit thoroughly for the time recommended by the manufacturer (usually 8 to 24 hours).
Paint the interior parts of the ornament with bright stained glass paints. It is important that the paints you use are distributed evenly within the outlined area, so practice on small piece glass, defining required quantity paints for fragments. Dry the finished painting well.
If desired, add additional ones to the finished painting. decorative elements copper circuit.
Paint the barrel lid with white rust paint. Now let's move on to the main part of the tabletop.
Prime the stand piece and paint it copper acrylic paint, then apply a patina product in some areas.
When the “foot” of the table is dry, glue small pieces of window seal onto the parts that will be in contact with the table top. This will allow her to hold on well.
Assemble the table: place the painted glass on the lid of the barrel, and place this “tabletop” on the foot.

Further on this page you can see ideas for a summer house made from scrap materials and photos of the process of their implementation in practice. We necessarily accompany all ideas for a garden and dacha with your own hands with photos from different angles so that you can clearly see the whole creative process.
 Try making a universal folding garden table for your utility room. It looks beautiful and saves space. And most importantly, it is very convenient and will help you maintain small utility block V perfect order: everything is in sight and nothing gets lost.
You will need:


Sand the board and paint it light yellow.
Decorate the ends of the board with a simple ornament using red paint.
Paint the lids of the jars with red paint.
Attach the jar lids to the board at regular intervals using small screws.
Hang the finished shelf on the wall of a utility room or workshop using ready-made fasteners (the covers should be on the underside of the shelf).
Fill the jars with screws, nails, small fasteners, staples, nuts and other small household items and screw the jars to the lids.
You can decorate jars with simple painting, applique and any other methods.
 And now we offer interesting ideas for a dacha and garden with your own hands in relation to other interior items necessary for the household.
This will be a comfortable seat on which you can relax after gardening. All our interesting ideas for a summer house and garden are accompanied by photos and can be implemented using various available materials.
Make a garden ottoman from old car tires. There are practically no costs, and the effect will exceed all expectations. This ottoman is not a simple one, but an ottoman-chest. You can store garden items in it. This will definitely not happen to anyone!
You will need:


Coat both tires with white spray paint and dry. Then paint both tires with light green paint, in a thicker layer, and dry.
Lay the tires one on top of the other, fastening them with liquid nails or silicone sealant. To do this, apply “dotted” small portions any of the means in a circle on the surface of the lower tire.
Cut a circle out of plywood with a diameter slightly smaller than the diameter of the tire. Cover it with fabric and secure the fabric with a stapler.
Place the fabric-covered circle on the tire base. There you go! The seat is removable, so the inside of the ottoman can be used as a place to store small items.
The paint color of the tires and the color of the seat can be anything, depending on the style of your garden and the color of other garden furniture. In any case, the ottoman will look impressive
 Garden tables and benches are indispensable attributes of a cozy and comfortable country life, in which it is possible to enjoy privacy in a shady corner of the garden.
How to do it garden furniture tables, you could already fully recognize their examples published above. And now we propose to make an exclusive design of a garden bench with your own hands.
A garden bench is not just a necessary thing, but a very necessary one.
It’s so convenient to care for plantings and weed, not on your knees, but sitting on a bench, especially one as beautiful as this one. Even if it stands just like that, it is already garden decoration, no worse than any figure.
Add green paint to the pictures: add branches and leaves.
Add accents with gold paint: make painterly strokes on the drawings, emphasizing the lines and details.

When the bench is dry, cover it all, along with the pasted pictures, with a clear or slightly tinted wood preservative.
If desired, the bench can be slightly tinted with blue-gray acrylic paint, creating the effect of old wood.
Many of the people coming with their families to country cottage area, the first thing they want to do is gather together at a large table to relax and have lunch. Meals at the dacha, be it breakfast, lunch or dinner, usually take place at fresh air. That is why there must be a special place in your garden plot, which plays the role of a kind of dining room. In order to avoid the need to remove furniture from your home every time, you can simply make DIY garden table from scrap materials. Naturally, it is necessary to take care not only of the construction of the table, but also of the chairs. Making a table for a summer house is not such a difficult task, for example, experienced summer resident, who is not the first time to build structures on his site, the job will take no more than one or two hours. Those who are engaged in construction for the first time will have to put in some effort.
Choose suitable furniture for a dacha is not so difficult, because manufacturers offer a fairly wide range of products to suit every taste and budget. Nevertheless, making country furniture yourself is becoming increasingly popular, which is not at all surprising. Thanks to this solution to the issue of arranging a summer house, you can not only save a significant part of the budget, but also get a lot of new impressions in the process of work, giving vent to your creative powers. The result of the work will be a thing that will not only fit perfectly into the interior, but will also become the highlight of the whole house, attracting the eyes of guests.

To build a garden table you will need the following tools:
Building materials needed in construction:

Before the beginning construction work It is necessary to pay special attention to drawing up a drawing of the future table. Below we will briefly look at one such example:
Attention ! It is necessary to strictly follow the dimensions listed below only if the work on the table is made from dried and planed wood.
To do this you will need a hacksaw or circular saw. Sawing parts is done as follows: using a hacksaw or circular saw make the required number of parts for the table from boards measuring 4 meters and 6. Based on the above drawing, it is necessary to cut boards 2 meters long, which will be used for laying the table and seating areas.

Attention ! In order to avoid mistakes when cutting out elements for the sidewalls, it is best to cut them according to a template, which must be made in advance from strong cardboard.
After all the structural elements have been cut, it is necessary to begin assembling them:
Attention ! The table must be assembled perfectly flat surface. This will help prevent parts from becoming misaligned.

After the table assembly is completed, it is necessary to process it using special means. It is recommended to carry out processing before starting the assembly process, which will make it possible to more thoroughly lubricate all elements and protect them.
Give a more attractive appearance country table You can use color or varnish. Varnish will be an additional means of protecting furniture and will increase its service life.
In addition, you can make a table for your garden with your own hands, using simple materials at hand.
For example, what can be done with an ordinary stump? You can easily make an original table from it that will decorate your garden plot. Stumps can be decorated with mosaics, tiles or other decorative items. It all depends on creative imagination. You can also make stools for sitting (also from stumps), after decorating them with mosaics.
If you find an old table at your dacha, don’t rush to throw it away, because you can give it a second life. Remove from it old paint, decorate the tabletop with mosaics, and repaint the legs. This table will last for many years and will be pleasing to the eye.

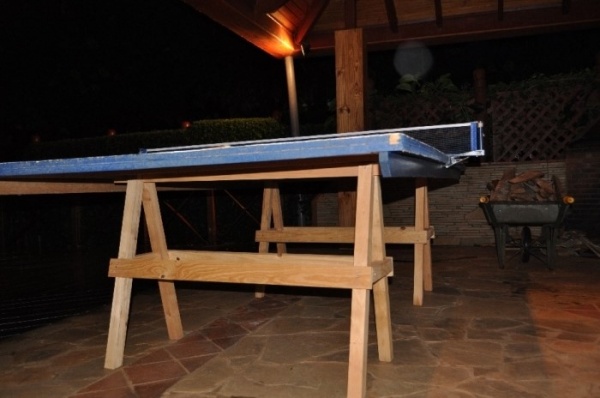
So that at the dacha you can occupy yourself with some active species sports, you can build a tennis table. It’s quite easy to make, you just need to buy necessary materials and prepare your tools.
Necessary materials:
The table dimensions should be 76 centimeters in height, 152 centimeters in width, 274 centimeters in length.

Then you need to choose a place to place a table 7 by 5 meters.
Installation process:

After this, the countertop must be sanded and covered with several layers of antiseptic.


