The attic is the favorite home of poets, artists, artists and creative people. Thanks to new building materials, the attic floor can be used as a room under the roof as a living or utility room (zone) not only in summer, but also in winter (for winter accommodation). Abroad, well-designed and decorated attics even fall into the category of bohemian housing.
In modern housing construction, an attic is not just a furnished warm attic, This effective method increase the functional space of a residential building. It is noteworthy that, in accordance with urban planning standards, the attic is taken into account when determining the number of storeys of a building.
Advantages of an insulated attic:
Disadvantages include: sloping ceilings, the need for additional insulation, difficulties with the rational organization of living space.
Most of the disadvantages of the attic are completely removable with the right approach become advantages.
A specific feature of the attic is the presence of a sloping ceiling. Moreover, according to SNiP 2.08.01-89 “Residential buildings” standards, the height attic floor cannot be lower than 2.5 m. It is allowed to reduce the height in an area not exceeding 50% of total area premises.
Other features of the attic include:
Thus, when deciding how to insulate an attic for winter living, you need to proceed from the design features.
Please note that it is correct to carry out work on insulation of a residential building or apartment outside the premises, because... This approach ensures a shift in the freezing point towards the one mounted on outside insulated walls.
However, insulating the attic from the inside is a widespread option, because... all surfaces that are subject to insulation are located inside the attic (room) floor - ceiling, floor and walls. The exception is the pediment, which can be insulated as part of the attic insulation or along with the insulation of the entire house.
Professionals identify two key factors that have a significant impact on the level of heat loss and operational characteristics of the attic after insulation work has been completed.
To insulate the attic of a house, you can use any heat-insulating material that has proven itself in practice.
Among the most popular materials are: cotton wool, polystyrene foam, polyurethane foam and their varieties. It should be remembered that insulation for the attic is selected taking into account factors inherent specific house and taking into account the level of skill of the person who will be installing the insulating material.
The characteristics that determine the suitability of insulation for use in a particular case are given in the table.
| Insulation | Stiffness (compressive strength) | Thermal conductivity | Hygroscopicity | Shrinkage | Weight | Installation on a broken roof | Price |
|---|---|---|---|---|---|---|---|
| Mineral wool (basalt insulation) | - | - | + | + | - | + | 100-140 rub/sq.m. |
| Glass wool (synthetic insulation) | - | - | + | + | - | + | 70-80 rub/sq.m. |
| Penofol (foil insulation) | - | - | - | - | - | + | 40-50 rub/sq.m. |
| Ecowool (cellulose insulation) | - | - | + | - | - | + | 23-35 rub/kg |
| Polyurethane foam (PU foam) | + | - | - | - | - | + | 170-212 rub/kg |
| Styrofoam | + | - | - | - | - | - | 2560-3200 rub/m3 |
| Expanded polystyrene (penoplex) | + | - | - | - | - | - | 3500-5000 rub/m3 |
Material prepared for the website www.site
Features of the use of insulation different types and types.
Note that breathable soft insulation materials would be a good option if necessary to insulate a wooden attic.
The widespread distribution of sprayed insulation is hampered by their high price, as well as the need to attract specialists and use special equipment. At the same time, as consumer reviews indicate, the price is justified high level thermal insulation. After all, the sprayed material fills the smallest cracks and eliminates sources of heat loss.
The thickness of the attic insulation depends on: the type of roofing material, the height of the room, the availability heating system, location of insulation and its type.
Recommendation. If a chimney passes through the attic roof, you should use basalt wool. It begins to melt at a temperature of 1000 °C, and does not smolder like ecowool and does not melt like rigid insulation materials (foam plastic, penoplex).
Since wool is the leader among materials for attic insulation, and at the same time it is hygroscopic, there is a need to take care of the wool itself, protecting it with a hydro- and vapor barrier film. Otherwise, the cotton wool will get wet and lose its thermal insulation properties.

Complex thermal insulation involves performing the following types of work:
Each stage has its own characteristics, which we will dwell on in detail. Insulation of the attic from the inside is carried out if the roof is already covered.
It doesn’t matter what roofing material the rafter system is covered with. The main thing is that it effectively copes with the task of preventing water from getting inside. attic room. From the point of view of insulation, the type of roofing material does not matter - their thermal insulation properties are close to zero. This means that the most significant heat loss occurs through the roof. Therefore, work on insulating the room begins from the roof of the attic floor.

The cotton wool is placed end-to-end between adjacent beams or metal profiles, so that there are no gaps. If any appear, you need to cut out a piece of cotton wool and close the gap.
Craftsmen recommend using mineral wool mats rather than rolled material, because... they are more dense. It is also recommended to lay the wool in two layers with an offset. To ensure that the cotton wool sits tightly in the intended place, it can be strengthened with rope or nails;
Advice. If you are insulating an attic ceiling with a slope length of more than three meters, you need to make wooden jumpers between the vertical beams of the sheathing. Because The cotton wool can “slip”.
Note. To insulate the rafters, some craftsmen install thin insulation between the vapor barrier film and the finishing material.
When laying layers in a given order, it is important to ensure reliable adhesion of films and insulation to the ridge, valley, walls, window openings, etc.
An attic above a bathhouse is a great way to have additional comfortable spaces with a relatively small loss of time and money. But the comfort of the premises can be achieved only under one condition - all construction operations will be carried out in strict accordance with the existing requirements of building codes and regulations.
Of course, one must take into account how architectural features buildings and the climatic zone of residence. Any heating costs money, we will tell you how not to throw it away, what conditions to follow in order to be guaranteed to get the desired effect.

You need to start, as always, from the very beginning. The effectiveness of insulation largely depends on the chosen material; you need to understand their features and characteristics, only such knowledge will help optimal choice building materials in each specific case.
Today, so many different thermal insulation materials are produced that it is very difficult for some consumers to understand. Manufacturers often take advantage of this, and with the help of not entirely honest advertising, they artificially inflate the prices of their products. Let's look at some of the most striking examples.

It sounds tempting, not everyone understands, but attractive, that’s what manufacturers call their products. The phrase “environmentally friendly” is always added to these words, and the consumer is ready to pay a lot of money. At the same time, the companies “modestly” keep silent about the fact that basalt volcanic rocks consist of 60-80% ordinary glass, and the rest is impurities that are removed during production.

In principle, their products are ordinary, long-known glass wool. Due to the use of “free” glass, the cost of mineral wool should be much less than the cost of glass wool. But advertising does its job; due to its action, the price increases significantly.

Previously, glass wool was difficult to work with; it caused quite unpleasant irritations on the skin. Outdated technologies did not allow making fibers very thin. The thick glass fibers were strong enough to damage the upper layers of the skin. Now technology makes it possible to reduce the diameter of glass fibers to 6 microns; to the touch such products are no different from cotton wool.

But the buyer reacts negatively to the word “glass wool”; manufacturers do not use it today. A striking example of expensive ordinary glass wool is the Izover brand. An unclear word and the absence of “glass” allows manufacturers to increase the price of their products made of ordinary glass.

What do we recommend? For attic insulation, mineral or glass wool is an excellent material in all respects, but you should not buy fashionable, well-promoted brands. Their performance indicators do not quite correspond to the high price. There is an opportunity to buy glass wool - take it, the quality is no worse than the most fashionable names, and the cost is thirty percent cheaper. Any mineral wool is safe for health, unlike other modern thermal insulation materials.
Another tip on mineral wool. It can be rolled or pressed.

Insulating an attic with rolled mineral wool will cost approximately one and a half times less than with pressed wool. The thermal conductivity of both options differs by no more than twenty percent. Think before you start insulating the attic in the bathhouse.
glass wool
These are the so-called “budget” thermal insulation materials, average price one and a half to two times lower than that of mineral wool. The main common disadvantage is that they release chemical compounds into the air. The quantity of these compounds is regulated by sanitary authorities, but they are necessarily present in one percentage or another.
Very technologically advanced, easy to cut, not afraid of moisture. But he is afraid of rodents; after a few years they can “grind” the foam sheets into powder, it will crumble and, as a result, the quality of thermal insulation will decrease.


The “sibling” of polystyrene foam, universally used, has slightly increased physical strength.
The most “harmful” insulation, it is not recommended for use in residential premises. The main advantage is that it is applied in liquid form to any complex surface. After cooling it forms an impermeable coating.


Also sprayable, can be used for insulation in hard to reach places finished buildings. It is made from wood processing waste and waste paper, and is impregnated with antiseptics to slow down the decay process. Moreover, here “eco” is understood only by advertising agents of production companies.


We hope that this knowledge will allow you to consciously select materials for attic insulation; we are sure that additional knowledge has never hurt anyone. Now we can talk about the technology for performing work on insulating the attic above the bathhouse. We will look at the two most common options - mineral wool and foam sheets were used as insulation.
expanded polystyrene

Insulation of the attic should begin during the construction of the roof. Waterproofing must be placed between the roofing and the rafter system. Let's start with the roof. Initial data: when covering the roof, a waterproof membrane has already been installed.
Step 1. Carefully inspect all wooden components of the rafter system. They must be in excellent condition; after insulation from the inside, access to them will become impossible. Take roof dimensions and purchase materials. We recommend using pressed mineral wool mats.

Nominal sizes of mats and maximum deviations from nominal sizes according to GOST 21880-94

In terms of price, this material is in the middle price segment, in terms of its operational characteristics completely suitable for use during insulation. Increase the measured amount of mineral wool by at least 10%.
To effectively insulate the roof, the thickness of the mineral wool must be at least ten centimeters; in colder regions, the thickness must be increased to 15 centimeters. Mineral wool is sold in thicknesses of 5 and 10 cm. If you buy the material in rolls, you will be able to make the roof insulation almost seamless - it will decrease heat losses from the interior.

Step 2. It is very good when builders, during the construction of the rafter system, calculated the distance between the rafters taking into account the width of the mineral wool mats. This will not only speed up the work, but also reduce the amount of unproductive wastage of material. The distance between the rafters should be 1–2 centimeters less than the width of the mat; the edges will shrink slightly and ensure a tight, stable fit. If this is not done, measure the dimensions between the rafters, add one or two centimeters to them and cut off the mats.

Step 3. Insert the wool between the rafters.

If you need to increase the width of the mats by using thin strips, you will have to fix the sheets with hardware. Use thin nails with wide heads or mushroom dowels. It is difficult to find these in the store - increase the diameter of the caps yourself. Make special washers from thick polyethylene, galvanized sheet, pieces of fiberboard and other hard materials. thin materials. The nails need to be driven into the sheathing slats.
Perform this operation very carefully. What is the reason for caution? Firstly, the sharp part of the nails should not pierce the slats - the waterproofing may be damaged. Secondly, the mats should not shrink at the points of fixation; the caps should only support the material in the desired position.


Avoid gaps and gaps between the joints of individual pieces. If you decide to lay wool in two layers, then the joints should overlap. Some manufacturers make mat surfaces with different sides different. On one side they are smooth, on the other they are rough. The smooth side has good water-repellent properties; it should be placed against the roofing, with the rough surface of the mat facing the room. This will ensure additional protection insulation against moisture penetration.

Using this scheme, install insulation over the entire roof area. Make sure that the mineral wool sits more or less firmly in the niches; if problem areas are found, strengthen it further.

Important. You cannot lay mineral wool mats more than three meters high, as it may shrink. And this will result in a significant loss of heat from the room. In order to avoid such an unpleasant situation, we recommend making wooden jumpers at the required distance as necessary.

Step 4. Now you need to protect the insulation from moisture. Water condenses from moisture at so-called dew points, and they will always be located in the insulation layer.

Water in cotton wool - a big problem. The fact is that wet mineral wool sharply worsens its heat-saving properties. And that's not all the problems. There is almost no natural ventilation in the “pie”; wet cotton wool takes a very long time to dry. At the same time, direct contact of the waterlogged material with the rafters is maintained all this time. In conditions of high humidity and high temperature, destructive processes begin very quickly in wooden structures. Moreover, no one treats the rafters with antiseptics.
The vapor barrier layer is laid in rows from bottom to top, with an overlap of at least ten centimeters of material. To ensure complete tightness, the seams must be sealed with tape. The vapor barrier is fixed to the rafters with a stapler.

Step 5. Make a lath to secure the finishing slabs.
For lathing, you can use 20x50 slats or cheap types of boards of approximately the same thickness. Lathing parameters depend on linear characteristics upholstery material. You can use plasterboard, plywood or OSB. Natural lining looks great, but it is the most expensive option for roof cladding.


We insulate the attic with polystyrene foam
The thickness of the foam sheets also needs to be selected taking into account the climate zone of residence. 10÷15 centimeters can be considered universal; to achieve this thickness, the foam will have to be laid in two layers.

There are two ways to fix foam boards:
Important. Do not buy household foam, use only professional foam.
Household foam is supplied complete with a plastic tube through which the foam is supplied to the Right place.


Everything seems to be fine, you can work, and the cost is somewhat cheaper than professional one. But that's not true. Firstly, if you did not manage to immediately use up the entire container of household foam at once, then after half an hour you can throw all the remains in the trash. It will harden and will no longer be usable.

Secondly, using a flexible tube to fill narrow cracks is very inconvenient. The tube bends with the slightest effort, it needs to be guided with a second hand, and even then this “technology” does not always work.
Professional foam has significantly improved quality, and a special gun makes it possible to use one started cylinder at any time until it is completely used up.

The cost of a gun varies, but on average does not exceed the cost of three cylinders of foam. Within just a few days of completing the work on insulating the attic of the bathhouse, it will pay for itself and begin to generate direct profit.
| Model | Price |
|---|---|
| 350 rub. |
| 810 rub. |
| 660 rub. |
| RUB 1,520 |
The gun tube is metal, allowing you to foam the narrowest crevices without any problems.

To insulate the attic, you will need more than one day and more than one can of foam, do not throw money in the trash, immediately buy a professional gun and polyurethane foam.
polyurethane foam
So, the materials have been purchased, insulation work can begin. And in this case, we will take into account that there is already waterproofing under the roofing.

Now it is needed not so much to prevent the foam from getting wet (it is not afraid of water), but to guarantee protection of the rafter system from moisture. After insulation with polystyrene foam, natural ventilation is completely blocked, wet rafters will quickly begin to rot with all the unpleasant consequences.
In the example of performing insulation, we will use the method of working with polyurethane foam.
Step 1. Remove the distance between the rafters, transfer them to a sheet of foam plastic and cut out the insulation along the lines.

It is better to cut thin foam plastic with a sharp one construction knife, to cut thick (more than five centimeters) use an ordinary hand saw.

When cutting, the measurement lines should be left intact, which will allow you to increase the dimensions by a few millimeters and thereby increase the strength of pressing the sheet to the rafters.
Step 2. Using a foam gun, carefully apply a thin continuous line on the rafters where the bottom of the foam sheet meets, allowing it to dry slightly for about five minutes. The fact is that the foam does not hold well on fresh foam; in addition, in places where it is pressed, it stops increasing in volume - there is a risk of the formation of unclosed cracks.
Step 3. Carefully place the foam in the desired location. It is highly desirable that the surface of the sheet does not touch the waterproof layer. A dew point may appear in these places, and condensed water will fall on the elements of the rafter system. This is a very undesirable phenomenon.
Step 4. Continue laying the first layer of foam in the same way.

To ensure that work moves quickly, organize it correctly. During the few minutes that the foam dries, you need to take the dimensions of the next sheet and cut it out. Apply a line of foam under the second sheet and prepare the third sheet. You inserted the second one - work in the same way with the next one. This work algorithm makes it possible to significantly reduce the time required to insulate the attic.
Carefully foam all joints between individual sheets. At first it is difficult to guess the amount of foam, but after a few sheets experience will appear and as much foam will be applied as needed.
Step 5. The first layer is laid - start doing preparatory work under the second layer of foam. Using a sharp knife, cut off all the foam protruding beyond the plane of the insulation; the fit of the two layers should be as tight as possible.


Check the tightness of the joints again; if problem areas are found, they need to be corrected by foaming.
Step 6. Start laying the second layer of foam.
Very important. The joints must overlap. This ensures an increased guarantee of tightness.
Step 7 The process of laying the second layer of foam is no different from that described above. We remind you once again - perform the work very carefully and accurately. Small gaps not only increase heat loss, it is not even the main problem. The trouble is that it is at these cracks that inside the sheathing will have a dew point, small areas plywood, OSB or drywall will be constantly wet. And this will certainly become noticeable over time. finishing walls - on wallpaper or decorative plaster spots will appear.

Step 8 Although polystyrene foam is not afraid of moisture, we strongly recommend making a vapor barrier. Without it, moist air can penetrate to the wooden structures of the rafter system and condense on them. In this case, you already know what awaits the roofing elements.

Step 9 Nail the sheathing under the upholstery boards and begin finishing.

The insulation of these structures has features depending on the method of construction of the bathhouse. If the gables are made of the same material as façade walls(timber, foam blocks, bricks), then before insulating them you need to make niches for foam plastic or mineral wool. For them, boards or slats should be used with a width no less than the thickness of the insulation material.


If the gables are made of vertical supports, covered with clapboard on the outside, then no preliminary preparation is required. In most cases, a 50×150 mm board is used for the vertical supports of the rafter system, and this width is quite sufficient for high-quality insulation walls
Most baths in all rooms have insulated flows, which means that the attic floors do not require such construction measures. If for some reason the bathhouse ceilings do not have thermal insulation, you will have to do it. Although there are options here too - the uninsulated ceiling of the rooms in the bathhouse automatically makes the floors of the attic room warm. Decide for yourself what to do in your case. Take into account the specific purpose of the attic in the bathhouse, the frequency and time of use of these rooms.

If you decide to insulate the floor, you can use the same polystyrene foam or mineral wool. The installation technology has one fundamental difference - the vapor barrier layer must be placed under the thermal insulation, and the waterproofing layer on top.
Never skimp on the thickness of the insulating layer. If it gets too hot, you can always open the windows to ventilate the rooms. And if it is too cold, you will have to spend additional significant money on heating to comfortable temperature values.
We did not consider options with ecowool and liquid polyurethane foam for several reasons.


 Equipping the roof with insulation is one of the most important stages in the construction of a roof that is designed for long-term operation.
This process is not complicated and is carried out according to the following algorithm:
Considering that the material is not protected from precipitation, work should be carried out only in clear weather.

External insulation
At first glance, you can decide that this method of insulation is more reliable and practical due to the fact that precipitation does not fall on the material, because protected by roofing.
However, this method has disadvantages:
Stages of installing a heat-insulating layer internally:
CAREFULLY!
Seal cracks and gaps using construction foam Not recommended. To avoid unnecessary distance between sheets, it is best to lay them with a margin of 5 m.

Internal insulation
Which installation method to choose for arranging a heat-insulating structure for an attic roof largely depends on the individual parameters of the structure. You should initially study fully all the nuances and conditions.
In this article you will learn how to properly insulate an attic roof:
In contact with
If the attic space remains uninhabited, the air in the under-roof space serves as good thermal insulation (along with insulation of the ceiling). In the case of an attic, everything is completely different: here the thermal insulation is very close to the roofing material and the task is not only to insulate the attic, but also to create such conditions that all roofing system served for a long time.
Let us say right away that all wood that is used in the construction of the roof must be treated with antiseptics. Indeed, everything: battens and counter-battens, and rafters. All wooden parts. It is also necessary to make them less flammable. To do this, they are treated with fire retardants. All elements located on the street side are treated with compounds for exterior work. Treat all wooden parts facing indoors with impregnations for interior work. If you use a composition for outdoor use indoors, the specific smell will remain for several years. If it’s the other way around, the wood outside may be damaged: the degree of protection is insufficient. Therefore, do not save on this matter.
More. Before describing how to insulate an attic roof with your own hands, it is worth recalling this: a ventilation system must be organized in the under-roof space. For this purpose, special ventilation holes. Through them, air escapes from under the roofing material, carrying away excess moisture. And it must get under the roof deck through the overhangs. There is absolutely no way to do everything hermetically. This is where the air intake comes from. This is the only way the condensate will dry out in a timely manner and the roof will last a long time.

So that the attic floor is warm in winter and cool summers, there were no problems with high humidity, icicles did not freeze on the roof, it is necessary to properly insulate the roof. But in the case of roofing, insulation, vapor and waterproofing are a complex solution and one without the other works very poorly, or does not work at all.
If the sloping roof is also the walls of the attic floor, the pie will be as follows (from inside to outside):

The photo shows the insulation of a sloping attic roof in a graphical version. Please note: a superdiffusion membrane is placed above the insulation (indicated blue). Its purpose is to prevent condensation that has formed or seeped through the roof covering from getting into the insulation and to remove the steam that did get into the mineral wool, ensuring its drying. Therefore, with vapor permeability from 1500 g/m2. This layer is often called waterproofing (that’s what it actually is), only the waterproofing is vapor-permeable.
Ideally, it is laid exactly as shown in the figure: wrapping the rafters and laying closely on the insulation. Often, to save money, it is rolled out over the rafters, but not by pulling it, but by making a sag of 3-5 cm. This option also works well: moisture gets to the surface, and then rolls down and is removed outside the roof. Here is another important point: the membrane must extend into the drainage gutter. Then moisture will be removed from the under-roof space.

A few more points on laying the membrane. It rolls out across the rafters, starting from the bottom. The first row runs into the gutter. The next one rolls out with an overlap of 10-15 cm. And so on until the ridge. At the ridge, the membranes on both sides are cut along the upper edge and secured. A strip rolls along the ridge, going down from one side and the other of the roof. This creates a coating along which water flows all the way to the drainage gutter.
It is worth talking separately about vapor barrier. This should also be a membrane. Polyethylene or polypropylene film will not work: its characteristics are not the same. The vapor permeability of this layer (expressed in g/m2) should be minimal. Ideally, it is equal to zero. That is, this layer should not allow vapors to pass from the room into the insulation layer. When using mineral wool as insulation, this is very important: when it gets wet, it loses more than half of its properties, and when it freezes in a wet state and then melts, it completely crumbles into dust.
Therefore, the vapor barrier film is also laid with one panel overlapping the other. Moreover, these joints are glued with special double-sided vapor-impermeable tape (it looks like adhesive rubber). An ordinary painter's or stationery tool will not work. They do not provide 100% steam protection. In addition to the joints, all junctions are also glued: from below, from the sides, from above.

There is a line marked on the vapor barrier. It marks the border from which the next layer begins (this is the amount of overlap) and the line along which the canvases are fastened with tape
The vapor barrier is usually attached to the joists using staplers or, as in the figure, with internal sheathing slats for installation of the sheathing. In this case, another ventilation gap is formed, which will dry out the finish and membrane. This gap is desirable, but not required. In principle, the lining can be mounted directly on top of the membrane.
How best to insulate a sloping roof is a complex question and there is no clear answer to it. Mineral wool is used, only hard, with a density of 30-50 kg/m3. Since the attic roof usually has a large angle of inclination, then soft materials may slip. It is for this reason that it is better to take slabs. Although in this case you will have to adjust the pitch of the rafters to the size of the insulation: it should be 10-15 mm less than the width of the slab so that the material fits between the beams and holds well.
Thermal insulation must be laid so that there are as few cold bridges as possible. For central Russia, 200-250 mm of mineral wool is usually required. These are several layers of mats. When laying between rafters, the slabs are positioned so that the seams of one row overlap the next. The width of the insulation, as already mentioned, should be slightly wider than the distance between the rafters. Then the slab becomes tight, eliminating the presence of cracks. If the width is larger/smaller, you have to cut the material. In this case, the chance of getting a smooth edge is small and there are a lot of residues left.
If the dimensions of the rafters do not allow laying all the insulation, planks of the required thickness are stuffed across the side of the room. The remaining insulation is placed between them. A vapor barrier and, if necessary, lathing for finishing are already attached to the top. This option is even better: cold bridges are completely eliminated, even covering the rafters. This method requires slightly higher installation costs, but the attic will definitely be warmer, which will reduce heating costs.
The good thing about the attic floor is that it allows the completion of construction to be extended. It is immediately necessary to lay and secure the superdiffusion membrane on the rafters, along with the sheathing and roofing material. And insulating the attic can be done from the inside after some time.
But please note: the waterproofing layer must be installed together with the roofing. This is the main mistake of many developers: they do not install this membrane. As a result, it is either necessary to remove the roof and lay it, or to invent systems to correct this deficiency. The whole problem is that in this case there is no cheap solution that guarantees the normal condition of the materials.
If you do everything at once, the order of work is as follows:

With this option, working with insulation is not difficult: it is easy to lay, it rests on the sheathing (laces).
This option allows you to push back interior decoration for the required period (useful if there is a shortage of funds). After installing the rafter system, here is what you need to do:
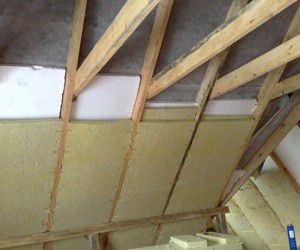
That's all for the first stage necessary work. Once you are able to continue, you will need to insulate the attic roof from the inside. It will no longer be so convenient to work: you will have to make an enclosing structure that will prevent the insulation from being pushed out higher than necessary. The cotton wool itself will have to be fixed somehow: it tends to fall on your head. The order of work is as follows:

A few notes on how thermal insulation material can be laid. If these are mats made of high-density mineral wool and their width is slightly larger than the pitch between the joists, everything is relatively simple: they themselves hold up well.
If rolled mineral wool is installed, everything is more complicated. When insulating the attic roof from the inside, it is laid from bottom to top. Take a lace and a construction stapler. Roll out the cotton wool, press it against the slats, fasten a piece of lace with staples, drawing the letter Z. This is how you secure the first layer, followed by the second and all subsequent ones.
In general, if you want the attic roof to be warm, it is better to use mineral wool mats of the required density of 30-50 kg/m3. They are tough enough to hold their shape well. Softer rolled materials on vertical surfaces or with a large slope they cake, settling down, and the thermal insulation of the attic roof deteriorates.

As mentioned above, the most popular material for insulating an attic roof is mineral wool. She is good, but not at all ideal: she is afraid of moisture. That is why it requires such careful protection from all sides so that it retains its properties.
The roof is sheathed with foam plastic or extruded polystyrene foam - EPS. Polystyrene foam (grades PSB-S-25, PSB-S-35) has good characteristics, but when burned it emits harmful substances, although there are self-extinguishing brands (with special additives). It is better to use them for roof insulation.
The main advantage of polystyrene foam: low price. It is easy to install: it is placed between the rafters, all joints are sealed with polyurethane foam. It’s convenient to insulate the attic from the inside with polystyrene foam: just order the slabs the right size- 10-15 mm more than the gap between the rafters - and place them tightly. Due to their elasticity, they hold up very well.
A ventilation gap is also left on the roof side and waterproofing is installed. But she protects more wooden structure, since polystyrene foam is not afraid of moisture, it practically does not absorb it, and does not conduct steam. This is where the main drawback lies. Since the material does not allow steam to pass through, it is necessary in the attic good system ventilation, and this is an additional cost.
EPS has best characteristics: under equal conditions, its thickness is two times less than mineral wool of the specified density and one and a half times less than that of foam plastic. It also has a locking system that reduces the risk of gaps through which heat can escape. Another plus: extruded polystyrene foam is not liked by mice and insects; fungi and mold do not grow on it. What limits its use: a respectable price. You also need a ventilation system.
EPPS brands - Extrol, STIREKS, PENOPLEX, URSA XPS, Technoplex, PRIMAPLEX, Styrofoam, KINPLAST, Teploizolit, GREENPLEX. Although the technology is the same, there are some differences in characteristics, so compare when choosing.
Appeared not long ago new type insulation: foamed polystyrene foam. It is applied in liquid form to the surface, reacting with air, increasing in size many times over, filling all the cracks and forming a monolithic layer. This is, perhaps, the only way today to correct the situation and efficiently insulate the attic if, when installing the roofing, they forgot to lay a layer of waterproofing.

This insulation has good characteristics (thermal conductivity coefficient 0.036-0.040 W/m² °C), but has a special application technology. It is necessary to organize a closed cavity into which the composition will be poured. In case of mansard roof the side parts are rafters, nailed to them from below and above sheet material(Fibreboard, GVL, plywood, etc.).
A feeding sleeve is launched into the formed cavity, from which loosened cotton wool emerges under pressure. It fills all cavities, forming a single layer of insulation.

The main advantage of ecowool compared to all the insulation materials described above: it conducts vapor. It can absorb moisture up to 20% of the volume and then release it. That is, there is no need to organize a vapor barrier: humidity is regulated naturally, as is the case with wood. The ventilation gap between the roof and the insulation should be the same, as should the properly organized movement of air masses in it.
Today, insulation of the attic roof is very popular in construction.
The construction of houses with mansard roofs is very popular in the countryside and is widespread.
Attic houses are not only very presentable in appearance, but also provide the opportunity to increase usable area from the inside.
Their only drawback is the scheme of complete contact of the walls and ceiling of the attic with the street, which creates certain problems with thermal insulation.
This can cause about 30% heat loss and create condensation from the inside.
This is explained by warm air, rising, will collide with a cold roof, which will subsequently lead to the appearance of fungi, mold, and possibly rot.
Therefore, if you do not want to have all these problems, then it is better to take care of thermal insulation in advance. The article describes how to insulate an attic roof correctly.
Polystyrene foam is one of the most popular. Uses polystyrene foam to insulate pitched and flat roof and most importantly, it is ideal for attic floors.

Foam insulation can be carried out both on an open roof and after laying the roofing.
The material has undeniable advantages, thanks to which it occupies one of the leading positions in the market.
Here are the main ones:
If you decide to use polystyrene foam, then you should not forget about two main disadvantages, such as vapor impermeability and high flammability.
You can avoid them if you do good ventilation attic space and adhere to established standards fire safety.
Before you buy materials and start insulating the house, you need to study and prepare the room from the inside as best as possible, especially if you plan to do all the work yourself.

To do this you need:
If you plan to insulate the roof of your house with your own hands, then when choosing sheets with foam plastic, do not forget about some important points:
Remember: foam plastic has good sound conductivity and it is better to additionally buy a layer of special sound insulation (at least 5 cm thick) and install it from the inside of the decorative cladding.

At correct device If you install it yourself, all external sounds will be absorbed by the soundproofing layer and will not disturb the peace and quiet in your home.
Insulating an attic roof from the inside is quite simple and its diagram is quite suitable for correctly installing the material yourself.
First you need to lay the waterproofing film.
That's right, use special film for roofing (Izospan is most often used), with a broken membrane structure that releases steam only in one direction, from inside the room to the outside.
The film is laid crosswise over the rafters, without stretching it along the entire length of the roof (do-it-yourself installation assumes possible slight sagging).
Make sure that the smooth, water-vapor-proof layer is on the outside. The next strip of film is laid with an overlap of at least 10cm, and special tape is used to seal the joints.
When installing it yourself, remember that you must leave an air gap between the layer of films and the sheathing.
To do this, five-centimeter bars are nailed to the rafters on top of the film, sheathing boards are installed on the bars, and only after that the roof covering is laid.
Sheets of foam plastic are laid between the rafters, ensuring that no gaps are left. You can cut them with a stationery or regular long knife, using a metal ruler.
Sheets with insulation are attached to the rafters using auxiliary slats or polystyrene glue.
If the rafters are round, then fastening with glue is not enough.
Proper fastening is done with a sheet of boards, which will hold the foam layer in several places.

After installation, voids may remain along the broken line; they can be filled with construction foam.
Helpful advice: to increase the service life of sheets with foam, experts recommend using, in addition to glue, mounting screws and dowels.
This fastening extends the shelf life and reliability of the structure.
If you do not remove the space along the broken line, then it will penetrate cold air and condensation will accumulate from the inside, causing leaks and rotting processes.
To exclude this, you can lay sheets of foam in 2 layers, also along a broken line, top layer covering the bottom joints. The top and bottom layers are secured with glue.
For additional soundproofing of the space, soundproofing mats made of fibrous material are used.

It should be remembered that the fiber absorbs moisture well, so it must be covered with a vapor barrier anti-condensation film.
The film is laid overlapping along a broken line, gluing the joints and securing it to the rafters (binding) using a construction or furniture stapler.
The sheathing is attached using wooden blocks or profiles that serve as guides.

When choosing their thickness, remember that it is necessary to leave a space for ventilation of at least 3-5 cm. For cladding, they are mainly used natural materials, on which condensation cannot form.


