Almost every owner of a plot of land, sooner or later, thinks about building a bathhouse. After all, a bathhouse is not just a room for washing, but also an important element of a country holiday. The construction of a turnkey bathhouse can be ordered from professionals for a tidy sum, or you can try to build a bathhouse with your own hands.
After reading this article, you will be able to choose a project, find out the sequence of the construction process, get acquainted with boiler models and find the best bathhouse option for your dacha.
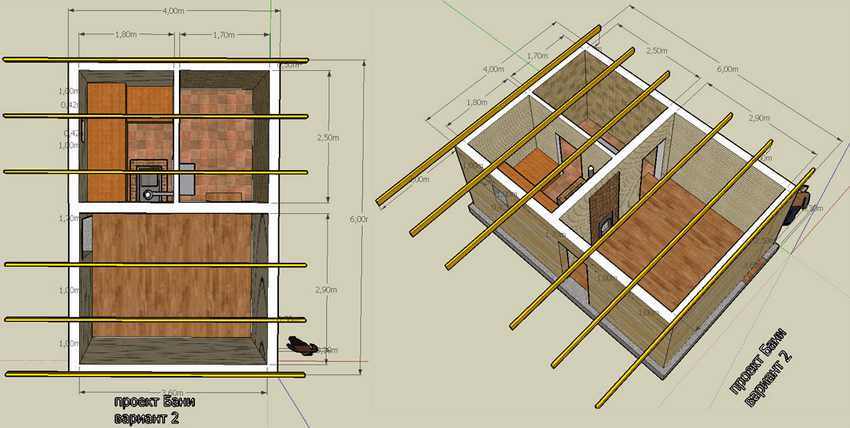
Before starting construction, it is necessary to develop a bathhouse design. To do this, you don’t have to contact an architect; you can develop a simple project yourself, especially since there are now many computer programs for design.
Think about what size bathhouse will be optimal for your family. What rooms will be located inside the bathhouse? What materials to make the foundation, walls and roof from, do not forget also about finishing the bathhouse. An important point in design is the placement of the boiler and the method of firing it.
Below you can see popular bathhouse projects:


Once you have decided on the size and materials for the bath, you need to create a cost estimate.
To build a bathhouse, several types of foundations are used. Depending on the weight of the walls and soil characteristics, the following types of foundations are made:

As practice has shown, the most reliable foundation for almost all types of soil is a concrete strip foundation reinforced with reinforcement.
To make a reinforced strip foundation for a bathhouse you will need:
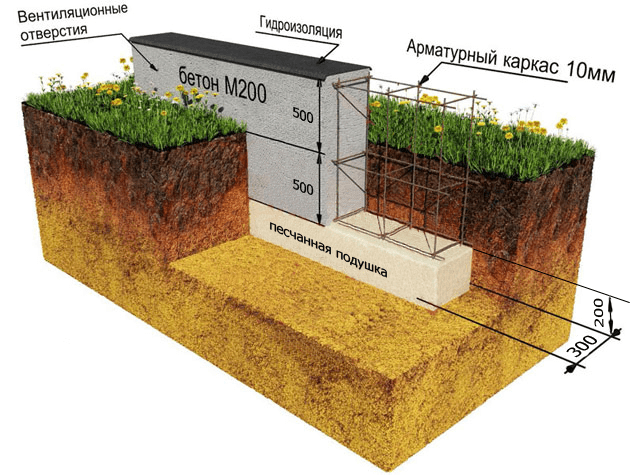
In the location chosen for building the bathhouse, mark a trench for the future foundation. To mark, use a tourniquet stretched between the pegs. The width of the trenches is based on the weight of the wall material. For one-story bathhouse made of wood or brick, it is enough to make a trench 30-40 centimeters wide. After installing the markup, do the following:

The foundation for the bathhouse is ready!
The following materials are used for the construction of walls:
Since the construction of a bathhouse from logs or bricks is already quite widely described on the Internet, let's consider the option of building a frame bathhouse from timber 15x15 and 5x10 centimeters and boards with a section of 2x15 centimeters:


Please note that the manufacture and insulation of the ceiling can also be done after the roof has been installed.
There are three types of roof for a bathhouse:
Usually the first two options are used for a bath. Let's look at the option of a gable roof covered with metal tiles: 
The manufacture of the roof begins with the installation of the Mauerlat. In the case of frame walls, the role of the Mauerlat is performed by the upper outline.
For a more visual understanding of the roof fastening, here is a drawing: 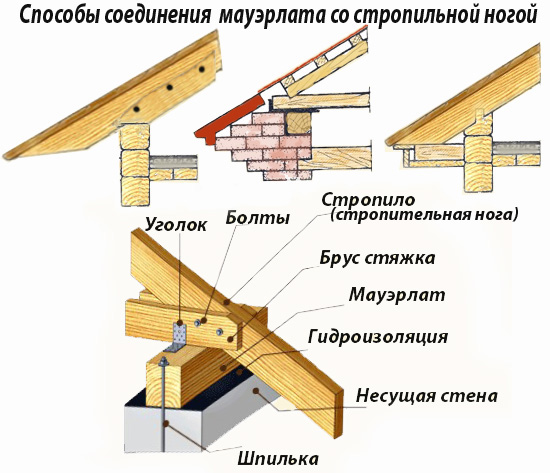
All dimensions of roof elements are given in the list: 
Please note that the less you slope the roof, the more it will bear snow load in winter. Also, slight slope roofs, can lead to poor water drainage and leaks.
The design of the floor depends on the type of room. In the recreation room, ordinary wooden floors are made. In the wash and steam rooms, the floors are made of two levels:
If you want to make a floor of porcelain stoneware or tiles, then they are simply laid on the first level at a slope towards the drain hole. 
In order to make a concrete floor and drain in a bathhouse you need:

At the second stage, wooden floors are made:
Do not forget, before installing wooden floors, to treat all parts with wood impregnation. When making floors, keep in mind that they should be higher, or at the level of the upper edge of the foundation.
The boiler model for a sauna will largely depend on your financial capabilities and the fuel you will use for heating. If you know how to use welding, then you can make a simple boiler yourself from thick sheet iron. If you prefer more advanced colas with gas or electricity, you can purchase them from specialized companies.
The boiler in the steam room is installed in such a way that the combustion chamber is loaded with fuel either from the street or from the rest room (dressing room). The boiler itself, for purposes fire safety, located 10-15 centimeters from the nearest walls. The walls are as high as the boiler and covered with iron sheets. A good decision, will cover the boiler with bricks, thereby reducing its cooling time and protecting the walls from fire.
When installing a chimney for a boiler, pay special attention to the place where the pipe comes into contact with the ceiling. The opening for the chimney should be insulated with refractory material. Also, pay attention to the place where the chimney pipe exits through the roof. This area is usually prone to leakage, so it should be sealed thoroughly. Below are the options for boilers for baths:


After the bathhouse is built, it is necessary to equip it:


After arrangement, you can safely invite guests to take a steam bath in your personal bathhouse!
You can also watch the instructions for assembling a mini-sauna for a summer house without a foundation in the video:
In addition to traditional materials and design for a bath, there are many alternative solutions. Below we present photographs of the most unusual baths:


![]()

At the end of the article, I would like to remind you that heating a bath is associated with fire and high temperatures. Therefore, when building a bathhouse from bricks, logs, cinder blocks or boards, pay great attention to fire safety. This warning also applies to electrical wiring, since the rooms inside the bathhouse have high air humidity and the risk of a short circuit due to condensation is very high. 
We hope that reading our article will encourage you to self-construction baths!
A do-it-yourself frame bathhouse, the step-by-step construction instructions of which includes several stages, is built quite easily if the construction technology is followed frame buildings. The option of constructing a frame-panel bathhouse is considered the most suitable for most homeowners. The simplicity of construction has made this type of bathhouse one of the most popular among owners of suburban areas.
This is due to the fact that this design looks very good from the outside, requires little time and money, and is guaranteed to serve its owner for up to fifty years.

Baths of this type have a number of advantages besides those already mentioned. This way you can build the structure yourself without using heavy construction equipment or outside help. The structure can be erected regardless of the time of year, with complete absence of shrinkage. The design of the structure allows for covered communications. Using frame structure It is possible to choose a practically unlimited number of options for finishing the building both inside and outside.
At the same time, a frame bath can, if necessary, be moved to another place, sometimes without dismantling its structure. This allows it to be moved to a new plot if the old one is sold.

In the process of building a frame-panel type bathhouse, it is necessary to take into account and properly think through its thermal insulation. The fact is that the walls of such a bathhouse retain heat worse than the walls of, for example, a wooden structure, so it definitely requires good thermal insulation.
The second point worth paying attention to is the vapor barrier. The whole question here is that the frame structure of the building favors the collection of steam condensate in it. It is possible to get rid of it only by using a vapor barrier film or glassine. This insulation is laid between layers of mineral insulation and the cladding of the building.
When selecting building materials for a frame bathhouse, you should pay serious attention to ensuring that the boards used during construction work are dry. It is desirable that they be aspen, linden or larch. These types of wood are practically not deformed and have reduced thermal conductivity.
 Frame mini bath
If we consider the construction of a frame-panel bathhouse in stages, then it consists of the following operations:

Separately, it is worth mentioning the preliminary work. These include drawing up a construction plan, its estimate, purchasing building materials, communications.
So, even before the construction of the foundation begins, it is worth marking and clearing the site for the bathhouse, performing the necessary excavation work, and purchasing all the necessary building materials.
Laying the foundation of the structure
In order to make a frame bathhouse, a foundation built according to a simplified scheme is sufficient. The fact is that a building of such a design weighs extremely little and can be built, for example, on asbestos-cement pipes filled with concrete mortar.
To build it you need:
 Foundation for a frame bath
The strapping from the boards is created at the next stage of construction work. Their size should be 50x100 mm, and they should be impregnated with an antiseptic. The strapping marks the walls, while the boards are mounted with the outer edge and nailed together. The strapping is fastened to the base using supports.
To make the entire structure highly durable, the strapping and logs are secured using metal fasteners embedded in concrete. Upon completion of its production, this building construction impregnated with an antibacterial substance.
Installation of bath walls
Having decided to build a frame bathhouse with your own hands, the builder should know that when installing the walls, the distance between the axes should be 0.6 millimeters. At the same time, such a wall should not provide for the arrangement of a window or doorway or a connection with other walls.
The gap for such walls is up to 0.4 millimeters. To provide overall structural strength in the area where the frame, walls and lintels join, an additional rack must be installed. Upon completion of frame installation, its geometry is checked.

Further work begins with drawing out the corner of the building. To do this, first a wall is built that directly communicates with the harness. After checking for verticality, it is temporarily secured using struts. The rest of the walls are installed in approximately the same way. When their construction is completed, the sheathing is installed.
Roofing construction and finishing
The assembly of rafters and other roofing elements is usually carried out on the ground. They are lifted directly onto the roof by hand and placed strictly above their stand. There are several types of roofing, but the most common for baths is ventilated.
It allows excess moisture to be removed from the room. During its construction, the sheathing is placed directly on the beams, and the hydro- and vapor barrier is laid under the counter beam. The finished roof is covered with ondulin, and the gables are covered with sheets of chipboard.

The final stage of the construction of the bath complex is its finishing inside and out. Exterior walls are now usually finished with siding or blockhouse. Most cheap option- boards, most often spruce or pine. Sometimes a frame bathhouse is plastered or covered with tiles. At the same time, do not forget about waterproofing and insulating voids in the building cladding.
The interior of a bath usually excludes the use of paints and varnish due to their high toxicity when heated. It is best to finish the ceiling and walls with the same OSB sheets. You can use clapboard or wood siding. To avoid rotting of the walls, the walls must be insulated with foil.
 Finishing the bathhouse with clapboard
Separately, it is worth mentioning the joints between the walls and ceiling. The fact is that the installed heat insulator must have a margin of 15 centimeters. You should check whether the floor boards are nailed face down to the joists.
We must not forget about fire safety: it is better to separate the steam room from other rooms with bricks.
Do-it-yourself frame bath: step-by-step construction instructions

In our country, a summer cottage or your own house without a bathhouse looks, to say the least, lonely. For centuries, bathhouses were built from logs and could not boast of a variety of layouts due to the peculiarities of the material. Today the situation has changed. Construction technologies and modern materials will allow you to turn the most daring architectural ideas into reality. By following the advice in this article, you can learn how to build a frame bathhouse with your own hands step by step.
Frame technologies have been used to build houses for about 200 years. Construction using this technology is widespread in the Scandinavian countries and North America. The simplicity and relatively low cost of construction have become the reason for the increase in popularity frame construction and in Russia.
To start construction and accurately calculate the material, it is advisable to have a project. You can find it on the Internet or order it from a specialized company. Do-it-yourself frame bath projects (photo) are best ordered from professionals, however, you can draw it yourself, but you need to be as careful as possible. In addition, for the construction of a bathhouse you will need certain materials, namely:

The next stage after purchasing the material will be preparation of the construction site and construction itself. Let's outline the main steps:
It is very important to create the correct project for a frame bath, and it is better to use already existing drawings. Below is a diagram of a do-it-yourself frame bathhouse, photo projects.

The main box of our bathhouse is lightweight design, so the requirements for the foundation will be minimal. You can use a foundation made of concrete blocks laid around the perimeter of the frame, or the so-called columnar foundation.
The columnar foundation consists of asbestos-cement pipes filled with concrete. The depth of laying pipes is selected based on the type of soil. If the soil is dense - clayey, it is enough to dig the pipes 0.5 meters. For light soil types - sandy, the depth should be at least 1.5 meters. The optimal pipe diameter is 100 mm, standard length is 4 m, take this into account when calculating the amount of material. When digging in pipes, a gasoline drill will be an excellent assistant; you can rent one, as it is quite expensive. The diameter of the well should be twice the diameter of the pipes. The pipes are cut, taking into account the laying depth; it is enough to leave 0.5 meters on the surface. After installing the pillars in the well, fill them in a circle with soil and compact them well. The pipes are filled with concrete. Composition of the solution (cement grade M400):
An important point: the distance between the columns is selected based on the thickness of the walls (optimally 27 cm). To strengthen the foundation, you can additionally fill the pipes using the tape method (along the perimeter of the frame).

If you purchased dry material for the frame, then construction can begin immediately after the foundation hardens. Otherwise, let the wood dry for a while. Next, guided by the design plan, prepare the frame racks and roof rafters. Mark the mounting locations for the racks and begin installing the main frame. The assembly of the bathhouse begins with treating the plinth timber with a fire-bioprotective compound. The treated timber is laid around the perimeter of the bathhouse and connected with nails and staples. Support beams are mounted on top, connected on top of the structure with 50x150mm boards. Constantly check the accuracy of installation of the supports with a level.
Important point: when assembling the main frame, use only NAILS of the appropriate size. The use of self-tapping screws is unacceptable! The difference in the fracture resistance of nails and self-tapping screws makes the use of the latter in frame assembly DANGEROUS! (SNiP 31-02).
Wall assembly procedure:

Following this algorithm, the entire structure is assembled. Consider the location of door and window openings. It is advisable to select the distance between the internal frame posts according to the width of the insulation board. Calculate the locations of windows and doors in advance so that the racks do not have to be moved during construction.
Advice! When assembling the supporting frame, the racks can be reinforced with slopes; after covering the structure with OSB boards and installing the roof, the slopes are removed.
A do-it-yourself frame bath involves compulsory work with the roof of the building. As written above, the rafters and roof base are mounted on the ground, after which they are installed according to the design diagram. The rafter material is a board with a section of 150x50 mm. Before the final assembly of the roof, it is necessary to lay a beam (mauerlat) around the perimeter of the frame; it serves as the lower support of the rafter system. Don't forget to cut the OSB under the gables to final installation roof structures. During installation, assemble the rough flooring for ease of assembly.
Before the final covering of the roof, you need to lay the sheathing. The sheathing is laid from the ridge with 100x25 mm boards. After assembling the sheathing, you can lay the roofing itself. A good roofing material is metal tiles or ondulin. To ensure that the roof truss system does not become damp and collapse over time, it is important to provide good ventilation. To do this, a vapor barrier is laid under the rafters, and the roof sheathing is placed on top of the rafters.

Next, you should close the gables, install windows and doors, and you can begin interior decoration. Do-it-yourself frame bathhouse step-by-step instructions will help you make a reliable construction, so construction should be carried out strictly according to the indicated stages.
The first priority is to lay the floor. The classic procedure for laying a floor consists of the following points:
It is worth noting that when installing the floor, errors are possible, which can then lead to the rework of part or the entire floor. Take floor assembly seriously. We will provide recommendations from experts that will help your floor last as long as possible:

An important point: before laying the floor in the washing compartment, solve the problem with draining the water. We talked about organizing sewerage in a summer cottage in one of our previous articles. In the washing compartment, the floor should be slightly sloping towards the drain hole. The floor boards must fit tightly together.
After installing the floor, proceed to finishing window and door openings and installing interior partitions. After that, all that remains is to cover the walls and ceiling with clapboard; for a paired compartment it is better to use clapboard made of non-coniferous wood - alder, ash, linden. Pine is perfect for other rooms. A vapor barrier and insulation are installed under the sheathing. A few words about the façade cladding. Several types of materials are used:
Each of them has its own pros and cons. The choice is yours.
How to build a frame bathhouse with your own hands - step-by-step instructions - projects - photos
Prefabricated and inexpensive frame baths are very popular. More and more owners of country houses are deciding to build it on their site themselves, since construction does not require large investments. Find out everything about building a frame bathhouse with your own hands, a video from the foundation to the roof from the article.
The advantage of a steam room built by yourself is that the weight of the structure is light and the building does not require a powerful foundation. You can purchase for construction inexpensive materials. It is necessary to purchase asbestos pipes with a diameter of 100 mm and a length of 4 m. You need sand, crushed stone, and cement. The materials left over from the construction of a house, gazebo or garage are also quite suitable. We invite you to familiarize yourself with the advantages of building a frame bathhouse with your own hands, namely:

A frame bathhouse’s design is significantly different from a building made of brick, logs and foam blocks. To make the room more practical, you need to pay special attention to vapor barrier and thermal insulation. Craftsmen recommend using vapor barrier film and mineral wool for these purposes. In this way, a high degree of tightness will be achieved, and normal air exchange will not be disrupted. This point needs to be given due attention, since the disadvantage of frame buildings is the tendency to form a large amount of condensate.
Before starting construction, you must select the type of structure. The most inexpensive option is a frame bathhouse attached to the house. This saves money on the construction of walls, and the capital structure gives the structure greater rigidity. A separate building with an attic or gazebo is a wonderful opportunity to combine business with pleasure. However, the cost of such a bath will be higher.

Where is the best place to place a frame bathhouse on the site? In this matter, you can completely focus on your personal preferences. It is better to place the structure in a recreation area in a suburban area. Many owners decide to build a sauna next to a pond or swimming pool. If you place the steam room next to the grill, then after the thermal procedures you can immediately start eating delicious food.
Boards made from these types of wood have low thermal conductivity, and they should only be placed vertically. Boards made from the above wood are able to maintain excellent appearance and shape for a long time; they do not deform under the influence of high temperatures.
On self-construction The bath takes a little time, but this will not affect its service life in any way. According to reviews from many owners of such structures, they can easily last for several decades, strong enough to withstand gusts of wind and heavy snowfalls.
We suggest following the following sequence of work:


Despite the fact that a frame bathhouse is assembled quickly and is simply arranged, this structure turns out to be quite attractive and practical. Maintenance of the structure is simple and inexpensive, and with proper use it will last for more than 50 years.
Do-it-yourself frame bathhouse: video from foundation to roof
Building a frame bathhouse with your own hands is quite simple. If it is also properly insulated and protected from moisture, it will be possible to get a steam room that will be practically in no way inferior to structures made of stones or rounded logs.
Each building material has its own advantages and disadvantages that must be taken into account. Recently, frame baths have begun to become popular, so it makes sense to find out why they are better than structures made from other materials.
The advantages of such a bath:

However, it is important to know that a frame bath has significant disadvantages:
Creating a drawing requires certain skills. If they are not there, then it is better to entrust this work to a specialist or use a ready-made drawing.
Before drawing up a diagram, it is important to decide on the following points:

You need to include all the information received in the drawing, as well as supplement the project with the necessary details. The more detailed the diagram, the easier it is to build a bathhouse.
 The more detailed the project, the easier it is to make a frame bathhouse yourself
A standard bath includes a corridor, a dressing room, a washing room and a steam room.
 A standard frame bath consists of a dressing room, steam room, shower and rest room
Quite often a separate room for recreation is provided. It is recommended to mark the installation location of the stove on the diagram. If this is a steam room, then it is best to place the stove in the corner closest to the door. The stove can be stone or brick.
It is recommended to determine in advance the dimensions of each room and indicate them in the drawing. The standard dimensions of the steam room are 200x240 cm. The optimal ceiling height is 220 cm. This design can accommodate 2–3 people at the same time.
In the drawing you can see a bathhouse for a suburban area with a balcony measuring 1.5x4 m. The overall dimensions of the building are 4x6 m. The project is suitable for organizing gatherings on open area in summer.
 A frame bath can be equipped with a terrace for gatherings in the warm season
This bathhouse consists of 3 rooms:
The corridor is shown separately in the diagram. There is no room for a locker room. There is a small changing area in the washing room. The terrace connects to the living room.
The optimal wall thickness of a frame structure is 100 mm or more. Wood that is used in the process of making a bath must be processed antiseptic. It is recommended to use dried, calibrated lumber.
It is mandatory to perform a vapor barrier of the insulating material on the internal base. In the steam room you need to use foil vapor barrier. The reflective layer can increase the temperature inside the steam room.
Walls and ceilings in the stove area should be made using non-flammable materials. For example, the frame is made of a rack-mount metal profile, which is coated with zinc. Cuttings can be made from asbestos cord. In these places, a basalt slab can be used as an insulation material.
Supply and exhaust ventilation is required in all rooms. Floors in the sink should be made with a slight slope or along a screed. The top and bottom floors need to be insulated in the same way as the walls.
The minimum size of a frame bath is 3x4 m.
 The minimum size of a bathhouse for a comfortable stay of several people is 3x4 m
The budget version of the frame is made in this way: the racks are sheathed on the inside and outside with boards up to 25 mm, basalt insulation or ecowool is laid inside the frame structure.
If you plan to use ecowool inside the walls, it should be carefully compacted and horizontal platforms for unloading should be installed. The frame must be sheathed inside and outside. To do this you will need to make a sheathing. On the outside, the insulation material is covered with a membrane to protect it from the wind. In the horizontal plane, the use of ecowool is a more economical option compared to basalt insulation.
The outside of the frame structure can be covered with any facing material. The inside of the building is covered with clapboard, plasterboard sheets with tiles or imitation timber.
The frame should be assembled from the following parts:
Instead of plank flooring, the floor base can be covered with tiles. You need to choose based on personal preferences, however, in the case of a steam room, it is recommended to give preference to wood. There will also be materials for protection. Quite often, lining is used for wall cladding.
 It is recommended to cover a frame bath with wooden clapboard
To cover the structure from the outside, you can use larch lining. The inside of the building is clad with clapboard made of coniferous trees. Sheathing boards must be mounted vertically.
Excess moisture and elevated temperatures will negatively affect structural elements, so it will not be possible to do without the use of special protective materials. You can use glassine, polyethylene or roofing felt. A vapor barrier should be placed between the insulation and the sheathing. The disadvantage of roofing felt is that during the heating process it will emit an unpleasant odor. Therefore, it is not recommended to use it.
You need to pay attention to the selection of material for thermal insulation. If you choose wisely and install the insulation correctly, it will be possible to significantly reduce heat losses, as well as the cost of heating a bathhouse building.
Mineral wool is used as insulation in most cases.
 A good insulation material for a frame bath is mineral wool.
A good option is to use fiberglass. In some cases, the ceiling is insulated with expanded polystyrene, and the floor base with expanded clay.
As an example, we will consider the calculation for a frame bath of the most common sizes. The frame is made of timber, the size of the structure is 5x4 m. The base will be reinforced columnar.
 For the frame structure, you can use a lightweight foundation made of asbestos-cement pipes
Coniferous wood lining is used to decorate the walls inside and outside. The roof will be gable, the covering will be metal tiles.
A pressing issue is the choice of wood. The material must be dried. Linden, larch or aspen are most suitable. These rocks have low thermal conductivity; they are capable of maintaining their original structure for a long period of time. The walls are erected from boards 2-3 cm thick. Slats made of larch or pine are suitable for external cladding.
In terms of cost and reliability, a columnar reinforced base is the best option for frame construction.
 Columnar reinforced foundation is suitable for the construction of frame baths in most regions
It can be used in most regions. You will need to prepare materials in the following quantities:
The frame can be made from boards, pieces of plywood sheets or OSB. If the soil on the construction site is clayey, then formwork is not necessary.
The most complex and financially expensive part of the bathhouse is the frame. To purchase materials for at this stage you need to approach it carefully. List of required materials:
To save money, instead of bars you can purchase 50x100 mm boards.
 To save money, you can use 50x100 mm edged boards during the frame manufacturing process
The timber must be of the second grade and lower, the board can only be of the first grade. The cladding of the walls on the outside can be done not with wooden lining, but with plastic sheets or corrugated sheets.
The floor is made of edged veneer boards. The ceiling should be covered with clapboard. If you want to save money, you can use mineral wool for thermal insulation. List of materials:
You can save money on attic flooring. If you do not plan to use it, then the mineral wool may not be covered edged board or pieces of slabs.
The roof is gable, the attic can be used to store tools.
 The best option for a frame structure is a gable roof.
There is no need to insulate the roof. The rafters will be hanging. You will need the following materials:
In a bathhouse, quite often, instead of a drain, a blind area around the perimeter is installed using a cement-sand mortar.
It is important to think through all architectural and construction tasks, which include:
After preparing the tools and materials, you can proceed to construction work.
A building of this type is lightweight, so the base can be lightweight. The easiest way is to make a columnar foundation on asbestos cement pipes, which will later be filled with concrete mortar. Sequencing:

Next, the structure is tied. To do this, you need to prepare slats with a cross section of 100x50 mm. The materials will need to be pre-treated with an antiseptic mixture to protect them from rotting. The walls are marked, after which the slats are placed along the outer line.
 Before tying the boards, you need to treat them with an antiseptic.
The boards must be placed on the outer edge and nails must be driven in for fixation. The base trim can be connected using supports.
The upper and lower trims should be made of boards, while the bottom one should be cut off from the base to make it possible to lay roofing material. The horizontal position should be checked with a level. If deviations are found, it will be necessary to lay only several layers.
Intermediate racks are mounted taking into account that it is possible to install thermal insulation and cladding materials. To increase the strength of the structure, the harness and joists should be secured using pre-fixed iron plates.
 To add strength to the structure, it is recommended to use metal plates
The binding must be treated with a mixture that prevents rotting.
How to make walls
In the process of building walls, the interaxial distance is essential. The indicator will be equal to 0.6 m, provided that preparation of the opening and joining with the remaining walls is not planned. Otherwise, the gap must be reduced to 0.4 m. The distance between the racks will depend on the dimensions of the doors and windows. For the frame you need to use 50x100 mm boards. Sequence of actions for constructing walls:

If you plan to make a frame bathhouse with an attic, you need to leave space for installing doors and windows.
For the frame structure, 100 mm strips are used, so the insulation must be of appropriate thickness.
 The thickness of the mineral wool should correspond to the thickness of the boards
During the installation process, the excess length and width can be compressed, as a result the resulting gaps will be tightly closed.
During the insulation process, each connection must be carefully inspected, otherwise the structure will be leaky. Such baths are unsuitable for use. Vapor and waterproofing is made from foil. Minimum thickness material - 40 microns. The foil joints are sealed with tape or foil film. The foil is laid in strips from bottom to top. To secure the foil to the wood pieces, you need to use a hand stapler.
How to arrange a roof
For convenience, you can make a template that will allow you to easily assemble the rafter system.
 Installation of a gable roof must be carried out according to the diagram. A template can make the process easier
You will need to do the following:
After this, you can sheath the structure on both sides. It is also important to take care of quality ventilation. For a small bathhouse, an asbestos-cement pipe with a diameter of 12 cm is suitable. The part must be taken to the attic.
The outside of the bathhouse is covered with siding, boards, plaster or ceramic tiles. Under the sheathing should be placed waterproofing material. The resulting gaps can be filled with thermal insulation material. You need to leave a small gap between the clapboard and the foil for ventilation. For this purpose, strips several cm thick should be nailed to the vertical supporting parts. The distance between the elements must be selected taking into account the distance between the supports.
 In the diagram you can see the design of the wall cladding
To give rigidity to the walls, they need to be covered with plaster shingles. After the cladding work is completed, the outside of the structure must be plastered.
Guide interior lining frame structure:
The slats can be nailed using different methods - during the fitting process, a selection is made into a groove or a quarter. The slats must be attached to the joists with the front part.
There is no need to make holes between the foil and the corrugated sheet; the sheets are nailed to the foil. Fixation is done using self-tapping screws with rubber gaskets.
After this, the furnace and boiler are installed. It is important to remember fire safety rules. The wall that will be used for the soaring room and resting place must be made of brick. It is recommended to place the heating boiler in the dressing room. The best option is a brick stove, but if you have no experience in laying a similar structure, it is recommended to entrust this work to a qualified stove-maker.
When working with foil, you need to be careful, as the material is easily damaged. Any gaps will significantly reduce the effectiveness of thermal insulation. The vapor barrier should be fixed with a stapler, and it is important to ensure that there is no sagging of the material. The minimum distance between the wooden paneling and the insulating material is 1 cm.
 In a bathhouse, it is best to attach foil using an ordinary stapler.
Frame structures are convenient in terms of finishing. Work can be done both inside and outside. If there is a forced break, you can make partition frames at this time, upholstering them with blockhouse or clapboard. In this case, the time will be spent usefully.
For most regions optimal thickness walls of a frame building is 10 cm. Insulation can be done either with mineral wool or with expanded polystyrene. A layer of mineral wool 12 cm thick can replace a wall made of bars 50 cm thick.
 You can insulate a bathhouse from the inside using mineral wool
For northern regions with cold climates, there are 2 methods of insulating a bath:

If you plan to use expanded polystyrene, then after installing the sheets you need to make a thin screed using a mesh of reinforcement. Finally, a topcoat should be applied.
 It is not recommended to use sawdust and clay to insulate the ceiling
During the cooking process, they will be mixed in water with clay, and therefore the insulation will have a lot of weight. In addition, a large amount of liquid often causes wet ceiling parts made of wood. This has a negative impact on the performance characteristics of the bathhouse building.
Frame walls are an excellent bait for rodents who love polystyrene foam. In 2–3 years, solid sheets can turn into dust. Therefore, it is not recommended to use polystyrene foam for insulating rooms inside a frame structure.
Particular attention should be paid to the quality of vapor and waterproofing. Such a bathhouse does not have free supports; each of them will carry the load and hold other parts of the building. If the strength is compromised due to prolonged exposure to moisture with one rack, the sauna may become unstable. In this case, complex renovation work. A similar situation It is best to prevent it at the stage of insulating the rooms.
To insulate the insulation, it is best to use aluminum film.
 It is best to insulate the insulation with aluminum film
However, the material is not cheap. If you want to save money, you can use plastic film. The material is cheaper, but in terms of steam and water protection parameters it is practically not inferior to foil. It should be remembered that polyethylene can be damaged when exposed to sun rays. For this reason, it is important to cover the frames. This will reliably protect the film from exposure to ultraviolet radiation.
When designing baths, you should take into account many factors - from location to area. Financial opportunities also play a significant role; if the bathhouse is planned primarily as a place for family recreation, then it is not necessary to build a palace.
For full functioning, 2-3 rooms are enough - a dressing room, a steam room and a washing room. The last two rooms are sometimes combined into one to save space.
Layout of a small bathhouse
In an effort to reduce the space occupied by a bathhouse, you should not be too zealous - there are certain standards. So, two people should fit freely in the steam room, taking into account the fact that they use brooms. If it is very crowded, then you will hardly be able to enjoy going to the bathhouse.

Small log sauna
The layout of a small bathhouse begins with the choice of material for its construction - it can be a log, timber, brick or foam blocks. Wooden construction is the most preferable, as it allows you to breathe easily and freely, and naturally maintains a balance between humidity and high air temperature.
What you should especially pay attention to:
The useful area of the bathhouse cannot be less than 10 square meters. meters, otherwise it will be impossible to steam in it and wash comfortably.
Convenient bath layout for two people

Bathhouse project of 3 rooms
It is not always possible to build a spacious bathhouse and you have to be content with modest dimensions. But even if it is not possible for two people to be in the steam room at the same time, then the presence of a separate washing room will allow the structure to be used for its intended purpose.
Competent design internal space makes it functional:
Note! If a residential building does not have a bath or shower, then a small bathhouse is an excellent solution. She will combine business with pleasure.
Project of a small bathhouse of two rooms

Small frame bathhouse made of timber
If you don’t want to huddle in tiny rooms, then by combining a steam room and a washing room, you can get good result. The external size of the bathhouse can be 3.6 * 2 meters - this is quite enough.
How to build a small bathhouse with your own hands on a plot of land, this is only possible if you have a carefully thought-out project:
To ensure that the benefits of bathing procedures in this project are not reduced, the following instructions must be followed:

Photo of a small bathhouse on the lake shore
In both layout options, the door should open outward, and the building itself should be installed no less than 5-10 meters from the permanent house. These are mandatory fire safety requirements. The ceilings in the bathhouse should not be more than 2.2 meters, and the door frame should not be more than 1.5 meters. Otherwise, it will not retain heat.
The stove can be any - electric, wood or gas. But the latter is not very desirable. Electric is easy to install and makes it easier to control the temperature level.
But the best one is wood-burning. It creates a unique spirit and aroma of the bathhouse.

The price of a wood stove is not that high
A bathhouse is the dream of almost every owner of a suburban area. But the size of the plot does not always allow for the construction of a large and spacious structure, and then you have to be content with the small. But this does not make the bathhouse any less functional.
At the right approach to planning, it turns out to be useful and convenient. The video in this article will tell you in more detail about small bathhouses and their advantages.

The primary task facing every owner of a country plot is the construction of a small bathhouse located not far from the country house. Our article will talk about how to build a 3x3 sauna with your own hands, which would fit perfectly into the space of a small household plot.
The starting material used for the construction of such a structure is most often traditional wood beams. For those wishing to deviate from established traditions, such common building materials as brick, silicate and foam blocks or natural (artificial) stone can be offered.
The bathhouse, measuring 3x3 m, is a small one-story building that can accommodate 2-3 people at a time. His effective area usually does not exceed 8‒8.5 m² and is distributed as follows:
Note that the dressing room in such a bathhouse is also used as a relaxation room. Despite the limited size of the room, it is usually possible to fit a small table and 2-3 benches. The table can be made folding, which allows you to free up as much space in the dressing room as possible while lighting the stove and cleaning the room.
When choosing the design of a bathhouse building, one should not exclude from consideration the option of a small-sized structure that is simply attached to the main residential building.
The simplest and cheapest way to make a wooden bathhouse from timber is to use a standard frame structure installed on a lightweight strip foundation.
A bathhouse made from traditional “round timber” also looks good, which is well-sanded logs selected according to the appropriate diameter. Forest moss is usually used as insulation in these structures, laid between the individual crowns.
In addition to timber and round timber, profiled or laminated timber can be used to construct a bathhouse. In any case, the material you choose must be well dried (that is, subjected to a shrinkage procedure in advance). Thanks to this, you will be able to start using the sauna building immediately after finishing it.
Note! When erecting a structure made of brick or stone, the strip foundation for a bathhouse must be designed for a heavy load.
The construction of a bathhouse from the material you have chosen is usually carried out in the following order:
Foundation preparation
Basically, the type of foundation is not a whim of the customer, but is selected based on many factors. Often, for the construction of a bathhouse, a pile or columnar foundation is made. In some cases it may be necessary to manufacture slab foundation. We will consider only one type of foundation, which is more universal and applicable in most cases.
The strip foundation for a log house made of three-meter timber is made shallow, which is also acceptable when using rounded logs. The procedure for its preparation is as follows:
Walling
When assembling a box from 100×100 beams for the lower crowns, it is advisable to use larch or aspen blanks with a larger cross-section (150×150 cm, for example). The base frame is attached to the foundation using special plates, the counterpart of which is fixed to the lower beam of the frame.
The construction of the foundation is carried out using one of the well-known methods, which involves the use of the method of joining beams (logs). Given the relative lightness of three-meter beams, the assembly of the frame is most often done manually and without assistants.
To reliably connect the crowns to each other (without gaps), pre-prepared wooden dowels and a special jute seal.
Manufacturing of roof, ceiling and floor
When arranging a roof for a 3x3 meter bathhouse, preference is usually given to one of the simplest structures: single-pitch or gable. The optimal angle of inclination of the roof is selected taking into account the brand of material used as a roofing covering (inexpensive roofing felt or slate are most often used for these purposes). You can see a sample of roofing arrangement in the photo located at the end of the article.
At the next stage of work, the ceiling is installed, made in the form of flooring, laid directly on the walls of the building. The floor covering is fixed on special logs placed directly on the foundation.
Before finishing the bathhouse, the walls and ceiling of the building are reliably insulated; in this case, special attention is paid to the steam room. To finish it, it is advisable to use natural views insulating material (mineral wool, for example) followed by applying a layer of foil on it. Note that the foil in this case is used as a reflector capable of retaining heat inside the steam room.
After installation of the insulation and foil is completed, the walls and ceiling of the room are sheathed with clapboard made from special types of wood (linden or aspen).
As for the dressing room, it is not at all necessary to use expensive materials to decorate it; the walls of this room can simply be impregnated with special waterproof varnishes that perfectly highlight the texture of the wood.
How to build a 3x3 sauna with your own hands - building a small sauna

A small do-it-yourself sauna is a great option when the area near the house or in the yard of the dacha is limited. In addition, with this solution you can significantly save your budget, but as a result you will get a full-fledged vacation spot, which will not only relieve stress after a hard day, but improve your health and have a pleasant time with family and friends.
IN ideal The bathhouse includes 4 rooms in its design:
You can expand the functionality of some rooms by combining them with each other. At the same time, the comfort of your stay is not lost. The overall size of the building will largely depend on how many people will be inside at the same time.
These are indicative examples. You can easily vary the size of the premises within accessible limits. You may want to reduce the steam room because... there is no need for 4 people to be there at the same time. At the same time, it will be possible to expand the space of the rest room.
Various materials can be used to build walls. Much will depend on the project you choose, as well as the amount of money planned. For example, you can use ordinary brick. You can read how to build a brick sauna here. The following points will be positive:
The negative aspects include:
Along with brick, foam block is often used. This is a more progressive material; it has properties characteristic only of it:
There is also a fly in the ointment:
The most favorite manufacturing method is a rounded log. A lot can be said about its advantages, here are just a few:
The negative side is:
One of the cheapest and fastest options is the construction of a frame structure. Minimal construction skills will be required for this method. The advantages are:
One of the disadvantages is the need to organize good sound insulation. High level of noise – transmission of various vibrations, which can cause inconvenience. It is also important to ensure good ventilation so that moisture does not accumulate inside, which will lead to the development of fungus and mold.
In the case where a really small bathhouse is planned, there is no point in sinking the foundation to the level of soil freezing. This will only increase the overall cost of the project. With proper manufacturing and waterproofing, you won’t have to worry about the walls being cold. This type of foundation will be relevant for any of the listed building options.
At the stage of laying the foundation, provision is made for the supply of necessary communications. This could be a water supply and sewer drain for washing water.
There are several ways to build a foundation. Piles can be bored or driven. In the first case, a well is drilled, formwork is made, reinforcement rods are lowered and the entire space is filled with concrete. In the second option, ready-made concrete, wooden or metal posts with a pointed end are driven in immediately. The most suitable options for a small bath will be screw ones. They consist of a metal base in the form of a pipe and blades that help immerse the supports into the ground. You can purchase them or make them yourself. If you chose the second option, then you need to act like this:
In each of the described options, separate supporting elements for the stove should also be provided, especially if you plan to use a heater. This is very important, because its weight can be large, which can lead to damage to the floor and joists.
For a bathhouse, it is better to use red brick, which has undergone heat treatment and has a lower thermal capacity. To calculate the quantity required material, you need to calculate the area of each wall. To do this, the width is multiplied by the length. Then you need to divide this number by the area of one brick. The area of the masonry joints can be neglected, because you will still need to make a reserve in case of battle or marriage.
The wall can be erected using several methods:
Work begins with the construction of corners. This is an important process because... It is they who will subsequently ensure the correctness of the entire structure. In order to maintain the vertical level of the future walls, two metal profiles of 5x5 cm and a length equal to the height of the future walls are dug into the corners. They are leveled and secured with jibs. A fishing line is stretched between them to the height of one row. After it is laid, the line is rearranged to the height of the next one. The thickness of the seam should be about 20-25 mm. It should be applied at a distance of no more than a meter so that it does not have time to dry. Additionally, the plane is checked using bubble level. If the second and third types of masonry are chosen, then it is necessary to ensure a bandage between the two walls. This is achieved by laying two bricks transversely opposite each other at certain intervals. Also, each row should be offset by half a brick to ensure the overall interweaving of the entire plane.
Above the windows or doorways a jumper must be installed. Usually it is reinforced concrete. You can purchase it ready-made or pour it directly on site. It should extend beyond the openings by at least 25 cm. Supports are installed and a wooden board is mounted on them. Two rows of bricks are laid out on edge. Between them there are reinforcement rods, which should also extend 25 cm beyond the opening, and it is better to bend them to intertwine them with the existing masonry. Concrete is poured inside. After complete hardening (usually 10-12 days), the lower supports can be dismantled and the logs removed.
The general installation principle will be the same as in the previous case. You should also start with the corners, which must be accurately and clearly set.
In the same way, guides are made from profiled pipes. But there are some nuances:
This is exactly the option that comes to mind when it comes to a bathhouse. To make it, you will need to stock up on rounded or profiled logs. It is better to make from this material external wall. Because The structure is small, it is good if the partitions are framed.
After the construction of the walls is completed, primary caulking is performed. During which the hanging insulation is simply driven into the joints. Complete shrinkage of the building can last more than 1.5 years.
After the foundation is erected, an additional foundation is made for such a structure. It is carried out according to the example of the grillage discussed above. For the corner posts we will need exactly the same timber as for the base. In addition, you will need to stock up on edged boards with a length equal to the height of the future walls, a width equal to the width of the grillage and a thickness of 5-10 cm.
For small buildings ideal solution there will be a pitched roof. It is necessary to plan its production at the design stage. It is very important to be able to raise one wall higher than the other. When this is done, in the case of a wall made of brick and foam block, waterproofing made of bicrost or roofing material is laid on the upper end. Additional beams are mounted on it, which will serve as a Mauerlat. They are attached to the base using anchor bolts or walled-in studs. Beams are laid on top onto which the sheathing will be placed. They can be secured to the Mauerlat using metal corners.
In another option, the walls are made the same. Ceiling beams are laid on the Mauerlat. On one side, vertical boards are installed that will form a pediment, from which the rafters are lowered onto the other wall. At the point where they adjoin the Mauerlat, they are cut to the required angle. They are secured with metal corners. To make it easier to maintain the roof in one plane, the two outermost elements are installed first. A string is stretched between them, which will serve as a level.
The ceiling must be insulated. A vapor barrier is attached to the top of the ceiling crossbars. Thick foil can play this role. Insulation in the form of mineral wool is placed in the space between the beams. Additionally, it is covered with plastic film. WITH inside The filing is made using wooden lining or polished edged boards.
An integral part of every sauna is the stove. It can be made independently from sheet material or a large-diameter metal pipe. In another version, it is laid out of brick, but in this case it can take up a large space. For small spaces, it is better to use electric options that are purchased ready-made.
A shelf is installed inside the steam room. It's better not to use it conifers wood, because When heated, it may release resin, causing burns. Good stuff for her there will be aspen, larch, linden or oak. If the space is small, a width of 40 cm will be sufficient; it is more convenient when there is a footrest. The fastening material must be flush so as not to burn the skin (it must also be made of stainless material). It is better if the entire structure is assembled on dowels.
For wiring, you must use a double braided cable. It is better if it is non-flammable (usually the marking has the prefix “ng”). Be sure to lay the conductor in the corrugation. There are no switches installed in the steam room itself. The lamps used are waterproof with an IP68 index.
Make sure there is good ventilation. To do this, you can install an adjustable supply valve, as well as anemostats with output to the gable through the roof. This will be enough to ensure that all moisture is removed after taking a steam bath.
As you can see, there are no restrictions on what you can build a small bathhouse from. Choose the option that suits you best.
Small sauna with your own hands - how to build
 Washing in a country bathhouse is a pleasure available to everyone. Its construction does not require large financial investments. In a minimal plan, such a structure is erected in a few days.
In this article we will look at the topic of how to build it yourself simple bath at the dacha quickly and inexpensively.
Let's start by studying ready-made options, we will discuss the designs of walls, floors, stoves and sewers that are popular among craftsmen.
The main conditions for the comfort of any bath are:
In photo No. 1 we see a simple bathhouse, reminiscent of Diogenes’ barrel. You can only take a steam bath in it. You won't be able to wash yourself here because there is no sewage system in the building. However, if desired, it is not difficult to do. To do this, you need to install a standard shower tray in the corner of the bathhouse and lead the drain pipe into the septic tank.

An important advantage of this design is its low weight, allowing it to be placed on a plank terrace.
The construction of the simplest bathhouse from the container category is shown in photo No. 2.

It consists of one steam room. For washing, the owner needs to attach a canopy with summer shower or supplement the room with sewerage, and the stove with a tank for heating water.

Improvising on the theme of a barrel-shaped bath, let’s pay attention to cellular polycarbonate. You can quickly and easily assemble an original design from it. In order for it to retain heat well, you will need two large sheets of this material and a frame made of metal or wooden blocks. A mineral wool insulation 10 cm thick is laid between them.

The ends of the building can be made from boards, stuffed onto an insulated wooden frame. Place such a bathhouse anywhere: at your dacha, on a polar ice floe or on the top of Everest and you will always be comfortable in its steam room (photo No. 5).

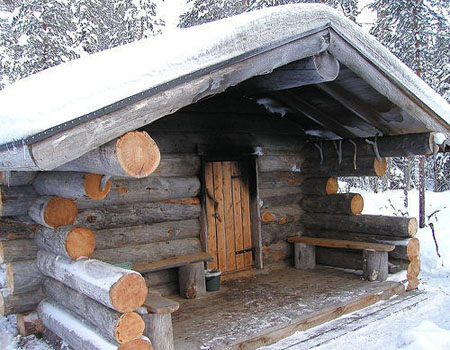
A small Russian bathhouse, made from scraps of timber, can be installed on oak posts. We see an example of such a structure in photograph No. 6.

Larger structures require their own foundation. There are three possible options here:
Do not forget that the type of foundation affects the choice of material and wall design. Pile and columnar foundations are used to install a wooden frame, as well as for bathhouses made of timber or logs (photos No. 7 and No. 8).


The “tape” of rubble concrete is suitable for any walls (made of gas silicate blocks, logs and frames).

A cheap, reliable and simple version of a bathhouse is obtained using a technology called “clay mortar”. For such a structure you will need little: a truck of firewood, a cart of straw and a dump truck of clay (photo No. 10).

The best shape for a wood burning structure is round. It eliminates the need to reinforce masonry corners and looks aesthetically pleasing and original.
By borrowing from birds the technology of building nests from branches and clay, you can build such a simple and warm bathhouse (photo No. 11).

For the exterior finishing of a frame bath, we can recommend the following materials:

It is best to use ecowool as insulation. It does not accumulate moisture, does not rot and does not burn. If ecowool is not available in your region, then you can buy ordinary mineral insulation in the form of a semi-rigid slab. It is easily and simply placed in the spaces between the frame posts.
To protect mineral wool from water vapor and reduce heat loss, the walls are lined with sheets of foil polyethylene. After this, a frame of slats is attached to them and trimmed with wood: alder, linden or pine clapboard (photo No. 13).

We do not recommend installing OSB board indoors. This material releases toxic gases when exposed to high temperatures.
Options for steam and thermal insulation of walls of a frame structure, as well as a bathhouse built from blocks or logs, are presented in Figure No. 1.

Building a simple bathhouse with your own hands includes sewerage. It can be made from standard plastic pipes discharged into a cesspool or drainage well.
The water intake funnel is placed in the center or in the corner of the room, and the floor is made in the form of expanded clay concrete screed with a slope towards the drain. Before concreting, you need to compact the soil and cover it with several layers of waterproofing. Wooden flooring is an excellent option, but in a bathhouse it quickly rots and requires replacement. Instead, we recommend making gratings from wooden slats and laying them on a concrete screed. After washing, they can be removed, taken outside and dried.

The design of the bath ceiling is standard. First, a vapor barrier film is “attached” to the rafters and counter-battens (3x4 cm) are stuffed. A clapboard cladding is attached to them. The gaps between the rafters are filled with insulation and covered with under-roofing film. It protects it from weathering and atmospheric moisture (Fig. No. 2).

A counter-lattice is placed on the film, creating a ventilated gap between the roof and the insulation. The work on the installation of the ceiling and roof is completed by installing the main sheathing and laying roofing material(slate or metal tiles).
The main “detail” is any country bathhouse- bake. It should provide rapid heating of the air and maintain a high temperature. A metal stove heats up the fastest.
To accumulate heat and create steam, it must be equipped with a compartment for stones. There are many options for stoves for simple baths, so we will not dwell on them in detail. Let's just say that the easiest way to make a heat generator is from a large-diameter steel pipe, an old gas cylinder or barrel (photo No. 15). Another easy-to-use material is a steel sheet 3-5 mm thick (photo No. 16).

Knowing the simplest welding techniques, you can assemble such a structure without outside help.
A simple do-it-yourself bathhouse - options and construction features
You can build a Russian bathhouse with your own hands from start to finish, install windows and doors yourself, install a wooden font and furniture assembled with your own hands. But first you need to properly raise the frame, lay the floor, sew up the ceiling, and build a stove. Studying step-by-step instructions and advice from professionals will help with this.
The human body temperature does not exceed 40° because he sweats, due to which he releases excess heat into the surrounding air with the release of excess fluid. This is the basis of the operating principle of any type of bath. The differences are only in the ratio of temperature and humidity.
In a Turkish bath (hammam), the humidity reaches 100%, and the temperature of the air, stone floor and benches does not exceed 40°. In sauna ( Finnish sauna) this relationship is completely opposite. At 120° the humidity is only 40%.
But the optimal combination of temperature and humidity for health (and there will be no negative consequences from such a procedure) can only be maintained in a Russian bathhouse, but only if it is properly designed and built.
A bathhouse cannot be called a cheap pleasure. If you order its construction on a turnkey basis, the amount may turn out to be unaffordable. With average prices for materials and specialist work, you will have to pay from 7 to 22 thousand dollars. You can build the simplest bathhouse yourself, saving significant money.
Russian baths, as close as possible to traditional ones, are coming back into fashion. They have their own characteristics:
All this creates a lot of unnecessary difficulties; the bathhouse itself is generally flammable and short-lived. But there is every opportunity to independently build a bathhouse with the same qualities, but much more practical and modern. It is recommended to make a sauna house not only with a steam room, but also with a washing room, where there is a font, a tub for dousing or a shower, and a dressing room.
They undress in it, store towels, sheets, brooms and brooms, relax between visits to the steam room, and drink tea. This room serves as a barrier to cold air. There is a window there (for security reasons and for beauty).
A heater with a water tank is installed in it, and beds or shelves for lying on are built. The oven provides uniform, strong heating and exposure to superheated steam without convective air mixing. The steam room may have a small window for ventilation, which will help avoid waterlogging (one or two ventilation holes can be made for the same purpose).
Heat enters this room from the back wall of the furnace. After visiting the steam room, you need to cool down in the font or shower, which removes waste and toxins from the body. At the same time, sweating does not stop, and due to high humidity it also intensifies. The washing machine's operating principle is similar to that of a hammam.
On small area you can build a small bathhouse that can comfortably accommodate three to four people.
If the area is small, then you don’t have much choice. But if it is spacious, then there is an opportunity to use all possible advantages.
You can limit yourself to the simplest and cheapest foundation if the site has good hard soil and deep groundwater. The bathhouse should not be located close to the well, as it is considered a source of pollution, the house (so that moisture from the drain does not damage the foundation), the toilet and the compost pit (so as not to wash away their contents).
Although a bathhouse can now be built from anything, for example, from brick, polystyrene concrete, aerated concrete, expanded clay or foam blocks, there are physical laws that confirm the appropriateness of the conservative practices of our ancestors. And all due to the fact that it heats up very much and then cools down, high humidity is created in it, and after ventilation the rooms dry out quickly. Blocks and bricks in this mode must have a special multi-layer cladding.
The tree may not have any cladding. In addition, it is this material that, when heated, gives an exceptionally healthy and beneficial heat. Therefore, for aesthetic and practical reasons, it is recommended to dwell on it.
The intensity of the steam depends on the wood from which the walls of the steam room are made:
What you need to pay attention to when buying wood:
Glued imitations are suitable for any building, except for a bathhouse. The lamellas from which the timber (or log) is made warp and deform due to temperature.
Solid timber can be profiled or regular edged. The main disadvantage of the second type is frequent warping as a result of air drying. Profiled timber is expensive, and not just any one is suitable for building a bathhouse; for example, material with recesses at the top is not suitable due to the collection of condensate in them.
Therefore, most often a log is used to build a bathhouse. Raw or wild is difficult to buy. Therefore, it is recommended to choose a rounded log: it is well dried and smooth. It should not have radial cracks, as condensation accumulates in them, and this leads to rotting. Likewise, it should not have cuts in the upper part. To cut into a bowl, the log must have a so-called moon groove at the bottom.
You need to choose the cutting method in advance. There are several options for designing the ends of the logs and assembling them into a structure:
Since the length of a rounded log is 6 meters, it would be logical to take this into account when designing a bathhouse, making its side exactly like this. The building must have a steam room, a washing room, a dressing room and a stove. The height of the bath is usually determined solely by capabilities, but traditionally the floor to ceiling should be 220 or 230 cm.
This is a key step. Without approval of the project before the start of construction, an already built bathhouse can be demolished due to any complaints from neighbors, and you will lose the labor and money invested. The project should include the following items:

To carry out the calculation, you need to take into account what diameter the log will have. A larger one is better for a bath, but it is more expensive. The optimal diameter is 280 mm. The cost of 1 m 3 of such logs with cups is on average about 8 thousand rubles.
Now you need to determine the height of the pediment. To do this, it is recommended to focus on natural conditions. With a large amount of precipitation, the gable should be high and the roof steep so that the snow does not linger on it, and in strong winds, vice versa, so as not to create excessive windage. The average height of the pediment is 1.5 m.
 Top view and log cross-section parameters
  A drawing of a log house will help in filling out the initial data
  To calculate the amount of material, you must fill in all the initial data
  A special calculator can help with the calculation.
  All values can be entered into a special table
To build a bathhouse with your own hands you need:
Now you can proceed directly to construction.
All work can be divided into stages that follow each other. Between some of them it is necessary to make a certain time interval.
First you need to select its type:
All types of foundations, except boulder foundations, require waterproofing between. It is usually done using roofing felt or bitumen.
Lathing with thin slats over waterproofing is needed to prevent capillary seepage of moisture into the frame. However, a columnar block foundation does not need it.
This stage occurs immediately after the foundation is laid, before the construction of the log house, simultaneously with the insulation of the subfloor.
In the old baths, the drain went straight through the plank floor to the ground, so the building was placed on a natural slope. Now such a drain is prohibited, but you can use the idea itself both in the steam room and in the washing room. It is recommended to organize a drain through the entire floor or collect it at one point where a drain grate is installed. But the first option will be more environmentally friendly.
Important! Under no circumstances should a bathhouse drain be connected to a common septic tank; it will simply choke due to volley discharges. You need to dig a separate drain hole.
The subfloor is first insulated with expanded clay, then a concrete screed is made on a slope. This work can only be done in summer, as the concrete will not be strong if it is poured in the cold. The cement is mixed with the addition of a water-polymer emulsion (at the rate of 200 ml per 10 liters of concrete). The dried and already hardened foundation is coated with bitumen mastic, then left for a week. It is advisable to build a primitive water seal that can eliminate unpleasant odors.
It cannot be strictly connected to the log house. The ends of the logs, on which the floor with slots are laid, are inserted into the slots of the lower crown. It is advisable to make the logs from “tar”. The floor may have slots or a ladder. In the vestibule it is always solid. It is recommended to use a tongue and groove board for the floor.
It is placed sequentially, each crown is fixed with dowels - round dowels (it is advisable to take oak ones). A hole for fastening half the thickness of the previous one is drilled through the log, all the way down. They take it off. They put caulking. Insert the dowel by piercing the caulk with it. Thread the top log onto the dowel. Repeat in a checkerboard pattern.
Do not forget to remove a piece of log in those places where there should be openings for windows and doors on their upper side.
Caulk is laid between the logs in a stretch, and then the finished log house is caulked with a cord.
Residential buildings are insulated with synthetic waterproofing agents, but this is not suitable for a bathhouse. Jute will replace traditional moss and hemp. It literally fuses with the wood and seals the room perfectly. This type of caulking is sold in sets (tape and cord).
Don't forget about the so-called technological break. The finished log house is sewn up on top with any auxiliary material, including cardboard, and covered with film for drying and shrinking. The process can take from six months to one and a half years. Only after this period has expired can construction continue.
Openings are cut down from the marks left with mandatory control by a hydraulic level. The trimmings will go to the ceiling and furniture. You can immediately make a frame for the doorway. Since the log house is constantly “walking”, an ordinary door frame will not withstand the changing load. There is a special technology by which only vertical parts are fixed, which eliminates its deformation. To do this, mark a hole for the door along a hydraulic level or plumb line, and remove the wood according to the intended profile. The height of the opening should be 5–7 cm greater than the door so that there is freedom for deformation. It is then recommended to fill this gap with tow and then cover it with platband. The edges of the logs are trimmed so that the platbands can be secured.
It is recommended to choose a suspended ceiling due to its durability and cost-effectiveness. This design consists of beams connected to a log house, which also serve as rafters. After constructing the ceiling, it is caulked with jute, covered with roofing felt and insulated with mineral wool.
The roof is suitable gable. The rafters are mounted from timber.
All work takes place in several steps:
If the frame was raised correctly, it had enough time to shrink, then no interior decoration no walls needed.
These parts can be bought or made yourself (from tongue-and-groove boards with dowels).
Installation should be carried out according to the following plan:
Bathroom furniture can be used for a steam room (shelves) and a washing room with a dressing room (benches, table).
Shelves come in different widths. This depends on personal preference, although there are some design traditions that allow you to calculate the minimum size suitable for a person of average height and build. It is customary to increase the average sizes to comfortable ones.
The minimum distance from the shelves to the ceiling should be at least 110 cm. In such a bathhouse you will not overheat on the upper tier, and there will be enough space to sit or lie with your legs raised. There are people who like to wave a broom very actively. Then it makes sense to leave it at the top more space(up to 1.5 m). The lower tier is traditionally located no lower than 30 cm from the floor of the steam room.
It would be advisable to make the shelves not from pine, but from linden, since it has lower thermal conductivity and does not emit resin. The frame can be made from timber, then sheathed with prepared boards.
Even at the construction stage, it is necessary to use modern impregnating compounds that can withstand high temperatures and humidity without harming human health. This way you can protect the building from fungus and rot. Those that are suitable for the ceiling cannot always be used to cover furniture.
Manufacturers of varnishes and paints (Senezh, Empils, Rogneda, Dulux, Tikkurila, Nobel, Belinka, Teknos) produce many such products with water-repellent natural substances such as paraffin, wax, oil. They are divided into those suitable for external walls, internal surfaces that a person does not touch with his body (ceiling) and furniture.
Pyroprotective and antiseptic impregnation of logs is usually done at the timber mill, but it must be done again after construction.
The first application of the compositions to furniture is carried out immediately after its manufacture on a dry and clean surface, or even before manufacture (on wooden blanks). The product should be evenly distributed with a sponge, soft cloth or with a brush. Due to the thick consistency, a spray gun will not work.
For all sauna stoves there is a single condition, the fulfillment of which is mandatory - lengthening the combustion channel so that the door is located in the dressing room (firewood is placed in it in that room).
You can install a metal stove by purchasing it ready-made, or build a brick one yourself (it is much better due to its slower heating and long-term heat transfer). The most difficult thing will be to correctly remove the chimney through a wooden roof, insulating it with special metal sheets and vermiculite.
Stones must be selected as carefully as possible. They must have the following qualities:
The stones should be:
If the heater is made correctly, then unforgettable moments of steam await you.
Only a steam room provides the healthiest and only correct ratio of humidity and heat. But even there there are extreme values. This is also confirmed scientifically. The best state of health at a certain combination of humidity and temperature is graphically expressed by a homeothermal curve. Below the first curve is the optimal combination of temperature up to 90° and humidity up to 80%, which is what the Russian steam bath provides.
While in the steam room, the body is washed with hot, humid air, especially when exposed to it with a broom, due to which everything warms up. In this case, there is a constant flow of oxygen to the tissues.
After being in the steam room, you need to plunge into the ice plunge pool.
Steam in a Russian bath trains blood vessels, improves immunity, reduces weight and pleases the soul. And if it is also built with your own hands, then the pleasure increases many times over.
A bathhouse is a mandatory attribute of most country houses and personal plots. However, its construction is often associated with considerable costs. However, when it is built small building, used only in the warm season, financial losses can be minimized.
The main expenses that await us when building a bathhouse are the purchase of construction and Supplies. Therefore, when drawing up an estimate for construction, let’s think about how these costs can be reduced. The traditional building material for baths is wood in the form of timber or rounded logs. Slightly less common are buildings made of brick or sibit, which have proven themselves well. But, unfortunately, the price of such consumables is quite high.
Let's consider alternative materials that are not so well known, but are quite suitable for the quick construction of an inexpensive bathhouse:
Of these options, the last two are the most acceptable. The fact is that a classic cinder block can hardly be called an environmentally friendly material. Of course, modern manufacturers reduce its danger to a minimum, but this only applies to large companies. But health is not something you want to risk. A lot has already been said about frame baths. Therefore, further we will talk about how to build wood concrete bath.
Among owners of dachas and country houses, strip, monolithic, screw foundations and options on support posts are popular. Each of these options has strengths and weak sides. For example, it is quite possible to make a strip base with your own hands without extra costs, but it is almost impossible to equip it in areas with difficult terrain. In addition, concrete (the main component) gains strength for at least 14 days, and ideally a month. There is no need to talk about efficiency.
A monolithic foundation can withstand significant loads, but at the same time it is subject to the same disadvantages as a strip foundation - it is difficult to equip it in swampy and uneven areas. Not to mention the price. The cost of such a base is not affordable. But you also need to take into account logistics costs. Foundations on support columns are considered one of the most affordable. Yes, the installation of such a foundation will require a minimum of labor and money costs. However, like the previous options, it is not advisable to use it in areas with watery soil.
Screw piles are considered equal in cost strip foundation. You can agree with this opinion if you forget about the associated expenses. To install metal piles, you do not need to order and pay for the delivery of concrete, or spend money on a reinforcing belt, sand and gravel for the cushion. But perhaps the main advantage is that you can install a screw foundation in one day without outside help.

Such piles are blamed for their inability to withstand significant loads. But our task is to build a bathhouse as quickly and with minimal costs. For us, screw piles are the best option.
Let's start with a description of the pile itself. This is a steel pipe equipped with a tip and blades at the bottom. The dimensions of the pile depend on the required depth of screwing into the ground, but cannot be less than 2.5 meters. The body of the pile is coated with an anti-corrosion solution. After screwing into the ground, the pile is crowned with a square head (50x50 cm). It is fixed with welding machine, after which the seam is protected from corrosion. It is on this head that the support beam (channel) will lie, from which the construction of the bathhouse will begin.

Work by device screw foundation starts with marking. The proverb “measure twice, cut once” is more relevant than ever. The number of piles depends on the dimensions of the future building, but the distance between them cannot be more than 3 m, and preferably 2–2.5 m. After marking and clearing the construction site of debris and foreign objects, we invite helpers and begin screwing in the pile:
Of course, the length of the crowbar will not allow you to create an effective lever. Therefore, we extend it with pre-prepared pipes, preferably square section– they have higher rigidity. average speed depth - 20 cm per turn of the pile. Stop screwing when the metal lever becomes deformed. But it is important that the pile goes below the freezing point. The minimum distance from the soil surface to the pile tip is 1.5 m.
After deepening the piles, we check their above-ground edges - they should be at the same level. If necessary, we make adjustments using a grinder. We complete the work by pouring cement mortar into the pile cavity. This will give it additional rigidity and prevent corrosion. The final stage, when working with piles - installation of strapping. For a bathhouse made of wood concrete, we make it from a metal channel, welding it to the ends. For a frame bath, a beam secured with bolts is sufficient. A mandatory requirement in both cases is the use of a building level; the horizon must be level, because the quality of the walls and roof depends on it.
Theoretically, you can make wood concrete blocks yourself. To do this, you will need a vibrating table, block molds, cement and leftover lumber (sawdust, shavings). However, given that the cost of such material is low, it can be purchased at a hardware store. This material combines such important characteristics for a bath as good vapor permeability and low thermal conductivity. In addition, we do not forget about the safety of this material for human health.
Today you almost never find bathhouses with a combined steam room and sink. As a rule, the layout includes a separate steam room, sink and room. Drawings drawn up before construction will allow you to select optimal sizes and the number of consumables. There are two technologies for constructing walls from wood concrete - monolithic and from blocks. The first involves preparing or purchasing wood concrete mortar. Let’s say right away that the pleasure is not cheap, and if you make it yourself it will also take a long time. Therefore, let’s turn to the second option – block construction.

By and large, this method is no different from working with brick, sibit or cinder block. The laying begins with the installation of corner blocks, after which a thread is stretched between them - a guideline for the masonry. Adhering to the line specified by the cord, lay out the first row. Next we check its horizon building level. If necessary, we correct the flaws and proceed to laying out the second row.
Please note that, unlike the same sibit, laying arbolite blocks does not require special glue - it is quite possible to get by with the usual mortar of sand and cement. However, there are similar points. For example, when laying out door and window openings, you need to lay a corner or channel on top. So, we have raised the body of the future bathhouse, all that remains is to build the roof, install the stove and finish interior spaces.
Among the variety of roofs of various types (Gothic, hip, oriental), we will focus on the gable roof. The explanation is simple - this design is simple, reliable and relatively low in price. From building materials for the construction of such a roof we will need:
In addition to lumber, we will prepare a vapor barrier film, mineral wool, and roofing material. For the latter, we use a metal profile - it is easy to work with and is relatively inexpensive. We start by treating the wood with an antiseptic and fire-fighting solution, in the bathhouse - this mandatory requirement. Then we lay it along the upper perimeter of the walls. waterproofing layer. And only after this we begin the installation of the rafter system.
It begins with laying timber - Mauerlat - around the perimeter of the walls. Naturally, all angles are checked with a construction angle, and the horizon is checked with a level. After the Mauerlat is leveled, we tighten it to the walls with anchor bolts. The next step is the installation of tension beams. They are attached to the long sides of the Mauerlat “in the paw”. That is, we need to cut out the corresponding grooves in the beams and timber (base). After laying, we additionally fix the wooden parts with nails or staples. It is advisable to maintain the distance between the beams at 1.5 meters.
Having finished preparing the base, we place vertical posts along the ends of the building. We immediately attach temporary slopes to them (they will give rigidity to the structure) and rafter legs. We connect the racks with a beam - a purlin, on which the rest of the rafter legs rest. By the way, release them 20 cm from the wall - this will reduce the impact of precipitation on the wood concrete. After installing the rafters, we stuff them onto them as lathing. unedged board, we lay a vapor barrier film on it. It is attached using a construction stapler.

The final stage in roof construction is laying the roofing material. The metal profile is pressed to the sheathing with roofing screws. Having closed the constructed circuit, we have already completed 70% of the construction. All we have to do is hem the ceiling and finish the walls inside the bathhouse.
Among the budget finishing materials, we highlight PVC panels. They have proven themselves well in finishing rest rooms and washing areas. This is a completely worthy alternative to ceramic tiles. You can choose such material to suit every taste and budget. But only for the washroom. In the steam room, it is better to use traditional linden lining - it will not melt when exposed to high temperatures.
It is noteworthy that wall coverings with clapboards and panels are performed almost identically. In both cases, we need to install wooden sheathing. Metal carcass, causing corrosion, is unacceptable in this case. On stuffed and leveled wooden base We install wooden (in the steam room) and plastic (in the sink) panels.

Keep in mind that the distance from the stove to wooden surfaces should be at least 0.5 meters, but it can be reduced to 25 cm by protecting flammable surfaces with non-combustible material.
The final stage before installing the stove is installing the ceiling. To do this, you can use clapboard or planed boards. We nail them to the tension beams and go up to the attic, we need to insulate the ceiling. Boards hemmed underneath and tie beams formed the floor of the attic. Let's cover it vapor barrier film and fill it with mineral wool. In order to save money, we will not use ready-made mats, but crumble mats; it can be purchased as residual raw materials at enterprises producing sandwich panels and similar products.
The only caveat when arranging the ceiling is to install a 40x40 cm metal box at the chimney exit. It will be required in any case, regardless of which stove you prefer - metal or brick.


