This material should be of interest to all apartment owners who have a separate balcony or loggia. In this article I want to talk about how simply insulating a balcony with your own hands will help make it a full-fledged part of your apartment. If you are tired of using your balcony exclusively for storing old unnecessary things, read the article and find out how to properly insulate it.
To avoid any confusion in the future, I first want to explain the difference between a loggia and a balcony:


In old multi-storey buildings, apartments with balconies and loggias were rented to residents without any glazing. This means that snow and rain can freely fall there, and the air temperature throughout the year remains the same as outside.
Apartments in modern new buildings, most often rented with glazed balconies. Glazing helps protect it from rain and snow, but does not protect it from cold, wind and dampness. Therefore, the temperature and humidity on a glazed but uninsulated balcony are not very different from the weather outside.
I can tell from personal experience that simultaneous glazing and insulation of balconies with your own hands allows you to solve several housing issues at once:


If the layout of your home allows, then using a balcony or loggia, it’s easy to turn a one-room apartment into a two-room one:

Even if you do not plan to convert the balcony into a living room, its insulation will help to significantly reduce heat losses in your apartment. Firstly, this will make the house much warmer in winter, and secondly, it will reduce monthly heating and air conditioning costs.
To insulate balconies, it is best to use rigid polymer-based thermal insulation materials, or roll insulation based on mineral wool.
Both insulation materials have their advantages and disadvantages, so below I will talk about their main qualities in more detail:
It is characterized by the following characteristics:


Penofol in thermal insulation coating performs three important functions at once:

Basalt wool is considered a universal type of insulation, since it has practically no restrictions on its use in construction:

Besides stone wool, there is glass wool on sale, which is made from thin threads of molten glass. Its fibers are very fragile and break easily, so after creasing, such cotton wool does not restore its shape. I do not recommend using it for insulating residential premises, because small glass fibers can penetrate human skin and cause severe irritation.
To insulate a balcony with your own hands, you can get by with the usual set of household tools:


At night and during the day, significant changes in air temperature can be observed on an insulated balcony, which in turn can lead to the formation of condensation on the walls and ceiling. Therefore, for interior finishing it is allowed to use only moisture-resistant and frost-resistant materials.
Insulating a balcony from the inside should begin with installing windows, but in some cases this may cause problems. During construction multi-storey buildings, balcony parapets are usually made in the form of a light metal fence welded from a corner and a steel square. It is unsafe to install heavy double-chamber balcony glazing on such a parapet, so before installing new windows, it needs to be strengthened.
I can suggest three ways to strengthen the parapet:


To do this, you can use the following method:

Installation of metal-plastic double-glazed windows requires certain knowledge and practical skills, so I recommend entrusting such work to qualified specialists in this matter. Firstly, it is more reliable and safe, and secondly, they provide a guarantee for their work. In addition, when ordering windows with installation, you can get a discount on installation work.
Balcony floor slabs usually have a small thickness, so before installing the finished floor covering, it must be properly insulated.
Floor insulation can be done with foam panels, sheets of extruded polystyrene foam or mineral wool slabs.
The general principle of using these materials is approximately the same, so I will tell you how to do this using foam sheets as an example:


If you want to lay linoleum or laminate on the balcony, then first you need to arrange the subfloor. To do this, sheets of moisture-resistant plywood or OSB with a thickness of at least 20 mm must be secured to the longitudinal bars. After this, the subfloor must be sanded and a finishing floor covering laid.
For normal thermal insulation of a balcony and loggia, it is very important to properly insulate the parapet and side walls, because they are in direct contact with cold air from the street. The solid wall between the apartment and the loggia does not need to be insulated so that it can freely transmit heat from the heated room to the loggia.
Below is step-by-step instruction, in which I will talk about insulating walls and balcony parapets using polystyrene foam and mineral wool:


When making a supporting frame for finishing sheathing, some craftsmen use a metal profile for drywall. At first glance, this option may seem simpler, but I do not recommend doing so. The fact is that metal has a higher thermal conductivity than wood, therefore, at the installation site of metal profiles, cold bridges are formed in the wall. They worsen the thermal insulation of the balcony and can cause condensation to form in the insulation layer.
If you plan to install a separate heating system on the balcony, then we must not forget that warm air from the radiators always rushes upward. In order not to heat the neighbor’s balcony from the top floor, I advise you to devote Special attention thermal insulation of the ceiling.
The gap between the canopy and the floor slab must be filled with foam.


Even with full compliance with the insulation technology, condensation can form inside the insulating sheathing. To protect wood from rotting and mold, it is important to follow two simple rules. First of all, everything wooden parts Before installation, it must be treated with antiseptic impregnation. Secondly, always leave a ventilation gap of 15-20 mm wide between the finishing sheathing and the insulation.
After reading this article, you can easily insulate any balcony or loggia in a city apartment yourself. A visual guide to insulating balconies can be seen in the video in this article. I suggest discussing all your questions and wishes below in the comment form.
The best way to insulate a loggia from the inside: step-by-step instructions and advice = professionals. From a constructive point of view, a loggia is ideal for becoming an extension of an apartment or even a full-fledged room. To achieve this, a series of construction and installation work on glazing, etc.
As a result, you can get a spacious living room, a cozy relaxation room, or even additional space for a work area.
If you do not take into account important factors when choosing materials, the result of insulation may not turn out as desired, so let's look at which materials are better for insulating a loggia, and what technology should be used to carry out the insulation.

Since if it is small in size, then you will need to give preference to insulation, which, despite its small thickness, has a high thermal protection index. In this case, you will lose minimal usable space.
Keep in mind that each material from which indoor walls are made has the ability to allow accumulated moisture to pass through. This is water vapor that collides with cold air from the street and settles on the wall outside. If you have insulated the wall, it means that the main insulation will be covered, and this will lead to further rotting and a decrease in properties. It is important to ensure that steam simply does not reach the insulation.
On construction market you can find a lot of materials to insulate a loggia, the characteristics of which are important to familiarize yourself with in advance before starting construction and installation work. What needs to be done?
Mineral wool, as well as materials based on cotton wool or basalt fiber, are quite popular materials with excellent thermal insulation, fire resistance, etc. When used, these materials perfectly retain their structure, appearance and shape, and are also resistant to negative impact environment and microorganisms, but the downside is that they are highly hygroscopic. Due to such water permeability, careful waterproofing is necessary. The disadvantages include the need to create and the thickness of the material, which has a bad effect on the usable area.
What is the best way to insulate a loggia from the inside? Polystyrene foam, which is obtained from polystyrene. It is not in vain that it is chosen, since it is durable, has a low level of thermal conductivity, has a low level of hydrophobicity and is resistant to microorganisms. For insulation from the inside, it is recommended to use self-extinguishing foam, since the usual type is highly flammable.
The following materials are also suitable as insulation for the loggia: those made of extruded polyethylene and covered with foil on one or both sides: Izocom, Izolon, Penofol, Tepofol. Among the listed heat insulators, this type has the highest thermal conductivity, so it is used as an independent material for insulation only for “cold” insulation or as a reflective material on internal walls.
But its small thickness and high level of vapor permeability makes it possible to use it as a second layer of insulation.
I would like to talk separately about the material that is produced in the form of slabs or rolls. This is polyurethane foam - it is sprayed like foam and creates a thermal insulation surface. It surpasses all the materials described above in terms of technical indicators. But it also has a drawback - a high level of flammability with the release of toxic agents. Manual installation is not possible, as a special spraying installation is required.
When you have finally decided how best to insulate the loggia, you need to carry out a number of preparatory work:
For glazing, you can safely choose double-glazed windows with a frame made of any material. They must be functional, be sure to have a ventilation mode and be relatively light so that you do not create additional load on the floor slab. The ceiling, walls and floor must be cleared of debris and other contaminants in advance, and the integrity of the surface must be checked. If you find any gaps between the tiles or tiles, they need to be filled with sealant and, if necessary, leveled.
In addition to these procedures, it is definitely worth carrying out waterproofing. For this, several materials are used, but sometimes only one, since waterproofing is carried out for parapets and external walls, frames, ceilings and floors.
Such materials include:
Waterproofing roll type should be glued overlapping to the base, and the resulting seams should be sealed with sealant, soldered or sealed with special tape. If you use foil insulation for the coating, you get an additional layer of thermal insulation. When using painting, coating and penetrating types of insulation, it will be justified if you are insulating in hard-to-reach places and where the room size is very small.
Once you have decided on the material for waterproofing and are ready to insulate the loggia, you can begin the insulation itself. There are two ways:
In this option we will use materials with a low level of vapor permeability - expanded polystyrene and polystyrene. The thickness of such materials must be such that when created, the required resistance to the passage of steam is obtained, and thermal insulation is maintained.

You can also use rolled thermal insulation materials, and the installation technology will be the same. In this case, you should cut pieces of insulation to the size you need. After this, we receive a surface that is completely ready for painting or plastering, as well as for pasting with liquid wallpaper and other decorative materials.
In this method there are no restrictions on choice, since thanks to the technology it is possible to create a vapor barrier between the finishing and the insulation. This type of insulation is carried out with the help of arranging a wooden sheathing (but it is possible without it), but in this case, to attach the lining and sheathing, a vapor barrier is placed on top.
From wooden beams They make a sheathing, but you can also use metal fasteners or a profile for this. If you use metal parts, be sure to lay insulation under them.
After installation has been completed, we attach the overlap to the vapor barrier material. It could also be simple polyethylene or a membrane. All joints should be taped with tape. If you did the insulation without lathing, then you should attach profiles on top to install the finishing.
And as a reminder, we want to provide a list of common mistakes that many people have made. We will help you find out exactly what mistakes are made and how to avoid them.
People often think about how best to insulate a loggia, but few people think about the fact that your decision to make one large room out of a loggia and a room must be registered by BTI representatives. This measure is necessary so that you do not have problems with selling your apartment in the future when inconsistencies are found with you. real apartment and technical passport.
Advice: you can glaze the balcony using sliding double-glazed windows on an aluminum profile and thus equip an unheated summer loggia. This measure will give you extra space, there will be fewer drafts, and you will not need to take permission for redevelopment.
 If you have permission to re-equipment, then you are unlikely to decide to take such a step, but just in case, it is worth warning that the removal of radiator pipes and heating equipment unacceptable. There is too much heat loss on the loggia, and sometimes even with insulation the pipes freeze, which causes accidents. In addition, because of this you will have to pay extra for heating.
Advice: for heating, use a heated floor system or oil as an alternative - it can be hung on the wall or used as a regular radiator.
This design solution looks great - when closed it is a smooth surface, and sometimes it is not disturbed even by edges. In addition, such sashes are convenient to assemble into an accordion, and this will not take up the space of the loggia. But for insulated rooms this is not an option - single glazing and cracks will not protect against the cold. In addition, dirt and dust quickly accumulate on them, as well as fingerprints, and there is no way to attach a mosquito net.
Advice: don’t stop at just this option – we advise you to take a closer look at the latest developments like insulated tilt-and-slide windows. But perfect choice There will be a PVC double-glazed window with hinged sashes. They do not take up as much space as they seem; it is possible to open them for ventilation, as well as open them to clean the glass surface from the outside.
To increase the area, or more precisely, the volume of the loggia, apartment owners often want to build a frame for glazing (extended by a couple of tens of cm). This is how a canopy is made along the upper perimeter, on which snow will accumulate, and in bad weather the sound of rain will be heard. The main thing is that a glass build-up will form on the facade, which will spoil the appearance of the structure.
Advice: an alternative option is available only if the façade is monotonous. If all the balconies in your house are open, you should discard this idea, or even simple glazing. You can also decorate your loggia with greenery.
A real perfectionist's nightmare is seams with bubbling foam. They are unsightly, and they can also ruin the microclimate of your apartment - the fact is that the foam of polyurethane sealants cannot withstand the impact sun rays and moisture, and without protection it will quickly collapse, thereby opening all sealed cracks and gaps to street noise and drafts.
Advice: The “foamed” seams should be treated well and the excess should be cut off, and then sanded with fine sandpaper and covered with a layer of putty or acrylate paint (ideally, both options should be used). If you have neither paint nor putty on hand, use mounting tape, but then in the future paint will not adhere well to such seams.
As you can see, the process of insulating the loggia itself is not complicated. It is very important to follow the instructions and recommendations that will help you create a warm loggia.
The balcony is the most vulnerable room in an apartment, which often suffers from severe frost and wind. And if earlier it often served as a kind of storage room, storing all the necessary (and often even unnecessary) things, now many people turn the loggia into a full-fledged room.
The only difficulty that residents face is that in winter it is almost impossible to be on the balcony - frost and strong wind create a beautiful picture outside the window, but a cold atmosphere on the loggia. However, today this problem can be prevented. A huge amount of thermal insulation materials make it easy and quick to insulate a balcony with your own hands.
Today, there are a huge number of options for how to insulate a balcony from the inside. The choice of one option or another may depend on many factors:
One way or another, before you start insulating the loggia, it is important to study in detail all the popular materials. This is the only way you can choose the option that suits you perfectly. We invite you to familiarize yourself with the most common insulation materials.

It is made of clay, therefore it is considered an environmentally friendly and safe material. Expanded clay is small and light porous granules. Such weight and structure of the material can be achieved thanks to special technology firing clay. The raw materials are first heated to approximately 1000 degrees, as a result of which voids are formed inside, providing heat and sound insulation. Expanded clay is used to insulate walls, floors, ceilings or even the foundation of a country house.
Advantages:
Flaws:

The most common insulation for walls and floors. Outwardly, it resembles a thick canvas, which consists of many molecules chaotically intertwined. The raw materials for mineral wool are glass, rocks or slag. In order for the fibers to be reliably connected to each other, they are impregnated with special mixtures based on oils and alcohol. Mineral wool itself is divided into several other types:
Advantages:
Flaws:

Perhaps the lightest thermal insulation material. It is a foamed mass that is more than 90% filled with air. It is thanks to such technology that it is possible to achieve good result and high quality. The popularity of polystyrene foam as insulation is also due to the large selection of materials. It is divided into the following categories:
Advantages:
Flaws:

Today, many people prefer to insulate their balcony with polystyrene foam. This material is a subtype of polystyrene foam and is also characterized by its low weight and good thermal insulation properties. Comparing polystyrene foam and expanded polystyrene, it can be noted that the materials have both common features and some differences. For example, the texture of the latter is not granular, but more even.
Advantages:
Flaws:

The basis for polyurethane foam is a subtype of plastic that has a foamed structure. Like some previous insulation materials, this material consists of 90% gaseous substance, which fills all its cells. Usage various technologies helped create several types of polyurethane:
Advantages:
Flaws:
It is one of the most innovative insulation materials for balconies. This material consists of several layers:
Unlike previous insulation materials, penofol is not able to absorb heat. Thanks to the foil, it works on a different principle, namely, it reflects thermal radiation. The material, in turn, is divided into several types:
Advantages:
Flaws:
In any repair or construction process, everything begins with the preparation of surfaces and territory. Therefore, before you insulate the balcony with your own hands, you will have to get rid of all the rubbish that is there. By the way, things that you plan to leave later also need to be moved to another room.
After the balcony is completely cleared of unnecessary things, you need to completely inspect the room. Firstly, it is important to understand which parts of the loggia require more thorough insulation. In addition, you need to pay attention to cracks and chips that allow cold air to pass through.
Important! Some balconies have a rather small area. And the thermal insulation material takes up space in the room. In this case, it is better to immediately determine the so-called “cold” and “warm” zones of the loggia and insulate only those that are more susceptible to frost and wind.

The balcony parapet especially needs insulation
Right now it is desirable to get rid of significant defects on surfaces. Large cracks can be sealed with putty or foam.
At the same stage, you should decide on the type of insulation for the balcony and stock up on all necessary tools. We'll talk about thermal insulation materials a little later. Now let's look at what tools you will need to insulate your balcony.
Tools for insulating a balcony:
Insulating a balcony with your own hands is a fairly simple and straightforward process. The main thing is to understand the sequence of work and stock up on the necessary tools. These include the following basic materials:
In some specific cases you may also need:
Here everything will depend on finishing loggias.
If you are planning to insulate a balcony with your own hands, then it is best to start from the ceiling and move further from top to bottom. Of course, if the ceiling of your loggia is the floor of your neighbors, then the process of protecting the room from frost and wind is much simpler. However, if the roof is independent, then a little effort should be made to insulate it.

To best protect your balcony from cold and wind, we recommend performing the work in the following sequence:
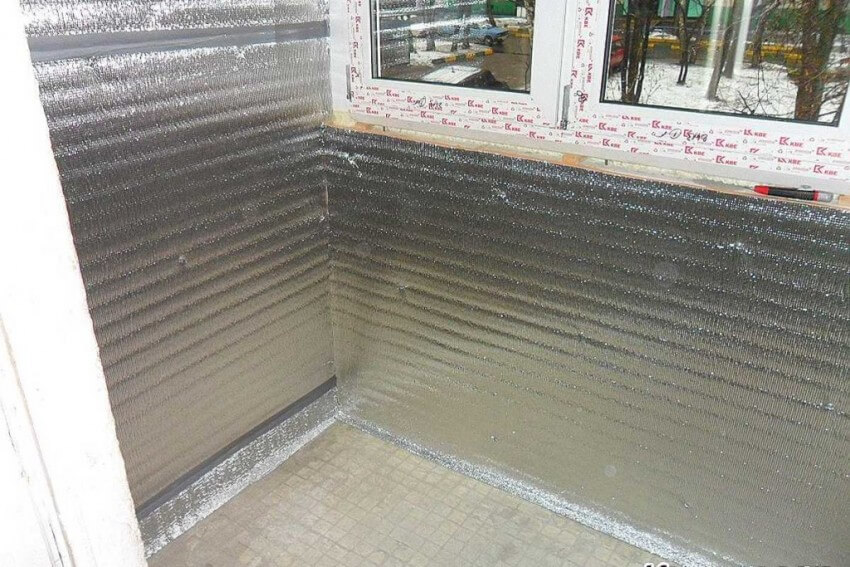
The initial stage of insulating the balcony floor is installing waterproofing on the surface. Polyethylene or penofol will do this role perfectly. Be sure to hide all seams between sheets with tape. This way you can be sure that the balcony is protected as much as possible from dampness.
Tip: If you use one-sided penofol (type “A”), install it with the reflective layer facing down.
Another popular option for waterproofing balcony floors is bitumen mastic. However, do not forget that such material dries for about 24 hours.
After waterproofing, you should install a frame or, in other words, logs. For this, wood or metal is used. The main thing is to choose the highest quality material that can last for many years.
Tip: If you are installing wooden beams, make sure that the moisture content does not exceed 12%. Also for that. To prevent the appearance of fungus, we recommend that you treat the beams with an antiseptic or a special primer.
The beams are laid at a distance equal to the width of one sheet of insulation. As for the height of the beams, it is usually 10-15 cm. To prevent gaps that appear between the logs and the wall of the balcony, ordinary polyurethane foam.
After installing the logs, you can proceed directly to installing the insulation. Make sure that there are no even the smallest gaps between the sheets (or slabs) and the frame. Otherwise, your work will not bring the desired result. In some cases, the insulation is laid in several layers (for greater protection). Then it is important that the seams between the plates are not in the same place. That is, the material needs to be laid with a slight offset.

In the process of insulating the floor on the balcony, it will not be superfluous to immediately take care of the walls. So, for example, making out waterproofing layer, sheathe the entire room around the perimeter. This will make your future work much easier.
Important! Most often, the wall that connects the balcony and the room (living room, kitchen, etc.) is insulated with one layer. While on external walls You should install at least two layers of insulation or use a denser thermal insulator.
If you want to insulate your balcony from the inside as efficiently as possible, you should never forget about the windows. After all, even the highest quality thermal insulation materials for walls, ceilings and floors will not bring any benefit if the wind breaks through the cracks in the window opening.
If your balcony has not been glazed all this time, you should pay special attention to the wall that protects it from the street. The parapet (that’s what this wall is called) must be strong enough to support the frames and double-glazed windows. In some cases, it is better to further strengthen this part of the loggia. There are two options for strengthening the parapet:
Before glazing a balcony, you need to select the material from which it will be made. window frames. Of course, the most popular today are PVC structures. However, some modern manufacturers They make wooden or aluminum frames, which are in no way inferior to plastic ones (except that they are more expensive).
Classic wooden frames are practically not airtight. Therefore, it will be impossible to insulate the balcony with their help. Therefore, it is better to use them in areas with a warmer climate.
As for aluminum structures, then they are able to retain heat much better than wood. In addition, they are also resistant to rust and corrosive processes. However, most the best option(if price-quality ratio is considered the criterion) are plastic windows. They're not afraid high humidity and temperature changes. In addition, such structures have good thermal conductivity. Therefore, if you want to insulate your balcony, choose PVC windows. The most common types of structures today are:

Advice: If you do not have the time or financial opportunity to update the balcony glazing, you can try to insulate the opening using special materials (spray foam, foam rubber, etc.).
If you live in an area with a cold climate, insulation alone on the balcony may not be enough. After all, even the highest quality heat insulators are sometimes unable to protect against severe frosts. Therefore, on cold winter days, you can organize additional insulation of the balcony.
For example, install an ordinary electric heater. For greater effect, it should be placed near the wall connecting the balcony and the apartment itself.
Important! Never place the heater near windows. The condensation that will be released during the process can greatly damage the glass unit.
If you do not want to install additional heating devices, and installing central heating on the balcony is strictly prohibited, you can install a “warm floor” system on the loggia. It will last for decades, creating a comfortable temperature even in the cold season. In addition, today many such systems are equipped with a special thermostat that helps you choose the most optimal mode.
Another option for additional insulation is air conditioning. In addition to the fact that it will heat the loggia in winter, it will also be able to cool the air on summer days. However, using an air conditioner has one rather important disadvantage - it will not be able to properly warm the floor on the balcony. Therefore, the warm floor still wins.
Tip: Installation of heated floors is another expense item. You should not rely only on your own strength, since installing the system is a rather complicated process. It is better to entrust the work to professionals.
Protecting the room from cold air and strong wind, do not forget that it is also important to organize on the balcony good ventilation. With hermetically sealed cracks this will be a little more difficult. Therefore, we recommend that you periodically ventilate the loggia for a more comfortable stay on it.
If you live in a cold climate, pay attention to the “breezer” type ventilation system, which supplies purified air from the street, preheating it to the temperature you need.

Work process ventilation system breather
When organizing balcony insulation yourself, you may not take into account many important nuances. As a rule, people make fairly predictable and common mistakes, including:


Sequence of materials when insulating a balcony
A loggia is several square meters that can serve a variety of purposes. To use this premises all year round, you need to ensure a comfortable temperature there. Every home craftsman can transform it into a cozy, useful and well-equipped space.
Are you planning to start arranging these additional square meters, but don’t know how to insulate the loggia with your own hands and what materials will be needed for this? We will help you deal with all the issues - our article provides recommendations for choosing insulation and discusses step-by-step instructions for thermal insulation of the walls, ceiling and floor of the loggia.
You should start, of course, with planning. You should decide on functional purpose this small room. If you plan to use it as a warehouse for things that are not very necessary, then insulation does not make much sense. But the loggia can be turned into an office, a small gym, a winter garden, etc.
There are also restrictions. For example, a loggia cannot be used as kitchen area, that is, install a stove there, a sink for washing dishes, etc. It is also prohibited to install a centralized heating system in this area.
There are a number of other restrictions that may be associated with architectural features And fire safety building. This may be a ban on glazing above a certain floor, on changing the appearance of the building, the height of the fence, etc.
As practice shows, many manage to somehow circumvent these standards and arrange a loggia to their liking. Before starting work, it doesn’t hurt to coordinate your plans with supervisory authorities or prepare for problems to arise after the rework is completed.
Installation of electrical wiring, lighting and heated floors during insulation of the loggia must be thought out in advance so that damage to the heat-insulating material is minimal
But under no circumstances should openings be made in a load-bearing wall; only the openings provided for in the original design are permissible. Even taken from the loggia window-door unit may pose a danger.
To keep the loggia warm, you will need high-quality glazing. It is better to order it from a reliable company. Double-glazed windows will do the job perfectly.
Part of the space will be “eaten up” by a layer of insulation. These centimeters will have to be sacrificed in order to reliably protect the house from the cold. Loggias located on the lower floors are most often insulated from the outside. We talk about the best materials for external wall insulation.
From the very beginning, you need to consider options for heating this space.
There are not so many of them, because only suitable for a loggia:
Considering that the installation area is small, you can spend money on such convenience as a TP. Cable systems are easy to install; you can do all the work yourself. Infrared flooring is more difficult to install; it requires almost perfect level base, but electricity costs during operation will be moderate.
But the simplest solution would be to use, especially if the loggia is not used every day, but only from time to time. Installing heated floors will require more expense and effort.
The choice of materials and options for insulating a loggia with your own hands is quite wide.
Among the most popular it is worth noting:
Mineral wool has a low price, but this is almost its only advantage. To lay such material, you will need to first arrange the lathing. Mineral wool is sensitive to moisture; when wet, it loses its beneficial features, so it is not always suitable for a loggia.
You need to provide a place for installation in advance. Usually a niche of a suitable size is made on the wall for these purposes. A temperature sensor placed in a corrugated tube is placed among the turns of the cable TP. It will also need to be connected to the thermostat.
Detailed video tutorial on how to insulate a loggia with your own hands:
Insulation of the loggia floor:
Modern materials and technologies make it possible to insulate a loggia really reliably and quickly. In any case, when performing installation work, the technology requirements and manufacturer’s recommendations should be observed. Then the result will fully meet expectations, and the insulation will remain effective for many years.
Are you planning to do your own insulation of the loggia, but do you still have questions after reading our material? Feel free to ask our experts for advice - write questions in the comments block.
The loggia is a part of the apartment that requires high-quality insulation. If you leave it in its original state, then in winter the cold will penetrate into the rest of the rooms, and this will mean extra money spent on heating. Owners who do not know how or how to insulate a balcony on their own invite workers, whose services cost a lot of money. And it’s good if the hired craftsmen turn out to be professionals, because contractors with a lack of qualifications often come to the call.
Show all

 If we take professionals as an example, they first visually assess the condition of the balcony and take into account what year it was built apartment house. Then they pay attention to the frame (whether it is metal or wood) and evaluate the dilapidation of the cladding. Lastly, experienced workers compare neighboring loggias and can suggest that the owner make a structure in the same style.
Because of the old-style balconies, all work becomes more complicated, especially if this building is not closed, but open type. In this case, the craftsmen are engaged in additional strengthening of the structure and replacement of rotten parts: they cut off the rusted metal elements of the frame and reconstruct the concrete platform. The upper and lower parts of the balcony must be strengthened.
how to insulate a balcony with your own hands
It is after the measures to restore the structure that specialists are engaged in cladding and internal thermal insulation premises. Often, owners prefer to equip their balconies with foam blocks and double-glazed windows. The stones are laid out at half the total height of the loggia, and the open space is covered with windows. The result is not only an attractive appearance of the building, but also significantly increases its strength. By the way, a double-glazed window will significantly insulate the room.
If the owner of an apartment replaces the windows with plastic ones, then it is advisable for him to purchase products with double glass, since single glass retains heat by only 30% in the cold season.


Without preparing the balcony you cannot take the next drastic steps. Before purchasing materials for insulating a loggia, specialists carry out the following work indoors:

The interior arrangement of the loggia concerns not only the ceiling and walls. It is equally important to insulate the floor, for example, with penofol.


 For internal insulation Almost all buildings use polystyrene foam very widely. Its low cost does not affect its quality. It is sold in the form of slabs 5 cm thick or more. If the apartment is located in the north, then it is better to use sheets 15 cm thick. To install polystyrene foam, a sheathing with identical cells is made. Expanded polystyrene is convenient in that it can be easily cut with an ordinary knife.
The positive aspects of this insulation are that it is odorless, does not emit harmful substances, is environmentally friendly and does not affect human health. Sheets are usually fixed with special “umbrellas” or construction glue. To save money, it is better to insulate the balcony inside with it.
Mineral wool is also quite popular. Such insulation is slightly more expensive than polystyrene foam, but this is due to the additional sound insulation that the material has. Therefore, by using mineral wool, you can not only efficiently insulate the structure, but also eliminate street noise. It is sold in the form of yellow rolls.
Insulation of the loggia Secrets of craftsmanship from Alexey Zemskov

 The fire safety of this insulation is at high level, and the absence of a specific odor makes mineral wool one of the most popular. The material begins to melt at a temperature of 1000 degrees. It is also necessary to make a sheathing for such rolls. Another plus is that it is easy to cut. The disadvantage is due to the composition, which includes powdered glass, which penetrates into the skin during operation and causes itching and redness.
Penoplex is a new insulation material that appeared on the building materials market relatively recently and has already become popular. It is lightweight, making it easy to work with. Penoplex is produced in the form of rectangular sheets, the cutting of which is possible even stationery knife. According to the method of fastening, it is similar to foam plastic, which is glued or fixed with fasteners. The surface of the material is rough, so it does not slip in your hands.


 Granulated expanded clay is often laid on the floor. This kind of insulation for a balcony inside has a porous structure and consists of baked clay, so it is environmentally friendly. Builders use it to insulate floors and ceilings.
The work process is simple, just create a layer of expanded clay and pour liquid cement so that the granules are held together. But we must take into account that such material will take away 15-20 cm of height from floor to ceiling. In addition, a thin-layer screed will have to be poured over the expanded clay, because the relief surface will not be suitable for laying, for example, parquet or laminate.
Another insulation option - penofol. It is made from foamed polyethylene. The material is especially suitable for water-heated floors, as it has a foil coating with a heat-reflecting effect. This insulation has 4 advantages: it does not allow wind to pass through, retains heat, prevents the penetration of water and has vapor barrier properties. Penofol is flexible and easy to cut, and environmentally friendly substances do not harm human health. The insulation is produced in the form of rolls, therefore, it is convenient to work with it. The installation process takes no more than 1 hour.
Insulation of balconies and loggias: eight mistakes of finishers
As previously mentioned, polystyrene foam is cheap, but nevertheless it is practical, and many builders use it. What is the best way to insulate a balcony from the inside with polystyrene foam:

The thickness of the wall from the edge of the interior to the exterior, taking into account the foam block, should be 30 cm. This is enough to retain heat and prevent cold from penetrating into the room.
Pouring concrete, expanded clay layer and similar methods cost a lot of money. You can do similar insulation, but at the same time save money. An option for cheap wood and foam finishing could be like this:

How to insulate a balcony? Choice of insulation.
Specialists always start finishing the walls and ceiling, and finish with the floor. If you do everything the other way around, the base will be damaged and the front surface will be scratched.
It is very difficult to calculate the total amount as there are many factors that influence it. Firstly, you must first decide whether the loggia will be a living room. If yes, then you will have to spend money on double-glazed windows. Secondly, prices for insulation change almost every day. Thirdly, you need to decide what kind of furniture the room will be furnished with. Therefore, you should not allocate a strictly fixed amount for such an event; it is better to prepare additional funds just in case in case unforeseen expenses arise.
It is also recommended to prepare an estimate in advance and find a cheaper source of sales for the material, for example, not through intermediaries, but directly buy building materials at the base. If you turn to specialists for help, they will take into account the following points:

You may also have to spend money on furniture and other interior items.
Arranging a loggia with the help of specialists will cost a large amount, which will significantly hit your wallet. But if you insulate the balcony inside with your own hands, the final cost will be approximately 10 thousand rubles.


