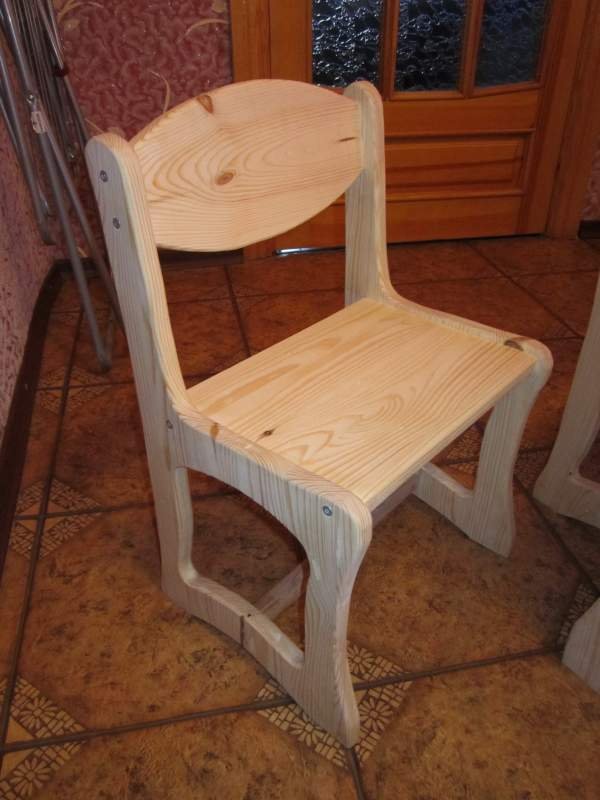
Purchased furniture for a child’s room, especially from natural materials, can be quite expensive. In a store or online, you don’t always find exactly the option you like. High chair and you can create a wooden table yourself. The work will not be difficult if you prepare all the necessary parts and tools, use your ingenuity and imagination. The reward for the work is a unique product, as comfortable as possible for the baby and practical in home life.
You can create a children's high chair and table from wood yourself.
A DIY chair will cost much less, and one made according to your own sketch will meet the intended parameters and the required degree of comfort for the baby.

The reward for the work is a unique product, as comfortable as possible for the baby and practical in home life.
All details from natural wood can be purchased in specialized departments of construction stores. They will select boards and bars of the required sizes for you.
A DIY chair will cost much less.
A child's high chair, created with one's own hands, is high-quality furniture for a child. In the process of work, you take into account the dimensions of the seat and backrest, which are as comfortable as possible for a growing baby, and check the strength of the structure directly at home.

All natural wood parts can be purchased in specialized departments of construction stores.
A wooden chair you created with your own hands can be decorated to your liking, and not be satisfied with ready-made solution purchased furniture.

They will select boards and bars of the required sizes for you.
To create a chair you will need various materials. Individual parts will be made from them. First of all, this wooden blocks and boards from which the frame, seat and back are assembled. Instead of natural massif For wood, you can use chipboard or plywood, but these materials are short-lived. For fastenings, take sufficient self-tapping screws. You will need medium-hard sandpaper.

A child's high chair, created with one's own hands, is high-quality furniture for a child.
Dimensions of bars (length):

A wooden chair made by yourself can be decorated to your liking.
During the manufacturing process, the thickest bars with a cross-section of 5x5 cm are used for the legs. For the planks, parts are taken with a diameter half the size of the supporting ones.

For the planks, take parts with a diameter half the size of the supporting ones.
The parameters of the seat board (height and width) should also not exceed 20 cm. The back part may be slightly higher, but preferably no more than 30 cm.

The parameters of the seat board (height and width) should also not exceed 20 cm.
To make a chair with your own hands, you need the right tools:

The dorsal part may be slightly higher, but preferably no more than 30 cm.
The assembled chair will “require” original decor. In addition to the carved option, you can use paint or other materials to apply a design or appliqué. To accurately apply the image you will need a stencil.

The assembled chair will “require” original decor.
For a wooden product, you can come up with any option. A highchair is usually made with straight supports and the following forms of the back structure:

To accurately apply the image you will need a stencil.
Creating a product with your own hands requires careful preparation. You must first make a sketch of the project. Visually draw a diagram of the connections of all parts separately with calculations of sections and lengths. Following the sketches, you will recreate the model in reality with exact parameters. A chair that has all the right dimensions will fit the baby and will not create any inconvenience.

For a wooden product, you can come up with any option.
Certain models are created with the expectation that the child will sit at a common table with other family members. In this case, high legs are chosen for the product, which are not attached exactly vertically in relation to the seat and floor, but more widely. The lower part of such a chair will look like a truncated cone, connected for stability by wooden blocks around the perimeter. Top part will be approximately 30-35 cm below table level.

A children's high chair is usually made with straight supports and the following forms of the back structure
If you have certain skills, you can assemble a folding product. Such items can be easily removed if necessary into storage areas.

For selected design solution parts are processed in accordance with it.
After preparing a drawing with exact parameters, we begin to assemble a simple children's high chair.

A chair that has all the right dimensions will fit the baby and will not create any inconvenience.
If the parts are disproportionate, “adjust” them according to the design diagram using a hacksaw. To make the chair you created with your own hands comfortable, ask your baby to sit on it, ask how comfortable he is.
If all sizes were determined correctly, the child will like it New furniture. To ensure the parts are smooth, sand the surface again.

Certain models are created with the expectation that the child will sit at a common table with other family members.
To varnish the product, use only safe compounds - a special coating for children's furniture, environmentally friendly and having the appropriate certificate.

The top part will be approximately 30-35 cm below the table level.
After exterior finishing varnish, let the chair dry thoroughly for a day or two. Then you can start decorative finishing, if such is intended. If it involves carving, then varnishing is done after finishing the artistic treatment and sanding the parts.
Use a jigsaw for carving. You can make a decoration in the form of a flower by cutting it in the center of the back, or any geometric figure. First, mark the area of the future decoration with a pencil so that the carving is even. Parts such as legs and back can be carved. The corners of the seat can be rounded using a jigsaw and sandpaper.

During the manufacturing process, the thickest bars with a cross section of 5x5 cm are used for the legs.
The top can also be made not strictly rectangular, but a truncated cone, rounded, compound. IN latest version You will need additional bars and cross bars - one or two. They are secured using special holes at the junction with the dorsal frame. It's pretty labor-intensive process, but if you wish, you can choose this option.

For fastenings, take sufficient self-tapping screws.
All steps for processing parts must be performed before the chair is assembled - this way the work process will be faster, more convenient and neater.

If you have certain skills, you can assemble a folding product.
To make a home-made piece of children's furniture look more interesting, you can apply a design to the back and seat. To do this you need to use safe paints. The color scheme should be bright and cheerful. Simple ornaments, floral patterns, and imitation of children's toys, such as cars, look great on wooden furniture.

Instead of natural solid wood, you can use chipboard or plywood, but these materials are not durable.
Due to the small size of the product, large drawing will become a kind of accent that attracts the child’s attention - he will like to sit on such a beautiful chair, play or have breakfast.

You can use appliqués for decoration – there are plenty of adhesive bright films on sale.
The image will turn out smooth if you use a stencil pre-cut from paper or thick plastic.
You can use appliqués for decoration – there are plenty of adhesive bright films on sale. Whether the image will be monochromatic or multi-colored depends on your imagination.

First of all, these are wooden blocks and boards from which the frame, seat and back are assembled.
It is not recommended to use bulky (protruding) parts, both small and large, in finishing the seat or back of a children's chair. Firstly, it is inconvenient for the child, and secondly, they quickly fall off when frequent use products.

To create a chair you will need various materials.
This set of table and chairs is durable, beautiful, it is simply ideal for a child’s room, you can also make such a set for kindergarten or schools. By making such a kit with your own hands, you will greatly delight the children, while saving a lot of money.

The table cover and chair seat have rounded corners to prevent children from being injured by bumping into them. The height is suitable for children aged 2 to 8 (depending on size).

The chairs have attractive heart carvings on the back of the chair, the same on the table backsplash.

Such a set can be made from MDF, 16 mm thick, and pine. Individual elements You can order it to be cut to your dimensions in any carpentry shop, then you just need to assemble everything together. The design turns out to be very durable (I personally checked the entire assembly while sitting on it).

To make such a kit we will need:
TABLE
:
1,600 x 600 mm, 16 mm thick - table top;
4 elements 70 x 504mm, thickness 1 6 mm - aprons at the bottom of the table with cut out hearts;
4 things. 32 x 32 x 584 mm - table legs.
CHAIR
:
8 pcs. 32 x 32 x 700 mm - rear legs of chairs;
8 pcs. 32 x 32 x 334 mm - front legs of chairs;
4 things. 340 x 350 mm MDF 16mm thick – seats;
8 pcs. 40 x 26 mm MDF 16 mm thick - strips for attaching a chair;
4 things. 155 x 270 mm MDF 16 mm thick - chair backs, curved with cut out hearts;
8 pcs. 40 x 2 70 mm MDF 16 mm thick - front / back strips;
8 pcs. 40 x 26 mm MDF 16 mm thick - strips for side supports of the chair;
4 things. 40 x 2 86 mm 16 mm central strips;
Wood glue;
Putty;
Primer for wood;
Acrylic paint with glitter.
TOOLS:
Drill;
Random orbital sander 80-, 120- and 240-number sandpaper;
Jigsaw;
Tape measure and pencil.
Manufacturing progress children's table and chair
Preparation


The decorative part of this project is cutting heart shapes into the bottom of the apron and on the backs of the chairs. First we draw a template, for this we use a jigsaw. We cut slowly and carefully, and then sand with sandpaper. Next, cut out a slight curvature on each back, at the top.

In addition, it is necessary to make a 40 mm cut on the side (340 mm edge) and 32 mm on the back (350 mm edge) to attach the rear leg.

Before we start assembling, we will sand all the corners of the table and chair.

1 . Attach the front legs to the front support rail, making sure the top edge is level.
2 . Assemble the back of the chair by securing the back legs to the back of the chair. Connect all the elements using a screwdriver and self-tapping screws.

3 . We connect the sides together, fasten them with screws and glue, as shown in the photo.

4 . Attach the frame and two side drawers to the rear leg.

5 . Assemble the front part as shown below.

6 . Secure the chair seat with self-tapping screws.

ABOVE: The chairs are ready for sanding and painting.

7 . Assemble the table, starting by attaching the legs to the aprons. Make sure the splashbacks are flush with the top of each leg before attaching the tabletop.

Finishing work
Fill all screw holes with putty. Let dry and then sand with 240-grit sandpaper. Wipe to remove all traces of dust.

Treat all areas of wood with primer. Wait until everything dries.

Apply two to three coats of acrylic glitter paint, allowing time to dry between each coat.
Making it yourself - regular or for feeding, is not such a difficult undertaking. Even if you don’t have much experience working with wood. The basic design is simple, there are a lot of options for the degree of complexity, and the work does not require any special tools.
The main thing is to determine how much weight the product should support.
The choice of material for is determined by financial capabilities and skills home handyman. It is much easier to make a seat from plywood, and if for some reason the workpiece turns out to be unusable, duplicating it will not make a hole in your wallet.
Before manufacturing, it is recommended to subject pine to a procedure such as de-resining. Wood contains quite a lot of resin, this will interfere with work, and in the future may cause resinous dirty spots to appear on the surface.
The selected material must be available in the following form:
The product is best mounted on dowels - wooden bushings. They are inserted into holes when joining parts and hold them together. This is the most reliable way. But self-tapping screws, nails and even metal corners can also be used.
Quite a few hardware stores offer their cutting services. wood materials by size. If you have little experience working with wood, it is better to take the help of professionals.
If it is expected not only to assemble parts, but also full production wooden children's chair with your own hands, you will need the following tools:
Is your child still very young? Then the following video will help dad create a high chair for him:
You can always use a ready-made drawing of a children's chair with your own hands, found on a construction site. The best in such cases are the sketches presented on the forums. Firstly, they contain the maximum possible amount of information. Secondly, the questions asked on the forums and the answers received can clarify many difficulties that arose along the way.
Before starting production, you need to make sure that the dimensions indicated in the drawing are suitable for the child. If not, then the parameters need to be increased proportionally, since the stability of the product depends on the correct ratio of height and width.
If you decide to develop the drawing of the chair yourself, then it is recommended, after calculations, to make a test model from ordinary construction cardboard. Thus, the proportions, height and stability of the model can be checked by the most the best method– practical.
Children's high chairs - from 0.5 to 6 years old, are made according to two main schemes.
Traditionally it is a frame with four legs, a seat and a backrest. However, for children, a good option would be products made from two sides, a seat and a back. The first model is usually made of wood, the second - of plywood and chipboard.
Drawings of chairs for children
Drawing 1 Drawing 2 Drawing 3 Drawing 4
Furniture production can be divided into 3 stages: preparation of material, cutting and assembly of the product. A fourth option is also possible – finishing. The sequence is the same when making any model, but the work itself will depend on the complexity of the design and the selected material.
The following video will help you make a beautiful and bright highchair:
Often these stages are carried out in parallel to each other. The material in the store does not always have a sufficiently low degree of humidity - 12–16%. Therefore, it is advisable to dry the wood additionally. Also, any of the wood materials must be acclimatized. Therefore, before starting work, it is recommended to leave wood, plywood or chipboard in the room for at least a day.
Cutting bars, boards and sheet material can be done independently, or to order in a workshop at the store. A standard drawing of a high chair includes the following elements:
If the chair is made entirely of plywood or chipboard, then all the parts - the sides, the partition connecting them, the seat and back - are first drawn on a sheet and then cut out with a jigsaw.
The following video will tell you how to make a children's chair from chipboard:
The best option is to connect with dowels. The latter are easy to make yourself from a board. The bushings are rectangular in shape, their edges are sanded.
All parts according to the drawing are connected to dowels using the described method. If we're talking about about a plywood chair, then its elements are cut out with tongues and grooves, and connected in the same way - with glue.
Bright children's homemade chair

On the seat, and sometimes on the back, a soft insert is made of foam rubber and a fabric cover. It is better to choose a fabric that can be easily washed, as it will get dirty quickly.
It all started when I had a daughter :) Now she is 1.3 years old and she has already learned to deftly sit on daddy’s lap and read a book. Each child, like an adult, should have his own chair. Searches in children's stores were unsuccessful; the chairs were all plastic and large or with a hole for a potty. We needed a normal high chair for a very little girl.
Here is a chair, made with my own hands in a couple of evenings, not a work of art, but very comfortable and my daughter loved it!
There were no drawings initially, everything was done by eye.
In the photo, my daughter is already sitting on the new chair :)

The children's chair is made of 8 mm plywood. The parts are glued together with PVA glue, several screws and the entire structure is coated with colorless varnish in one layer. The weight of the chair is 715 grams, the child can easily drag it around the apartment.
The height from the floor to the seat is 180 mm, the size of the seat cover is 240x190 mm, the height of the chair from the floor to the upper edge of the back is 360 mm, the dimensions of the back are 235x115 mm.
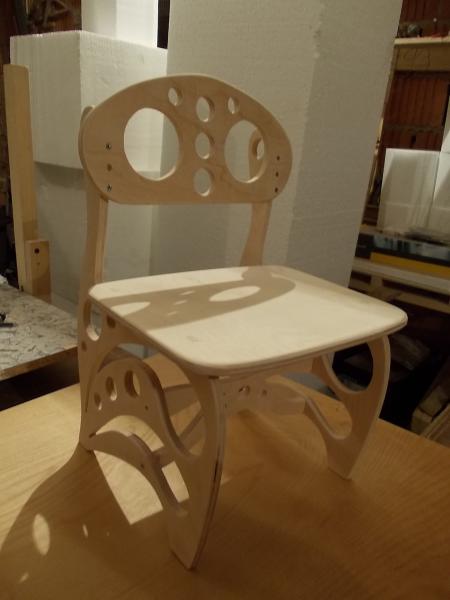
The test version of the chair was made from cardboard in three minutes. It was made in order to get approximate dimensions and understand how comfortable it would be for a child. It didn’t work out very well to sit the baby on this chair, but in terms of size it turned out to be just right!


To make the second part of the chair, I simply traced the first part with a pencil and also cut it out with a jigsaw.
By the way, I must say about connecting parts. Initially, I planned to do everything without screws and nails, and since I did everything impromptu, there were some mistakes. In the photo below you can see that the parts have spikes, on the part on the right one spike is missing, I forgot to draw it and sawed it off :)

I also sawed off the tenon on the part on the left later, so the back had to be secured with screws.
Below in the photo is a detail of the back and a detail that is located under the seat; it prevents the chair from swaying. This part should also have spikes, which I also forgot about :)

After all the parts of the chair are cut, everything needs to be cleaned with sandpaper, I spent a lot of time on this so that not a single scrape was made! Afterwards, we glue everything with PVA glue or screw it together with screws, if suddenly you, like me, forget to make spikes :) And finally, we cover the product with a layer of varnish or, as is now fashionable, we do decoupage. I would like to paint the chair with bright colored paints, but for now I will leave it as a pure wood color.

Update: I cut several of these chairs using CNC, so I had to transfer the drawings to AutoCAD.
Alice: “But I’ll still sit on daddy’s chair!”:)

Send photos of your chairs and happy smiles of kids, email address on the page
Do-it-yourself wooden children's chair: easy, simple and fast
Still don't know how to design a highchair yourself? Our article will help you understand all the intricacies of folding this irreplaceable piece of furniture. You will see that assembling children's high chairs from wood with your own hands is not difficult.
Before you start assembling the chair with your own hands, you should decide on the material. Of course, a tree is the best choice, it is completely safe and environmentally friendly. Which wood to choose? Let's start with beech. Beech is considered dense and durable wood, and it’s easier to work with than, for example, oak. If you are looking for something more budget-friendly, birch and pine - a good option. But before starting work, the wood should be deresined, since the resin, even if it is natural, is unsafe. You can also choose plywood to make a chair - good material, made from layers of tree veneer. Plywood is not heavy and is easy to process. Chipboard is the most affordable, but at the same time, the most short-lived. It is suitable for making a table top for a high chair.
You can find materials and drawings for children's furniture in any hardware store. Dry the wood by leaving it in a room with room temperature for a day. The wood will become suitable for work.
Are you not sure that you can make all the elements of the chair with your own hands? Contact a hardware store.
The back and seat must be rectangular shape. The sides of the children's chair can be made and decorated as you like. Try not to make a highchair with sharp corners– they are dangerous for the child.
Naturally, use the material in original form It is not possible for both a regular chair and a high chair. It needs to be processed. You can do this yourself or turn to professionals. The wood should be treated with hand router or regular sandpaper. With a router, processing must be done in cross sections. Apply varnish. Buy varnish with a turpentine base - it does not contain toxic substances. After letting the varnish dry, sand the surface several times. For a smooth finish, coat with varnish again.

On: another option for designing a high chair. Must watch????
To fasten a regular chair, you can use dowels. They are good because they can also be made from wood with your own hands. Holes with a diameter of 6-8 mm should be made under them. Place the pieces tightly onto the dowels by tapping them with a hammer. Secure with a clamp and leave for 24 hours. If you need to secure the elements of a high chair, it will be more convenient to use confirmats. Similar ties are suitable for folding large quantity details.
You can make drawings and diagrams yourself or find them on a construction site. It’s better to do the drawing yourself, measuring the child’s parameters. Carefully calculate the dimensions, height and width ratio. Of course, it is more difficult to draw a diagram for a high chair yourself, so it is better to turn to ready-made drawings.
If you have made a drawing, but are not entirely sure whether it is correct, test it by folding a cardboard model of the high chair.

Typically, children from 1 to 6 are provided with either regular wooden chairs for games or activities, or a high chair. You can make a separate small table and chair with your own hands using a drawing.

For a regular DIY high chair, you will need the following parts:
A corner should be made from the wide parts of the tall legs. Use a sander to smooth the sides of the short legs and bars. Take drilling machine and install a drill with a diameter of 6 mm. Measure the depth of 1.5 cm on the drill and mark it using the drawing. Drill along the long legs at an angle, making 12 holes. Using a chisel, we select everything from the drilled parts and make grooves. We insert the back into the grooves.

If part of the back rests, cut out a triangle and hammer the back into the groove. Make spikes on the sides of the block and round the corners. We make grooves for the tenons in the legs. We assemble the frame. If the back is too wide and does not fit into the grooves, measure and cut off the excess. Don't forget to make triangles on the sides of the back so that it sits firmly in the grooves. Take your time to insert into the back legs. Make a handle for the chair in the back. Mark the distance and cut a hole for the handle.

We insert the back into the frame. Now we make marks on the seat and cut it out. Sand the seat and insert it into the frame.

Lubricate the holes, elements and spikes for fastening with glue, secure with clamps, and leave to dry.

You will have to spend more time and money on a wooden high chair for feeding your baby. In order to make such a piece of furniture with your own hands, you will need:
For the chair you will need: 4 legs, 2 upper crossbars and 2 lower ones, 3 crossbars. tabletop.
For the table: legs, slats, crossbars 4 pieces each, table top

We cut out the parts for the chair from the bars and sand them with sandpaper. We cut out the elements for the chair arms from the board. We connect using dowels and glue. Holes with a depth of 30 mm will be needed for the dowels.
For the side, you will need crossbars, 2 curves, 2 legs. Lubricate the dowels and holes with glue. First, assemble the bottom crossbar and legs (the angle should be 90 degrees). Then we collect top bar and two roundings. We tighten everything with a clamp. Leave for one day. The second side is folded in the same way. Make sure they are the same.
Now another one important stage– assembly of seat and backrest. Be careful here, as children are very restless during feeding, so all parts must be firmly fixed. You need 6 parts from a plate measuring 300*250 mm. Round the corners so that the radius is 50 mm. Next you need to start sanding the ends. Lubricate the parts with glue and press. You can connect the back and seat with screws. We glue the crossbars to the sidewalls. Then you need to connect the legs with all the planks, attach the sides with crossbars and fix the tabletop at one end. We get a ready-made baby high chair.


