It is very important to determine the actual scope of work and correlate it with your financial capabilities. All design decisions must be made before the actual renovation work begins. Remodeling is expensive, time consuming and sometimes impossible.


If you have planned to renovate a room with your own hands, but don’t know where to start, by reading the materials on our website “Remontik” you will solve this problem. Following our advice, renovation work It won’t take too long, and the final result will please you.
First of all, you must understand that renovating a room requires serious preliminary preparation. Most important point is to prepare a detailed repair plan taking into account all the nuances. Let's consider tips on organizing repairs from professionals:
Now let's look at each of the stages in more detail, attaching photos and videos to them.
What kind of room renovation is needed: major or cosmetic?
First of all, you need to decide on the volume and complexity of future repairs. To keep the apartment clean and bright, it is enough to carry out superficial, cosmetic repairs: replacing wallpaper, replacing old linoleum, whitewashing the ceiling, painting the walls, etc.
If you are planning to get rid of everything old and boring, decide on a major renovation with replacing windows, leveling walls, installing new floors, and modern ceilings. Your home will be transformed and become beautiful and new.We do not recommend refusing the help of professionals when carrying out major repairs. First of all, this concerns the creation stylish design premises, including redevelopment, as well as the demolition of some partitions and walls.
When planning repairs, starting from your financial capabilities.
Choose an interior design and decide on a renovation plan
At the very beginning, decide on the design and interior of each individual room that you are going to change in your apartment. You can ask for help from experienced designer, which will slightly increase your financial costs for repairs.
For the room where you are going to carry out renovations, you need to make detailed drawings of all stages of work, in their clear sequence.
We recommend completing five renovation sketches for all individual rooms. We recommend showing the top view of the premises in the first drawing, and each wall in the other four drawings. Complete all drawings detailed description, as well as a plan for sequential repairs, which will avoid inaccuracies and simplifications in work.
In the repair plan, it is necessary to indicate the required finishing option: painting, wallpapering the walls, etc. To divide the room into separate zones, we recommend painting one of the walls with a different color to focus attention and visually divide the room. Such moments also need to be reflected on the plan.
According to the advice of experts, in order to avoid excess dust and dirt when performing repairs, we advise you to first carry out repairs in rooms that are located away from the front door. As the last stage of renovation, it is better to choose passage rooms, as well as a corridor through which people will often rush Building tools and materials. In order not to scratch or stain the finish of an already repaired wall, and also not to damage the new floor.
As additional protection cellophane film may protrude from the renovated room (it is fixed with outside doors). It provides reliable protection of the premises from construction dust, dirt, plaster, paint and accidental damage.You should not carry out all repair work yourself. If necessary, repairs or only particularly complex activities can be entrusted to experienced specialists. Firstly, knowledge and experience will allow them to carry out repairs efficiently and quickly. Secondly, you don’t have to buy expensive tools with which to pour screed or lay tiles.
Even if the process of installing an interior door seems simple to you, the slightest inaccuracy in this regard is unacceptable. Of course, you can hang and arrange furniture in the kitchen, level the walls and do a little painting yourself. However, entrust more complex repair work to specialists so that you do not have to redo them later, which will significantly increase financial costs.
Make a list of necessary tools and materials
Calculate your expenses
When the preparatory work has been completed: sketches and repair plans have been drawn up, lists of all tools and materials have been prepared, a decision has been made about the possibility of repairing the room on your own or with the help of repair specialists, you will calculate the average total price of the planned repair.
Don't rush to buy all the materials when you first visit the store. In the compiled lists of tools and materials, indicate the cost of various stores, which will allow you to save on purchases. Be careful when choosing the services of a construction team. Special attention should be paid not just to the cost of repair work, but also to reviews from our friends about the quality of repair services.
Clear the premises
To provide reliable protection furniture from damage, construction dust and dirt, collect it in the central part of the room. After this, cover with plastic wrap. Therefore, free up access to the ceiling and walls. We recommend moving expensive equipment and clothing to other rooms.
Repair work should start with the most dusty ones: replacing windows, window slopes and installation of new window sills. This way you can avoid dust and dirt when performing painting works when opening windows is prohibited to avoid increased humidity and temperature changes. When slopes, windows and window sills are installed, cover them with hardboard or plastic film to prevent accidental contamination and mechanical damage.
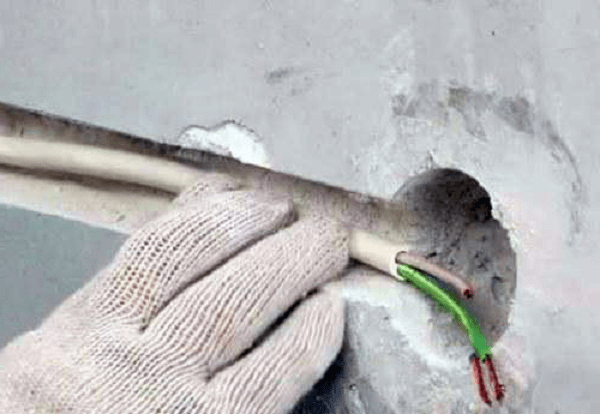
Take care to mark out places for installing additional sockets, and do the wiring of electrical appliances. At this stage, do not install sockets or connect them to the panel.When using welding work (for example, when replacing batteries), perform it simultaneously in different places in the apartment to quickly carry out this difficult and dusty stage of work, which sometimes involves breaking down walls.
Before repairing floors, walls, ceilings, you need to check their condition with water or laser level. Start by applying the thickest layers of mortar. While they dry, you can do other minor work no downtime.
Upon completion of this preparatory stage proceed with the repair, performing it in next sequence: repair of ceiling, walls, floor. First, work is carried out using putty, gypsum, cement mixtures. Then they begin installing the floor, doors and slopes.
The last stages of repair work:
By following the correct order during repairs and having a clear action plan, you can avoid many mistakes and save time and money. This is one of the main components of durable and beautiful renovation, along with compliance with technology and the quality of materials used.
Repair is not only expensive, but also time-consuming. Sometimes it is possible to remodel the interior of an apartment using cosmetic repairs, which is much cheaper than a capital one. But, if there are no other options, you have to do a full renovation.
Where to start a major apartment renovation so that it doesn’t turn into a long “epic”? After all, many people literally live in a state of renovation for years, trying to turn their apartment into a more comfortable and beautiful home. It is very difficult to make major repairs on your own, and not all people will be able to cope with such a task. However, nothing is impossible. In a matter such as a major overhaul, you need to follow the correct procedure, only in this case will you be able to achieve excellent result in a short time.
Without a clear, well-thought-out plan, it is not worth starting a major renovation. You should not only have a good idea of what your apartment will look like after renovation, but also visualize your dream. It is best to develop a 3D project, but you can get by with a simpler diagram. First you need measure the entire apartment. You shouldn’t trust the technical plan of the room; you need real parameters premises. One centimeter can make an incredibly important difference. For example, ordered furniture may simply not fit in the required place. To avoid such situations, carefully measure all walls, openings, and distances.

Write down your results and, based on them, draw a floor plan on a scale convenient for you. Then you will need to decide on the zones (bedroom, living room, dining area) and distribute the furniture. Only after this will you be able to evaluate your idea, see its advantages and disadvantages.
If you are satisfied with the result obtained, then you can proceed to the second phase of planning. To do this you need to carefully think over communications. Electricity must be supplied to the refrigerator, computer, and TV. Take care of lamps and switches. The latter should be located in convenient places. If you do not distribute the furniture first, then after the renovation is completed, the switch may end up, for example, behind a sofa or closet.
The plan is ready, checked and double-checked, now you can start repairing.

First of all, you need to get rid of the previous repairs. Disassemble and remove furniture, tear off old wallpaper, remove linoleum or laminate. If you were planning a redevelopment, then do demolition extra walls. At this stage, it is important to think about removing construction waste. There will be a lot of it. Usually from one two-room apartment they carry out the “waste” onto two trucks.

Agree with workers or use the services of special companies to quickly get rid of garbage. You shouldn’t put it in front of the entrance, as this can lead to quarrels with neighbors.

Everything unnecessary has been removed, the walls have been demolished and cleared of old renovations. It's time to do the grunt work. If you also dismantled the screed, you need to make a new one. At this stage, the windows, glazing or loggia are replaced. Conduct all communications according to plan. Make 2-3 spare sockets, they may come in handy. Sockets located in inconspicuous places will help you avoid the need for extension cords, which noticeably spoil the interior of the apartment.
Once you have done the electrical, plumbing and heating wiring, you can begin preparing the walls. Plaster them and level them. The same process will be required for the ceiling, and in some cases for the floor. This completes the draft stage.

The ceiling is finished first. You can simply paint it, wallpaper it, or install a suspended/suspended ceiling. The main rule of repair is to move from top to bottom, this way you will protect your repair from contamination, and yourself from unnecessary work. If you start finishing the room from the walls, there is a risk of getting them dirty while finishing the ceiling. That is why first finish all the work in the upper part of the apartment. After this, you can begin finishing the walls and floor. If you are gluing wallpaper or painting walls, first remove installed sockets and switches. After the tiles in the bathroom are laid, install and connect the toilet, bathtub or shower, and sink. Don't forget about the special connections for the washing machine and dishwasher.

Floor preparation depends on the material used. You can choose, for example, between . For example, many people think that laminate can hide uneven floors. However, the height difference in one area should not exceed five millimeters, otherwise you risk not only the beauty of the laminate, but also your peace of mind. The fact is that laminate can crack and will definitely creak.
It is better to protect yourself from problems and adjust the floors using special solutions that independently take shape and level the floor ().

Separately, it is worth noting the fact that construction crews work as a well-coordinated team of specialists. They can install doors, lay tiles and wallpaper at the same time. If you use the services of professionals, then, of course, the repair will be completed quite quickly. But the cost of repairs will also increase significantly. Doing major repairs on your own is not an easy task; it will definitely take up not only your time, but also your energy. Many apartment owners make a “compromise” by hiring a crew for rough work. They do all the rest of the finishing themselves. In this case, you can complete the repair faster, but spend less money.

Everyone chooses for himself what is more important to him - money or time. However, we advise you not to skimp on work and materials; redoing a renovation is much more expensive than doing it right from the very beginning.
Almost always, new housing is purchased by a happy new homeowner from a developer company without interior decoration and renovation, but with communications installed in the apartment. Firstly, such housing in a new building will cost less, and secondly, almost always the renovation and furnishing of an apartment by the developer is carried out extremely carelessly, using cheap materials. Thirdly, there is a desire to complete some stages of apartment renovation with your own hands or with the hands of good craftsmen.
First, you need to make an audit and inspection of the apartment, identify problem areas of the walls, ceilings and floors. Next we proceed in the following order. We determine what needs repair and finishing first. If there is time and money for complete renovation The apartment is not enough, you need to put it in order first:
Advice! Before starting repairs, a list of claims for defects or defects must be presented to a representative of the selling company. You may be able to receive compensation for repairs in a new building. Do not agree to rework by the company.

In the process of carrying out the above preparatory work You can calculate the sequence of repairs in a new building.
Much in home renovation in a new building depends on the availability of time and money. Having bought a “bare” apartment and decorated Required documents on the right of ownership, you automatically start paying rent and house fees for use local area, for export household waste and construction waste. After connecting electricity and water, the new apartment in the new building began to bring you a loss in the form of costs for its maintenance and decoration. The longer it takes to renovate an apartment in a new building, the more it will cost you.
There are two main options for approaching the issue of finishing a new apartment in a new building:
The first option is well suited if the family has small children or elderly people who need to provide certain comfort and convenience. The second option is considered more economical and faster, especially if, after finishing the kitchen, bathroom, toilet and one room, the housing is rented out, with the remaining rooms of the new building being consistently brought to condition.
Among the most popular horror stories for new buildings are stories about the shrinkage of the walls of the house and its foundation. In reality, a similar process for a multi-storey building should be finally completed by the time the building is put into operation. This period averages no more than 18 months. If after 1.5 years in the corners, ceiling or cracks form at the joints and in the masonry of the walls, tiles in the bathroom fall off, doors are deformed with skewed doors - this means that the new building has certain problems with the stability of the foundation. It is worth waiting for the renovation until the main thing is clarified - what is happening with the new building.
Before starting work, first inspect the lock on the front door. The model and standard equipment of the door may be the subject of a separate agreement. Specify in the addendum to the contract which model of door and lock needs to be installed. If there is a need to take additional security measures, first of all change the lock installed when the new building was delivered.

At the next stage, it is necessary to resolve the issue of installing an electrical distribution panel and connecting an electric meter. This will give you the opportunity to start using power tools when renovating your apartment. To eliminate the need to use a large number of carriers and extension cords, plan the layout of the electrical wiring in the apartment. The following should be taken into account:
Advice! When installing wiring, use only copper cable without twists and adhesions.
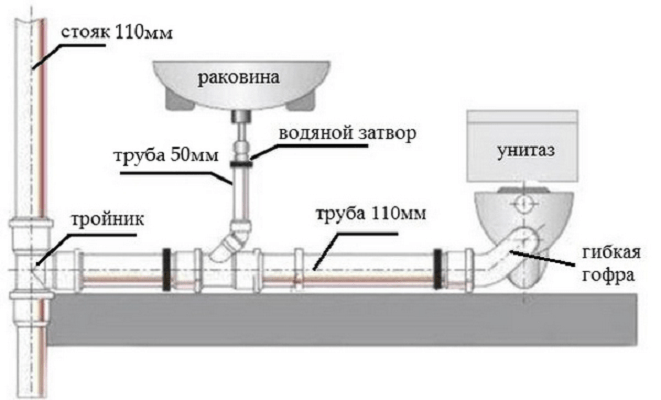
In addition to electricity, to create more or less normal conditions it is necessary to connect hot and cold water meters cold water and collect sewerage in the bathroom and toilet. You need to start work by installing the toilet and washbasin.

Considering that good plumbing is expensive, for the first time you can install inexpensive option toilet bowl, assemble and connect plastic sewer pipes, bellows and wash basin. During the renovation of an apartment, plumbing fixtures can be replaced at any time. Installing expensive plumbing increases the risk of damage during renovation; it must be installed at the final stage of renovation of a new building.
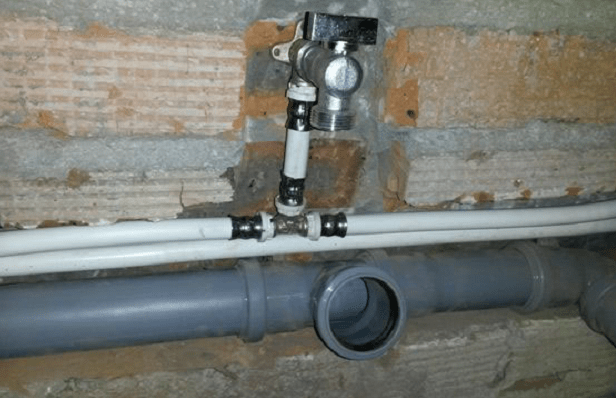
For laying plastic water pipe Using a hammer drill, we will drill channels in the walls of the bathroom, toilet, and kitchen with a depth of 2.5-3 cm. Next you need to solder water pipes and connect the leads to cistern and a washbasin. Lastly, we will install and connect water meters for cold and hot water to your home plumbing.
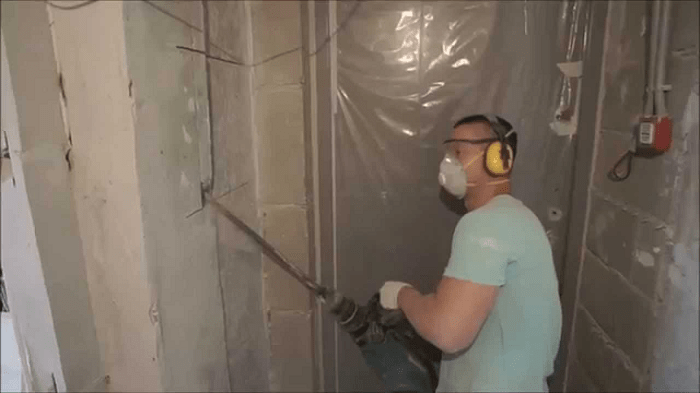
Before starting work, you will need to do a large amount of cleaning up the remaining concrete and mortar. The main part will be spent on rough cleaning of walls, floors, ceilings, gating them, leveling and trimming seams. Such work produces a large amount of dirt and dust, so it will be necessary to organize good ventilation And wet cleaning inside a new building.

A separate item should be the preparation of the floors in each room for final finishing. During the renovation of the apartment, it will be necessary to repair all the cracks, holes in the seams between the slabs, in the floor, and in the interior walls of the new building. The most difficult will be leveling the floor using a screed made of cement mortar and reinforcing mesh. This procedure will need to be performed upon completion of the preparation of the walls and ceiling for finishing.

We will perform similar work in the kitchen, bathroom and toilet.
After rough cleaning, it will be necessary to prepare the walls in the kitchen and toilet for laying tiles on the walls and floor. You can lay facing tiles with your own hands, but this is a troublesome task and requires large quantity time. Therefore, it is better to entrust the laying of tiles to craftsmen who specialize in this type of finishing. While the tile laying work is going on, you can do the renovation yourself in one of the rooms of the apartment. Most the best option will lay decorative plaster or liquid wallpaper on the walls. If at the time of the start of repairs in the apartment of a new building, the double-glazed windows in the windows were in satisfactory condition, then you can begin applying plaster to the walls of the room immediately.

Upon completion of laying tiles on the floor and walls in the kitchen, bathroom and toilet, you need to lay inexpensive linoleum in the corridor connecting these three rooms and the room in which the renovation was carried out using decorative plaster. This will reduce the amount of dust raised and simplify cleaning in the apartment.
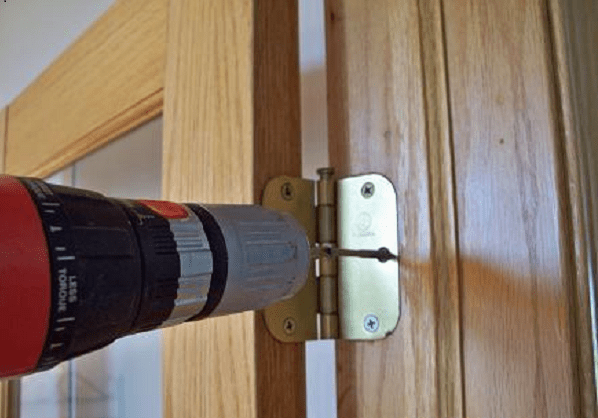
Before finishing the walls in the apartment, it is necessary to level them, and if a defect is found, repair the interior doors. If your future plans involve wallpapering, normally closing doors are simply necessary for high-quality wallpapering work. After the finishing of the walls is completed, we proceed to laying linoleum, laminate or carpet on the floor of the apartment. The most practical is considered to be laminate for living rooms, for the corridor, an office version of linoleum with increased abrasion resistance. Similar view The work does not require special qualifications and can be easily done with your own hands during the renovation of a new building apartment.
The final stage of repair is connecting the lamps and installing furniture in the apartment. Approximately 70% of the work involved in renovations in a new building can be easily done with your own hands. And only when performing special types of finishing - laying parquet, installing suspended ceilings, installing double-glazed windows or entrance doors in a new building, you will need the services of specialists.
If you want to change the interior of your apartment, or you have received a new home that requires finishing, then before buying building materials and hiring workers, you need to take care of the main components of any repair in advance:
To make it easier to navigate such a complex matter as renovating an apartment, we recommend that you familiarize yourself with the recommendations below.
Depending on the scope of work, repairs can be divided into cosmetic and major.
Major renovation implies the start of renovation work in a new apartment or complete replacement and reconstruction in an old home.
The scope of work includes the following items.
Major repairs require a lot of time, so in order not to sleep on newspapers among paint and plaster, you should take care of your sleeping area in advance. They say that nothing spoils a relationship more than renovations in an apartment. At this time, it is better to move in with relatives or rent an apartment.
Cosmetic or surface repairs will help create a new design, get rid of minor damage and update the interior. 
Repair work will affect the covering of the room without changing communications. This process can include finishing the walls (puttying, painting, wallpapering), laying new flooring and finishing the ceilings.
The first thing to start with is a clear plan of what you want to get in the end. Next, an estimate is drawn up and the sequence of work is determined.
 Repair plan
 Of course, it won’t be possible to plan everything down to the smallest detail, but this will save residents from typical mistakes, For example:
To avoid the troubles listed above, it is useful to invite specialists from technical services responsible for communications. Their advice will help you correctly position the communication system in the apartment and avoid alterations.
Many ideas arise in the process. Once a certain stage has already been completed, it is often impossible to return to the previous one. It’s better to think through your dream a hundred times on paper, and only then get down to business in practice.
If you are not proficient in 3D modeling applications, then a simple scale plan on a sheet of paper that is accessible to everyone will do. We draw the shape and size of the room that requires changes, observing all the proportions of the walls, the distance from windows and doors. Each plan has a unique purpose: for the planned application of lighting fixtures and sockets, room areas, furniture and marking out wall and floor coverings. This way it will be convenient to measure and calculate everything. Below is an example step-by-step instruction planning.
When wondering where to start renovating a room, you need to start from its direct purpose and divide the space into zones. If this is the case, allocate areas for the child’s games, relaxation and activities. When doing renovation work in the kitchen, determine workplace for cooking and space for family meals. 
Zones are separated different ways, these could be unusual decorative curtains made of threads, a rack with open shelves, a small step, LED lights, the place where one floor covering is replaced by another.
The options are presented in the video:
It’s worth fully expressing your design imagination in color scheme. Combine pleasant shades, don't be afraid to experiment. Whatever picture of the interior appears in your mind, everything is real and you can do it.
 Table of color combinations in the interior
 In the background, in accordance with the zones, they indicate where it is better to place suitable furniture, place the TV and other necessary items at home. It is important to take into account the estimated dimensions of the sofa, refrigerator, tables and other things in order to draw them with scale accuracy. 
The remaining space can be filled with light or multifunctional furniture.
Now it’s roughly clear what the space should look like, what will be located and where. The time has come to figure out where to place the sockets and run secret cable channels. For the sake of fire safety sockets should be located in easily accessible places so that, if necessary, it is possible to quickly disconnect electrical equipment from the network.
Separate important topic- this is lighting. Depends on lighting visual perception space, a feeling of comfort in the room. Therefore, even at the project stage, it is necessary to decide on the location of the light sources.
 Multi-level lighting in the kitchen
Each room has its own priority wall and floor covering. At the stage of planning the style of the premises, you need to analyze which covering will be better and more practical for a particular room.
When choosing flooring for your hallway, consider an abrasion-resistant floor covering. You can combine styling in different directions or different varieties material to separate the area around the front door.
To renovate a nursery, the age of the children and their activity in wanting to draw on the walls are taken into account. Accordingly, it is better to choose washable wallpaper and durable flooring.
The scope of repairs directly depends on the budget. Approximate costs for materials and payment of services to workers are calculated in advance. Even if you plan to do the finishing yourself, you will need to hire specialists for plumbing, electrical or suspended ceilings. You should not do this work without experience; remember the familiar saying: “The miser pays twice.”
Don't be lazy to travel around more construction stores, check the prices on the websites. Cost in different retail outlets may vary greatly.
If specialists are hired for finishing work, it is necessary to conclude a written agreement with them on the volume, quality and prices. Otherwise, there is a risk of getting an unpleasant surprise in the form of expensive and low-quality repairs.

Adhere to the following order of work.


