Modern fabrics allow you to perform unusual shapes ceilings and change any room beyond recognition. Let's look at what draping a ceiling with fabric is like, the features of fastening the fabric and popular decorating styles.
The content of the article:
A fabric ceiling is a fabric decorated ceiling surface, which is considered alternative way ceiling design. The main purpose of draping the ceiling with fabric is to add harmony to the interior and create coziness in the room. To obtain the desired result, adhere to certain rules for selecting fabric and arranging the structure, which we will now get acquainted with.


A tent-shaped ceiling looks good if the walls are decorated in the appropriate style. This type of drapery looks good when done independently. Tent covering significantly reduces the ceiling height near the walls and cannot be used in any room. For a better perception, it is advisable to take a photo of a fabric ceiling made in the shape of a tent.
Wave-shaped ceilings are made using additional suspensions. Any material is suitable for such structures, but it is better to use translucent and not very heavy types.
The method of installing a fabric ceiling “from the walls to the center” has many variations. For example, a canvas from soft material can be hung with slack or pulled tighter until large quantity flat folds. Usually a chandelier is placed in the center of the composition to create a semantic center.
The construction of a fabric ceiling is very simple: a fabric for creating a false ceiling and a frame for attaching it. Very often, the canvas is modified to install lamps, and slats, tubes or other elements are added to the base ceiling or frame to create a relief surface. Information on drapery fabrics and profiles is provided below.
There are practically no restrictions on the choice of fabric for drapery, but there is a practical side to the problem. The material for the ceiling must have the following properties:

Some types of materials have sound absorption and water resistance properties, for example, leather, tapestries.

Colors are chosen depending on the purpose of the room:


The frame method involves mounting the structure on the floor and then attaching it to the ceiling. The frame is assembled from wooden or plastic slats. Typically this method is used to obtain flat designs or products with slightly sagging fabric. Frame ceiling can be attached to the ceiling using special devices. In this case, you can adjust the height of the ceiling. One of the varieties of fabric ceilings made frame method, is called boiserie. They are sold as ready-made fabric or leather panels that are made to order. The user can only attach the product to the ceiling.
Fastening fabric with slats involves the use of wooden or plastic bars measuring 30x40 mm, which are first attached to the ceiling without fabric. Wooden structures used in rooms, plastic ones - in the kitchen, bathroom or toilet. For drapery, fabric with a 20% margin is used. In this way, fabrics of pastel shades with gold or silver threads are fixed.
Fastening the fabric to the slats is carried out in the following sequence:

Silk fabric is most often fixed to the ceiling using the adhesive method. The process is similar to wallpapering, but the glue is applied only to the ceiling. Upholstery of the ceiling with fabric is performed in the following sequence:
To obtain a ceiling in the form of waves or a sail, thin tubes or cords are attached to the ceiling or walls, and the canvas is thrown over them. Also, beautiful waves are obtained when the canvas is attached to the ceiling using Velcro.
Watch a video about draping the ceiling with fabric:
Draping the ceiling with fabric is a fashionable solution, stylish, sophisticated design. You can invite a specialist to do this work, or you can do everything yourself if you want to try, learn something new, and gain interesting life experience. It's easier than it seems.
Regardless of whether the ceiling will be upholstered with fabric yourself or a professional will take on the work, the first thing you need to do is choose the fabric.

The most popular options are:

Velvet, silk, satin look luxurious, ideal for decorating the ceiling in the living room, bedroom, nursery, even hallway. Linen, organza, chiffon create a different effect. Silk and satin reflect light. The flickering is captivating - in the twilight, in bright light.


Silk clothing suits both women and men. The silkworm butterfly weaves its spindle day and night so that a person can decorate his home with this material. She gives a miracle, a fairy tale, and will protect the house invisibly.

Velvet seems to absorb light. At the same time it radiates. It symbolizes mystery, riddle, and intrigue. I just want to touch him, at least with a glance.

Draping the ceiling with velvet allows you to create an atmosphere of ease, romance, and encourages dialogue.

Linen is simple and light. This is a durable material that evokes pleasant associations. Reliability, practicality, rationality, optimism - this is about him. It is easy to work with when decorating the ceiling, it is not a easily soiled material, and is easy to care for.

Organza and chiffon are full of coquetry. They will help to revive the wonderful story of Scheherazade, Princess Jasmine, the daring Aladdin, and the Genie who grants every wish.

If you choose a golden color, coffee, beige, silver, orange, burgundy, and lay luxurious carpets in the room, the story of Cleopatra will come to life. Chests, chests of drawers, dressing table, coffee table made of solid wood will complement the interior. Wooden furniture in general will come in handy.

You can choose neon colors and another illusion will be born. Shades of green combined with sky blue will fill the space with lightness and freshness. Such decor will contribute to the revival of strength and restoration of harmony. Photos of fabric ceilings beckon to a world where everything is possible.

For centuries, fabric has been used to decorate rooms, ceilings, and walls. IN small apartments its use is also appropriate, although it is not the most popular solution. Many other options have been invented, but this one is the most delicate and sophisticated. A lot depends on the color.


Natural colors and a play of black and white are in fashion. However, modern suspended ceilings can be anything - there are no restrictions, all prohibitions have been lifted.

If we are talking about a living room or hallway, it is of course better to choose colors that are suitable for the epithet “restrained”, “unobtrusive”, “polite”.

There are special fabrics for decorating the ceiling - they have a denser base and are resistant to dust settling and fading. They can not only be draped, but also glued. If you plan to create a frame, any material will do.

Fabric ceiling covering - unique technology. The work is carried out almost silently. If you invite your neighbors over when the new design is created, they will be completely surprised by the changes.


You won’t have to clean the apartment for long after installation either. There will be virtually no construction waste. This is definitely a plus.

Before you go to the store for fabric, you should draw a sketch, calculate the footage of the fabric, and take into account the reserve for drapery. In addition to the fabric, you will need to purchase beams for the frame with a small cross-section and dowels. You will need a construction stapler.

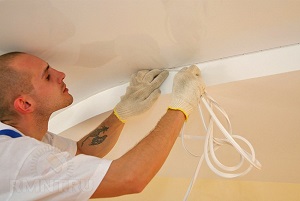
The beams are nailed along the entire perimeter of the ceiling and around the chandelier. The fabric is attached to them using a construction stapler - from one edge of the wall to the other, then to the opposite wall.

The ceiling is completely closed in length, let's assume. In width, the material should be attached a little differently - start from the middle of the wall, move towards the corners, controlling the tension.


All that remains is to rip off the staples by gluing the tape. The ceiling is ready. It's not the only one possible variant fastenings

It is permissible to create a frame, tension the fabric and use this structure as a movable element.


The new ceiling can be attached at a distance from the original surface, at an angle, adjusting the height if necessary. Such additional features, of course, they may be of interest.

This is a more complex option, since the mechanism for fixing and adjusting the height must be carefully thought out. Creating ceilings with your own hands - after all difficult task.

A specialist, of course, will make any dream come true. It’s good if you know a mechanic or have a personal interest in devices and simple mechanisms like levers. In this case, the decor will be created and the structure will be safe.

Perhaps the most convenient option for fastening fabric is Velcro fastening for clothing. They are glued to the slats and sewn to the edges of the fabric. The material is securely fixed and additionally sewn if large, solid fabrics are used. They can be removed at any time without much difficulty or excessive effort, cleaned of dirt or replaced.

It is not recommended to install a fabric ceiling only in the kitchen and bathroom and toilet. In other premises it is guaranteed to last for at least five years, and if desired and cared for, longer.


Fabric ceiling drapery is an aesthetic and affordable solution. Its popularity is explained by the simplicity of the device - installation does not require special construction skills - and the relative cheapness of the material. How to properly decorate a ceiling using fabric? What types of material are suitable for this purpose?
Fabric stretch ceilings will help hide all surface imperfections and disguise communications passing along it. They are different from the usual stretch fabrics increased strength, have sound and heat insulating properties.
This type of decoration looks appropriate in rooms decorated in a wide variety of styles. It is suitable for a classic, Gothic, Art Nouveau or Art Deco interior. A lot of ideas and options for its use can be seen in the photo.
The disadvantages include the fact that the usual types of fabrics used for drapery, if they are not processed by special means, do not have moisture-repellent properties and quite easily absorb all odors in the room.
The design of the ceiling can be made from almost any fabric, but it is advisable to choose those types that have the following characteristics:
When using heavy materials - brocade or velvet, which will look luxurious both in life and in photos - you will need to organize additional fastening.
The ceiling must be re-upholstered taking into account the interior of the room. Light and weightless false ceilings made of organza or veil are combined with light walls and good lighting. Velvet, brocade or other types of heavy fabrics will look appropriate in a living room or bedroom decorated in oriental or Victorian styles.
After studying the photo ready-made structures, you can get a lot of ideas and choose the one you like. 
Ceiling finishing is most often done using:
Before you start cutting, you need to conduct a shrinkage test. To do this, cut a small piece of 10 by 10 cm from the roll, wash and dry it. If the width and length of the flap remain unchanged, then no additional processing of the fabric is required. If the material has shrunk, then the entire cut is first wetted, dried and ironed, and only after that they begin cutting.
Ideally, you need to take a fabric that is wide enough to cover the entire ceiling. However, if this is not possible, it is advisable to place the connecting seam where the constriction runs in folds - they will hide the joint points. Methods for performing such tasks can be seen in the photo.
The finished panel should be 20 cm larger than the perimeter of the room. 
Ceiling reupholstery is carried out using these tools:
The length of all materials (timbers, baguettes, cable ducts and pipes) is equal to the perimeter of the room in which the reupholstery is performed. 
Decorating the ceiling with fabric begins with determining the level of the false ceiling. To do this you will need a level and a tapping cord.
The calculation is carried out as follows: the cross-sectional size of the beam is added to the caliber of the cable channel and pipe, the final result is the total height of the future structure. For example, if you use a beam 25 by 30 mm, and the diameter of the cable channel with a pipe is 16 mm, the level of the canvas will be 46 mm below the ceiling.
Since, without preliminary leveling, the top floor in most Russian buildings varies in height, markings are carried out as follows. The wall where the ceiling is located lowest is taken as the starting point. In this place, 30 mm are retreated from the ceiling, and a horizontal line is marked with a paint cord. Check its evenness using a level.
You can understand how correctly the marking is done using a regular cord or rope. One cord is pulled from one corner of the room to the opposite, and the same is done with the second cord and the remaining corners. In the center of the room, at the point of their intersection, they should touch. If there is still a distance between them, the marking is done incorrectly and needs to be redone. You can see the process in more detail in the photo.
Holes for self-tapping screws are made in the timber along the entire length at a distance of every meter. Points for installing dowels are marked on the marked lines on the walls.
Remove the cover of the cable channels, secure the box at the bottom of the beam, stepping back 1 cm from the edge. For fastening, use small self-tapping screws, screw them in at a distance of half a meter from each other. You can see the process in detail in the photo.
lamp To secure the lamp at the cable exit, attach a piece of timber on which the hook will be held. Position the hook so that its bend is 2 cm below the future false ceiling. To do this, cross cords are again used. 
The edges of the fabric are wound on plastic pipes on all sides, inserted into the groove of the cable channel, and secured there. All unclear points can be clarified by looking at the photo.
The next step is stretching the fabric. Hold the pipe in the channel with your hand, while simultaneously pulling the edge of the canvas down so that the false ceiling straightens out. It is necessary to achieve such a degree of tension at which there will be no folds on the canvas, but at the same time the tubes will hold tightly in the grooves.
Before fixing the fabric, you need to make a hole for the lamp. The place where it will come out of the ceiling can be seen from the protruding silhouette of the hook. The easiest way to make a hole is with a lighter or a match - the stretched area is burned, and a hole appears on it. Due to the fact that the edges of the hole are melted due to the fire, the material will not spread.
After this, they lay between the fabric and the ceiling electrical cable, take it out into the hole with a hook. The installed lamp will hide the hole made in the canvas. The fastenings are decorated with polyurethane baguettes. In the photo you can see how this finishing is done.
The DIY fabric ceiling is ready. This design will cost several times less than ready product, but will perform its functions in exactly the same way.
Ceilings trimmed with fabric look stylish and rich. The choice of textures and colors of canvases suitable for ceiling decoration is huge, so fabric finishing is increasingly used in modern renovation. There are several ways to decorate the ceiling with fabric, we will talk about them in this article.
The most popular among them are:

They are made from a special fabric based on synthetic fabric impregnated with polyurethane. They are attached to special baguettes with a clip, installed on the walls around the perimeter of the room.

Advantages of stretch fabric ceilings:
Flaws:
Stretch fabric ceilings are an excellent choice for finishing rooms in classic style. They gently and unobtrusively emphasize the decor of walls and interior items, without distracting attention. They are used in the living room, office, and other rooms where strict lines and muted colors are appropriate.

It is not recommended to use suspended ceilings made of fabric in rooms with high humidity: the material will collect condensation and dust and quickly become dirty. It is also undesirable to install them in the kitchen - the porous structure of the canvas absorbs odors, soot and grease, so the ceiling will quickly lose its freshness.
fabric stretch ceiling
Note! Stretch ceilings can also be made from natural fabrics. It is important to choose a fabric of such a width to avoid unnecessary seams. As a rule, curtain fabrics are used for this purpose.

This type of finishing allows the use of any fabric, from smooth silk to translucent chiffon and organza. By using different textures, you can create different effects and give the ceiling any shapes and bends.
Two-layer designs are also popular, when over a smooth stretched fabric of thick fabric lay a skillful drapery of translucent shimmering material. Drapery can be used to decorate the entire surface of the ceiling or its individual fragments.

Fastening draped ceilings can be done:
Advantages of draped fabric ceilings:

Flaws:

Drapery can be pulled in rooms where comfort and homely atmosphere: in the bedroom or nursery, living room or dining room, as well as on open veranda or a terrace - there it can be mounted on summer period, and take it off for the winter.
Draped ceilings fit perfectly into East style design or "empire", and smooth stretched fabric will decorate rooms in the style of "country" or "Provence". In a nursery, you can use fabric to create a fairy-tale atmosphere by choosing textiles with magical motifs.
satin stretch ceiling
Note! Almost any fabric is suitable for draperies; the main requirement is resistance to sunlight and the ability to maintain its shape for a long time without sagging.

For this finishing method, mainly silk fabrics or satin are used. The canvases are glued to the prepared surface in end-to-end stripes, like wallpaper. It is important to use a special glue that does not leave streaks and does not change the structure of the fabric.
Silk for covering the ceiling can be either plain or printed with a bright pattern. Bright hues visually raise ceilings and expand rooms, giving it a soft glow, especially in combination with directional or spot light. Bright colored fabrics allow you to achieve originality and attract attention.

Advantages of covering the ceiling with fabric:
Flaws:
Pasting with fabric can be used in almost any room, from an office to a bedroom, it is only important to choose the right shade and pattern. Designers often use silk finishing in ceiling niches in combination with wooden beams. Often combined with wall decoration, columns or decorative inserts.

Note! When choosing colored silk, it is important to consider the size and general style rooms. A large and bright pattern visually expands the room, and a small printed one gives it coziness. At low ceilings It is better to use light pastel colors.
First you need to draw a sketch and decide on the method of attaching the fabric, since the preparatory work, and the finishing technology itself. After choosing the ceiling design, you can begin to calculate the material and select the fabric, as well as purchase the canvas and related materials.
A textile ceiling can be ordered from a specialized company, and if you have the tools and skills, you can install it yourself. This work is not that difficult, it is only important to follow the stretching technology and be careful.
ceiling profile

Required materials and tools:
The stages of work and installation technology are described in the table.
Table 1. Installation of fabric stretch ceiling.
| Steps, illustrations | Description of actions |
|---|---|
| Under fabric ceilings there is no need to level the surface; it is enough to remove the old peeling coating or finish. Whitewash or paint is removed using a spatula or a special remover. The wallpaper is removed and the remaining glue is washed off. Seal cracks, seams and cavities using alabaster or cement putty. Suspended structures completely dismantled, the holes from the frame fastening are sealed with putty. If this is not done, the sound insulation of the ceiling will deteriorate. |
| To ensure that the ceiling is level and strictly horizontal, careful level markings are necessary. More convenient to use laser level, but you can get by with bubbles. Marking starts from the lowest corner. Step back from the ceiling at least 5 cm and draw horizontal lines with a pencil or marker using a level on both adjacent walls. They lead to the corners and put a mark in them. Lines are drawn from it in a similar way to the last corner; ideally, they should converge at one point. |
| It is most convenient to use special moldings for suspended ceilings made of plastic or aluminum as guides. They are equipped with special clamps - clips, under which the canvas is tucked using a spatula or spatula. The guides are secured according to pre-applied markings using dowels and self-tapping screws. Holes in the wall are made with a drill or hammer drill every 30-40 cm. |
| Mounting platforms or special fittings are installed for lamps. |
| The fabric for the stretch ceiling must be cut to the size of the room with allowances of at least 20 cm on each side. The fabric, unlike PVC fabric, does not have good elasticity; it cannot be stretched. Therefore, it is important to correctly calculate the required width and cut the fabric. Canvases made from specialized material are usually selected according to the width of the room, and the length is rolled out directly from the roll. |
| The fabric is straightened and aligned so that there are equal fabric allowances on all sides. Having retreated from the corner at least half a meter, the canvas is temporarily fixed in a baguette in increments of 0.5-0.7 m without strong tension around the perimeter of the room. The fastening of fabric ceilings begins from the middle of the short walls, then the long ones are fixed, the corners are tucked into the baguettes last. The fabric is tucked into the baguette using a rounded spatula. |
| Gradually tightening the canvas, it is leveled and stretched to an elastic state. The excess is cut off with a mounting knife or scissors. When cutting, it is convenient to place a wide metal spatula under the knife - it will protect the canvas and baguette from damage. The remains of the canvas after trimming with a spatula are tucked into a baguette. |
| The gap between the molding and the wall is closed after finishing the ceiling and walls. decorative plinth. |
| Install lamps by cutting holes in the canvas the right size. Glue is applied to the mounting ring and it is glued to the canvas in place of the lamp so that the centers of the ring and the lamp coincide. After the ring has set to the fabric, the material inside the ring is carefully cut out. The height of the lamp is adjusted so that it is at the level of the ceiling panel, after which the lamp is screwed in. It is advisable to use conventional lamps with a power of no more than 60 W or halogen lamps up to 35 W to avoid strong local heating and deformation of the panel in the area of the lamp. |

Fabric stretch ceilings can also be mounted on wooden blocks installed around the perimeter of the room. In this case, the fabric is secured to the guides with a construction stapler, and later the fastening points are covered with a plinth or decorative polyurethane baguette.
Unlike smooth ceilings, draped fabrics do not have to be pulled tight; they can form waves, folds, and if you gather the fabric in the center of the room, it can create a cozy tent. You can also pre-mount a frame on the ceiling and give the ceiling relief and bends in the right places.
The photo shows various forms of draperies.

To work you will need:
Calculating the size of fabric for drapery is a rather complex task, which depends on the shape of the drapery. To avoid mistakes, it is better to draw a sketch of the ceiling to scale, then cut out the proposed canvases from soft paper on the same scale, fold them like an accordion and lay them out on top of the ceiling drawing. The larger the folds, the denser the drapery will be. You also need to leave fabric allowances for attaching to the guides.

The preparation of the ceiling before installing draped fabric is carried out similarly to stretch ceilings. If the fabric chosen is translucent and the ceiling is non-uniform dark color, then it is better to pre-paint it or putty it with a light compound. Marking of walls for guide bars is also carried out using the above technology.
Install the draped ceiling according to the instructions below.
Table 2. Installation technology for draped ceilings
| Steps, illustrations | Description of actions |
|---|---|
| Cut the bars to the desired size using a hacksaw or jigsaw. Drill small holes in them at 40-50 cm intervals and mark the wall through them, placing the block with its lower edge against a pre-drawn line. |
| According to the markings, holes are drilled in the wall, dowels are hammered into them, after which the bars are fastened to the wall with self-tapping screws. If it is necessary to create a ceiling of complex shape, a frame of the desired design is made from a block. |
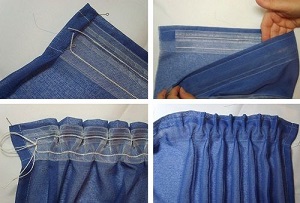
| Cut the selected fabric. To make a simple longitudinal drapery, sew elastic or curtain tape on two opposite sides of the fabric. With its help you can gather the fabric into even folds. To construct a tent-shaped ceiling, several strips of material of the same width are cut out. Canvases can be used different shades, this will give the tent additional charm. One side of the strip is collected, and the second is evenly distributed across the width of the sector. |
| Grab the corners of the fabric to the block using a stapler and distribute the folds evenly. Fix the canvas around the perimeter. For thick fabric you can use a stapler; for thin fabric it is better to press it to a block wooden plank and nail it with small nails. |
| The polyurethane baguette is attached to the block using nails or self-tapping screws. You cannot attach it with glue using conventional technology - it will not stick to the folds of the fabric. You can give the baseboard or baguette any desired shade by covering it with paint. Paint and dry the baguette before installing it in place so as not to stain the fabric. After installation, the nail heads are carefully tinted. |
In the case of a multi-layer ceiling, the first layer of dense fabric is stretched without draperies, the second, made of transparent material, drape and fasten directly on top of the first. This ceiling acquires depth and a soft shimmer, especially when equipped with LED strip lighting.
ceiling lamp
Pasting with fabric is not much different from decorating the ceiling with wallpaper. The surface preparation must be more thorough, otherwise the fabric will not stick to the ceiling. The fabric for pasting the ceiling must be strong enough and not deform when stretched, otherwise the strips will warp and it will not be possible to glue them end to end. For this reason, natural or artificial silk is often chosen.

Required materials and tools:
Table 3. Covering the ceiling with fabric.
| Steps, illustrations | Description of actions |
|---|---|
| Fabric glued to the ceiling will reveal all the irregularities and defects, so careful preparation is required. First you need to carefully remove the old coating, and then seal all the cracks and seams. The ceiling is then leveled using putty. Dry and apply a primer of a suitable composition. |
| The selected fabric must be checked for shrinkage. To do this, a small piece of fabric is measured, soaked and dried in room conditions. The shrinkage is measured again and calculated. If it is more than 5%, the finishing fabric will first have to be wetted and dried or ironed with steam. Otherwise, it may shrink when applied and fall off. |
| Cutting the fabric into strips is carried out only after checking the shrinkage, leaving allowances of 10 cm. If large drawing, you need to adjust it in advance and cut the canvas with this in mind. It is better to roll strips of fabric into rolls; the latter are put on a rod and gradually rolled out when gluing. It is more convenient to do this together. |
| To glue the fabric, you can use casein glue, special mastic or furniture hot-melt adhesive that hardens when exposed to heat. In this case, the fabric will have to be heated construction hairdryer. Prepare glue according to instructions. Apply it to the ceiling using a roller, apply a strip of fabric and level it using a roller. The next strip is glued end to end and the seam is carefully rolled with a roller. Cut off the remaining fabric near the walls. Dry the glue or mastic according to the instructions. The joints of the ceiling and walls are finished with decorative plinths or baguettes, secured with special glue. |
Not the entire ceiling can be covered with fabric, but only certain areas. This technique can be used in zoning premises.
Note! When heated and in bright light, the fabric may fade and change shade. When choosing lamps, it is better to give preference to LEDs or chandeliers in which incandescent lamps will be located at a sufficient distance from the fabric trim.
A ceiling trimmed with fabric using any of the above technologies looks quite impressive. It will decorate any room in your home and allow you to create a unique coziness in it.
Reading time ≈ 3 minutes
At the stage of finishing the ceiling, you need to focus on finding the best one, optimal for you, from the many options. This choice may well be a fabric ceiling created by yourself. This modern alternative has many advantages that justify its popularity.
This question worries many. To understand the difference and the main advantages you need to know the main thing about it:

This is the one important point, which you should be careful with. After all, when choosing fabric stretch ceilings, you need to consider that you will need to install them yourself. Therefore, you need to realistically assess your capabilities. For example, U-shaped profile Installs much faster and easier than a clip-on one. It all depends on desire, abilities, and talents.

If you decide on a simple option, then you will need:

We must not forget that this particular type, although easy to install, is not as strong and durable as the clip type.

If your choice is the second type of profile, keep in mind that the structure and system are different. In the photo materials you can see the main differences between the two installation systems.
First of all, let's proceed to the first task - determining the horizontal level. To do this, we use any type of special meter (laser/water level).

The next stage is to measure the corners of the room to accurately install our clip profile system.
We fix the baguette and stretch the fabric according to the principle: from a fixed angle to the sides. Now we proceed to install the second opposite corner. This way you should have two base points already secured, which is essentially half the job.

Next, one by one and slowly fasten the fabric sheet between the insert and the profile. Thus, we stretch the fabric base over the entire ceiling area. Your activity can be considered completed, the only thing left is to record decorative elements, install lighting fixtures. The practical part of our task can be considered completed.

During the installation of the fabric ceiling, you will need an assistant who will be able to perform additional work in parallel with you (hold the fabric, fix the corners, stretch and fasten the fabric).
It should be noted that by doing the work correctly, following all the tips and tricks, in just a couple of hours, your room will have an unsurpassed look, which largely depends on the type of ceiling and its structure.