Most likely, you just (or a week ago) saw on the Internet a beautiful photo with a completely unusual, one might even say “magical” effect, and now you passionately want to create the same thing with your camera.
Interesting fact: the bokeh technique came to us from Asia, or rather from Japan. In Japanese, “bokeh” is the part of the picture that is not in the sharpness zone. Often, “beautiful bokeh” refers to spots of light that are out of focus. Such spots are usually lanterns, night city lights, New Year's garlands or rays of light.
Bokeh can take different kind: from pentagons, various circles to all sorts of fancy shapes. IN classic version bokeh, the number of faces of polygons directly depends on the number of aperture blades: the more blades there are, the more round the bokeh will be.
The degree of brightness also divides bokeh into three main types: low, uniform and high brightness.

In order to get the bokeh effect in a photo, you must meet simple conditions:
A lot also depends on the lens you're shooting with. It is best to choose a lens for bokeh with the smallest aperture number, in other words: with the largest aperture opening. In most cases, the lenses that come with DSLR cameras cannot allow you to get a pronounced effect. That’s why some photographic equipment manufacturers have released special lenses for bokeh.
A lens with a focal length of 55 mm and no zoom will contribute to a soft artistic blur of the background.
Have you ever admired stunning blurs in the form of Christmas trees, hearts and other unusual shapes? In this article we will tell you the secret of creating such an effect.
How to make bokeh in a photo? Yes, it’s very simple: you don’t have to disassemble the optical device, you just need to acquire the following items:

Let's start making our accessory:
The only difficulty in this operation is that for different lenses and focal lengths you will have to make a slot of a certain size. If you make the figure too wide, you will not see the result at all. If, on the contrary, you make the slit not wide enough, you will get the effect of a DX lens: i.e. 100% vinentation at the edges.
But as practice shows, it is better to cut a hole that is too narrow and then expand it, than to overdo it and create the workpiece again.
To quickly check the correct bokeh, simply set the focus mode to manual and point the lens at the nearest object so that behind it there is something like a garland with many lights. If you have a magical shot with a blurry multi-colored background, then you can safely go in search of interesting shots on the evening streets, in cafes and shopping centers- there you will find large cluster lights, especially on New Year's holidays.
Getting the bokeh effect with a camera is not so easy. The difficulty lies in the fact that the intricate blur from an open aperture occurs exclusively in the place of a point light source. It’s hard to imagine how, when shooting in a studio, you place twenty, or even thirty flashes behind the model’s back, and even move away at a rather impressive distance. Of course, under such circumstances it is easier to just draw artificial bokeh.

In order to create beautiful bokeh in Photoshop, you first need to determine the shape of the future pattern. Perhaps it will be a circle or a polygon, maybe even a heart - the main thing is that you find a brush of a suitable shape.
So, in order, how to create bokeh in Photoshop:
1. Get somewhere a brush of the required shape: hardness 80 or 90%.
2. Create a brand new empty layer.
3. Choose a light shade for the brush, preferably white.
4. Now start painting: paint throughout the image where you want to see the bokeh highlights. Don't forget to change the brush size. It will also look nice if you change the opacity of the brush from time to time. But it’s better to get confused and create a new layer each time, drawing in other places, and only then reduce the opacity of the entire layer.
5. Then change the layer blending modes in Screen (Lightening) and Soft Light (Soft light) until you get desired result. Remember to keep tight control over the opacity of all created layers.
We hope you learned how to create a bokeh effect. If you want to learn even more about bokeh, sign up for photography courses at. We will help you master all the subtleties not only this effect, but also many other intricacies of photography.
To enjoy all the delights of a Russian bathhouse, it is not enough to install a high-quality and reliable stove; you also need to equip the bathhouse with a durable water tank. The capacity of the container, its location and material are selected based on the frequency of use of the bath, the number of washables and other significant indicators. If you decide to make a sauna tank with your own hands, you should first carefully prepare everything, choose the material, the method of supplying water to it and the heating method.
Firstly, it is worth identifying the system with which the water in the tank will be heated. For this, a built-in heating element or stove can be used. This is what will determine the choice of materials, displacement and location. The selection of a heating system depends on the number of people visiting the bathhouse, the optimal time for heating the water and the required tank volume.
If the bathhouse is intended for one visitor, then the most the best option is a 50 liter capacity. If the bathhouse is intended for big family or company, it is worth purchasing a tank of at least 100 liters.
Note! When choosing a mounting system, consider the thickness of the tank walls and its weight.

Depending on the location, bath tanks are divided into built-in, mobile and pipe-mounted. Built-in tanks are installed separately from other structures. They are installed during the construction of the stove inside the heating system using various fasteners and installations. In built-in containers, water is heated directly from the fire, so the efficiency is quite high.

It is impossible not to mention that this reduces the heat transfer from the stove itself, since most of the energy is spent on heating the water in the tank. The volume of the built-in tank is determined by the size of the stove itself.
Mobile containers are much more convenient and practical, especially with constant use. These tanks allow you to install them directly in the washing compartment. But in this case, you should behave with extreme caution, since contact with the tank can lead to burns. This especially applies to families with small children. The use of remote sauna tanks requires the installation of a heat exchanger in the stove, which communicates with the tank through a system of brass or copper pipes.

Installation of containers on the pipe is carried out in attic on the surface of the smoke removal pipe, or above the stove itself. The undoubted advantage of such tanks is the heating of water in a short period of time and high thermal output throughout the entire service life. Moreover this type containers is hidden, which does not affect appearance interior of the room and does not clutter it.

Once you have decided on the type of container, you should choose a method for heating the water in it. Based on this, all the necessary materials are selected.
There are several materials that are used to make sauna tanks.
The classic option for making sauna tanks is cast iron. However, this option has a number of both pros and cons. Although this material, undoubtedly very strong and durable; heating water in such a container requires a large number of fuel and time, but at the same time the high water temperature remains for a long time. Cast iron is not afraid of corrosion and temperature changes. One of the most significant disadvantages of cast iron is its large mass and the difficulty of making it yourself. In addition, it requires mandatory protection from exposure to high humidity.

Stainless steel bath tanks are increasingly being used. Their popularity is due to the fact that they:
Note! Stainless steel for making cookware has the highest levels of reliability and durability. Food grade stainless steel is highly stable: does not deform, is resistant to high temperatures, hygienic and has anti-corrosion properties.

Sauna tanks made of enameled material are practically rust-resistant.
Note! The only significant disadvantage of such tanks is high probability the appearance of chips on the enamel surface. And ferrous metal without additional protective coating Corrodes quite quickly.
Also, enameled containers have one important limitation during installation - they should not be built into the surface of the oven.
In principle, these are all the basic rules when choosing a container for a bath, following which will help you enjoy the washing process for a long time.
People, plants, animals need water. Without it they cannot develop and exist. And therefore it is important to have a supply of it on your site. Of course, almost everywhere there is running water, wells, boreholes. But there are circumstances when the water disappears. This happens most often in hot, dry summers. And then all your efforts invested in flowers, vegetables, fruit trees and bushes will disappear. It will be painful to watch your plants dry out.
To avoid such sad situations, it is recommended to install a water storage tank on your site.
Based on materials of manufacture, they are:
According to the manufacturing method, it is made on:
Depending on what the water will be used for, choose what material the metal container should be made of.
If the water is for drinking, for cooking, washing, then the water tank must be made of high-quality, stainless, GOST steel. Such a tank must have a ventilated hole with a tight-fitting lid. It is a good idea to install a protective mesh over this hole. A water tap is cut into a stainless steel container.
Twice a year it must be washed with disinfectants so that the quality of drinking water does not deteriorate. Therefore, in the side there is a hatch through which it is possible to wash the stainless steel barrel.
If you will use water for technical needs:
then you can purchase a tank made of any metal.
To avoid increasing consumption drinking water, it is best to install a container for collecting rainwater at the dacha. It could be as simple as a fifty liter metal barrel, and special storage tanks with filters for water purification.

And if the barrel is inexpensive, and you can also use a second-hand one, the main thing is that chemicals have not been stored there before, then special containers for collecting rainwater are quite expensive. True, the water collected in them can be used for washing and irrigation. But you can leave water in barrels for the winter.
These containers are the most popular. Advantages of these containers:
The plastic container can be made of either food grade plastic, and from technical.
Plastic food barrels are made of high-strength, frost-resistant plastic. He doesn't miss ultra-violet rays, so the drinking water in them does not spoil for a long time.
Most of these barrels are equipped threaded holes with a plug, the diameter of these holes allows you to install taps in the container.
Each plastic container has a quality certificate.

Plastic containers can be vertical or horizontal.
Eurocubes are in great demand and are readily purchased for the dacha. They are made from polymer materials, for greater stability, the cube is placed in metal sheathing. It has a neck at the top and a drain valve at the bottom.
Still containers found wide application in private farming. They can be used as a storage container for:
It is worth mentioning that Eurocubes are used for transportation various liquids, they cannot be used as containers for drinking water.
If you have enough money, you can buy a factory-made water container for your dacha.
But, after spending a little time, you can make a water tank with your own hands, and it will be no worse than a factory one.
It’s very easy to make an unusual storage tank for water with your own hands from old tractor tires. To do this, you just need to purchase discarded large-diameter tires and install them on your site.

You can easily install the container yourself, for this:
The water that will be stored here is, of course, unsuitable for drinking or washing. But it will heat up quickly, and it will be possible to water the plants in the greenhouse. In addition, the container will serve as an excellent storage tank for rainwater. The advantage of the container is reliability and durability.
Such containers are suitable as a backup option for small volumes of water. If you need a large volume, then you should make storage tanks more solid.
To make a container that holds 7 m3 of water, you will need:

Manufacturing stages:
The advantages of this container:
However, to use such a container you need a pump, and the water in it will not be potable.
On a hot summer day after working in the garden, you want to take a warm shower. But in order for the water to be hot, it needs to be heated. You can buy an electric heater for your dacha, but it is not economical.

It is easier to install a storage tank in which the water will be heated by the sun. Any barrel can serve as such a container - galvanized, stainless steel, metal or plastic.
To do this, just place the container at a height and fill it with water.
The easiest way to install plastic containers.
A stainless steel container will not rust, the water in it will not bloom, it will be drinkable. But stainless steel products are expensive.
An alternative could be a galvanized barrel; it, of course, is not as durable, but if the galvanization is not damaged, it will not rust either.
The most economical option is a metal water tank, but it must be painted to protect it from corrosion.
Instructions
Bacteriological culture of urine is carried out as follows: a small amount of biological material is applied in a thin layer to nutrient media (agar, sugar broth). The tubes are then placed in a thermostat, which maintains the temperature optimal for the growth and reproduction of bacteria. After this, it is determined which bacteria are present in the biomaterial and whether there are pathogens among them. On average, such an analysis takes up to 5 days.
During pregnancy, bacterial urine culture is carried out at least 2 times - in the early stages and at 36 weeks. In particular, when registering a woman at the antenatal clinic, one of the first tests will be a urine culture for Staphylococcus aureus. If expectant mother If you already have diseases of the bladder and kidneys, such analysis will be necessary more often. During pregnancy, a woman's hormonal levels change, and physical changes are observed, which include dilation of the ureters. This contributes to the development of infectious and inflammatory diseases of the urinary tract. Urine culture will help identify the pathogen at an early stage of the disease and prescribe adequate treatment.
To obtain an accurate result, several rules must be followed when collecting biological material. For analysis, you need to collect an average portion of your first morning urine in a sterile container. You should first perform hygiene of the external genitalia. To make the analysis more accurate, send urine to the laboratory within an hour. The results of a urine culture analysis list all microorganisms present in the biological fluid: bacteria, fungi, protozoa.
Urine culture test results are measured in colony-forming units per ml of fluid (CFU/ml). For values less than 1000 CFU/ml, no treatment is required. If the value is between 1000 and 100,000 CFU/ml, the results will be considered equivocal. IN in this case The doctor will issue a referral for a repeat test. A reading above 100,000 CFU/ml indicates the presence of inflammation or infection that requires immediate treatment. To determine the sensitivity of microorganisms to drugs, a study is carried out called an antibactogram. It is performed in order to prescribe the most effective treatment. Bacteriological culture is repeated 3 weeks after the end of taking medications.
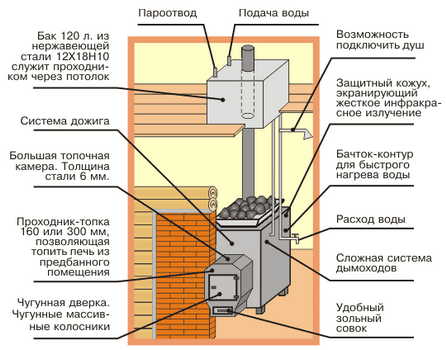
Installing a water tank in a bathhouse opens up a number of conveniences and advantages for the owner. Firstly, it becomes possible to prepare hot water while firing the furnace, which allows you to save energy resources and use them as efficiently as possible. Secondly, the use of such a unit in most cases makes it possible to refuse installation electric water heater, which also benefits the budget allocated for the arrangement of the bathhouse.
There are several basic requirements for water tanks: they must be spacious, durable, warm up in the shortest possible time and retain heat for as long as the needs of steam room visitors dictate. Among the options available to the average user, products made of stainless steel best meet the listed criteria.


Diagram - example of installing a remote water tank
The modern market offers a wide range of water tanks made of cast iron, stainless steel and enameled material. As practice shows, stainless steel is the most popular among bathhouse owners, which is due to the competent and acceptable ratio of performance and technical characteristics and cost indicators.
Stainless steel is characterized by excellent thermal conductivity, withstands temperature changes and objectively lasts longer than various ferrous metals.


A logical question arises here: which of the existing brands of stainless steel is better suited for the manufacture of the container in question, intended for use in a bathhouse? Firstly, this is brand 08Х17 (430), secondly, 8-12Х18Н10 (304). The materials mentioned, among other things, are used for the production of tableware and are characterized by high resistance to high temperatures, are completely hygienic, do not rust or deform during use. In addition, such materials are unpretentious and extremely easy to maintain.

To summarize the above, we can highlight 3 main advantages of water tanks made of stainless steel:
stainless steel sheets
Water tanks designed for use in a bathhouse may have different design. There are 3 main options: a built-in tank, a remote container and a unit installed on a pipe. You can see the features of each type of design in the following table.
Table. Stainless steel water tank designs
| Construction type | Description |
|---|---|
| Installation of representatives of this category is carried out during the construction process sauna stove, as a result of which the stove and tank become a single structure. Heating of water in a built-in stainless steel tank is carried out by the forces of fire, due to which the efficiency of the water tank itself is kept at a fairly impressive level. The key disadvantage of this design is the fact that a significant part of the heat is spent on heating the water in the tank, as a result of which the heat transfer directly from the sauna stove noticeably drops. Helpful note! Much easier to manufacture and use is a mounted/mounted tank installed on top of the heater. |
|
| A more convenient and practical option compared to the previous model, especially if the tank is designed and installed for permanent use. If desired, a ready-made stainless steel water tank can be installed in the washing room of the bathhouse, connecting it with a pipe system to a furnace heat exchanger. Optimal material making pipes - copper or brass. The only one significant drawback a remote water tank reduces the risk of getting a burn in case of careless handling - the situation is especially relevant if children will go to the bathhouse. |
|
| A pipe water tank can be installed either directly above a sauna stove or in the attic space. In such designs, water is heated in the shortest possible time. At the same time, the heat transfer rates of the furnace unit do not decrease. The undoubted advantage of installing a water tank in the attic is the ability to “unload” the steam room by eliminating the container from its surroundings and ensuring large quantity free space. |
The table does not include another possible option for installing the tank - on the side of the stove.

 Stove with a side tank - photo
This method has been neglected for the simple reason that it is the worst. The water in such a tank will boil very quickly. If the steaming process drags on, the constantly boiling water will make the atmosphere in the steam room simply unbearable. Yes, and servicing such a tank is a complete inconvenience: in order to save space, the container is made high, but very narrow.
Having understood the features of stainless steel water tanks and choosing the most appropriate design option, all that remains is to determine the optimal volume of the container, after which you can proceed directly to the stage of its manufacture.
When choosing the required volume of a stainless steel water tank, you must, first of all, focus on the planned number of visitors who will simultaneously go to the bathhouse. For example, if the steam room, due to its physical dimensions, is not capable of accommodating more than 2-3 people, you can safely install a tank of 50-80 liters, at the rate of 25-30 liters of water for each bathhouse attendant.

There are tanks different sizes– choose the appropriate one
Using the above recommendation, you can calculate the required volume of the water tank, taking into account the traffic of the bathhouse being equipped. For greater convenience, it is recommended to add at least 10-20 liters on top of the calculated value - each person’s needs and ideas about comfortable washing are different.
Most factory models of water tanks are made of stainless steel 1 mm thick. For self-made It is recommended to use thicker sheets - about 1.2-1.8 mm (the specific indicator is selected in accordance with the volume of the container). The costs of manufacturing the structure in this case will be higher, but for many years you will not have to think about the need for repairs, painting, coating with various special compounds and other similar maintenance of the tank.
As an example, you can use the following drawing - this is the simplest for self-assembly and one of the most popular design options.

You can change the dimensions proportionally in accordance with the required volume of the container. The volume is calculated according to standard formula, i.e. indicators of the length, width and height of the product are sequentially multiplied. For example, the volume of the container presented as an example will be about 25 liters.
Helpful advice! An even simpler version of a water tank is a product made from a piece of seamless stainless pipe. By choosing this solution, you get a number of advantages. Firstly, you don’t have to waste time and effort on cutting sheet metal, calculating allowances, reserves and other points, i.e. the likelihood of errors occurring is reduced to a minimum. Secondly, making a water tank from a pipe requires the use of welding in a minimal amount.
Stainless steel pipes with a diameter of up to 1020 mm and even more are available for sale, which allows you to purchase a product for making a container of the required volume without any problems. To determine the volume of the cylinder (namely, this is the final shape the storage tank will have), use the following formula.

Helpful note! If you wish, no one will forbid you to make a tank from a profiled stainless pipe, and then the container will have a rectangular shape.
The further procedure for making a water tank yourself will be considered using the example of using a piece of pipe as a workpiece.
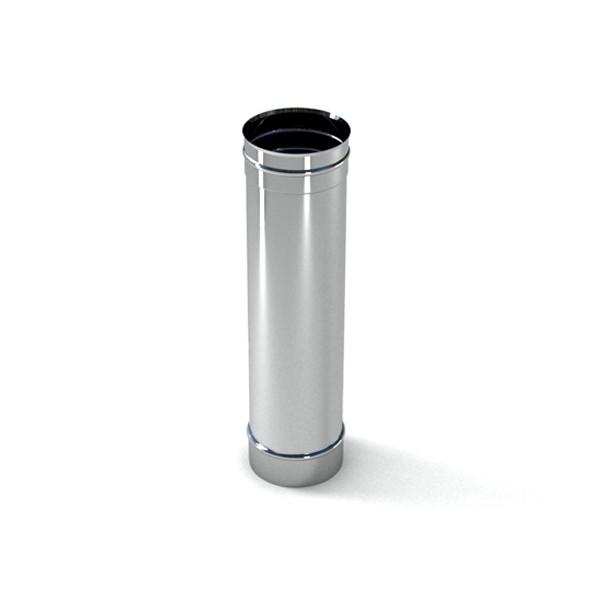
Pipe - blank
Important! If you plan to install a pipe water tank, it is better to use a shorter but wider blank for its manufacture so that the smoke exhaust pipe can be passed through the internal cavity of the tank. It will look something like this.


The procedure for making a water tank from a pipe is presented in the following table.
Table. Making a water tank for a bath
| Work stage | Description |
|---|---|
| Previously, a formula was given to calculate the volume of a cylinder. With its help we find the required height of the water tank. For example, we want to get a tank with a volume of 30 liters and use a pipe with a diameter of 1020 mm to make it. Using simple arithmetic manipulations at the 5th grade level, we transform the formula into the following form: H=30/(3.14*0.512)=37 cm - this is exactly the length the pipe section should have to obtain a water tank of the specified volume. To cut a piece of pipe, we use a grinder. For working with stainless steel, discs with a thickness of 1 mm and a diameter of 11.5 or 12.5 cm are suitable. |
|
| In order for the finished water tank to look beautiful, you need to properly treat the cut areas. In the future, similar actions will be performed when boring holes for connecting pipes with taps. Most convenient tool A hand drill that allows you to quickly and efficiently solve the problems mentioned above is a hand drill. Such devices are equipped with a wide variety of abrasive attachments, which allow achieving maximum quality of processing of a particular material. In the absence of a hand drill, the seams will have to be tidied up using improvised means: a file, sandpaper, etc., which is definitely a more time-consuming and labor-intensive undertaking. |
|
| At this stage we will need a sheet of stainless steel. It is recommended to make the lid and especially the bottom from a material that has a more impressive thickness compared to the walls of the pipe chosen for the manufacture of the body. The work is carried out in several stages: - a circle is drawn on a stainless steel sheet according to the diameter of the holes that it will cover. You can simply place the pipe on a sheet of metal and draw a circle, tracing the contour of the product; - 2 blanks are cut out in accordance with the markings. For cutting and subsequent grinding of the edges, you can use the previously mentioned grinder and hand drill. If a pipe-based method of installing a water tank is intended, at the same stage, holes can be prepared in the bottom and lid according to the diameter of the chimney pipe (preferably 1 mm larger so that the chimney can pass through them; in the future, the gap will be leveled by welding). Also at this stage, you can prepare holes for further connection of pipes with taps, if they are mounted in the bottom (relevant for remote structures installed away from the furnace; in the case of over-fire/built-in and pipe-mounted tanks, it is more advisable to embed the pipes into the wall of the tank body). The nuances of drilling and welding stainless steel will be discussed in more detail in the relevant sections of the instructions. |
|
| The photo shows a profiled pipe, but the welding process for this case and working with a round workpiece remains the same. Products made from the material in question can be connected in different ways: - by soldering using lead-free or high-temperature solders; - manual or automatic welding (in the case of stainless steel, work is carried out exclusively in a protective gas environment). The most preferable is the second option, the easiest to learn - manual arc welding. Argon is used as a shielding gas. Welding is carried out using a non-consumable electrode for working with stainless steel. In the international classification, devices intended for such welding are marked with the abbreviation TIG. When buying or renting a welding machine, do not forget to purchase/rent an argon cylinder and a reducer. The function of the latter is to reduce the pressure of the shielding gas at the outlet. The seams should be as neat and uniform as possible. It is recommended to clean them after completion. Recommendations regarding a suitable tool for this purpose have been provided previously. Helpful advice! If desired, the tank cover can not be welded, but attached using bolts and lugs, or simply made removable. This option is relevant for cases when water will be added manually by the user, and not supplied through the water supply. The container is ready. We begin to prepare the holes for further insertion of pipes. |
|
| The structures under consideration are equipped with two pipes with taps. Cold water is traditionally supplied to the container through the upper pipe, and the heated liquid goes to the consumer through the lower pipe. The diameters of the plumbing pipes correspond to the diameters of the water pipes used in conjunction with them. The most commonly used pipes are ½ or 1 inch in diameter. An ordinary electric drill is suitable for drilling stainless steel. The main thing is that the work is performed at low speeds - no more than 100 rpm. In a drill with an electronic regulator, setting the required mode is not a problem. If there is no such regulator, you simply need to activate the start button with short presses - within a second the tool will not have time to accelerate to operating power. The holes are best made with a P18 drill. Even more convenient option– special step drill (shown in the image). This tool does not lift up the edges of the hole, so it gets a perfectly round shape. Along with this, for drilling holes with a diameter of more than 14 mm, it is more convenient to use special attachments - the so-called. "crowns". |
|
| The presented diameters of such crowns correspond to both inch and metric gradations of plumbing pipes. Using appropriate drill bits, you can also prepare holes in the bottom and lid of the tank if it is intended to be installed in pipes. |
|
| Branch pipes with taps to shut off the flow of water are available for sale. In combination with a stainless steel tank, it is preferable to use components made of the same material. In order not to waste extra time on arranging the threads, the pipes are simply welded to the previously prepared holes. Recommendations regarding tools and welding modes remain the same. After installing the water tank in accordance with the selected scheme (will be discussed later), water pipes are connected to the nozzles (previously noted that it is best to use products made of copper or brass) suitable diameter. The connection of the pipe to the pipe is made in any suitable way, for example, using a threaded adapter. |
So, the water tank is ready, and even the pipes for inserting pipes have already been installed. All that remains is to connect the finished device for its subsequent intended use.
It was previously noted that the most common options for mounting the tank are: inside the stove, away from it and on the chimney pipe. We propose to replace the first option with a method in which the tank is installed above the stove. This method easier to implement, at the same time, you can resort to using it even if the stove has already been built - what if at first you thought that you would not need such a heater, but after studying the material presented, you understood all the advantages of using it and wanted to install it in your bathhouse.
Important! The mentioned replacement will be possible only in the case of a collapsible chimney. The proposed method involves the combined installation of a tank - it will be simultaneously placed above the stones and around the chimney pipe, which will make the efficiency of heating water as high as possible. Otherwise, you will either have to give preference to the built-in tank model (if the stove is just being built), or install the unit at a distance from the stove.
If the stove is brick, preparing the space for the tank and its direct installation are carried out during the laying process (the specific stage depends on the chosen stove design and the size of the firebox, most often it is row 10). When laying a row, an opening is left to accommodate the tank. The size of the opening should be several millimeters larger than the dimensions of the structure being installed to compensate for thermal expansion.

The diagram shows an opening for installing a tank
Note! Pipes are laid in the spaces between the marked quarters of the brick, the presence of which will help increase the heating efficiency - these are design features For this particular furnace unit, these pipes may not be available in the project you have chosen.
The stove with the tank installed looks like this.

A plumbing tap is embedded into the wall of the tank from below. It is assumed that the user will draw hot water directly from the steam room. If desired, the design can be improved by cutting in the previously mentioned pipe instead of the tap and connecting to it water pipe and taking her out to the washroom.
When the masonry is completed top edge tank, 2 metal strips are placed on it, the presence of which will allow you to safely cover the storage tank with a brick.


In the case of metal sauna stoves, the water tank is welded above the firebox (recommendations regarding welding were given earlier). As a result, the container is heated by flame forces, which ensures maximum quick cooking water. The design looks something like this.

Important! If preference is given to a built-in tank design, for its manufacture you should use metal with a thickness of more than 1 mm and, at the same time, ensure that the quality of the welds is as high as possible. Otherwise, the tank will either quickly burn out or leak through poor-quality seams.
Helpful advice! In case of brick oven you can take a simpler route by placing the water tank on the stove body above the firebox. The design looks something like this.

This method, as noted, involves combining options for installing the tank above the heater and on the chimney. The distance between the heater and the bottom of the tank is usually maintained in the range of 20-35 cm, with the possibility of changing in both directions: the smaller this indicator, the faster the water will heat up, but the tank will last less, and vice versa.
Provide detailed step by step instructions makes no sense - you already have all the necessary knowledge. Previously, we described how to prepare holes in the bottom and lid of the tank for passing a smoke exhaust pipe through them. Do it.
Next, you need to pass the smoke exhaust system element through the internal cavity of the tank and connect the pipe to the tank at the inlet and outlet points (in the bottom and lid) by welding. You also know how to do this.
Stainless steel water tanks are relatively lightweight (for example, cast iron is much heavier and a tank made of it would require fixing to the ceiling using chains or other suitable means) and do not require additional fastening. Further installation of the chimney is carried out according to standard scheme, depending on the selected type of structure.
Ideally, the finished system will look like this:


In the example image, the pipes and taps are not visible. The next design is not so beautiful in appearance, but the connection of the water outlet is clearly demonstrated here.

Regarding the submission cold water, it can be organized in several ways, depending on the characteristics of a particular situation:
We will not consider each of the listed options in detail, because... These are topics for separate lengthy instructions.
The setup of such a system is also not overly complicated. The only thing is that the circuit is supplemented with a new device - a heat exchanger. It can be built-in or external. For self-production, it is better to choose the second option - it is more convenient and easier to implement.
A diagram of a system with a remote water tank is shown in the following image.

Here we see that the external heat exchanger is installed on the chimney pipe. The water in the heat exchanger is heated by heat flue gases transmitted through the pipe walls. If there is an open heater under the heat exchanger, additional heating will be carried out by the heat of the hot stones.
Heated in the heat exchanger, the water goes into the external tank, from there, cooling, back into the heat exchanger. Water circulation will be ensured through the created slopes and pressure differences in the container with hot and cooled liquid.


Remote tank with hot water for 60 l
You can make a heat exchanger yourself. In essence, this is the same water tank, the manufacturing instructions for which you have already studied, only of a smaller volume (usually up to 5 liters). The heat exchanger is installed in the same way as the tank in the previous instructions (on the chimney pipe).


Register – heat exchanger for sauna stoves

heat exchanger
You already know how to make the necessary holes, install pipes, taps and pipes. Where to do this - see the diagram. All that remains is to prepare all the required elements and assemble them into a single system, maintaining the necessary distances and slopes in accordance with the above diagram.
In this example, a remote water tank is installed in the washing room and is equipped with a standard plumbing tap for draining water. The pipes, like the mentioned tap, are embedded in the bottom of the container. Holes for laying pipes through the partition can be made using suitable tool, for example, a hammer drill.
In accordance with the current provisions of current standards, cold and hot water supply pipelines, if they are laid through a partition, must be laid through a sleeve. The diameter of the latter is selected so as to be 0.5-1 cm larger than the outer diameter of the pipe being installed. To seal the gap between the sleeve and the pipe, fireproof soft material so that ultimately it is possible to move the pipe along the longitudinal axis in the event of thermal expansion. This is shown schematically in the following image.

The gaps in the partition can be masked in any suitable way, for example, by filling with the mentioned soft fireproof material and covering it with an element exterior finishing(lining, etc.).
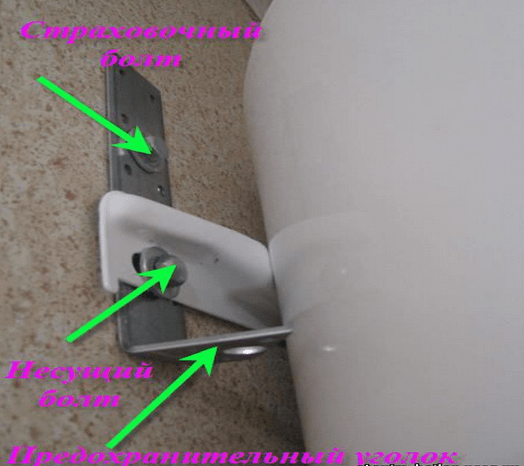
All that remains is to figure out how to secure the water tank to the wall. The simplest option is to install on metal corners, the power of which would be sufficient to support the weight of a tank of water.
Fastening is carried out as follows. Having attached the corners to the wall, you place marks on the surface, drill holes according to the marks and install dowels in them. Next, screw the corners to the wall using bolts 8-10 cm long and 1-1.2 cm in diameter.

You can install your water tank on the corners. The method is extremely simple to implement, but not the most reliable (we made a mistake when choosing the corners - they bent - the tank fell), and it is objectively suitable only for rectangular structures of small volume. The fastening method used when installing household water heaters is more reliable. To implement it you will have to work with again welding machine. You already have all the necessary knowledge, so no additional explanation is required. The procedure is as follows:
Further actions are similar to the previous instructions, with the only difference that the water tank is not installed on the corners, but is attached to the wall through them using a welded strip. It looks like this.
The tank is installed. You can test and, if everything is normal (no leaks, excessive heating and other unfavorable phenomena), accept the structure for permanent operation.
If desired, the system can be improved almost indefinitely, equipped with a variety of automation, measuring instruments, etc. The possibility of installing additional wiring to connect the tank to the shower stall in the washing room cannot be ruled out - this will allow you to wash with maximum comfort. An example of the implementation of such an idea is presented in the following image.

Helpful advice! Install the tank in such a way that it is minimally distant both from the sauna stove and from the point of hot water intake.
Having sufficiently mastered the art of welding stainless steel, if you wish, you can make a tank not from a pipe, but from sheet material– this is a more responsible job compared to the considered option. An example of its implementation is covered in detail in the attached video.
Good luck!


