The most important advantage country house in the age of urbanization it becomes possible to breathe clean air full chest. Alas, in overpopulated megacities, many have simply forgotten not only what a real forest looks like, but also a clear sky. Particularly envious among owners of private cottages are houses with open or closed verandas, where the whole family can gather in the morning and evening.
The aroma of summer or falling leaves in autumn cannot be compared with anything, and if you still have a mug of hot tea in your hands, then it seems that all your wishes in this life have come true. It’s nice, admit it, to feel the sweetness of ozone on the open veranda during the first thunderstorm of the year, and also to hear the rustling of green leaves under the streams of rain.
In the photo - finishing the veranda with wood
All this is possible only under one condition - the interior of the veranda will not push away from it, but rather attract it. If you are lucky and you have closed version such a room, you can place a dining room here, which, by the way, will be just right in the summer. However, in order to prolong the impression of the view from the window, we need high-quality interior decoration verandas

Using MDF on a terrace
Before answering the question - how to decorate the inside of the veranda, it should be said that they should be not only aesthetic, but also practical. It should be borne in mind that the veranda is usually not heated and has similar elements to the gazebo, which is attached to the main house.
In this situation, the corresponding requirements are imposed on the decor:
Most often, in private houses, wood is used to build verandas; probably no one can compare with it. construction material. But, due to its naturalness, it can cause a lot of trouble. Therefore, before finishing, it is necessary to treat the wood with antiseptic compounds.
If your veranda has glazing, then it is recommended to start finishing with thermal insulation work for the walls under the windows, as well as ceiling structures. Try not to rush and do everything carefully so that you can use the room almost until frost.

Thermal insulation with mineral wool
To insulate the ceiling, you can use the materials that are easiest for you to work with, for example, mineral wool, polystyrene foam or polystyrene foam; professional teams will be able to treat the surface with liquid polyurethane foam.
The price of the latter, taking into account the work, is high; it is best to take EPS boards and mats or rolls of mineral wool.
Advice: Before installing mineral wool, it must be wrapped in waterproof material to prevent it from becoming damp and deteriorating after several years.
The inside of the veranda is finished with your own hands only after all preparatory work. There are two ways here - trust your feelings and invite a professional designer. Usually they choose the first method, since today there are plenty of options to transform the inside of the veranda.
An inexpensive finishing method that will help transform ordinary room in an interesting and cozy way. The material is not afraid of high humidity and does not deform during sudden temperature changes.
Installation is easy and without any tricks. Thanks to various color design panels and their texture, you can end up with a pretty decent room that you won’t be ashamed to show to your friends.
Among the disadvantages, the fragility of the material should be noted, although today you can buy “armored” types, the cost of which is 2 times more expensive usual options. Therefore, you should be careful when moving chairs away or leaning on it.
Advice: a construction trick will help solve the problem - the 1st lathing strip is installed at knee level, the second - at the pelvis, the 3rd - at the shoulder.
Below instructions will tell you how to do everything with minimal cost:

Installation of metal sheathing profile
Tip: use wooden blocks laths on the wall facing the street. This way you can avoid the formation of “cold bridges”. For too uneven walls It is better to use the profile on suspensions.
Tip: finish panels with a pattern from left to right, plain panels - from either side.

Tip: do not fasten the plastic tightly so that it does not become deformed.
Tip: at the bottom and top of the wall, leave a thermal gap for the material within 20-30 mm and cover it with a plinth.
An alternative to plastic is MDF panels, which are also popular among hobbyists self-finishing. You need to know that although they are superior in strength, they are very sensitive to moisture. Install them only on closed verandas.
The installation process is similar to the previous one, only fastening occurs using clamps, special metal devices. They can be secured with a construction stapler or small nails, doing this through an extension so as not to damage the edge of the material.
The most traditional finishing option considered for the veranda wooden lining. It is a cladding board in which special grooves are cut to facilitate installation; the thickness of the material is up to 22 mm.
Used for finishing walls and ceilings in open and closed veranda. Treatment with antiseptic compounds increases the service life to 20 years. So far, no artificial material can compare with natural wood.
There are two types of lining - solid and spliced, when the best pieces are connected to each other in a special way. Although the latter looks ideal, it cannot be used to decorate the veranda. Increased humidity can cause cracks to appear at the bonding points, which will greatly damage the interior.
There are also 4 classes of material:
Advice: when buying material in a pack, be sure to unpack it and look through it so that you do not come across low-grade or defective planks.
Natural material must be adapted to the conditions in which it will be installed. To do this, the lining must be left on the veranda for several days. After adaptation, be sure to treat it with antiseptics.

Insulation and installation of sheathing
Work to prepare the surface for installation is similar to the previous options.
You can attach it in different ways:

Clamping scheme
At the last stage of installation, cover the joints and corners near windows and doors with a corner and treat the boards with stain or varnish. The process starts with the ceiling and ends with the walls.
The work of finishing the veranda is not difficult, it is more reminiscent of creative work. Allocate time for yourself on weekends, prepare the material in advance and update its interior so that everyone feels comfortable and comfortable in it. In the video presented in this article you will find Additional information on this topic.
Cladding a house with clapboards - photo of the process
In modern times, covering the walls of houses, saunas, baths and other buildings with clapboard has become a very popular activity. Most a good option wooden panels will be for those who prefer to use only natural Decoration Materials. At the same time, an additional advantage will be that it will be very simple to make wall cladding with this material yourself; for this you just need to be able to hold a hammer in your hands and comply with a number of certain requirements.
Speaking about the popularity of lining today, one should not lose sight of such a point as the price of the material, which today occupies a certain niche in the difficult choice among the proposals of the construction market.
This material, among other things, is beautiful, environmentally friendly and aesthetic, capable of transforming any room. Wooden panels can be used for both interior and exterior decoration, although this material is used much less frequently for exterior cladding.
When planning to purchase a lining, you should understand its classification and some of its features. This will solve the problem of choice, depending on future operating conditions.
The lining is distinguished by the presence of certain elements, from which not only the cost, but also the purpose is determined.
Having decided to clap a room yourself, you should determine what type of wood is suitable for this purpose.
It can be divided into two types:
Note! The use of softwood lining is possible for any premises intended for living or holding any household work. The exception is baths and saunas, since heat will promote the release of resin from the wood. Not only will this cause a fire if too much resin is released, but it will also make the boards too sticky.
In total, four types of lining are accepted, depending on the quality of the panels:


The pockets also have standardized dimensions and are within the range of 3x50mm. Grade “B” is characterized by the presence of no more than one spot of contrasting color, its size no more than fifteen square centimeters. Mechanical damage is acceptable, even if it is located on front surface. However, their dimensions should be no more than 3 mm.

On the surface of panels made of wood of this type there may be through cracks, the area of which should not occupy more than 5% of the length of the entire board. Resin pockets are also acceptable, no more than two, their sizes are unified - 5 mm long and 5 cm wide.
Similar to class “B”, there may be contrasting spots, the area of which lies within 15 cm, in addition, there may be spots of blue, as well as stripes. Sometimes, grade “C” panels exhibit mechanical damage, the diameter of which should not exceed 6 mm.

Depending on the type of profile, wooden panels for cladding are usually divided into classic and euro versions.
Eurolining differs not only in the method of wood processing, but also in the system of adhesion of the boards to each other. In addition, in this type of eurolining there is a wide variety of profiles and sizes.
Often the choice is made in favor of the option with the euro prefix, since the house is covered with clapboard High Quality, acquires enough technical characteristics. This is due to the presence ventilation ducts responsible for the possibility of condensate removal.
In addition, the channels are air ducts; they allow you to remove excess stress from products. Do not forget about the external beauty, which, of course, distinguishes eurolining.

Today this guy wood panels has more variations of profiles, for example, these can be the options “standard”, “softline”, “landhau”, “block house” and “American”.

Often the spelling of the name of this type of lining is found in completely different ways in different sources. This is due to the fact that in the original version it consists of two words, in principle, a unified rule in in this case does not exist.
Accordingly, you can write in different version- “blockhouse” or “block house”, as well as “block house”. However, no matter what you call this material, it will not change at all on the outside - a board with a front side that imitates a rounded beam.
Accordingly, for those who want to turn their house, built from any material, into a building made of rounded timber, they should cover it with “block house” clapboard. It is important that we clapboard a house whose surface has been prepared: the sheathing has been made or the surface itself is perfectly flat.
The dimensions of the lining may vary depending on what type of profile is available, as well as on which manufacturer offers its building materials for use.
Important! There is still a certain standard in this activity. For example, the thickness of the board should range from 12 to 25 mm, while the width should not exceed 150 mm. If we talk about the length of each panel, then it cannot be longer than 60 cm.
If we talk about the sizes of the Euro version, then they are more correct, since they do not have variations, but are simply regulated by certain size values.
For example, the thickness of Euro class lining can be:
Width:
The only parameter that varies is the length - from 500 to 6000 mm.
Depending on the thickness of the panels, the lining is divided into those used for cladding inside or outside the building. If the thickness of the panels ranges from 12 to 16 mm, then they are suitable for interior work The thickest panels (from 16 to 25 mm) are suitable for exterior decoration.
In principle, almost anyone can cover a house with clapboards with their own hands. House master without resorting to the help of specialists. Of course, everyone wants to make repairs or decoration forever. This is possible if you approach the choice of material responsibly. You should first understand the intricacies and nuances of each option.
For example, pine or spruce are most often used for finishing the walls and ceilings of balconies, terraces, living rooms private houses and dachas. Besides, conifers They are also suitable for this type of design, such as lining a garage with clapboard.

Linings are often made from linden or alder, but these types of wood are more suitable for finishing a bathhouse or sauna because their density is too low. In this regard, the heating of the surface of such wooden panels is insignificantly small, which is important in a bathhouse. With this type of finish you can touch the walls even with high heat.
Interestingly, both alder and linden are considered wood species that can imbue with energy, which will undoubtedly create a pleasant atmosphere in the building.
It is important! Aspen, although a hardwood, is not suitable for use in conditions high humidity, because it gets significantly darker. However, lining made from this type of wood is suitable if a protective coating is first applied to it.
The popularity of wood material for wall cladding is explained, first of all, by the advantages that it has.
Among them are the following:

Depending on the conditions in which the lining will be used, it will be possible to do even without impregnations and other compounds to preserve the external condition of the wood.
Note! The protective layer that naturally covers natural wood will not cause harm to health, but will make the walls in the room truly beautiful. In addition, even if the lining was coated with protective compounds, they do not contain any dyes.
When planning to cover a house with clapboards, you may be faced with a really difficult choice, because modern market offers too much material. At the same time, each manufacturer tries to convince potential buyer The fact is that its material is the best and most reliable. However, you should not rely only on those who only want to sell their goods profitably.
Today, lining can be made from two materials, it can be wood. In principle, most people still prefer wooden version However, covering a house with plastic clapboard can be quite acceptable.
Here are the benefits:

However, despite the fact that plastic has significant advantages, it is difficult to call it a replacement natural wood, which can not only create a certain mood, but also a healthy atmosphere. Of course, covering walls with clapboards with your own hands is an activity for which everyone chooses their own material, depending on their preferences and desires.
Now you know and understand the technology of clapboard cladding, and an additional video will help you understand the issue of choosing a material, as well as study minimal instructions carrying out the work and then clapboarding the house will not cause you any difficulties.
Finishing a veranda is a creative process, because it must be covered according to the rules. Identical materials can be used to construct a veranda various types. Find out the secrets correct cladding Some tips will help.
Most owners of private holiday homes prefer a veranda - an extension that is adjacent to one of the walls of the building. When creating and calm atmosphere, and the comfortable mood of the veranda, its decoration plays a role.
The design of the veranda can be open or closed type. Naturally, the finishing of the veranda inside is carried out depending on its type. For registration open veranda(also called a terrace), you will need building materials that are not susceptible to atmospheric influences in the form of high humidity (we advise you to pay attention to modern plastic panels For exterior finishing, perforated sheet, which can be used not only for decoration, but also for dividing into zones; a perforated sheet can be used to decorate the ceiling of a terrace, etc.) and other interior items. For summer veranda there is no need for glazing. This type of veranda is considered a seasonal space, so cabinet furniture or solid buildings are not appropriate on the veranda.
It is enough to decorate the summer veranda indoor plants and comfortable portable sofas and armchairs. This means that the decor of the outdoor veranda must not only be impressive, but also resistant to temperature changes or moisture.

Therefore, the interior decoration of the veranda begins with thermal and waterproofing of the lower part of the walls and ceiling. What materials can be used for this?
Traditionally as internal lining verandas use wood and stone. Before covering the veranda, all wooden structures must be treated with an antiseptic. The most common materials for covering the veranda inside and outside are:
Lining and plastic
Polystyrene tiles
PVC and MDF panels.

Of course, almost all the verandas of holiday villages and cottages in our vast Motherland are covered with these materials. Inexpensive and fast! But you always want to diversify your home, especially if a private house and its veranda is located in picturesque surroundings. You can help diversify the finishing inside and lining the veranda outside by using laminate and wood veneer.

Particularly interesting are the elements made from these materials for the verandas located on the upper floors of the house.
A simple option for creating and covering a veranda for a house is an extension made of planed pine beams. The structure will not require the construction of a complex and powerful foundation, so there will be no problems connecting with wooden structures and there is no subsequent finishing.
Light frame extension or you can build a veranda with your own hands. As roofing material good to use soft tiles, which, in terms of installation technology and performance characteristics, is successfully combined with the existing roofing private house.

An approximate list of materials required for covering a frame veranda:
Veranda foundation and frame
Concrete pillars for the foundation
Beam for frame
Lathing for the lower part of the veranda
Wooden lining or OSB boards
Brackets and corners for connecting beams
Self-tapping screws for fastening lining or slabs
Connecting anchors for frame

Roof
Beams and roofing material
Laths and boards for sheathing
Self-tapping screws for wood
Floor
Waterproofing
Floor boards or slabs
Logs and fastening elements.
In addition, it is necessary to consider the lighting option and finishing the lower part of the veranda with stone.

Useful tips
Experts believe that frame verandas are the cheapest and practical option construction of an additional building. The structure has less weight, which requires a lightweight foundation. The connecting connections of the main structure and the veranda are easily calculated and erected, always taking into account the junction of the veranda and the main structure of the house.

When connecting an open veranda, the main attention should be paid to the connection points. It is recommended to take into account the difference in cladding and foundation materials, as well as the time of construction of structures.

Ideally, the joints should act as an expansion joint, compensating for the difference in linear and volumetric expansions. This process is inevitable over time and with temperature and humidity changes. It is preferable to use anchors as a connecting element for veranda walls.

For a warm veranda, finishing options differ from finishing open type. In addition to the basic interior and exterior decoration, the owners are thinking about glazing and installing fireplaces.

The most common glazing option is the French veranda design, which uses metal-plastic windows large sizes.
The French veranda is characterized by a design with glass walls. Installation of powerful double-glazed windows requires a solid foundation and reliable support pillars.

For this, experts recommend using metal frames or corners. When glazing, you can use one or two-layer bags. It is preferable to use tilt-and-turn structures that allow them to be opened.

“French” windows are a sliding structure with two sashes, one of which is movable. Such structures can withstand significant wind loads. Window frames are high-strength profiles with sealing and reliable fittings.

The windows can be closed from the inside and outside, providing access to the veranda. Therefore, windows can be successfully used as doors.
There is no point in installing expensive multi-layer PVC windows. It is better to consider the option of insulating the floor and walls of the veranda. To insulate the walls, floor and ceiling of a closed veranda, it is better to use such traditional insulation materials.

In the case of budget and inexpensive finishing, you can install ordinary windows, which are recommended to be mounted at a height of at least 80 cm from the floor.
Drywall and plasterboard can be used to cover the walls of an enclosed veranda. Before covering the walls of a warm veranda, it is necessary to waterproof the walls from the inside and outside.

The following are suitable as insulation:
Mineral wool
Extruded polystyrene foam.
On the side of the veranda room, the insulation is “closed” vapor barrier film and covered with plywood, plasterboard, clapboard or wall panels.
How to cover a closed veranda is presented in the video.
People who plan to equip their home with a veranda or terrace often have a question: what material to use for cladding the structure? Considering that the veranda is enough open space, during the construction of which insulation and waterproofing are not used, the issue can be considered relevant. The material used for cladding must be reliable, durable and safe.
Lining is environmentally friendly material used for interior decoration, which is why it is very popular today.
All these requirements are met by lining - a modern building material made from edged boards. Typically, the thickness of the lining does not exceed 22 mm, but there is also non-standard material that is thicker. As a rule, lining boards are used for interior decoration, but in some cases they can be used outside.
Preparing for cladding work

When planning work, first of all it is necessary to decide on the method of attaching the lining elements to the structure. Today there are several of them:
If the master has extensive experience working with lining, you can use nails. In this case, the finishing process will go as quickly as possible, and a well-trained hand will eliminate any shortcomings. In all other cases, it is recommended to use a method that is less traumatic to the material.
When the method of covering the veranda is determined, it is necessary to prepare necessary materials and tools. In this case you will need:

Coating the lining with an antiseptic is necessary to prevent it from rotting.
When choosing lining for covering a veranda, you need to pay attention to its length. So, if when carrying out finishing work in a room it is desirable to purchase the longest possible boards, then finishing the veranda requires the purchase of shorter material. This is explained by the presence large quantity window openings in this room. Short material is easier to adjust to the required size.
In addition, it is necessary to take into account the type of wood from which the lining is made. Here is the most good choice The boards will be made of pine, larch or aspen. They are suitable for both a cold terrace and a heated room.
Return to contents
As a rule, few owners build an insulated veranda; it is usually an open space intended for use in summer time of the year. This means that moist air from the street can easily penetrate onto the veranda. Therefore, all material used for finishing must be treated with antiseptic solutions to prevent the occurrence of mold and rot. This will significantly extend its service life.
If the climate in the region where it is located Vacation home, is different high humidity, it is more practical to use not wooden, but plastic lining or metallic profile. This will slightly increase costs Finishing work, but will also give the structure durability.
Return to contents
The need to install sheathing depends on the design of the veranda. So, if the room is built of even and smooth boards, there is no need for lathing: the lining boards can be attached directly to the tree. If the design is open frame made of timber, it is necessary to create a base to which the lining will be attached.

For the lathing, bars with a cross section of 20x40 mm are selected. The bars are then attached to the wooden frame. The beams, which will form the basis of the sheathing, are installed in the corners of the structure. Their verticality is checked using a plumb line. Then the beams are attached horizontally under the ceiling and along the floor line.
Subsequent actions depend on the method of fastening the lining boards. So, if the lining is nailed horizontally, the sheathing bars are fastened vertically along the walls in increments of 50 cm. When the lining boards are positioned vertically, the sheathing elements are nailed horizontally in increments of 50 cm.
The first element of the lining is nailed with a comb into one of the corners of the room. If clamps are used as fasteners, the fasteners for them can be either special nails, or screws. The clamps are put on the bottom bar of the groove of the lining element and nailed to the sheathing. The next element of the lining, inserted with a ridge into the groove, covers the attachment point.
The interior decoration of the veranda is done in a similar way. After this, you need to move on to the exterior finishing.
Immediately after the construction of the veranda is completed, many people think about finishing it. After all, it’s not enough just to build it; you need to properly protect it in order to extend its service life. And besides the protective function, high quality finish plays a decorative role. After all, you must admit that people are greeted by their clothes. And the veranda is the calling card of every home. Therefore, it is important to choose high-quality finishing materials that will cope with all tasks. But, you may encounter the following problem: there are a lot of finishing materials, but you only need one.
Let's look at how to cover the outside of the veranda, find out the advantages and disadvantages of this or that method, and also consider the technology of covering the veranda. This will help you choose the material and work with it.
Because we're talking about about covering the outside of the veranda, it is important to understand the seriousness of the choice of material. It must meet certain requirements. For example, have you seen someone wallpapering a house or veranda? No? But why? The thing is that the material is simply not made for outdoor use. The wallpaper will fade in a few days, peel off, or get wet in the rain. From this example, you can understand that the material for covering the veranda must meet certain requirements. Here is the list:

Only such materials for covering the veranda can serve you good service, remaining durable, reliable and beautiful for many years. What can you choose from? Let's look at the list suitable materials, and video installation instructions for each of them.
One of the most popular materials for finishing both inside and outside. The lining is made of wood, therefore it is environmentally friendly. Besides, appearance The products are simply magnificent. As for the plating process, it is simple. It all comes down to creating wooden frame and fixing the lining on it. Due to lock connection, no seams are visible. The connection points are hidden. But you can fix punks different ways. Often, clamps, nails, screws or staples are used for this.

Here are the advantages of the products:
The installation process itself is simple. You can see the technology from this video:
This unique material, which is designed for outdoor use. It has all the advantages that we talked about above. There are several types of siding:
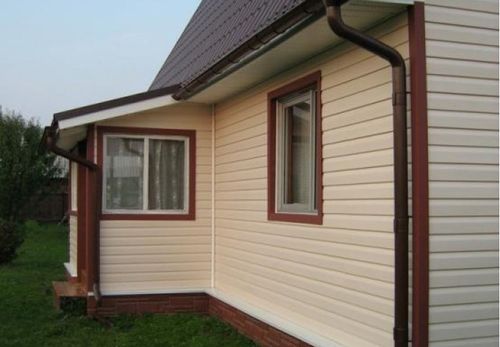
Most often, the last two options are used in finishing verandas. The installation technology is somewhat reminiscent of lining, since here you also need to build a frame and fix the siding to it. But there are some details and subtleties in the work that are different. The material itself is very worthy and is widely used for covering not only verandas, but also houses in general.
Here are the benefits of siding:

Due to its advantages, siding takes a leading position among other cladding materials. Although, like everything, it has some disadvantages:
You can see siding installation in this video:
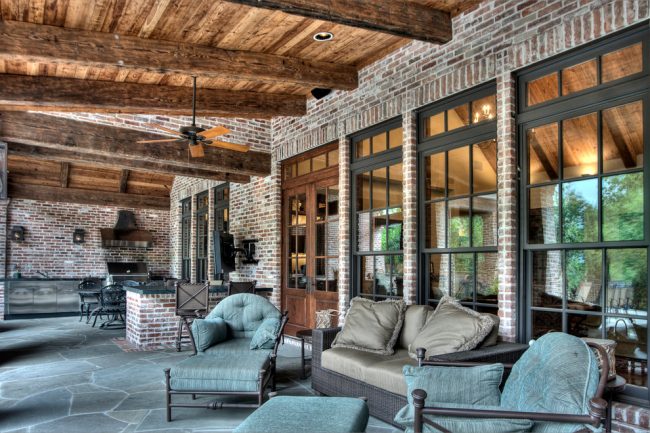
Most often, the materials described above are used for cladding. Although, there are other options that are also in demand. One of them is facing brick. If your house is completely covered with this material, then it would be foolish to use any other material for the veranda. Facing brick quite expensive, but has its advantages. We can note reliability, strength, external beauty, durability, resistance to precipitation and temperature fluctuations. The material is not afraid of impacts and ultra-violet rays. Therefore, we can say that this option is a guarantee of reliability.
If we are talking about wooden house, then the veranda for him can be made in exactly this style. Many people sheathe the veranda with wood; this includes lining. However, a block house or imitation timber (false timber) is often used for these purposes. These are some of the types of lining that differ in appearance and characteristics. A block house is a lining that imitates rounded timber. The material has a convex shape, so after covering the veranda it may seem that it is entirely made of wooden beam. But imitation timber creates the effect of ordinary timber, has rectangular shape. Take a look at the photo to understand the difference in appearance of the materials.

You can decorate the veranda in one way or another. It's up to you to decide. It all depends on desire, preferences and financial capabilities.
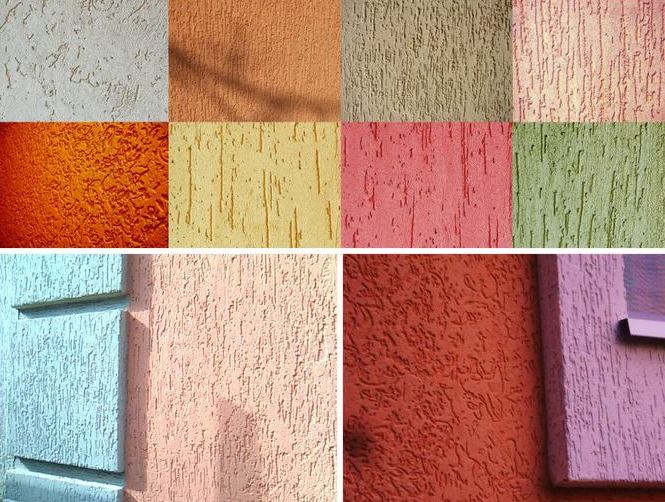
It is not always possible to sheathe a veranda. There is another finishing option, which is plastering. Often the house itself is finished using plaster, so the veranda can be made like this. At the same time, you have the opportunity to insulate it from the outside. It is enough to sheathe the veranda with insulating material. plaster the surface using reinforcing mesh, and then perform finishing putty or plaster. At the same time there appear various options plastering. It can be bark beetle, fur coat, structural, decorative or textured plaster. There are plenty of options, and the choice is up to you. At the same time, the material will resist perfectly external influence and protect the insulation inside. So, you can kill two birds with one stone at once. Look at the photo to see what the bark beetle looks like on the surface.
As you can see from this article, covering the outside of the veranda is a responsible matter and cannot be delayed. Thanks to the diversity finishing materials, you can choose the option that resonates with you. You will not only protect the building material from which the veranda will be made, but you will also be able to insulate it and give it a beautiful appearance. Then everyone who sees your beautifully decorated veranda will understand that respectable people live in this house. Do not forget about the requirements for the material, and when purchasing, consult with sellers. There is no need to save in this matter, since all efforts and funds may be wasted. Remember main principle: quality is paramount. Then your veranda will last for many years.


