Soviet-era furniture - walls, cabinets, chests of drawers - is not beautiful, but reliable and strong. Well, I just can’t bring myself to take it to the landfill. And rightly so. It is very easy to update it, giving it a completely new sound and modern look. Remaking cabinet-type furniture may not be very difficult: there are materials that allow you to significantly change with little effort appearance. The easiest way is to change the color and accessories. Everything is clear with the fittings - choose what suits your style best, and the color can be changed in two ways - paint and glue film (or wallpaper).
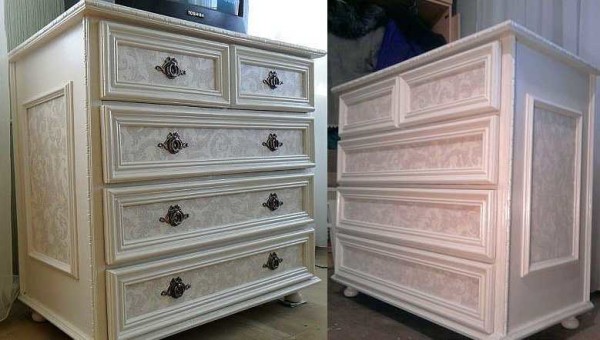
Covering old furniture with self-adhesive film is the easiest option for changing the decor. Film is available today in both plain and color, different colors, textures and shades. There is no point in gluing a film with a wood pattern; otherwise, it is in trend today. But plain or with a pattern - this is what can turn an old wall into new furniture. The steps are simple, but the work requires care. But the result is excellent. See two photos. The first one shows the old Soviet wall before the renovation, the second one shows it after.
Updating an old furniture wall - before and after
Now about how it was updated. Compacted furniture self-adhesive film was used, cream color, matte surface. The open part of the old wall was closed with glass doors; a translucent matte film was used for the glass. The edging is furniture layout (also self-adhesive) chrome color. The order of work is as follows:
This is the sequence of work with every detail. With glass it’s the same, you just need to glue it on inner surface. After assembly you have a renewed wall. This technique can be used for any items: chest of drawers, bedside tables, wardrobe, etc.

For example, after a successful experiment with the wall, they redid it in the same way old wardrobe and added it to the right. Now the entire wall is occupied. You can also update your kitchen set by gluing self-adhesive film and replace the handles.
There is a second way. It is a modification of the proposed method, but it is simpler and not so labor-intensive. Only the doors are covered, not with film, but with non-woven wallpaper. The wallpaper is glued with PVA glue. To prevent the edges from riding up, the parts are cut 5 mm smaller on all sides. It turns out a kind of edging. Everything looks good (example in the photo below).

What's good about this method: it's easy to change the decor. Tired of the old appearance, they tore off the wallpaper and put on new ones. Despite the fact that the method seems frivolous, the appearance is maintained for several years. Its author even tried it on a kitchen set. Only the wallpaper on top is coated twice with PVA glue. In this case, the cabinets can be washed. It is important to apply the varnish layer evenly, without sagging; there are no other difficulties.
Sometimes wallpaper is varnished. But before you do this, try it on a scrap piece: see how they react to it.
When choosing a varnish, you need to remember that acrylic and cellulose varnishes remain transparent after drying, while polyurethane varnishes turn yellow after time. Also, polyurethane is almost not softened by solvents: it can only be removed mechanically (from wood - cleaned with sandpaper).
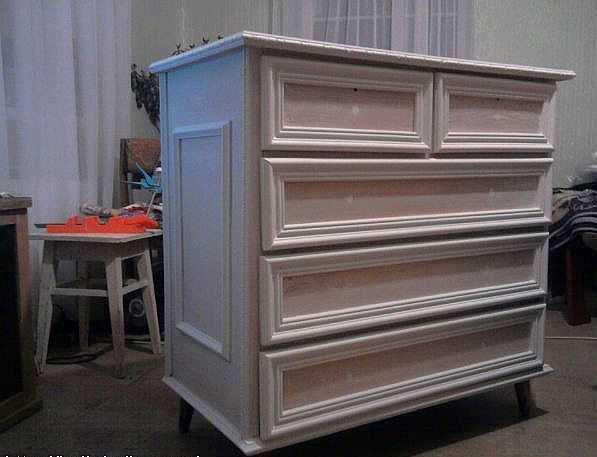
The old chest of drawers had stood for who knows how many years in the attic, but it was very strong and reliable, it had not dried out one bit, only the polish was cracked. It is much stronger than modern products. This is a feature that is inherent in old, Soviet-era furniture. It's not very detailed (to put it mildly), but after standing in poor conditions for several decades, it remains strong. Remaking a chest of drawers is more complex: two techniques were used: painting, and then decorating using polyurethane moldings and wallpaper.

Step 1. We remove the fittings and remove the old coating. In some places the polishing was scraped off, in others it was sanded with sandpaper. The chips were covered with wood putty and waited until it dried. On final stage Everything was cleaned with fine grain sandpaper. At the same time, the chest of drawers became the same as in the photo below.

This is after it was puttied and leveled sandpaper
Step 2. Installation of polyurethane moldings. When choosing moldings, make sure that they are not bulky: too thick ones will look very rough on a small chest of drawers. They should be no wider than 5 cm and as narrow as possible when looking at them in profile.
The purchased polyurethane moldings were carefully cut, the corners were filed at 45°. (). The pattern match must be perfect. We glue them on PVA. For reliability, you can additionally secure it with screws with wide heads. A small recess is made under them, after the self-tapping screw is screwed in, the hole is covered with putty. Try to ensure that the putty immediately lays down perfectly (you can correct it with a wet finger), since it is problematic to clean off dried putty.

Moldings are glued and mounted on self-tapping screws
Step 3. Everything is treated with a primer. You can use PVA glue diluted with water in a ratio of 1:2. After the primer dries, paint (two layers). For this case, acrylic paint was chosen water based. The color is coffee with milk, although it looks completely different in the photo. Color rendering is inaccurate.

This is after the second application of paint. Cute
Step 4. For decoration, wallpaper was chosen whose coating was made using the silk-screen printing technique. Pieces are cut to the size of the inside of the frames from the moldings and glued to PVA. After the glue has dried, the entire chest of drawers is coated twice with water-based varnish.

Step 5. And the last to be installed are new legs (furniture wheels) and handles.

We install the handles and legs)) The updated chest of drawers is completely different from the one you saw in the first photo.
As you can see, there are no difficult jobs. Everything is really elementary. But all processes require accuracy - the appearance depends on it. You can update in the same way old wardrobe. Get a set for the room. Stylish and original.
When updating furniture, the worst thing is if the surface is varnished. The varnish takes a long time and is difficult to remove. If the surface is smooth and the polishing is not damaged, you can apply primer for complex surfaces and paint after drying. This greatly speeds up the process of painting lacquered furniture.
If you have children and a cottage or yard, you may be interested in reading with a lot of photos. And about
In the photo gallery below you can see the process of restoring an old polished bedside table. First, the old polish was removed from it, puttyed, sanded and after processing it was painted twice acrylic paint. Then paper with an interesting design was glued to the doors (it was a gift paper bag). Once dry, the whole thing was coated with two coats of semi-gloss acrylic varnish.
The sequence of work is not difficult if you know how to do it. All processes will repeat the sequence of actions that you saw in the example of updating the chest of drawers. The result is also impressive.
Remodeling furniture with your own hands is a painstaking task, but the result is worth it. Below is a photo of a bedside table restored using a simple method: it is covered with embossed wallpaper, and varnish is applied twice on top.

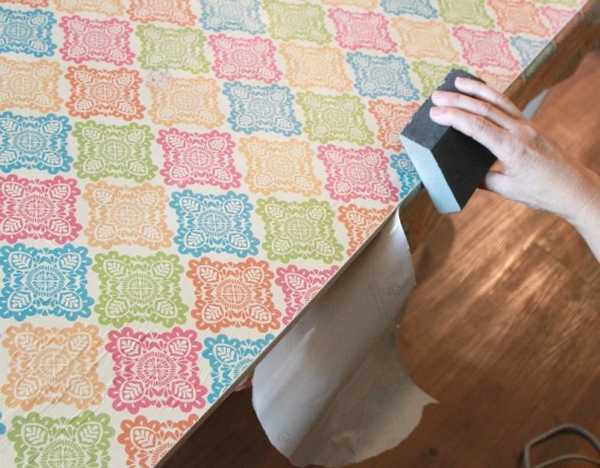
Using the same technology, banal Coffee table can be turned into a modern piece of furniture. IN in this case it was covered with wrapping paper. It is dense, adheres well and does not become limp when applying varnish.
Before starting work on decorating the table top, the legs of the old table and the edges of the table top were painted light color: this way it fits better with the new design style. Then the process of its transformation began.
When pasting, the panel is cut out significantly larger than the dimensions of the tabletop. It's necessary. The paper is glued to PVA and rolled with a roller so that there are no lumps or blisters. The surface must be absolutely smooth.

After gluing, take sandpaper with fine grain (it is more convenient to work if it is attached to a block). By running it along the edge, they bend and at the same time separate the excess paper.

Even cutting with a guillotine will not give you a fairly even edge. And with this method, it turns out professionally designed. There is no smell of amateur activity.

After the glue has dried, the surface is coated twice with a thin layer of varnish. It should be applied with a soft brush in a small amount. Layers are applied in different directions: first along the long side, then across.
Remaking furniture with your own hands is a creative endeavor. Even something boring can be turned into something great. And it is not at all necessary to repeat exactly what you saw. A lot of useful ideas comes during the execution of the “project”. It’s just a pity that some of what was planned turns out to be not as attractive as it seemed. Try it, experiment. Good modern technologies allow this to be done at minimal cost.
Despite the fact that Soviet-era furniture is quite reliable and strong, it is not considered beautiful, much less competing with modern furniture. In addition, by this time it was pretty worn out and required repairs. Even in such conditions, the owners feel sorry to part with her. To buy a new, modern one, you need a lot of money, since furniture has always been not cheap, and it is not cheap now. In this case, there is one alternative option to leave the old furniture and not buy new - this is to try to update the furniture with your own hands, giving it an attractive and modern appearance. Cabinet furniture can be remade quite easily, especially since all the materials necessary for this are available. In any case, purchasing materials to remake furniture will be much cheaper than buying new furniture. One of the easy and accessible techniques is changing the color and replacing the fittings. There won’t be any special problems with the fittings, but changing the appearance is much more complicated. There are several options, but the two most common are painting and gluing special film or wallpaper.

The most affordable and simplest option is to paste old furniture self-adhesive film. On sale you can find film for every taste, both colored and monotonous, in various colors, shades and textures. Many people prefer wood-effect film, but there are other options that meet the spirit of modernity. This approach can really turn an old wall into furniture that will have an attractive and modern appearance. It’s not difficult at all; it’s enough to do your work slowly and carefully, which will allow you to get an interesting result that deserves attention. To verify this, just look at 2 photos. The first photo shows an outdated Soviet wall made of chipboard, and the second photo shows the same wall, but after updating.

The wall received a new appearance thanks to the use of compacted furniture self-adhesive film, cream color with a matte surface. Where there was an open part of the wall, there were glass doors covered with a translucent matte film. For the edging, a furniture layout was used, chrome-colored, and also self-adhesive.
The work consists of the following stages:
After the wall was successfully papered, the old cabinet was also updated and installed on the right. The result is that the entire wall is filled with updated furniture. Using the same technology, you can update old kitchen furniture - glue self-adhesive film and replace the handles.

There is a second option for upgrading furniture, which is less expensive and, what’s most interesting, does not require disassembling anything. In this option, only furniture doors are covered, not with film, but with non-woven wallpaper. For gluing, PVA glue is used. To prevent the edges of the wallpaper from lifting, they are cut into blanks, the size of which is 5 mm smaller than the size of the doors. Judging by the photo below, the result is not bad at all.

The advantage of such a finish is that the finish can be replaced with new wallpaper at any time.
As a rule, a surface covered with wallpaper lasts for five years. A similar technology was used for finishing kitchen set. To make the surface washable, the wallpaper is covered with two layers of PVA glue. The most important thing here is to do everything carefully so that no smudges form, since you will have to work with a brush.
As an option, the wallpaper can be opened with varnish, but before that it is better to experiment on not the desired wallpaper. It is important to determine what the reaction of the wallpaper to the varnish will be. When choosing a varnish, you need to know that acrylic and cellulose provide a transparent surface, while polyurethane will turn yellow after a certain time. Polyurethane varnish is practically resistant to solvents and, if it needs to be removed, you will have to resort to mechanical action. Typically, coarse sandpaper is used for this or an electric drill with an attachment is used.
An old chest of drawers can sit in the attic for several years and lose only its appearance. Typically old varnish coating cracks, but otherwise he can be envied modern furniture. It does not dry out and remains as reliable and strong as it was before. In this case, the chest of drawers undergoes a more complex renovation, using painting and decoration, using polyurethane molding and wallpaper.

Stage No. 1. All fittings are removed from the chest of drawers, after which the old covering is removed. As a rule, the old varnish coating is removed mechanically using sandpaper (coarse). All sinks, cracks and chips are sealed with putty and wait until it dries. After complete drying, the surface is sanded with fine sandpaper. The result is what is shown in the photo below.

Stage No. 2. Installation of polyurethane moldings. The main task is to choose the right moldings so that they are neither small nor large. Basically, products are selected up to 5 cm wide and very narrow if you look at them in profile.
The purchased moldings are very carefully and accurately cut into pieces of the required length, and the corners are cut at an angle of 45 degrees. At the same time, you need to make sure that the drawing matches. The molding is attached using PVA glue. Alternatively, you can use self-tapping screws for reliability. At the same time, before screwing them in, recesses are made for them. All recesses are filled with putty very carefully, otherwise there may be problems when the putty dries.

Stage No. 3. All surfaces for gluing are treated with a primer. As a primer, it is possible to use PVA glue diluted with water in a ratio of 1:2. After the primer has completely dried, begin painting. As a rule, 2 layers of water-based acrylic paint are applied. The color is coffee with milk, although the color in the photo does not match the one indicated due to poor color rendering.
Stage No. 4. Decoration is carried out on the basis of wallpaper made using silk-screen printing technology. Sections of wallpaper are cut precisely according to the dimensions of the inner part, bordered by the molding. The wallpaper is glued using PVA glue. After complete drying, the entire chest of drawers is coated with water-based varnish in 2 layers.

Stage No. 5. Finally, modern legs in the form of furniture wheels are screwed onto the chest of drawers and handles are installed.
If you carefully study the technology, everything is much simpler than it might seem. Although, all stages require a certain accuracy, otherwise there will be problems with the appearance. You can update your wardrobe in the same style. The result is not a bad set for a room or bedroom. It may not be entirely modern, but it is original and stylish, and most importantly, very cheap.
If old furniture has a varnish coating, it is very difficult to get rid of it. If there are no obvious flaws, it is better to use a primer for complex surfaces and only then start painting. This approach will minimize the effort to update old furniture.
The photo below shows the process of updating an old polished bedside table. First of all, the polish was removed, after which the surfaces were filled and sanded. After that, it was painted with acrylic paint in two layers. Finally, the paper from the gift bag was pasted onto the door, making it possible to get an original design. After this, the entire bedside table is covered with two layers of semi-gloss acrylic varnish.

All stages are not particularly difficult if you have the slightest skills. All processes correspond to the sequence of actions described during the restoration of the chest of drawers. The result exceeds all expectations.
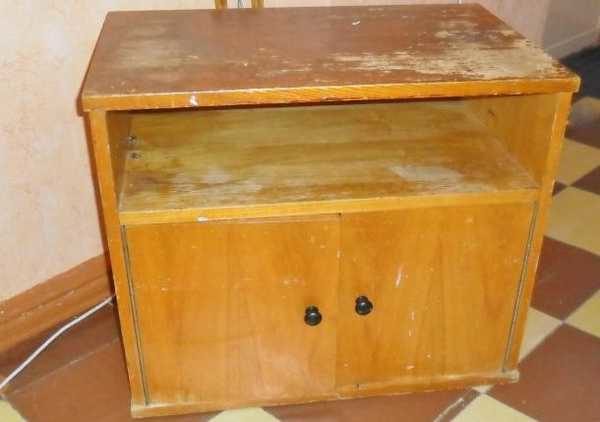 This old nightstand is due for an update.
  This bag will serve as an excellent decor for doors.
  The result of updating an old bedside table.
 Remaking furniture with your own hands is simple and accessible to everyone, if desired. Unfortunately, without desire nothing will happen. Above in the photo, you can see a bedside table that was redone using a very simple method: the bedside table was simply pasted over embossed wallpaper and opened it with varnish twice.
By adopting this technology, you can simply transform an ordinary coffee table into a piece of modern interior design. They simply take it and cover it with wrapping paper. This is thick paper that sticks without problems and does not become limp under the influence of varnish.
First you need to work on the legs and edges of the table top. They need to be painted a light color so that they blend better with the new style. After this, you can begin further work.
Before pasting, you should cut out a piece of paper slightly larger than the size of the tabletop. PVA glue is used for gluing. The surface is well rolled with a roller so that there are no air bubbles. The result should be a perfectly smooth surface.

After this, remove excess material by running a fine-grit sandpaper along the edge of the tabletop, pressing the paper against the tabletop. This method allows you to remove excess material very smoothly, which is more like a professional action.
Finally, the surface is covered with two layers of varnish. At the same time, the layers should be thin. Each layer is applied perpendicular to the previous one.

Old furnishings may vary high quality, long service life and attractive appearance. The upholstery may become worn or the armrests may become dirty, but they will still be reliable and durable. In order not to throw away these items, it is considered optimal to remake old furniture with your own hands; before and after photos confirm the feasibility of the work. The procedure will improve the appearance of the products, making them ideally match the existing interior style. Various techniques can be used for this, and many methods can be easily implemented with your own hands.
There are many different ideas for repurposing old furniture. The choice of a specific method depends on the skills of the owner of the piece of furniture. Depending on the chosen technique, the tools and materials that will be used during work are determined.
| Method of alteration or decoration | Materials and tools |
| Painting | Paint or varnish, primer, putty, protective clothing and glasses, respirator, fine sandpaper, rubber spatula, tape, water, paint or varnish tray, rollers, brushes, clean rags. |
| Using Film | Film of optimal color and quality, surface cleaning tool, degreaser, rags. |
| Padding | New upholstery, stapler, staples optimal size, scissors, measuring tools, pencil. |
| Aging with varnishes or paints | Special compounds, brushes or rollers, a bath for the product, a respirator, clean rags, sandpaper for cleaning the base, a degreasing solution. |
| Decoupage | Stickers or stencils with different images, adhesive. |
| Decorating with fabric | High-quality fabric for upholstery, stapler with staples, scissors for cutting material, ruler, pencil. |
Old furniture is restored different ways, but first you need to make sure that it is really in good condition, there are no rotten or warped areas.

You can remake old furniture with your own hands using different methods, each with its own technology and features. Most methods can be easily implemented independently, even without the appropriate experience or skills. To do this, you just need to study the instructions, as a result of which old things can easily be turned into original designs.
This method is chosen for various wooden interior items, which include tables, stools, chairs, walls, cabinets or other cabinet furniture. Due to the long service life, various abrasions may appear on the surfaces. Also due to exposure to moisture or high temperature old paint may burst and crumble. For furniture, it is advisable to choose water-based paints, as they are safe for residential premises and have good durability.
The most commonly chosen compositions are:
Before purchasing a certain paint, be sure to study the instructions to make sure that the composition is intended for use in residential premises and not outdoors. Do-it-yourself remodeling of an old Soviet wall or other furniture using painting involves performing successive steps:
You should only work with paint when open windows for ventilation, and it is also advisable to cover the floor with some newspaper in advance so that the paint does not get on flooring. Photos of items before and after remodeling old furniture with your own hands allow you to see how the appearance of the structures changes. They look updated, sophisticated and stylish.

We disassemble furniture

We wipe furniture coverings

Grouting with sandpaper

Cover the cracks with putty

Processing the coating with sandpaper

Painting the surface

Cover the surface with varnish
Ideas used to renew and remodel furniture include the use of a special decorative film that covers different surfaces piece of furniture. This method is ideal for walls, cabinets and even household appliances.
Modern films used for old furniture may have different images. They are easy to use, durable and can withstand a variety of mechanical influences. They can even be used in the kitchen, as they do not deteriorate when the temperature changes or is exposed to water.
Step-by-step instructions for remodeling furniture using film:
Thanks to this method, old furniture produces an interesting design that has a beautiful appearance with different images or patterns. The process does not require the investment of numerous funds and time, and is accessible to each person independently.

Processing the coating


Removing the protective table

We glue the film on one side

Removing air bubbles
When renovating an apartment, many people prefer to stick to a certain style. If you choose a Provence or country style, then you need to remake the old furniture to suit the conditions and requirements of these directions.
Designers highly value antique vintage furniture, so some interior items need artificial aging, which will give them sophistication. This remaking of old Soviet furniture is considered a simple process for which special compounds are used. The following materials are often selected for these purposes:
Furniture converted in this way looks elegant, aristocratic and luxurious.

Apply a base coat of paint

Drying the paint

Rub the surface with paraffin

Apply putty

Apply a second coat of paint with a sponge

Sanding the coating

Applying patina
High-quality upholstered furniture can last more than 30 years, but it quickly loses its attractiveness due to wear and soiling of the upholstery. In order not to spend money on the purchase of expensive structures, reupholstery is carried out, which allows you to update the appearance of the sofa or chair. We remodel furniture in such a way that the new upholstery is of high quality and durable, so a lot of attention is paid to its selection. The material must be:
Often leather or flock is chosen for upholstering furniture, as well as tapestry or jacquard. A master class on remaking old upholstered furniture consists of the following steps:
A photo of the finished result of remodeling furniture shows that after reupholstering, its appearance radically changes, it looks updated and can last for a long time.

We disassemble the components of furniture

Cutting off necessary elements fabrics

Sewing fabric details

We fasten the fabric with a powerful stapler

Stretch the fabric
There are many more different ideas used to decorate different old furniture. Their use provides the possibility of further use of structures in modern interiors. These methods include:
| Method | Features of the technology |
| Veneering at home | The process involves the use of a special material - veneer, which has an attractive appearance. It is made from natural wood, therefore it is environmentally friendly. It is glued using the hot veneering method using a heated adhesive solution. For a high-quality result, it is important to carefully smooth the glued elements. |
| Decoupage or decopatch | The technique consists of using different images that are applied to a special fabric or paper. Drawings can be different, so they are chosen depending on the style of the room and the furniture itself. |
| Decorating with fabric | The method can be applied not only to upholstered furniture, but even to stools, walls or cabinets. Can be used for this different types fabrics that fit well into the interior and are highly durable. |
| Stencils | This decoration option is considered simple, but quite interesting. With its help, you can decorate different types of furniture, without requiring the owners to have specific skills or abilities. For work, it is enough to buy suitable stencils and paint in aerosol cans. Next, the stencil is applied to the desired area surfaces, after which drawings and patterns are created on furniture using paint. |
| Wood carving | Is used for wooden structures. It is considered difficult to perform, since you need to have certain artistic skills. |
| Burnout | To do this you need to use a special tool. Initially, a drawing is applied to the surface with a pencil, after which burning is carried out along the lines. |
| Creating a mosaic | Special glass or small stones are selected and glued to the prepared surface with high-quality glue. |
Thus, the refurbishment of old furniture can be carried out according to different technologies. They differ in the materials used and the result of the work. Many technologies can be done independently, but it is important to choose high-quality materials and carefully approach the work to obtain updated, sophisticated, luxurious and bright furniture.


Veneering

Don’t rush to throw away old furniture - give it as a gift new life. Favorite interior items with deformed doors, curved side posts, peeled lacquer coating, loose fittings and unfashionable handles can be transformed yourself at home. Usually, remaking old furniture does not require large financial costs or any specific skills. The main thing that is necessary for renewal is the desire to create.
The kitchen is the most visited place in the apartment. Therefore, the kitchen set very quickly loses its attractive appearance:
There are two ways to put your kitchen furniture in order: contact a furniture shop to order new facades and countertops, or do the restoration yourself.
Most the easy way the execution is considered to be repainting the facades. True, this method is suitable exclusively for doors made of solid, framed and painted MDF. Laminated chipboard and film MDF are not recommended to be painted.
Patina effect on framed MDF

Repainting buffet doors White color

Decoupage kitchen furniture

Artistic painting kitchen set

Curtains are an original alternative to conventional doors

Bright film on kitchen doors
It is very easy to give a new look to your kitchen by replacing visible furniture fittings: handles, supports (legs), baseboards on the countertop.

New handles on kitchen furniture
In addition to the kitchen set itself, you can update dinner table by replacing the boring tabletop with a glass one; stools and chairs, upholstered top part using new fabric or decorating the legs; change the appearance of the refrigerator according to the new look.

Reupholstering a kitchen stool

Pasting film with a pattern on the refrigerator

Chair remodel
The basic principle of remodeling a furniture wall is to replace the front part. Here, as in the kitchen, it is recommended to use decoupage techniques, sticking bright films, repainting the doors, inserting glass instead of chipboard or MDF. It is also possible to divide the main blocks into several independent structures. Installing new legs and handles is also important.

Repainting in light tone

Wallpaper or film on old furniture wall doors

Fabric sticker on doors

Decoupage on a furniture wall

Drawing on old living room furniture

Vinyl stickers on facades

Household rope on a furniture wall

Replacing doors on an old wall: photos before and after the renovation
A chest of drawers is most often not an independent piece of furniture, but furniture that complements the set in a bedroom, hallway, children's room, or living room. Therefore, when remodeling it, you should design the chest of drawers as close as possible to the design large structures.

Cloth for dresser doors

Wooden facades in country style

Film and new furniture fittings on the chest of drawers (replacing handles, legs, gluing oracal

Gluing antique tulle to glass dresser doors

Vinyl themed stickers on old furniture

Decoupage of an antique chest of drawers


Repainted chest of drawers: makeover in youth style


Restoration using leather substitute
Bedroom furniture is always individual. It is best if it reflects the character of its owners. Therefore, when remodeling a bedroom set, you should be guided by your own preferences in choosing a new design for the bed, wardrobes, and bedside tables.
The most budget-friendly way to change the appearance of a bed is to provide it with a new headboard, because the rest of the structure can easily be covered with a beautiful bedspread. For those who are not looking for the easy way out, it is suggested that the bed be upholstered in leather or textiles with a soft foam layer.


Additional soft fabric element on the headboard

In wardrobes, only the front part, that is, the doors themselves, is usually redone. And to be more precise, the insertion into sliding system. A tired wardrobe can be updated by just changing the appearance of the facades. Moreover, in this case it is not even necessary to disassemble the doors and change the internal filling of the profile - it is enough to apply a new design to the glass, paint the mirror or glue a film with colorful photographs.

Self-adhesive film on the wardrobe

Wallpaper pasted on cabinet fronts

Stickers for wardrobes: budget update of old furniture


Drawing with your own hands using a stencil

New leather upholstery sliding doors cabinet
Remodeling children's furniture is always fun. This is where you can make the most of all your creativity, imagination and creative potential. Bright colors, unusual shapes, sophisticated structures, amazing prints and many, many illustrations, stickers, soft decor.

Multi-colored film on facades and chairs

Shelving remodel: before and after photos

Bright painted doors for a children's room

Children's watercolor on an old cabinet, a modified stool and coffee table

Furniture for a nursery from a Soviet wall


Decoupage technique for children's rooms


An abandoned attic, a box with broken children's toys, oversized souvenirs, trash on the balcony and the like are a treasure trove of the most incredible ideas for repurposing old furniture. In each of the listed places there are many unused items that may well be useful for restoring unsightly, neglected furniture.


.jpg)

