If, according to the proverb, sleighs are prepared in the summer, then the question of “how to make a vegetable garden” needs to be addressed in the winter. While there is snow outside, you need to think about what will be grown in the garden and how many beds need to be prepared, how they will be located on the site and how they will be watered.
Decorating the garden on the site
Growing vegetables is a responsible undertaking. You can count on the fact that in the spring you will be able to buy some seedlings and plant them anyhow around the site only if the process itself is important, and the aesthetics of planting has absolutely no importance. However, acting chaotically, in the summer you can find that the plants grow poorly, it is inconvenient to care for them, and it is not easy to water them.
To prevent this from happening, at the beginning of winter you should determine which vegetables will be grown and in what way - seedlings or from seeds. In the first case, you should think about where to purchase or grow seedlings, and in the second, purchase seeds in advance. Then you need to draw and distribute the beds over the territory, following the rules that are known to all gardeners:
 Option for planning a small vegetable garden on the site
If little space is allocated for a vegetable garden, then the beds should be compact. For this purpose, you should use as many vertical structures as possible: vertical beds, trellises, decorative arches, stepped structures on which boxes with earth are located.
 Option for manufacturing and designing original beds
 On vertical structures trellis type, you can grow not only climbing plants such as cucumbers and beans, but also tall tomatoes. This will make them much easier to process and harvest. By arranging the beds for a vegetable garden, you can also leave room for growing flowers. The main thing is that the crops harmonize well in height and size, without disturbing neighbors and without blocking their access to light. A flower and vegetable garden will not only produce a harvest, but will also delight you with lush flowering all summer long.
The geometry of the beds is limited only by the owner’s imagination and the available land. IN Lately not only gardeners, but also gardeners are gradually moving away from square and rectangular shapes, creating triangular, diamond-shaped, circular and segmented ridges. Gaining popularity in regions with cool summers raised beds (optimal height for such structures approximately 40 cm).
 Option for designing garden beds
 Their advantage is that the earth warms up better, and it is much easier to cultivate plantings in such structures. Only they have to be watered more often than standard ones located at soil level. All more people When growing vegetables, they strive not only for high yields, but also for aesthetically pleasing plantings, combining the useful and the pleasant.
It is no longer enough for plot owners to just work on the land; they want the plantings to be originally designed, and the garden to become a place not only for work, but also for a pleasant time and relaxation, during which the growing plantings are pleasing to the eye.
Therefore, a lawn is laid out on the site for relaxation, a pleasant landscape is created, and space is left for a beautiful vegetable garden for growing “vitamins.” Vegetables can be used to create beautiful compositions, no less attractive than blooming petunias or chrysanthemums.
 Design and decoration of garden beds
 Just look at the cabbage family alone, among which there are plants of various shapes and colors. Yes, and salads can be attractive like a flower garden.
The easiest way to make your garden attractive is to plant plants not as individual crops, but in mixed plantings. There are many crops that, when planted nearby, can provide symbiotic protection from pests, increase productivity and create interesting compositions by combining plants in height and color.
When creating a vegetable garden with your own hands, beds can be made in several ways:

The beds can be raised relative to the soil level using decorative fencing, inside of which fertile soil is poured. The fence is made of boards, slate, bricks, and large stones as well. The soil can be filled up, making it " layered cake": put old rags, kitchen scraps, small branches down, put last year's leaves or grass on top, and fertile soil at the very top.
 Warm bed arrangement diagram
 The lower layers will gradually overheat, increasing the thickness of the fertile soil and releasing heat, which will allow fruiting to prolong in the fall. And next spring, such a bed will quickly warm up and it will be possible to plant vegetables or flowers earlier, starting to arrange your garden in the vegetable garden.
The concept applies not only to lawns and other recreational areas. A properly planned and equipped vegetable garden will become no less a decoration of the site. Many crops are beautiful during growth, flowering and fruiting. The variety of colors of peppers and tomatoes, cabbage and salads, herbs and pumpkins fell in love with garden designers who created Various types ornamental vegetable gardens.
This style of planting is dominated by the lawn, with vegetables and flowers interspersed with lawns. And the fence has pots and flowerpots. Plantings are not divided into garden and vegetable garden; everything grows together and combines very harmoniously. Required element English design is vertical gardening. If you have a lawn, you can let Turkish beans (multifloral beans) bloom along its walls, blooming with bright red flowers.
The length of the vines of this plant reaches 3 m, so the gazebo will be woven quickly and thickly. Beans are not only beautiful, but can also tolerate light shade on the north side of the arbor.
This plant can be used to delimit zones and. Daisies planted among tomato bushes will not only create bright spots, but will also attract beneficial insects, destroying aphids and tomato caterpillars.
 Option for arranging an English vegetable garden
 Add variety to the beds with red leaf lettuce, purple kohlrabi and red cabbage, which contrast well with the surrounding lawn. All available land on the site is planted with a mixture of bentgrass, bluegrass and fescue and periodically trimmed. The beauty of this chic garden will be emphasized by the bright spots of the neat multi-colored beds located on it. Perfect and a budget option. And all vertical surfaces cover climbing plants. If you put a trellis in front of the house, then the ivy climbing along it will help hide the peeling wall. The veranda and fence are covered with wisteria or bindweed, which will add charm to flower beds with vegetables and herbs.
Beds of strict geometric shapes are separated, and the edges of the beds are necessarily decorated with borders made of low growing plants. Here again, regular or curly parsley and salads of different colors will help out.
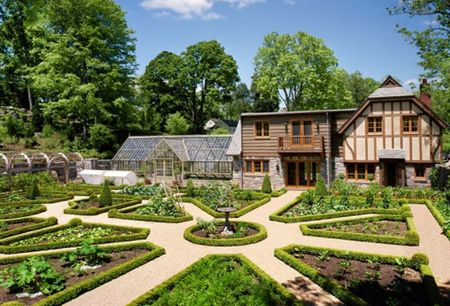
 An example of a French garden design
 Even ordinary onion looks attractive in geometric plantings. To combine the garden and vegetable garden, you can use pansies, low-growing marigolds or calendula as a border.
Four principles for creating a French vegetable garden:
French beds can be placed flush with the soil or raised, allowing them to become the dominant features of the composition. Plants are planted strictly in straight lines. It is most convenient to do this along a stretched string.
 Schematic arrangement of plants in a French garden
 The most suitable for French beds are marigolds, snapdragons, lettuce, calendula, ornamental cabbage, spices, carrots, beets. Beautiful landscape is not formed in one week. It’s not enough to know how to make beds in the garden; you need to figure out how to arrange them and what plants to plant.
It is necessary to find a middle ground between originality and ease of maintenance, take into account, take into account poorly drying lowlands. You should not chase exotic crops that grow poorly in a given area, but rather give preference to zoned plants.
Well-groomed mixed plantings decorate any garden, enlivening it with a combination of leaves of various shapes and shades. The main thing is not to plant plants nearby that cross-pollinate each other or block access to sunlight. In case of non-standard planting, the main labor costs will be required at the stages of planning and planting, and further care behind such plantings does not differ from the generally accepted practice.
Vegetable gardening in Russia is famous for the fact that people are constantly adopting various low-cost ways to increase productivity. The so-called warm beds have earned high popularity. Their device is created in such a way that early heating of the soil occurs with natural (from rotting organic matter) or artificial (using energy) heat.
To put it simply, a warm bed is a kind of compost pit, which has drainage at the bottom and a planting soil. There are three options for compost beds according to their placement relative to ground level:
In any case, filling the bed will look like a layer cake, in which each layer represents some kind of organic material.

Such beds are formed either in early spring, or late autumn. Going into winter with pre-prepared beds is very rational, because before freezing in the depths of the structure, the process of decomposition of organic matter will already begin, and in the spring it will continue with renewed vigor.
Approximate contents of raised beds from bottom to top:

IMPORTANT. The insulating layer protects the drainage layer from being flooded with water and also prevents the germination of weeds.
IMPORTANT. The thickness of the top layer must be such that the roots have enough space and do not grow into the layer of unrotted organic matter. Study in advance the specifics of the plants that you plan to plant in this bed.
Depending on the design, some layers can be eliminated. For example:

There are no strict rules. The main task of a novice designer of warm beds is to understand the whole operating principle:
Most questions revolve around how thick each layer should be. Experienced gardeners We recommend paying attention to the following key points:

There are different versions of garden beds that provide natural warmth from within. The choice of design depends on how much time and effort you are willing to spend on the result. Remember that any garden design is considered simultaneously as:
Technologically the simplest option. What are the advantages of a warm bed of this type:
IMPORTANT. Ideal for conditions where the soil is excessively swampy (an optimal environment is created inside the contour of a warm bed by selecting fillers, and the bottom is covered with insulating material).

The most difficult option in terms of labor costs. However, the result is more solid:

This option is considered optimal:
IMPORTANT. Working in a sitting position is important for older people. They often suffer from atherosclerosis and other vascular diseases, in which a head-down position is contraindicated.

Very important aspect- what to make the contour of the bed from. Although materials are available on the market wide variety, but has different properties:
IMPORTANT. Never use glass. There is a high risk of combat, and it is simply unrealistic to remove small fragments from the soil.
The final decision is always yours, and let it be balanced. Short review materials claiming to be used:

In this article we will look at a mixed type design:
This instruction will help you better understand general scheme and details of working with various materials.

Tools and material:
Bed dimensions:

IMPORTANT. Plan in advance, this will make it easier for you to implement your plans without wasting time on alterations and improvements.
Please note that the sides of the bed will have to be made of double boards, that is, place one board vertically above the other so that the height of the walls is sufficient. Thus, you will have the following actions:


IMPORTANT. How many stakes will it take? With a bed length of 2-2.5 meters, 6 pieces are enough. With a bed length of 3.5-4 meters, 8 pieces are enough.

This completes the preparation. The frame will need to be installed directly into the trench - fastening at the corners of the structure will also be done there. A measuring angle and level will help you maintain accuracy.
Step by step steps:


IMPORTANT. In fertile areas, before starting trench work, carefully remove the top layer of soil and set it aside. This is the turf you use for planting.
After all the steps, do not forget to water the bed to create a moist environment. In such conditions, the process of rotting inside will begin. Do not try to moisten each layer with water as you fill the trench. There is no need to rush, let everything go at a moderate speed. There is still time before planting, and the contents of the bed should rot and be loose, and not rot in a viscous slurry.
The concept is that:
IMPORTANT. Artificial heating is optimal for covered (tent) beds and greenhouses - the heat generated by the pipes is retained inside the system and is not sprayed in the open air.

The order and list of fillers may vary. In any case, the most important layers should remain:
Only after all these components is placed at the top fertile layer land.


What type of heating is allowed? It can be of any type:
It's actually quite simple:


In the absence of experience working with electricity, invite more help knowledgeable person. If electric installation work you understand, the whole process will be elementary for you, and the design will be durable, effective and reliable.
When summer residents create beds, they are increasingly moving away from traditional rectangular shapes to give the garden interesting view. And if there is a shortage on the site free space, I really want to lay out a lawn for relaxation, and create a pleasant landscape, and at the same time save space for growing “vitamins”. In this case, instead of flower beds, beautiful beds are laid out, which are no less pleasing to the eye. blooming roses or petunias. Just look at the salads, whose rich colors and leaf shapes allow you to create amazing compositions! We have put together an interesting selection of ideas for creating non-traditional garden beds. Perhaps some creative summer residents will like these methods of landscape design.
The easiest way to add aesthetics to your garden is to plant plants not in single beds, but mixed plantings. Agronomists have long found out that there are crops that, when planted in close proximity, can increase yields and get rid of pests. But if you combine them in height and color, then beautiful beds will shine in your garden.
Planting garden crops in stripes creates a beautiful geometric pattern, and the different colors of the leaves emphasize the unusual and decorative nature of the garden bed.
If the vegetable garden is in the center of the plot and is visible from all sides, then the most advantageous will be a round bed, which will become the center of the dacha composition. And it needs to look impressive from all sides.
First, mark the soil by driving a peg with tied twine in the center. The second peg (pointed) is fixed at the other end of the thread at a distance equal to the radius of your future bed. And, pulling the twine tightly, they draw a circle on the ground, which will be the border of your flower bed. Then the radius is narrowed by 10 cm, outlining the landing site of the last row. And so they move to the center of the flowerbed, leaving between the rows the distance necessary for normal growth specific culture. To make it more convenient to care for plants, they divide the circle into sectors and lay narrow paths to the center.
When planting vegetables in mixed beds, take into account their level of compatibility with each other, otherwise, instead of a beautiful bed, you may end up with a lifeless, sluggish landscape
Next, it is determined which crops will be planted in this bed. In this case, not only the favorable neighborhood is taken into account, but also similar growing conditions. You should not plant climbing vegetables (cucumbers, zucchini), because they grow to the sides and destroy orderly rows. Greenery will look best on such a flower garden, different types cabbage, carrots, beets.
Tall plants are planted in the center, for example, a support for beans is built. The next one is beets. After it - cabbage, then lettuce and ending with cheerful strawberry bushes. All plants are selected with a gradual decrease in height, so from any side the bed will look impressive, multi-tiered.
If the garden is located along the fence, then beautiful beds for vegetables can be created by making them triangles. At the same time, they maintain tiering, placing tall crops closer to the fence and gradually reducing the height.
An interesting solution could be planting in narrow rows like ridges along the paths. Fluffy crops are suitable for these purposes: curly parsley, lettuce, spinach. They are planted in one row, each variety, and low-growing flowers are added to the foreground - primroses, pansies, daisies, etc. Cabbage, alternating with hostas, looks unusual.
Some owners create beautiful garden beds in their dachas, raising them above the main surface of the ground and fencing them with decorative borders. In this case, “two birds with one stone are killed”: the beds warm up better, are not washed away by sudden downpours, and an original landscape is created.
A high bed, decorated with willow wattle, warms up perfectly and creates interesting element in the landscape, but requires frequent watering in hot summers
High beds do not require deep digging. It is enough to stir the soil with an ordinary garden fork. But first you need to plan the shape and location of all garden “flower beds” and fence them off by digging in decorative edges.
The whole difficulty of creating a decorative edge from slate is that it must be carefully cut, but the soil in such a bed will not crumble
You can use the following as sides:
Old plastic boxes without a bottom, laid in two tiers, create the necessary height for the garden bed and look very unusual
Ideally smooth and well-groomed paths between the beds create a beautiful geometric picture and thereby enhance the decorative effect of the composition.
Waste paper, rags, kitchen waste, cleaning materials, etc. are placed in a landscaped bed. The top is covered with a layer of foliage and chopped grass, and the last layer is covered with soil. Such a cake will gradually decompose, releasing a large number of warmth, and even on cold days root system plants will feel comfortable.
When the beds are created, it is necessary to improve the paths, otherwise the landscape will not look complete. The easiest way is to roll them up and sow them with lawn grass. But if you want a greater effect, then you need to buy geotextiles, cover the ground with it, and pour decorative gravel, bark or colored sawdust on top.
In urban areas there are such small plots that there is simply not enough land for a full-fledged vegetable garden. In this case, resourceful owners build beautiful vertical beds with their own hands. But not every vegetable can grow in such conditions. Strawberries, salads, onions, spices (basil, lemon balm, etc.), cucumbers and zucchini (with constant watering) lend themselves well to vertical gardening. There are many ways.
First, the rubber is painted, then the lower tier is filled with soil, a second tier is installed on it, etc. Seeds are sown only in free corners with soil. This mode can withstand greens and radishes perfectly.
A bed of tires should be painted in light colors so that the rubber does not heat up too much under sun rays and did not dry out the plant roots
By using wooden boxes nailed in rows to the wall, you can decorate an old outbuilding that does not fit into the landscape
The second option is to screw plastic bottles, cutting a small hole at the top and filling half the container with light soil.
Remontant strawberries, which produce a large number of tendrils that beautifully hang down and are decorated with red berries, thrive in such bottle containers.
From cucumbers and other climbing vegetables you can create decorative arch. To do this, each cucumber is planted in Plastic container, make a pergola or arch from thin pipes and place all the pots on the bottom plank of the structure. As the cucumbers grow, their vines must be guided and tied until they are firmly hooked to the frame with their mustache.
Caring for cucumbers planted in containers is much easier, because weed control and spraying against fungal diseases are not required
Creative gardeners come up with a lot interesting ways decorate boring beds. If you are one of them, be sure to try the above methods, adding something of your own to them.
In order to make the right garden beds with your own hands, you can study the positive experience accumulated by gardeners and begin your own country experiment. We will need to invest time and energy, but the high yield and minimal effort to maintain the garden is worth it! Modern vegetable garden can be comfortable and beautiful, and working in it can be enjoyable. Sound like a dream? To make this dream a reality you will only need desire and a little effort.
We will tell you a simple and effective method do it yourself productive beds, which has been proven by many years of practice. This method became widely known thanks to the experience of Igor Lyadov. The principle is quite simple: high beds should be narrow (60-100 cm) and long. It is important that the bed is stretched along a north-south line - this will provide maximum light and warmth to the plants growing on it.
First, a box is made from boards, logs, slate or any other material.
Cardboard is placed at the bottom of the box - this partially prevents the growth of weeds.
Then the cardboard is covered with a small layer of sand.
Then the bed is filled organic fertilizers(compost, manure) and covered with earth. The soil can be taken directly from the passages between the beds.
The passages themselves can be improved so that weeds do not grow on them and you do not have to waste time weeding them. It all starts with lining it with cardboard or newspapers.
Only now a layer of sawdust 2-3 cm thick is poured onto the newspapers.
Such proper beds last for many years and allow you to grow amazing crops. You just need to regularly replenish them with compost or other organic fertilizers.
Certainly, good harvest in the beds is the most important thing. But if it is important to you that your vegetable garden looks modern and beautiful, then here are some ideas for you.
Use various combinations plants in the beds, combining the colors of leaves and fruits to create interesting compositions.
Fences for garden beds serve not just utilitarian practical purposes, and make it easier for you to further maintain the beds and plant plants; Fencing of beds divides the garden into zones and creates a neat structure of landscape design. For fencing, you can use almost any material that you have on hand.
By raising the beds above ground level, you will make it easier for yourself to care for the plants and give your garden an attractive appearance.
Paths between beds are also very important. To make them comfortable and beautiful, do not forget to protect the row spaces from weeds. The easiest way is to lay agrofibre on the track substrate.
If you reach a certain level in vegetable garden design, then your country cottage area will be transformed beyond recognition, and at first glance it will be difficult to even tell whether it is a vegetable garden or a flower garden.
For some of us, the vegetable garden is still not the most inspiring place in the country. And indeed: there is nothing more tedious than monotonous rows of cabbage, beets and tomatoes, which constantly require weeding, watering, and treatment with chemicals against pests. However, we believe that things could be completely different! And we invite you to get acquainted with photos of beautiful vegetable gardens at the dacha.
 It may seem to you that arranging beautiful beds requires too much effort and time. Of course, it is simply unthinkable to equip thirty acres in this way with one or two people. But, firstly, not always and not everyone’s garden is so large, and secondly, even if you have almost industrial plantings, you can apply these methods to part of the garden.


