Those who decide to change their profession will need a diploma in another specialty. You can spend several years and get a document about second higher education, or you can undergo retraining, after which you will be issued a diploma professional retraining. Let's tell you more about this document and its features.
If you want to receive regularly useful tips about admission, studying at a university and employment, join our telegram channel. His subscribers are always up to date latest news and cool life hacks.
In addition to “regular” higher education, there are also additional professional training programs. They allow for a short time(from 250 to 2000 academic hours) to master a new specialty.
A retraining diploma is a document that confirms that its owner has completed such a training program.
Holders of diplomas of this type can work in any of the specialties recorded in the documents. Example: if a lawyer has undergone retraining in programming, he can get a job in an IT company.
The appendix to the professional retraining diploma contains a list of disciplines that the graduate has attended.
The diploma of professional retraining with honors has a traditional red cover. A retraining diploma is almost no different from a second higher education diploma
Compared to the second higher education, there are several benefits to retraining.
The disadvantages include the conditions for confirming the requalification diploma. Spoiler: every five years you need to confirm your qualifications.
The validity period of a professional retraining diploma is not limited, but every 5 years a graduate must confirm his qualifications: for example, take advanced training courses. Afterwards they receive a special certificate of advanced training.
During your retraining programs, you may need help with your schoolwork. It will help you deal with them student service: Its experts know the secrets of preparing essays, tests, presentations, etc.
Installation of the door frame is accompanied by the work of installing the door on the hinges. It is quite possible to perform this process on your own, but only if you become familiar with the technology for its implementation. There are several methods for installing a door on hinges. We'll look at how to embed hinges into a door and how to remove a door from its hinges below.
This method of installing a door on hinges is easy to implement. It is most often used by professional workers due to the speed of work. Therefore, during the work process you will need to have special tool. First of all, to insert the loops you will need to use a manual milling machine. With its help, it is possible to perform work on arranging a clean cut. Also, you should prepare a tool with which you can cut the hinges.

This device has the shape of a lining that prevents mechanical damage to the door leaf. Moreover, with the help of some professional tools, it is possible to completely set the dimensions of the hole for the hinges on the door leaf. IN in this case, it is possible to significantly simplify the process of installing the door on the hinges.
Please note that there is equipment that can be used to create a groove both on the surface of the door leaf and on the door frame. With it there are two parts door frame are connected together, so the process of combining groove joints disappears on its own. It is with the help of this equipment, it is possible to speed up the installation of hinges on the door.
If you don’t have such tools, you shouldn’t give up, because with just one milling machine, you can also do the work of mounting the door on the hinges. This tool, if you have the skills to work with it, allows you to build a groove connection for hinges, both on the door and on the door frame. However, the disadvantage of its use is the low quality of the result obtained and more time to complete the insertion.
Also, if you are careless with the mechanism, there is a risk of scratches on the door and spoiling the attractiveness of their appearance. Therefore, the foot of the router should be covered with a protective material such as felt.

This method is characterized by a lower quality of the result obtained than the previous option. To carry it out, a chisel and a hammer are enough. Popularity this method is explained primarily by the availability of materials for its implementation.
If the door has laminated coating, then as a result, the edges of the groove for the hinges will be sloppy and aesthetically unattractive. Instructions on how to install hinges on a door with your own hands are given below:
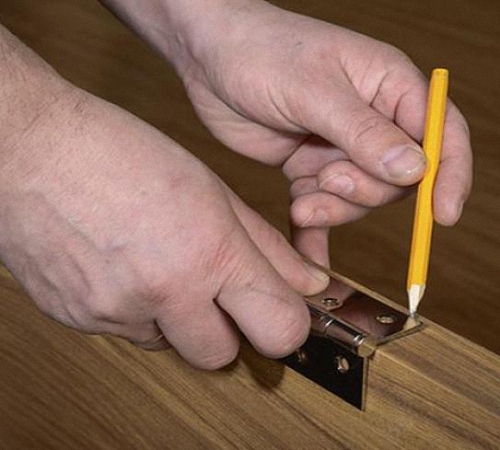
1. At the beginning of work, markings should be made for installing the groove. To do this, install the canopy on the end part of the canvas, outline it with a pencil. Please note that on at this stage Particular care should be taken, since the hinges must be installed in proportion to the door leaf. Wrong installed hinges will not be able to rationally distribute the load and will lead to premature failure of the door.
2. Next comes the process of edging the groove joint. A hammer and chisel are used for these purposes. The chisel should be installed a few millimeters inside the door leaf. This edging should be done in relation to the previously completed markings.
3. Next comes the process of selecting the groove joint itself using a chisel. In this case, the chisel is installed with a slight slope. The groove connection is knocked out with a hammer. Particular care must be taken at this stage to avoid damage to the face surface.
This method of installing hinges is suitable for wooden door, which is subject to further coloring. Since after its implementation, sloppy chips and selections are formed. Coloring will help eliminate and improve their appearance.

If you do not have experience installing doors on hinges, then it is best to use this option. Using a certain type of canopy allows you to avoid cutting them into special grooves. There are two ways to do the work:
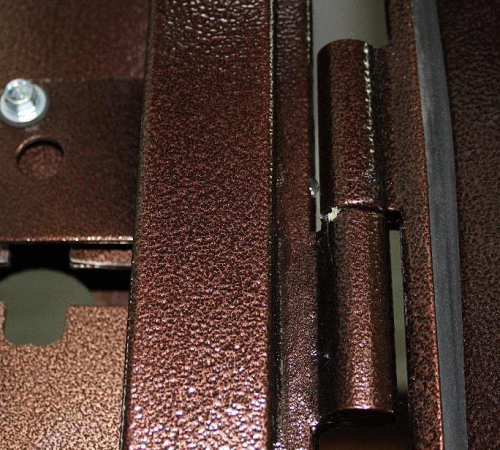
1. Use of hinges without inserts. To install this kind of hinged mechanisms, you will not need to cut grooves either on the door or on the frame. Their design is quite simple and allows them to be installed directly on the door. After the door is closed, they are installed into each other, since the thickness of one part of the hinge is no more than 0.25 cm, a technological gap is formed between them. To install this hinge, simply screw it onto the door and the door frame. Among the disadvantages of using this method is, first of all, the unaesthetic appearance of the door after installation.
2. The use of screw-in hinges is also important for beginners. In this case, the grooves on which conventional hinges are attached are replaced with holes. To install such a hinge, you will need two holes in the door frame and one in the door itself. To install the canopy, simply screw it into the previously prepared holes. Please note that the holes must be located in the correct order in relation to each other. Appearance such loops are more attractive than the previous version.
In addition, another alternative option door installation, is the use of pin hinges. They are inserted directly into the canvas. However, the specific design of such a loop hides the place from the insert, so the aesthetic side of the issue remains at the proper level.
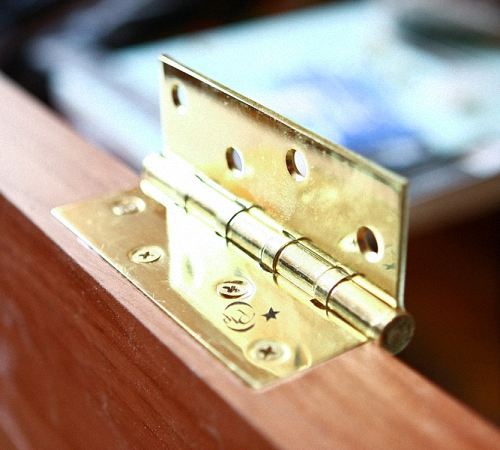
This loop consists of two plates, the rotation of which is carried out around an axis. This device is installed at the bottom and top of the door. In some cases, the top hinge is still visible, but only if the door is left open.
To perform these works, electric power is used. arc welding. At the same time, it is necessary to have skills in working with these tools. Properly installed and welded hinges on the door will ensure high-quality and silent opening.
In addition, during the work process you will need to have:
Most often, the loops have the shape of a cylinder or are distinguished by the presence of hexagons. The first version of the hinge is simpler to make and easier to weld to the door. To weld the hinges, special plates are used.

All work is carried out outdoors; the surface for laying the door must be strictly horizontal. scarves must be welded to the loops using a continuous seam. Otherwise, the quality and reliability of the connection will be compromised.
In addition, the plate must be selected in relation to the size of the loop. Also, you should take into account the load from the door, its weight and dimensions. With the help of these elements it is possible to equip a so-called working platform on which welding work will be carried out. In addition, they will serve as a support between the door and the hinge.
Before installing the hinges on the door and before starting welding, the doors are installed in a vertical position. Next, their position in relation to the loops is checked. After checking and marking the welding points, the welding process on the door frame follows. It is with the help of plates that the welding process can be facilitated for people who have no experience in performing this work.
To check that the door is installed correctly, use laser level. It is he who will help determine the installation location of the second of the loops, after welding the first. This is followed by attaching the hinge, pressing the door to the leaf and continuing to work. After welding the loops is completed, the seams are processed using a grinder.
When the need arises to hang hinges on a door, people who have never done this turn to specialists and spend quite a lot of money to complete this process. However, before attaching hinges to the door, we recommend that you familiarize yourself with the recommendations that will help even beginners complete this process.
First of all, installing hinges begins with their selection. You should also determine the number and direction of hinges on the door, if they did not come with it. If the door is double-leaf, then for its installation you will need two hinges for each of the leaves.
There are several options for door hinges:
Each of these loop options has individual benefits and disadvantages. Card loops can be either removable or non-removable. The second version of the hinges provides two-way opening of the door. However, if you need to remove the door, it is best to use removable hinges.

The mortise version of the hinge is used if the total weight of the door leaf is more than twenty kilograms.
To install hinges on a single-leaf door, you need to determine its opening type. The number of hinges is determined based on the weight of the door, the material from which it is made and the operational load that is placed on it. To fix a door consisting of one leaf, two hinges are enough; if it is an entrance door, then it is better to use three hinges.
Tip: When purchasing hinges in a store, ask the salesperson to open them for you. Since quite often you come across mechanisms with deformed rods inside.
In addition, make sure that the color of the hinges is in harmony with the overall tone of the door, fittings such as handles and locks. The screws must also match the color of the hinges. To carry out the work of hanging a door on its hinges, you will need:
The hinges are installed in relation to the top and bottom of the door by 20-30 cm. If there is a third hinge, its installation is carried out directly in the center of the door leaf. If you plan to install four loops, then total length the doors should be divided into five parts and the installation location of each canopy should be marked.
One part of the hinge is installed on the door leaf, without rods. The second part of the hinge is installed directly on the door frame.

In order to fix the hinge on the door leaf, follow the instructions on how to install hinges on the door:
1. Place the hinge on the surface of the door and trace it with a pencil.
2. Using a chisel, remove the hinge installation outline. The depth of the layer being removed should be equal to the thickness of the loop itself.
3. Using an electric drill or screwdriver, secure the hinge using the previously purchased self-tapping screws.
4. When choosing the diameter of the drill, choose an element that is half a centimeter smaller than the screw itself. Thus, it will be possible to increase the reliability of fastening.
6. In these areas you should also remove the top layer using a chisel. Fix the second part of the canopy in these recesses. Make sure the rods are horizontal. Otherwise, it will not be possible to achieve smooth opening of the door.
It is possible to change the order of actions. In some cases, the hinges are first fixed to the frame and then to the door.
If, when checking the door for operability, a squeak is observed, then use machine oil, technical petroleum jelly or grease to lubricate them. If the loops are too deep, special pads based on rubber or thick cardboard are installed under them.

If there is a problem with the door leaf being too low, then to raise it, you should install washers between the canopies. If, while installing the hinges, you get stuck with a screw that cannot be pulled out, use a drill to remove it. The place where the screw was installed should be sealed wooden dowel, which was previously soaked in glue.
Installing hinges on a door video:
An interior door serves to divide the space in a room and also provides sound insulation in a private house or apartment. Besides, door leaf is important detail interior, therefore it must correspond to the design style. Because installation work are quite expensive, the question arises of how to install correctly interior doors with your own hands. The answer is in the detailed step-by-step instructions outlined on this page.
Depending on the opening method, doors can be folding, sliding or swinging. The latter are the most popular because they are structurally simplest and fairly easy to install. They are presented in large quantities modifications. According to the opening method, the following are distinguished:
The box must be installed in a pre-prepared opening. The hinged post must be leveled first using a plumb line or level. It is imperative to check it from all sides. Then top bar and the stand must be spread apart with wedges. The stand will only be exposed when it is in a vertical position.
Next, wedge the second rack. Be sure to check the horizontal part of the box.
The old way– the side posts must be drilled through. To do this, holes for dowels are initially made in the wall. The box must be attached to the wall with self-tapping screws no less than 150 mm long.
 Old method of fastening
 In order to fix the box in the opening in a hidden way, you can use metal plates, which are usually used for installation plasterboard structures. Most often, such plates are used together with anchors. In this case, it is worth choosing the number of fasteners in accordance with the expected load.

 This is what the mount looks like
 The use of such plates is a non-standard method and is only possible in the absence of finishing. It is recommended to groove a section of the wall in order to subsequently putty the fasteners.
All that remains is to hang the door on the frame. After this, you need to make final adjustments to the box. The lock post must then be adjusted to fit the door so that it does not protrude beyond the wall. It is worth remembering that in order to maintain the integrity of the box and the canvas, you must first drill several holes for the screws.
After securing the canvas, you need to foam the gaps between the box and the edges of the opening. The foam should be fed carefully, layer by layer, and fed from above so that it does not protrude out. Then the door will have to be closed and not touched for a certain time so that the foam dries. Approximate drying time is 1 day.

If the composition accidentally gets on the canvas, immediately remove it with a clean, dry cloth; dried fragments can be cleaned using effective cleaning agents.
The most popular today are handles with a built-in lock. The work order is as follows:
An extension is a plank approximately 2 meters long, 250 mm wide, and no more than 3 cm thick. The plank should be used during the installation of interior doors if the wall is thicker than the door frame.
The timber for the box is made in a standard width - approximately 70 mm. It can be expanded according to the thickness of the opening with an extension. This will allow you to more clearly align the box and walls. The beam has a groove for the plank. You must first measure the distance to the edge of the wall, starting from the depth of the groove.

The allowance can be set in different ways:

The plank is sawn into several parts using a circular saw to obtain several pieces of the required dimensions. You need to prepare one short plank and two vertical ones. Explore our simple step by step instructions By .
During installation of platbands, the box must be located level with the opening on front side. To connect the platbands, you must first attach a vertical strip to the box and place a mark 0.5 cm higher, retreating from the crossbar of the box. This mark will act as a cutting edge. In the same way you need to mark the cut on the other side.


